概要
先日行っていた JavaOne の JUnit5 のセッションで、Android のプロジェクトにも JUnit5 が導入できるらしい(スライド23枚目)と聞いたので試してみました。
この記事で説明しないこと
- JUnit5 が何か、JUnit4 と何が違うのか……すでに資料が多く出回っているのでそちらをお探しください。 http://junit.org/junit5/
- Kotlin の Android プロジェクトへの導入方法
実行環境
| 項目 | 値 |
|---|---|
| Android Studio | 3.0 Canary 8 |
| compileSdkVersion | 26 |
| targetSdkVersion | 26 |
| Java | 1.8.0_131 |
Android Studio 2.xの場合
まず、現時点だと Android Studio 2.xでは動かないようでした。テストを実行すると下記のエラーが出ます。
Exception in thread "main" java.lang.AbstractMethodError: com.intellij.junit5.JUnit5IdeaTestRunner.setStreams(Ljava/lang/Object;Ljava/lang/Object;I)V
	at com.intellij.rt.execution.junit.JUnitStarter.prepareStreamsAndStart(JUnitStarter.java:261)
	at com.intellij.rt.execution.junit.JUnitStarter.main(JUnitStarter.java:84)
	at sun.reflect.NativeMethodAccessorImpl.invoke0(Native Method)
	at sun.reflect.NativeMethodAccessorImpl.invoke(NativeMethodAccessorImpl.java:62)
	at sun.reflect.DelegatingMethodAccessorImpl.invoke(DelegatingMethodAccessorImpl.java:43)
	at java.lang.reflect.Method.invoke(Method.java:498)
	at com.intellij.rt.execution.application.AppMain.main(AppMain.java:147)
Issue を見たところ、 Android Studio 2.x に起因するバグらしいです。
https://github.com/mannodermaus/android-junit5/issues/19
3系の正式リリースまで待つか、Canary 版を使う必要があるようです。今回は 3.0 Canary 8 を使って進めます。
導入
2017年10月時点で Android プロジェクトで JUnit5 を使うには、3rd-party 製プラグインを導入する必要があります。
Contributor が1人のプロジェクトなので、そこをリスクと捉えるか Contribution のチャンスと捉えるかは人それぞれです。
build.gradle に依存の追加
ほぼ README.md に書いてある通りにやれば上手くいきます。
プロジェクトルートの方に 3rd-party 製プラグインの依存を追加
     dependencies {
+        classpath 'de.mannodermaus.gradle.plugins:android-junit5:1.0.0'
app/build.gradle に依存を追加
+apply plugin: 'de.mannodermaus.android-junit5'

…
 dependencies {
     androidTestImplementation 'com.android.support.test.espresso:espresso-core:3.0.1'
+
+    testImplementation junit5()
+    testCompileOnly 'de.mannodermaus.gradle.plugins:android-junit5-embedded-runtime:1.0.0-RC3-rev1'
ここまでの修正が終わったら sync しましょう。
JUnit5 のテストコードを作成
JUnit5 のテストコードを作成します。今回は以下のコードを使ってみます。
package jp.toastkid.junit5androidexample;

import org.junit.jupiter.api.Test;
import org.junit.jupiter.api.function.Executable;

import static org.junit.jupiter.api.Assertions.assertAll;
import static org.junit.jupiter.api.Assertions.assertEquals;

/**
 * @author toastkidjp
 */
class ExampleJUnit5JavaTest {

    @Test
    void test() {
        assertAll(
                new Executable() {
                    @Override
                    public void execute() throws Throwable {
                        System.out.println("1st");
                        assertEquals(1, 0 + 1);
                    }
                },
                new Executable() {
                    @Override
                    public void execute() throws Throwable {
                        System.out.println("2nd");
                        assertEquals(3, 0 + 1);
                    }
                },
                new Executable() {
                    @Override
                    public void execute() throws Throwable {
                        System.out.println("3rd");
                        assertEquals(2, 1 + 1);
                    }
                }
        );
    }
}
assertAll は引数で渡された Executable の execute メソッドをすべて実行し、いずれも成功していれば OK とする新しい assertion メソッドです。
従来ですと、下記のように書かれたテストメソッドは2番目の assertEquals が失敗してその場でテストメソッドの実行が終わってしまうので、3番目のテストメソッドが実行されません。
assertEquals(1, 0 + 1);
assertEquals(3, 0 + 1);
assertEquals(2, 1 + 1);
ですが、assertAll の場合は3つすべてを実行してから失敗します。実行してみましょう。
1st
2nd
3rd


Expected :3
Actual   :1
 <Click to see difference>


org.opentest4j.MultipleFailuresError: Multiple Failures (1 failure)
	expected: <3> but was: <1>

	at org.junit.jupiter.api.AssertAll.assertAll(AssertAll.java:66)
	at org.junit.jupiter.api.AssertAll.assertAll(AssertAll.java:44)
	at org.junit.jupiter.api.AssertAll.assertAll(AssertAll.java:38)
	at org.junit.jupiter.api.Assertions.assertAll(Assertions.java:1039)
...
execute メソッドに入れた標準出力がすべて出ていることから、すべての Assertion が実行されていることがわかります。
Retrolambda 導入?
Executable は FunctionalInterface なので、
Lambda 式を使うと簡潔に記述することができます。先ほどのコードも、Lambda 式を使うと下記のように短縮して書けます。
        assertAll(
                () -> {
                    System.out.println("1st");
                    assertEquals(1, 0 + 1);
                },
                () -> {
                    System.out.println("2nd");
                    assertEquals(3, 0 + 1);
                },
                () -> {
                    System.out.println("3rd");
                    assertEquals(2, 1 + 1);
                }
        );
Android & Java の開発環境で Lambda 式を使うためのプラグインといえば Retrolambda があります。ですが、これを入れてもテストコードで Lambda 式が使えるわけではありません。
試しにやってみて出たエラーメッセージ
Information:Gradle tasks [:app:generateDebugSources, :app:mockableAndroidJar, :app:compileDebugUnitTestSources]
Warning:One of the plugins you are using supports Java 8 language features. To try the support built into the Android plugin, remove the following from your build.gradle:
    apply plugin: 'me.tatarka.retrolambda'
To learn more, go to https://d.android.com/r/tools/java-8-support-message.html

Warning:One of the plugins you are using supports Java 8 language features. To try the support built into the Android plugin, remove the following from your build.gradle:
    apply plugin: 'me.tatarka.retrolambda'
To learn more, go to https://d.android.com/r/tools/java-8-support-message.html

C:\Users\toastkidjp\Documents\workspace\JUnit5AndroidExample\app\src\test\java\jp\toastkid\junit5androidexample\ExampleJUnit5JavaTest.java
Error:(17, 17) エラー: シンボルを見つけられません
シンボル:   メソッド metafactory(Lookup,String,MethodType,MethodType,MethodHandle,MethodType)
場所: インタフェース LambdaMetafactory
Error:Execution failed for task ':app:compileDebugUnitTestJavaWithJavac'.
> Compilation failed; see the compiler error output for details.
「λ... < ユニットテストのテストコード上で Retrolambda が使えない」で述べられている通り、Retrolambda はテストコードのコンパイル時に JDK を差し替えてくれないようです。
Android & JUnit5 のテストコードで Lambda 式を使いたいのであれば、自分で差し替えのコードを書く必要があります。
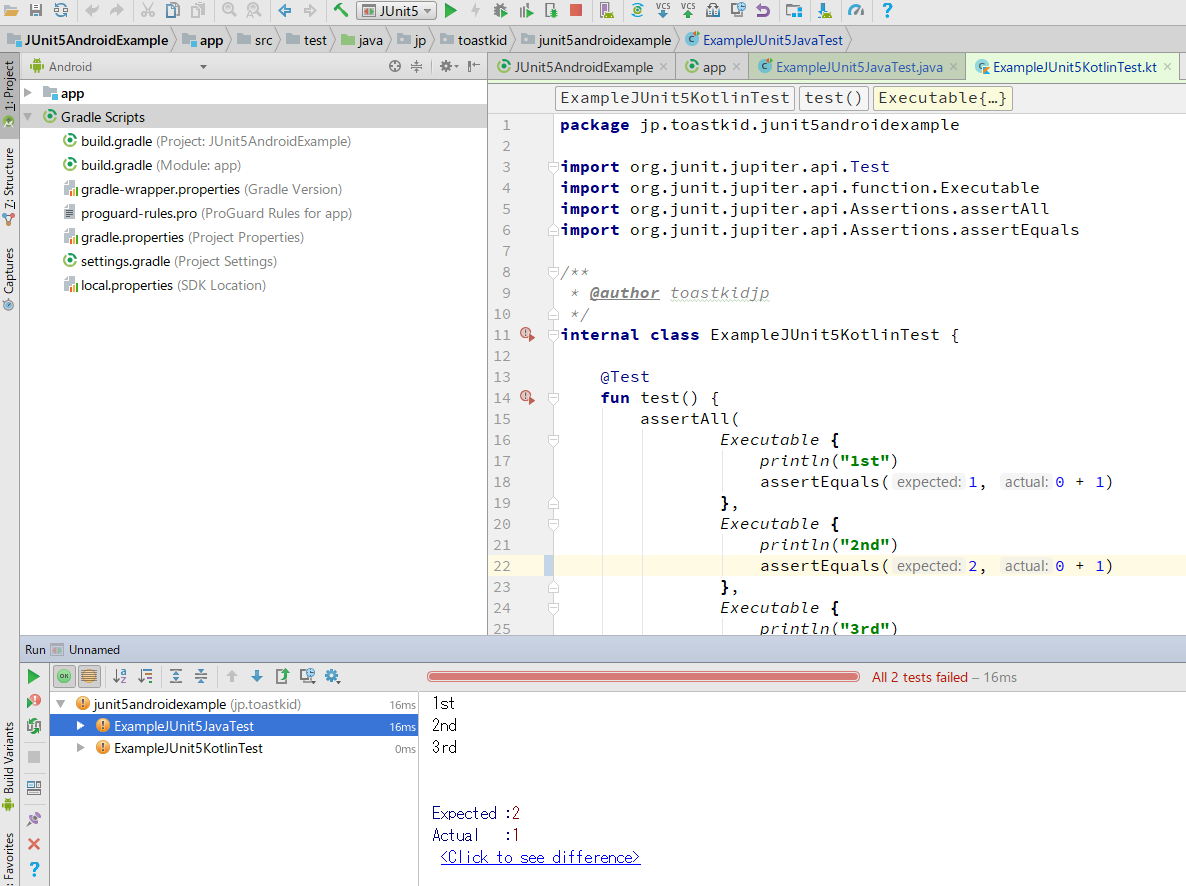
Kotlin で JUnit5 のテストコードを書く
Kotlin は標準で Lambda 式をサポートしているので、JUnit5 Ready と言っていいでしょう。
package jp.toastkid.junit5androidexample

import org.junit.jupiter.api.Test
import org.junit.jupiter.api.function.Executable
import org.junit.jupiter.api.Assertions.assertAll
import org.junit.jupiter.api.Assertions.assertEquals

internal class ExampleJUnit5KotlinTest {

    @Test
    fun test() {
        assertAll(
                Executable {
                    println("1st")
                    assertEquals(1, 0 + 1)
                },
                Executable {
                    println("2nd")
                    assertEquals(3, 0 + 1)
                },
                Executable {
                    println("3rd")
                    assertEquals(2, 1 + 1)
                }
        )
    }
}
実行すると、Java の時と同様に以下の通り出力されます。
1st
2nd
3rd


Expected :3
Actual   :1
 <Click to see difference>
ちなみに、特段の設定追加なしで Android Studio 上からテストコードを実行できます。
まとめ
3rd-party のプラグインながら、ごく簡単に Android プロジェクトで JUnit5 を使うことができました。Lamdba 式が使えない環境ではその力を完全に発揮できるとは言い難いですが、Kotlin だと特に問題なく Lambda 式を使えるので導入の障壁がやや低いと感じました。
Android プロジェクトに Kotlin を導入したい場合に、まずテストコードから Kotlin を導入していくというアプローチがあるらしいですが、それを強化する意味合いで JUnit5 も一緒に推していくという手もあるかと思います。