はじめに
Kotlin/Nativeのベータ版が出たということで、
multiplatform開発の環境構築をしてみました。
とりあえずAndroidとiOSそれぞれのエミュレータ(シミュレータ)で動くとこまでとなってます。
基本的に下記公式サイトのチュートリアルに沿ってやっていきます。
https://kotlinlang.org/docs/tutorials/native/mpp-ios-android.html
実践!
事前準備
下記をインストール
- AndroidStudio 3.2 (IntelliJ IDEAでも可)
- Xcode 10
※macOS 10.13.6上でやってます。
Android編
Kotlin ver1.3以上をインストール
とはいえ現状まだ1.3正式版はリリースされていませんのでRC版を入れます。
このときのRC版最新バージョンは1.3.0-rc-146となってます。
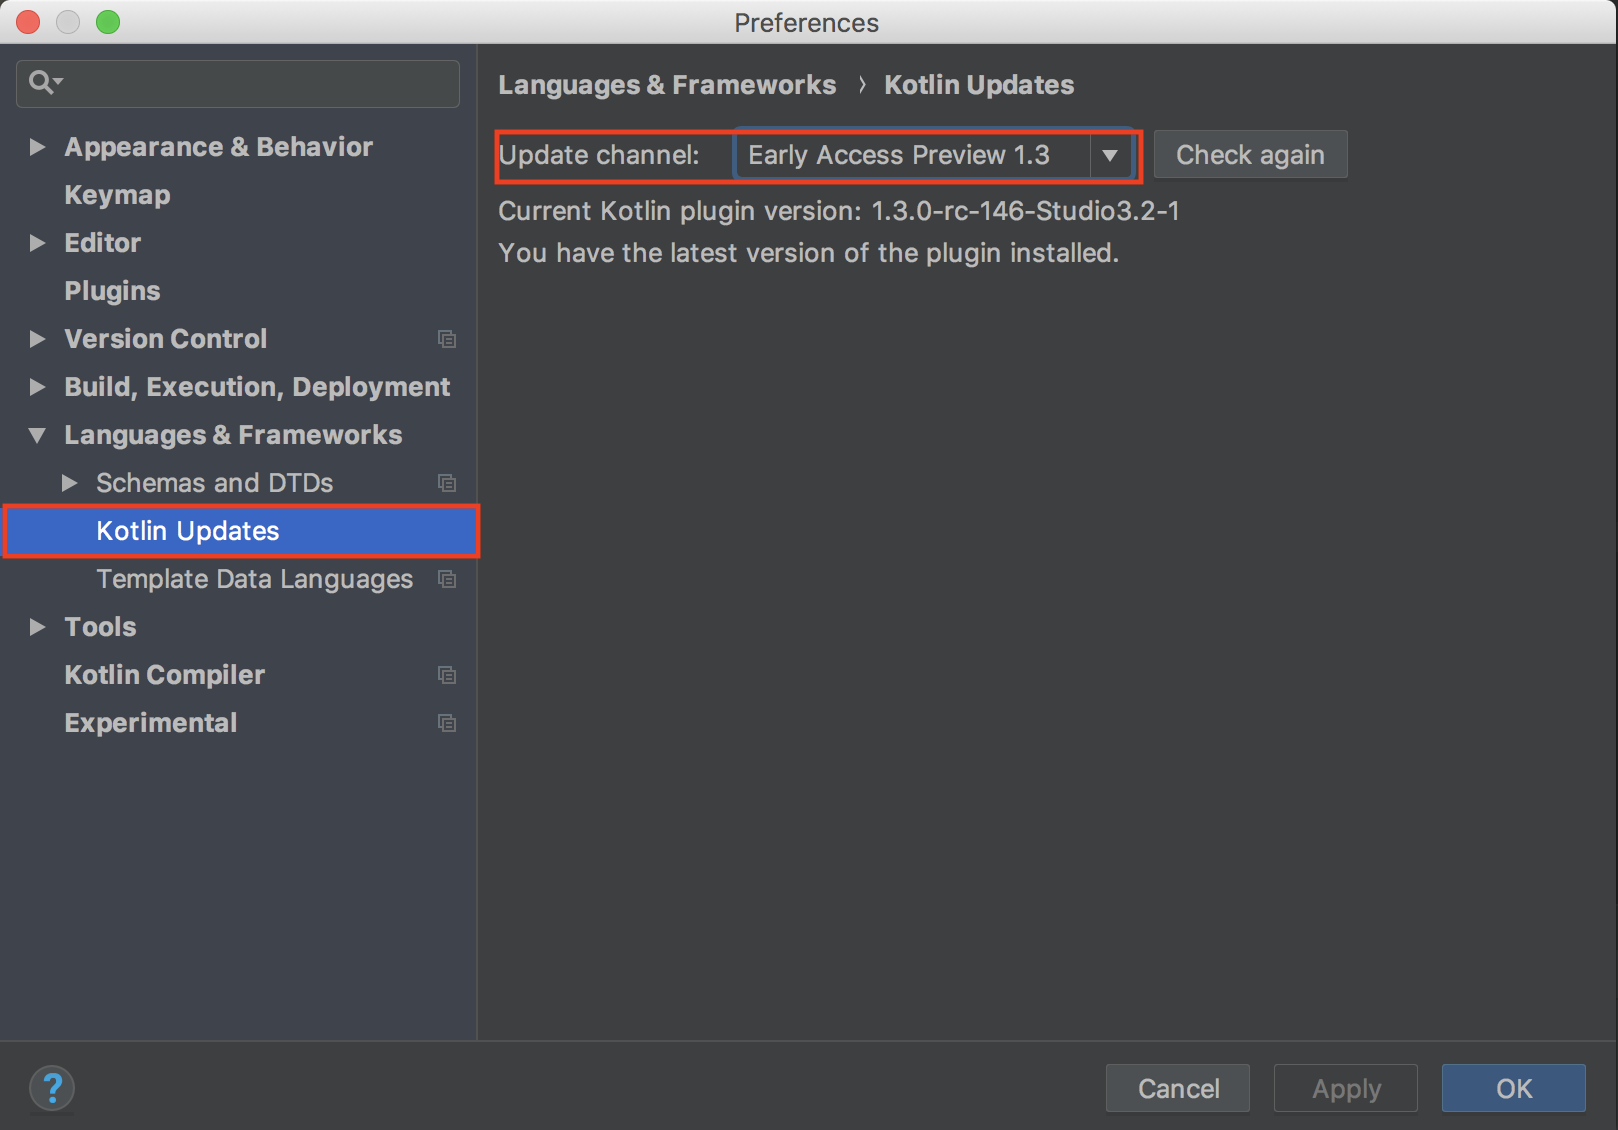
AndroidStudio上で
Preferences → Languages & Frameworks → Kotlin Updates
のUpdate channelをEarly Access Preview 1.3を選択してインストールし、AndroidStudioを再起動します。
プロジェクト作成
通常通りAndroidプロジェクトを作成します。
Include Kotlin supportはチェックをいれます。
ターゲットバージョンなどは適当に。
最小構成で作るのでEmpty Activityを選択して最後にFinish。
build.gradleの編集
プロジェクトルートにあるbuild.gradleにmaven { url 'https://dl.bintray.com/kotlin/kotlin-eap' }をrepositories 2箇所 に追記します。
ついでに、ext.kotlin_versionが先程インストールしたversionになっているか確認しましょう。
buildscript {
    ext.kotlin_version = '1.3.0-rc-146'
    repositories {
        google()
        jcenter()
        maven { url 'https://dl.bintray.com/kotlin/kotlin-eap' }
    }
    dependencies {
        classpath 'com.android.tools.build:gradle:3.2.1'
        classpath "org.jetbrains.kotlin:kotlin-gradle-plugin:$kotlin_version"
    }
}

allprojects {
    repositories {
        google()
        jcenter()
        maven { url 'https://dl.bintray.com/kotlin/kotlin-eap' }
    }
}

task clean(type: Delete) {
    delete rootProject.buildDir
}
gradle-wrapper.propertiesの編集
gradle/wrapper/gradle-wrapper.propertiesのdistrubutionUrlを4.10.2に変更します。
distributionBase=GRADLE_USER_HOME
distributionPath=wrapper/dists
zipStoreBase=GRADLE_USER_HOME
zipStorePath=wrapper/dists
distributionUrl=https\://services.gradle.org/distributions/gradle-4.10.2-all.zip
ここまでやったら一旦Sync Nowしましょう
Shared Moduleの作成
Android・iOS両方から呼び出せるmoduleを作成していきます。
まずはSharedCode/src/commonMain/kotlin/common.ktを作成します。
中にはPlatform名を返すコードを書きます。
package org.kotlin.mpp.mobile

expect fun platformName(): String

fun createApplicationScreenMessage() : String {
  return "Kotlin Rocks on ${platformName()}"
}
つづいて各プラットフォーム毎のソースを書いていきます。
Android用のファイルSharedCode/src/androidMain/kotlin/actual.ktを作成。
package org.kotlin.mpp.mobile

actual fun platformName(): String {
  return "Android"
}
iOS用のファイルSharedCode/src/iosMain/kotlin/actual.ktを作成。
package org.kotlin.mpp.mobile

import platform.UIKit.UIDevice

actual fun platformName(): String {
  return UIDevice.currentDevice.systemName() +
         " " +
         UIDevice.currentDevice.systemVersion
}
ここでUIKitが使えます!!
プラットフォーム固有のコードをcommon moduleから呼び出すにはexpected宣言を記述し、expected宣言に対応するactual実装を各プラットフォーム向けに実装する必要があります。
Gradle Scriptsの編集
Androidビルドする際にSharedCodeを含めるようにGradle Scriptsを編集していきます。
まずはsettings.gradleにinclude ':SharedCode'を追記します。
include ':app'
include ':SharedCode'
つづいてSharedCode/build.gradleを作成し、Scriptsを記載します。
これはAndroidとiOS両方になります。
apply plugin: 'kotlin-multiplatform'

kotlin {
    targets {
        final def iOSTarget = System.getenv('SDK_NAME')?.startsWith("iphoneos") \
                              ? presets.iosArm64 : presets.iosX64

        fromPreset(iOSTarget, 'iOS') {
            compilations.main.outputKinds('FRAMEWORK')
        }

        fromPreset(presets.jvm, 'android')
    }

    sourceSets {
        commonMain.dependencies {
            api 'org.jetbrains.kotlin:kotlin-stdlib-common'
        }

        androidMain.dependencies {
            api 'org.jetbrains.kotlin:kotlin-stdlib'
        }
    }
}

// workaround for https://youtrack.jetbrains.com/issue/KT-27170
configurations {
    compileClasspath
}
中身についてはこの辺を読むとわかるかと思います。
https://kotlinlang.org/docs/reference/building-mpp-with-gradle.html
AndroidからSharedCodeを呼び出す
まず依存関係の追加をするのでapp/build.gradleにimplementation project(':SharedCode')を追記します。
...//省略

dependencies {
    implementation fileTree(dir: 'libs', include: ['*.jar'])
    implementation"org.jetbrains.kotlin:kotlin-stdlib-jdk7:$kotlin_version"
    implementation 'com.android.support:appcompat-v7:28.0.0'
    implementation 'com.android.support.constraint:constraint-layout:1.1.3'
    testImplementation 'junit:junit:4.12'
    androidTestImplementation 'com.android.support.test:runner:1.0.2'
    androidTestImplementation 'com.android.support.test.espresso:espresso-core:3.0.2'
    implementation project(':SharedCode')
}
SharedCodeから受け取ったStringを表示するため、app/src/main/res/layout/activity_main.xmlのTextViewに対して下記のように変更します。(android:id="@+id/main_text"があれば大丈夫です。)
<?xml version="1.0" encoding="utf-8"?>
<android.support.constraint.ConstraintLayout
        xmlns:android="http://schemas.android.com/apk/res/android"
        xmlns:tools="http://schemas.android.com/tools"
        xmlns:app="http://schemas.android.com/apk/res-auto"
        android:layout_width="match_parent"
        android:layout_height="match_parent"
        tools:context=".MainActivity">

    <TextView
            android:id="@+id/main_text"
            android:textSize="42sp"
            android:textAlignment="center"
            android:layout_width="wrap_content"
            android:layout_height="wrap_content"
            android:text="Hello World!"
            app:layout_constraintBottom_toBottomOf="parent"
            app:layout_constraintLeft_toLeftOf="parent"
            app:layout_constraintRight_toRightOf="parent"
            app:layout_constraintTop_toTopOf="parent"/>

</android.support.constraint.ConstraintLayout>
最後に/app/src/main/java/<package>/MainActivity.ktに実際に呼び出すコードを書きます。
package <package>

import android.support.v7.app.AppCompatActivity
import android.os.Bundle
import android.widget.TextView

import org.kotlin.mpp.mobile.createApplicationScreenMessage

class MainActivity : AppCompatActivity() {

    override fun onCreate(savedInstanceState: Bundle?) {
        super.onCreate(savedInstanceState)
        setContentView(R.layout.activity_main)
        findViewById<TextView>(R.id.main_text).text = createApplicationScreenMessage()
    }
}
import org.kotlin.mpp.mobile.createApplicationScreenMessageとcreateApplicationScreenMessage()が呼び出しコードです。
Android実行!
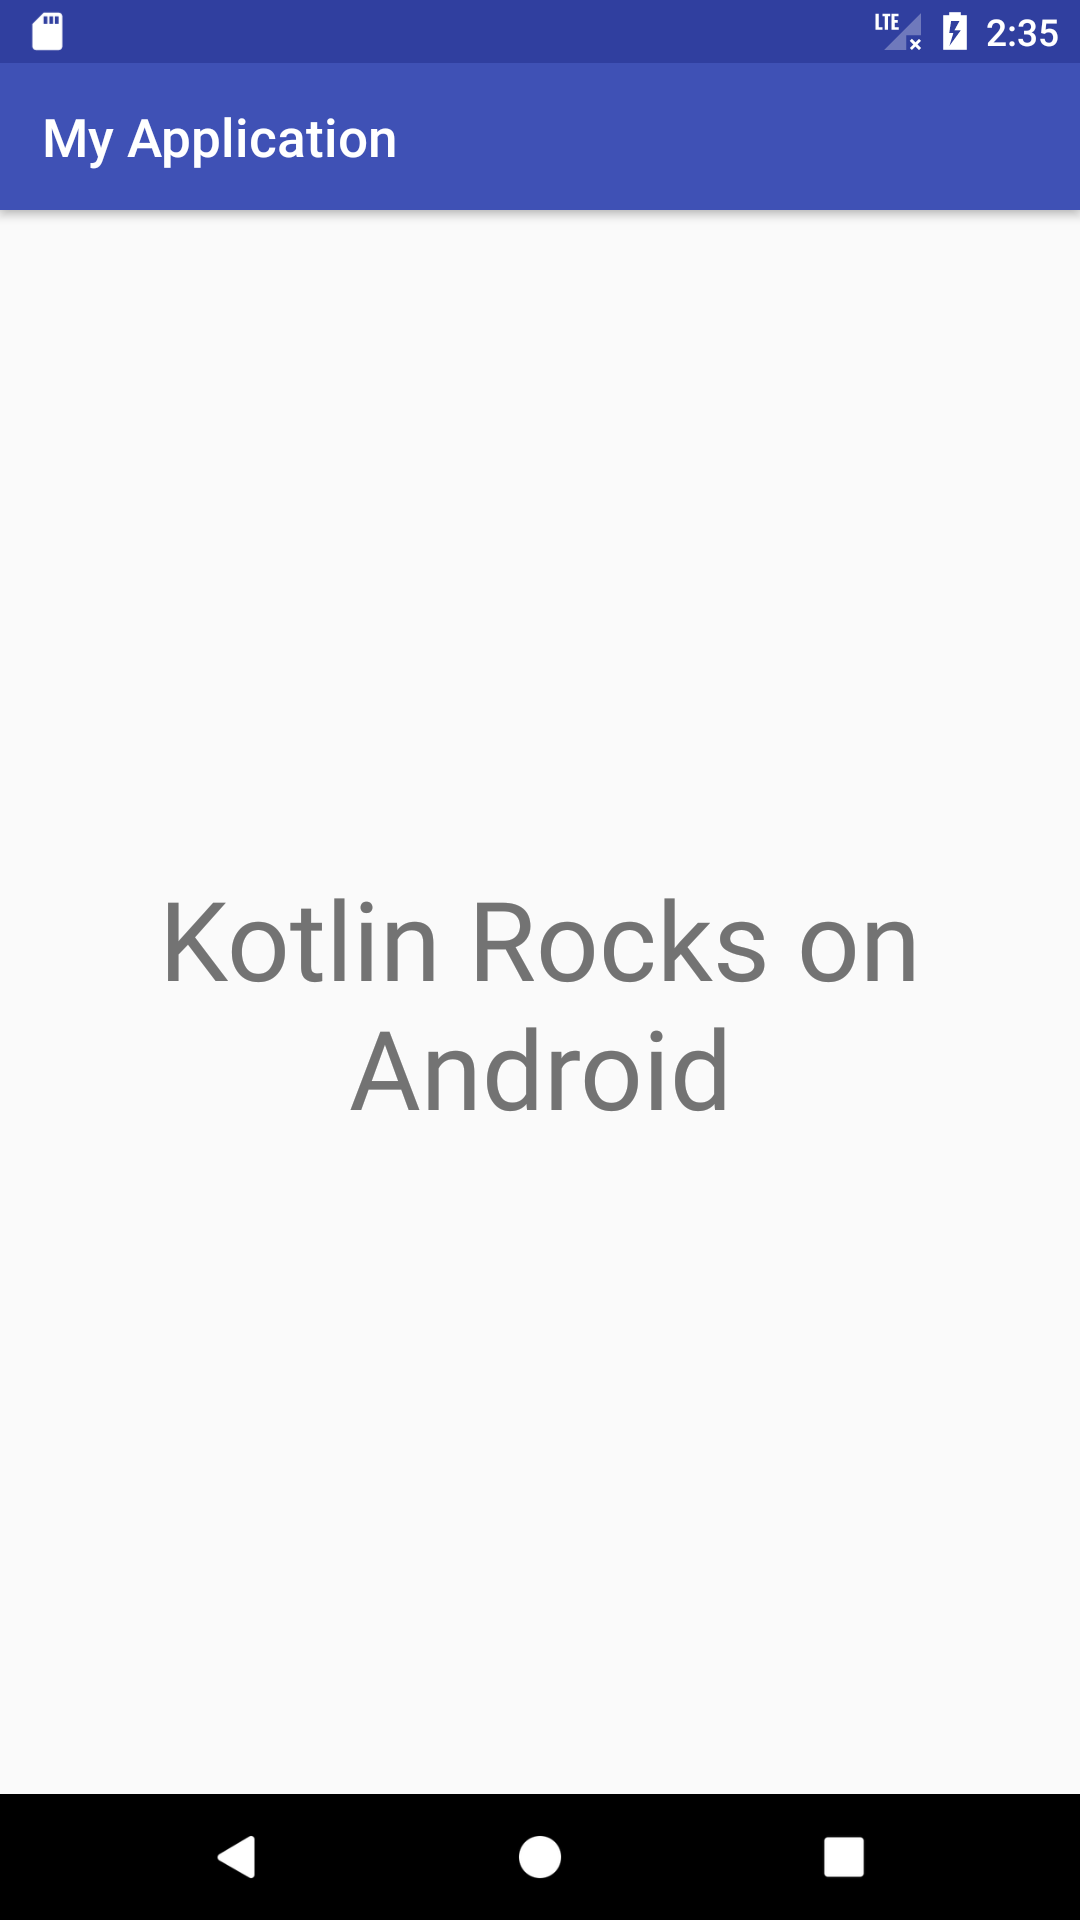
ここまで出来たら実行してみましょう。
Kotlin Rocks on Androidと表示されるはずです。
iOS編
プロジェクト作成
iOS側も通常通りXcodeでプロジェクトを作成します。
こちらも最小構成でやっていくのでSingle View Appを選択してLanguageはSiwftにします。(Objective-Cでも可能らしいですが試してません)
プロジェクトの作成場所はどこでも大丈夫ですが、チュートリアルに合わせて、Android側のプロジェクトルートフォルダ内にnativeフォルダを作成してその中に作ります。
frameworkの作成
AndroidStudioに戻り、SharedCode/build.gradleに下記コードを追記してiOS用のframeworkを生成していきます。
...//省略

task packForXCode(type: Sync) {
    final File frameworkDir = new File(buildDir, "xcode-frameworks")
    final String mode = System.getenv('CONFIGURATION')?.toUpperCase() ?: 'DEBUG'

    inputs.property "mode", mode
    dependsOn kotlin.targets.iOS.compilations.main.linkTaskName("FRAMEWORK", mode)

    from { kotlin.targets.iOS.compilations.main.getBinary("FRAMEWORK", mode).parentFile }
    into frameworkDir

    doLast {
        new File(frameworkDir, 'gradlew').with {
            text = "#!/bin/bash\nexport 'JAVA_HOME=${System.getProperty("java.home")}'\ncd '${rootProject.rootDir}'\n./gradlew \$@\n"
            setExecutable(true)
        }
    }
}

tasks.build.dependsOn packForXCode
つづいて、GradleツールウィンドウからSharedCodeをビルドします。
Gradleツールウィンドウが表示されていない方は、
View→Tool Windows→Gradleと選択すると表示されます。
SharedCodeを選択して上部にあるGradleアイコンを選択します。
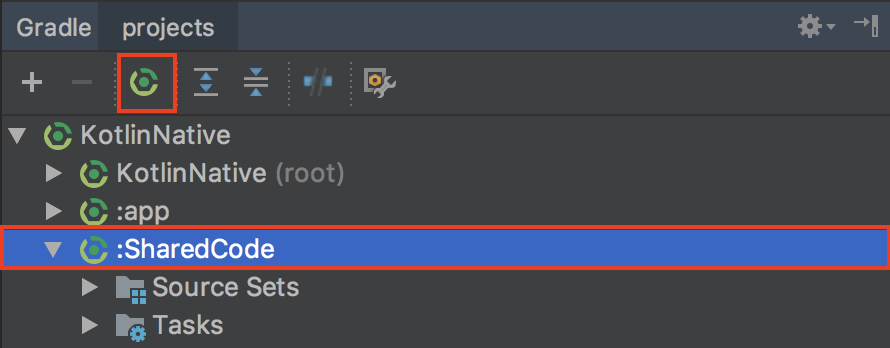
Run Gradle Taskというウィンドウが開かれるので、
Gradle projectが<project>:SharedCodeとなっているのを確認し、
Command lineに:SharedCode:packForXCodeと入力してOK。
これでtaskが実行され、SharedCode/build/xcode-frameworksにSharedCode.frameworkが生成されているはずです。

AndroidStudioからiOS用のframeworkを作るのはこの最初だけでこれ以降はXcodeからiOSアプリをビルドする時に実行されるようにあとで設定します。
XcodeでのBuild設定
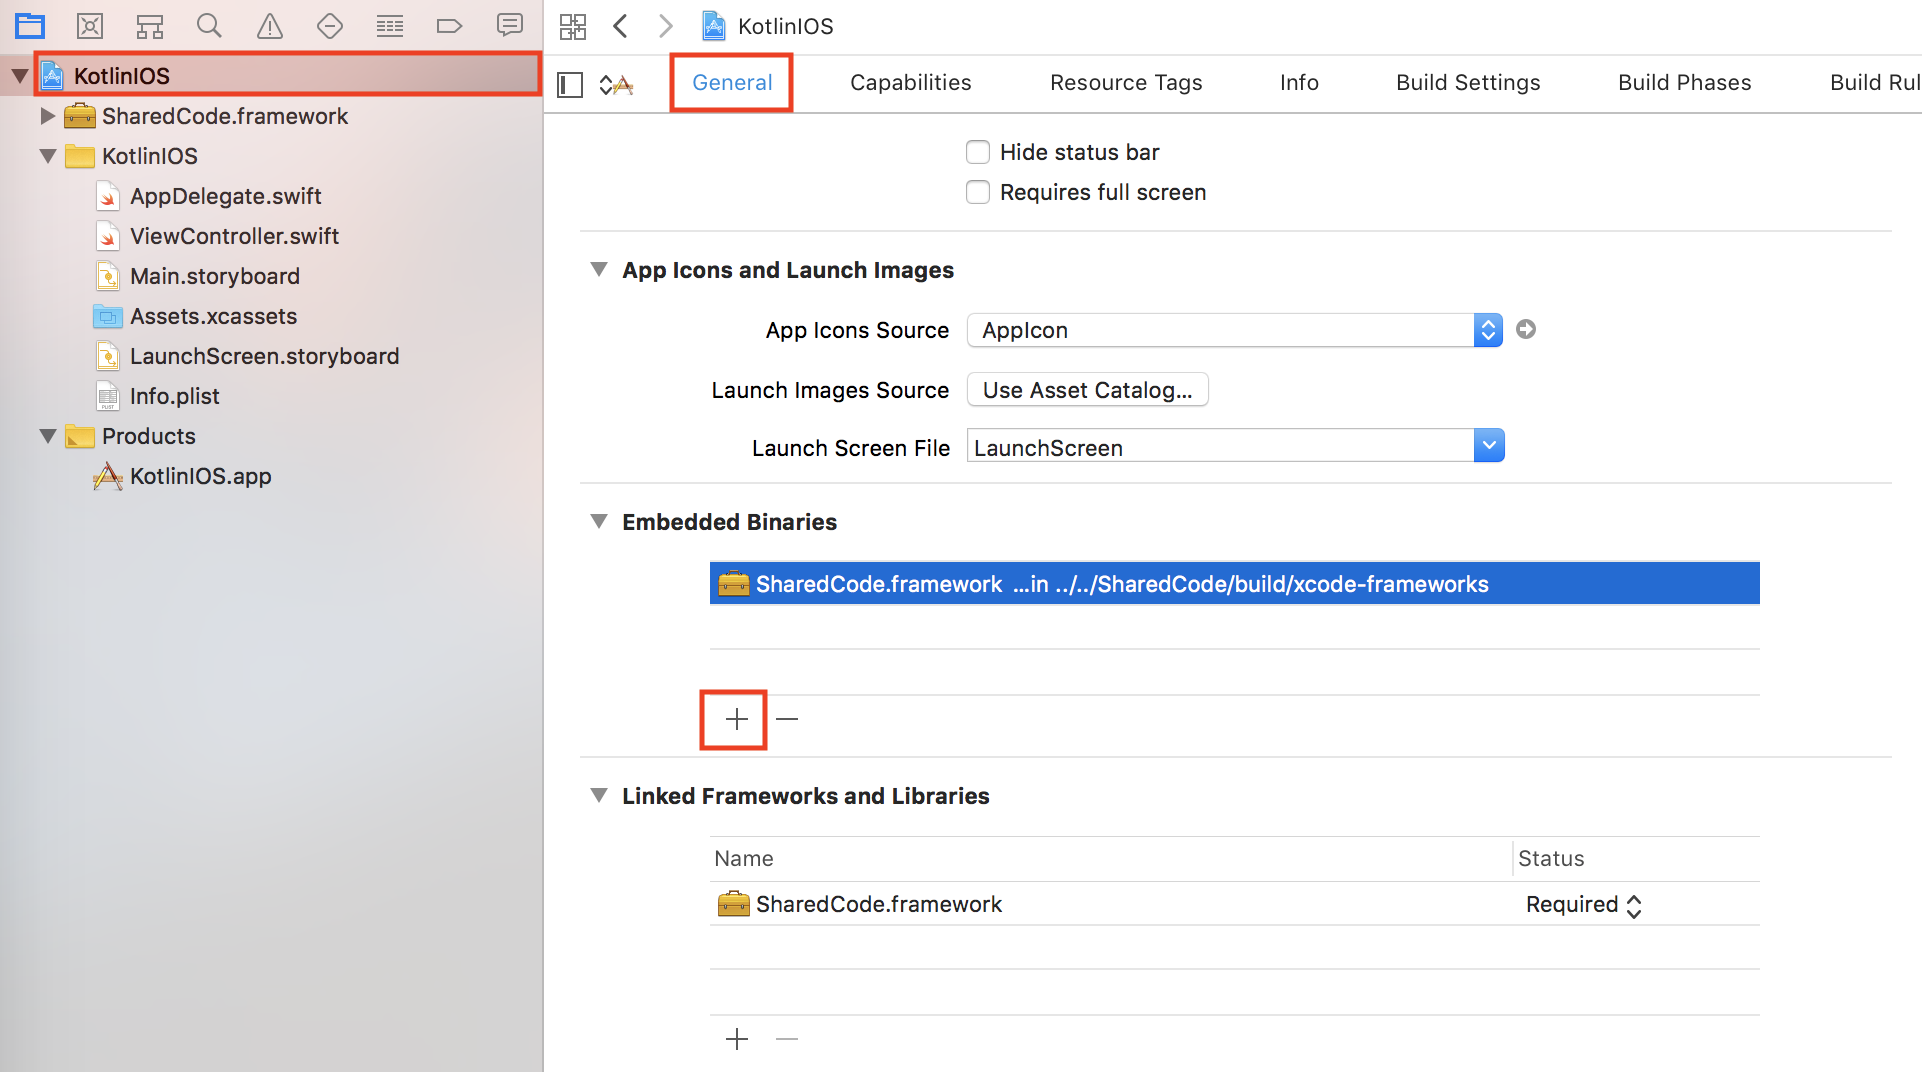
生成したSharedCode.frameworkをEmbedded Binariesに追加していきます。
Xcodeにもどり、プロジェクトを選択してさらにGeneralを選択します。
下の方にスクロールしEmbedded Binariesのところの「+」を選択して表示されたウィンドウのAdd other...からSharedCode/build/xcode-frameworks/SharedCode.frameworkを選択します。
追加すると下図のようになります。
続いてプロジェクトのBitcodeの設定を無効にする必要があります。
Build Settingsに移動しAllを選択します。
Enable Bitcodeを探します。検索欄に「bitcode」と入力すると簡単に見つけられます。
見つけたら設定値をNoにします。

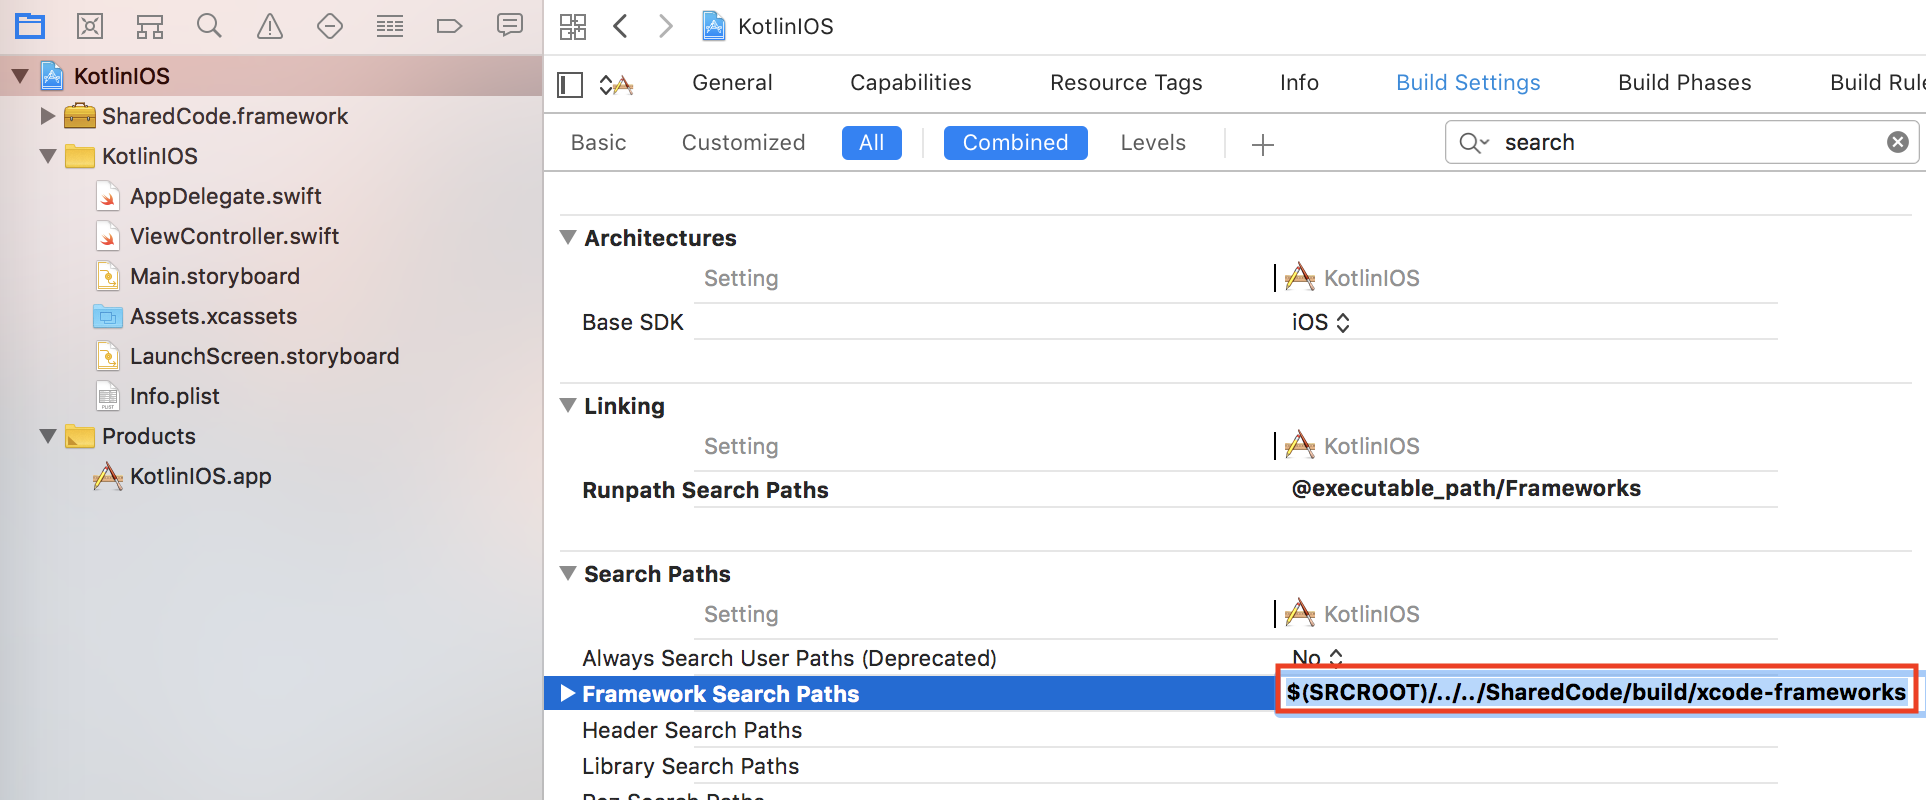
Frameworkの場所をXcodeに登録する必要があるので、同じくBuild SettingsのFramework Search Pathsにframeworkの相対pathを入力します。
同じく検索欄にsearchと入力すると見つけやすいです。
この手順通りにやっている場合は$(SRCROOT)/../../SharedCode/build/xcode-frameworksと入力します。
今後はXcodeからBuildするときにframeworkも更新されるようにScriptを登録します。
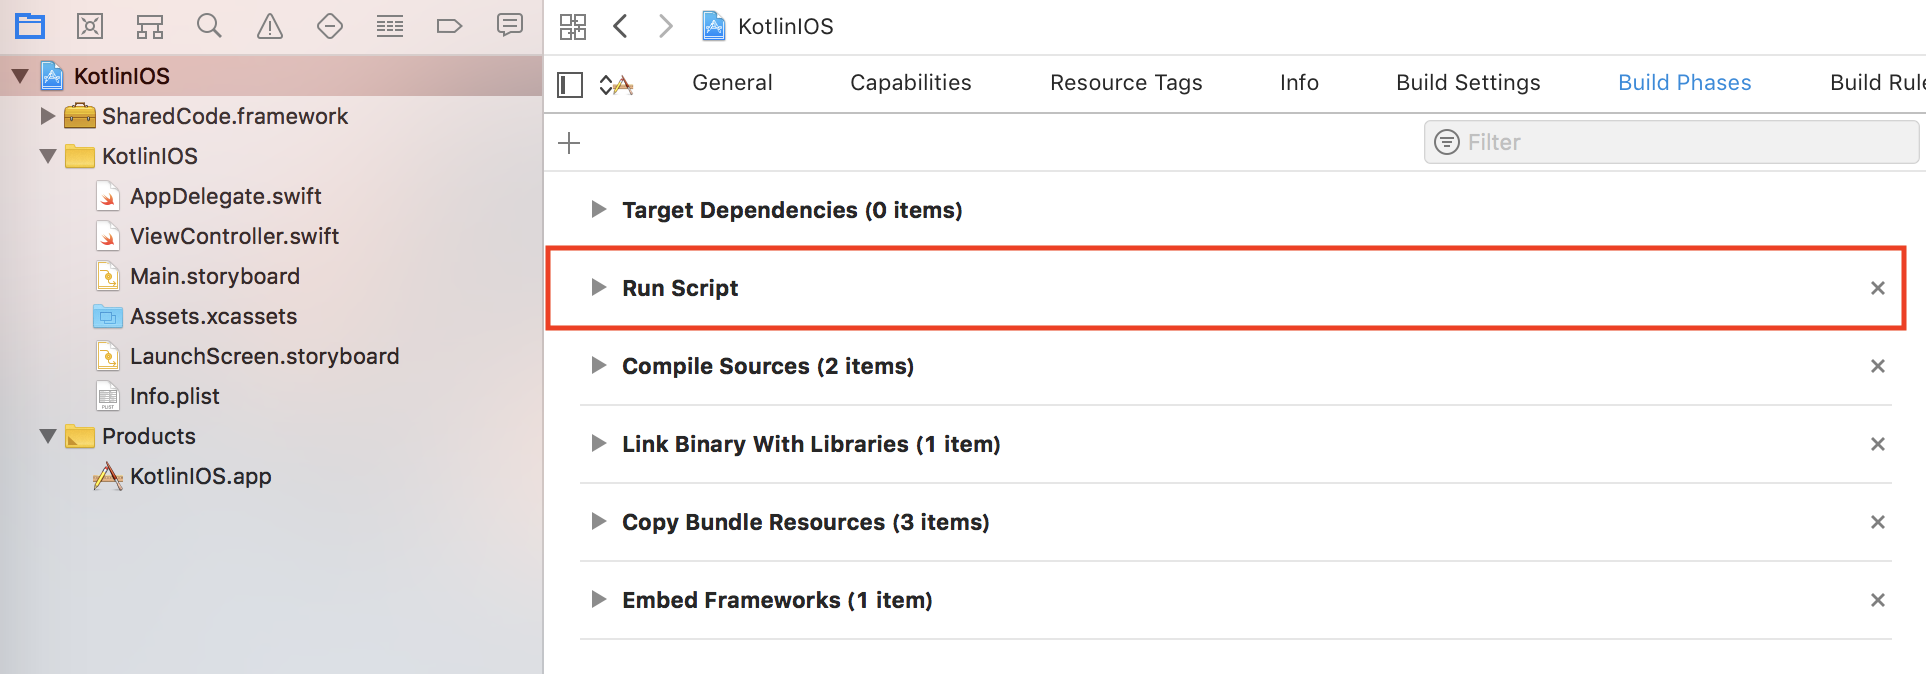
Build Phasesに移動し左上の「+」を選択してnew Run Script Phaseを選択します。
Shellのしたの入力スペースに下記コードを入力します。
cd "$SRCROOT/../../SharedCode/build/xcode-frameworks"
./gradlew :SharedCode:packForXCode

最後にRun Scriptを一番上(Target Dependeniesの下)にドラックで移動します。
SwiftからSharedCodeを呼び出す
ViewController.swiftにSharedCodeを呼び出すコードを書きます。
import UIKit
import SharedCode

class ViewController: UIViewController {

    override func viewDidLoad() {
        super.viewDidLoad()
        // Do any additional setup after loading the view, typically from a nib.
        let label = UILabel(frame: CGRect(x: 0, y: 0, width: 300, height: 21))
        label.center = CGPoint(x: 160, y: 285)
        label.textAlignment = .center
        label.font = label.font.withSize(25)
        label.text = CommonKt.createApplicationScreenMessage()
        view.addSubview(label)
    }
}
import SharedCodeとCommonKt.createApplicationScreenMessage()が呼び出しコードです。
iOS実行!
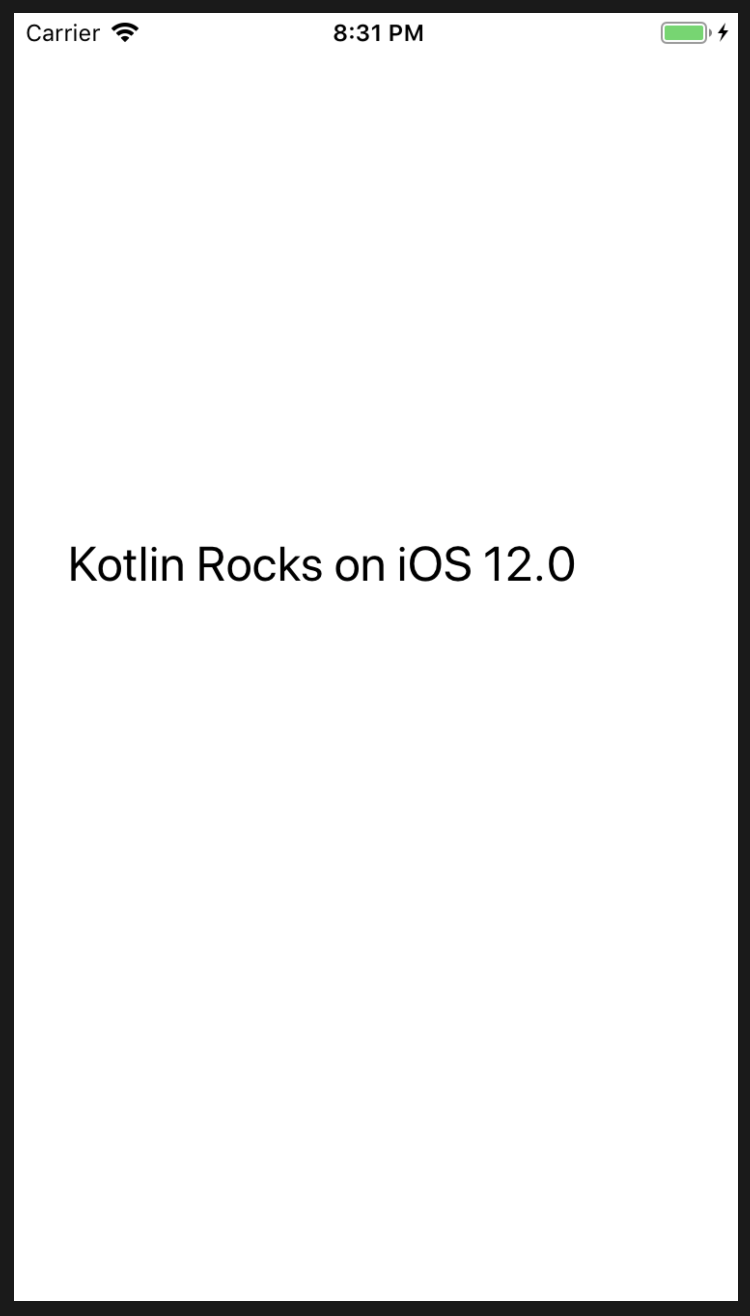
Xcodeで通常通り実行してみましょう。
Kotlin Rocks on iOS 12.0と表示されるはずです。
最後に
これでKotlin/Nativeで両OS動かすことが出来ました。
基本的にはAndroidStuioでコードを書いていく形になるのかなと思います。
iOSだけであればAppCodeを利用すればpluginが用意されているのでもっと楽にはじめられるかと思います。
長くなりましたが、参考になれば幸いです。
Kotlinは書きやすくていい言語だと思うので流行ればいいなと思います。