事前準備編はこちら
ここから先は全てChatViewControllerの話です
特記がない場合はChatViewControllerの編集ととらえてください。
STEP2 WebSocketの実装
ログ出力
このハンズオンではログで動作を確認するシーンが多いため、最初にログを拡張します。
Seesaa京都さんの方法を使わせていただき下記の関数を追加します。
func LOG(_ body: String = "",
         function: String = #function,
         line: Int = #line)
{
   print("[\(function) : \(line)] \(body)")
}
これでログに関数名と行番号が表示されるようになりました。
WebSocket接続
WebRTCによるP2P接続を実現するには接続情報の交換が必須です。今回はこの交換にWebSocketを利用します。
ブラウザの場合はコピペで接続情報を交換する素敵な方法があるのですが、iOSは最初からWebSocketです。
今回はハンズオン用にGoでWebSocketサーバを用意しました。
宣言
importにStarscreamを追加して
import Starscream

class ChatViewController: UIViewController,
         WebSocketDelegate {
    var websocket: WebSocket! = nil
    ...
WebSocketDelegateを継承させ、
クラスのメンバ変数にWebSocketを追加します。
WebSocketDelegate
WebSocketの接続、切断やメッセージ受信のイベントを受け取れるように、WebSocketDelegateの関数をクラス内に作ります。
func websocketDidConnect(socket: WebSocket) {
    LOG()
}

func websocketDidDisconnect(socket: WebSocket,
         error: NSError?) {
    LOG("error: \(String(describing: error?.localizedDescription))")
}

func websocketDidReceiveMessage(socket: WebSocket,
         text: String) {
    LOG("message: \(text)")
}

func websocketDidReceiveData(socket: WebSocket,
         data: Data) {
    LOG("data.count: \(data.count)")
}
接続と切断
チャット画面を開いた際にWebSocketの接続するように、Closeボタンを押した時に切断するように、WebSocketの接続/切断処理を実装します。
URLの[YourID]は自分のだけの英数字のIDを決めて変えてください
override func viewDidLoad() {
    super.viewDidLoad()

    websocket = WebSocket(url: URL(string:
         "wss://conf.space/WebRTCHandsOnSig/[YourID]")!)
    websocket.delegate = self
    websocket.connect()
}

...

@IBAction func closeButtonAction(_ sender: Any) {
    // Closeボタンを押した時
    websocket.disconnect()
    _ = self.navigationController?.popToRootViewController(animated: true)
}
テスト
この状態で試しに実行してみましょう。
OutputにwebsocketDidConnectと表示されれば成功です。

この通りStarscreamを使うと、やりたい操作を記述するだけで、容易にWebSocketが利用できます。
これで、接続情報が交換できるようになりました。いよいよ、PeerConnectionを作成していきます。
STEP3 映像/音声の取得
最初と最後の呪文
AppDelegate.swiftを編集して、WebRTCをimportし
import WebRTC
起動時にRTCInitializeSSLを終了時にRTCCleanupSSLを呼び出すようにします。
func application(_ application: UIApplication, didFinishLaunchingWithOptions launchOptions: [UIApplicationLaunchOptionsKey: Any]?) -> Bool {
    // Override point for customization after application launch.
    RTCInitializeSSL()
    return true
}

func applicationWillTerminate(_ application: UIApplication) {
   // Called when the application is about to terminate. Save data if appropriate. See also applicationDidEnterBackground:.
    RTCCleanupSSL()
}
WebRTC Native Clientを使う場合には必ず必要になる呪文です。ブラウザに対応する処理はありません。
RTCPeerConnectionFactoryの初期化
ChatViewController.swiftに戻って、いよいよWebRTCの処理を作っていきます。
クラスのメンバ変数にRTCPeerConnectionFactoryを追記します。
var peerConnectionFactory: RTCPeerConnectionFactory! = nil
RTCPeerConnectionFactoryはPeerConnectionを複数生成した場合でも親玉になります。
viewDidLoad内のwebsocketの初期化の前でインスタンスを作っておきましょう。
override func viewDidLoad() {
    super.viewDidLoad()
    // RTCPeerConnectionFactoryの初期化
    peerConnectionFactory = RTCPeerConnectionFactory()

    websocket = WebSocket(url: URL(string: "wss://conf.space/WebRTCHandsOnSig/[YourID]")!)
    ...
映像/音声の取得
映像、音声ソースの取得処理を書いていきます。ブラウザではgetUserMediaに相当する処理です。
これらのソースはPeerConnectio間で共有するため、メンバ変数に下記を追記します。
var peerConnectionFactory: RTCPeerConnectionFactory! = nil
var audioSource: RTCAudioSource?
var videoSource: RTCAVFoundationVideoSource?
取得処理はstartVideoというメンバ関数にまとめていきます。
func startVideo() {
    // この中身を書いていきます
}
音声ソースの生成
音声のソースを生成してします。デバイス制御の記述は不要です。
// 音声ソースの設定
let audioSourceConstraints = RTCMediaConstraints(
    mandatoryConstraints: nil, optionalConstraints: nil)
// 音声ソースの生成
audioSource = peerConnectionFactory
    .audioSource(with: audioSourceConstraints)
映像ソースの生成
映像のソースも同じように生成してします。
// 映像ソースの設定
let videoSourceConstraints = RTCMediaConstraints(
    mandatoryConstraints: nil, optionalConstraints: nil)
videoSource = peerConnectionFactory
    .avFoundationVideoSource(with: videoSourceConstraints)
最後に映像ソースをcameraPreviewに設定します
// 映像ソースをプレビューに設定
cameraPreview.captureSession = videoSource?.captureSession
startVideoの呼び出し
Factoryの初期化後、WebSocketの初期化前で呼び出しましょう。
override func viewDidLoad() {
    super.viewDidLoad()
    // RTCPeerConnectionFactoryの初期化
    peerConnectionFactory = RTCPeerConnectionFactory()

    startVideo()

    websocket = WebSocket(url: URL(string: "wss://conf.space/WebRTCHandsOnSig/[YourID]")!)
    ...
deinit
このままでは終了時にクラッシュしてしまうのでdeinitを追記しておきます。
deinit {
    audioSource = nil
    videoSource = nil
    peerConnectionFactory = nil
}
WebRTCのプログラムは解放順に注意が必要です。
テスト
この状態で試しに実行してみましょう。
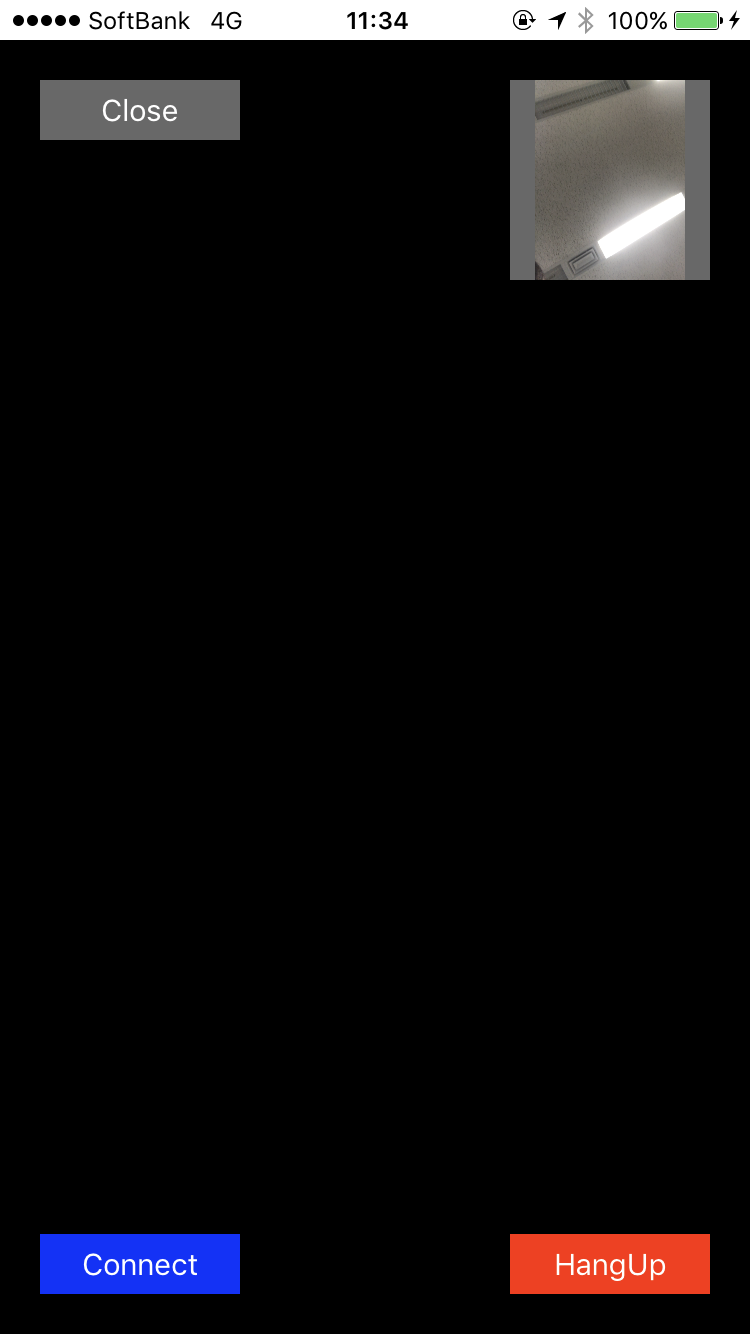
自画像が表示されれば成功です。
STEP4 PeerConnectionの作成
RTCPeerConnectionDelegate
WebSocket同様、PeerConnectionを複数のイベントが発生します。それを受け取る関数を書いておきましょう。
ChatViewControllerにRTCPeerConnectionDelegateを継承させ、メンバ関数を追記します。
class ChatViewController: UIViewController,
         WebSocketDelegate, RTCPeerConnectionDelegate {
...
func peerConnection(_ peerConnection: RTCPeerConnection,
        didChange stateChanged: RTCSignalingState) {
    // 接続情報交換の状況が変化した際に呼ばれます
}

func peerConnection(_ peerConnection: RTCPeerConnection,
        didAdd stream: RTCMediaStream) {
    // 映像/音声が追加された際に呼ばれます
}

func peerConnection(_ peerConnection: RTCPeerConnection,
        didRemove stream: RTCMediaStream) {
    // 映像/音声削除された際に呼ばれます
}

func peerConnectionShouldNegotiate(_
        peerConnection: RTCPeerConnection) {
    // 接続情報の交換が必要になった際に呼ばれます
}

func peerConnection(_ peerConnection: RTCPeerConnection,
        didChange newState: RTCIceConnectionState) {
    // PeerConnectionの接続状況が変化した際に呼ばれます
}

func peerConnection(_ peerConnection: RTCPeerConnection,
        didChange newState: RTCIceGatheringState) {
    // 接続先候補の探索状況が変化した際に呼ばれます
}

func peerConnection(_ peerConnection: RTCPeerConnection,
        didGenerate candidate: RTCIceCandidate) {
    // Candidate(自分への接続先候補情報)が生成された際に呼ばれます
}

func peerConnection(_ peerConnection: RTCPeerConnection,
        didOpen dataChannel: RTCDataChannel) {
    // DataChannelが作られた際に呼ばれます
}

func peerConnection(_ peerConnection: RTCPeerConnection,
        didRemove candidates: [RTCIceCandidate]) {
    // Candidateが削除された際に呼ばれます
}
RTCPeerConnectionの作成
PeerConnectionを作っていきましょう。今回は処理をまとめるためにprepareNewConnectionという関数を作って書いていきます。
複数人との通話を実現する場合は、このPeerConnectionを複数作成します。なので戻り値で受け取るようにしました。
func prepareNewConnection() -> RTCPeerConnection {
    // STUN/TURNサーバーの指定
    let configuration = RTCConfiguration()
    configuration.iceServers = [
        RTCIceServer.init(urlStrings:
            ["stun:stun.l.google.com:19302"])]
    // PeerConecctionの設定(今回はなし)
    let peerConnectionConstraints = RTCMediaConstraints(
        mandatoryConstraints: nil,
        optionalConstraints: nil)
    // PeerConnectionの初期化
    peerConnection = peerConnectionFactory.peerConnection(
        with: configuration, constraints: peerConnectionConstraints, delegate: self)
    //...つづく...
}
音声の追加
先ほど作成したソースを元に音声トラックを作成し、PeerConnection側ではSenderを作って作成したトラックを設定します。
// 音声トラックの作成
let localAudioTrack = peerConnectionFactory
    .audioTrack(with: audioSource!, trackId: "ARDAMSa0")
// PeerConnectionからAudioのSenderを作成
let audioSender = peerConnection.sender(
        withKind: kRTCMediaStreamTrackKindAudio,
        streamId: "ARDAMS")
// Senderにトラックを設定
audioSender.track = localAudioTrack
この状態で、音声送信が可能になりました。
映像の追加
ビデオチャットを作るので、同様に映像を追加します。呼び出す関数や設定する定数に変化はありますが、基本的には音声と変わりません。
// 映像トラックの作成
let localVideoTrack = peerConnectionFactory.videoTrack(
        with: videoSource!, trackId: "ARDAMSv0")
// PeerConnectionからVideoのSenderを作成
let videoSender = peerConnection.sender(
        withKind: kRTCMediaStreamTrackKindVideo,
        streamId: "ARDAMS")
// Senderにトラックを設定
videoSender.track = localVideoTrack

return peerConnection
この状態で、映像送信も可能になりました。
最後に生成したpeerConnectionを返しておきましょう。
今回はクラスのメンバにpeerConnectionがある前提なので追加しておきましょう
var peerConnectionFactory: RTCPeerConnectionFactory! = nil
var peerConnection: RTCPeerConnection! = nil
終話処理の作成
終話処理も作っておきましょう。PeerConnectionのcloseを呼ぶと終話することができます。
今回はhangUpという関数にまとめました。
func hangUp() {
    if peerConnection != nil {
        if peerConnection.iceConnectionState != RTCIceConnectionState.closed {
            peerConnection.close()
        }
        peerConnection = nil
        LOG("peerConnection is closed.")
    }
}
peerConnectionがclosedな状態ではない場合にclose()を呼ぶようにしてあります。また、この際にpeerConnectionの解放も行うようにしました。
hangUpの呼び出し
HangUpボタンとCloseボタンを押した際にhangUp関数を呼ぶようにしておきます。
@IBAction func hangupButtonAction(_ sender: Any) {
    //HangUpボタンを押した時
    hangUp()
}

@IBAction func closeButtonAction(_ sender: Any) {
    // Closeボタンを押した時
    hangUp()
    websocket.disconnect()
    _ = self.navigationController?.popToRootViewController(animated: true)
}
例によって、クラッシュ防止のためdeinitにも追記しておきましょう。
deinit {
    if peerConnection != nil {
        hangUp()
    }
    audioSource = nil
    videoSource = nil
    peerConnectionFactory = nil
}
PeerConnection状態変化
デバッグのためPeerConnectionの状態変化をログに出力するようにします。
また、closeされた時と失敗した時にhangUp()を呼ぶようにしておきましょう。
func peerConnection(_ peerConnection: RTCPeerConnection,
        didChange newState: RTCIceConnectionState) {
    // PeerConnectionの接続状況が変化した際に呼ばれます
    var state = ""
    switch (newState) {
    case RTCIceConnectionState.checking:
        state = "checking"
    case RTCIceConnectionState.completed:
        state = "completed"
    case RTCIceConnectionState.connected:
        state = "connected"
    case RTCIceConnectionState.closed:
        state = "closed"
        hangUp()
    case RTCIceConnectionState.failed:
        state = "failed"
        hangUp()
    case RTCIceConnectionState.disconnected:
        state = "disconnected"
    default:
        break
    }
    LOG("ICE connection Status has changed to \(state)")
}
prepareNewConnectionの呼び出し
作成したprepareNewConnectionを動作確認用にconnectボタンを押した際に呼び出すようにします。
@IBAction func connectButtonAction(_ sender: Any) {
    // Connectボタンを押した時
    if peerConnection == nil {
        peerConnection = prepareNewConnection()
    }
}
動作テスト
ここまで実装できたら、適当にConnect, Close, HangUpを押して操作してみましょう。
特に前回と画面の差異はありませんが、
アプリがクラッシュしなければOKです。
STEP5 かける処理の実装
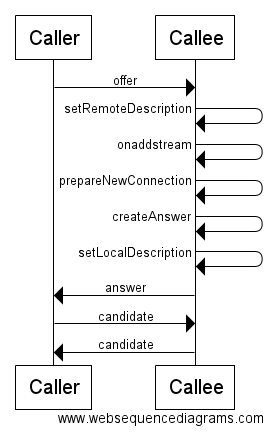
処理の流れ
実装前に、接続処理の流れを確認しておきます。
かける処理は次のようなシーケンスになります。

sendSDP
はじめにofferやanswerなどのSDPを相手に送る処理を作っておきます。
SwiftyJSONを利用するのでimportに追加しておいてください
import SwiftyJSON
SDPの入っているRTCSessionDescription型のdescから必要な値を取り出してJSONに格納しwebsocket.writeで相手に送信します。
func sendSDP(_ desc: RTCSessionDescription) {
    LOG("---sending sdp ---")
    let jsonSdp: JSON = [
        "sdp": desc.sdp, // SDP本体
        "type": RTCSessionDescription.string(
            for: desc.type) // offer か answer か
    ]
    // JSONを生成
    let message = jsonSdp.rawString()!
    LOG("sending SDP=" + message)
    // 相手に送信
    websocket.write(string: message)
}
makeOffer
それではPeerConnectionを作ってからofferを相手に送るところまでをmakeOffer関数にまとめて作ってしまいましょう。
func makeOffer() {
    // PeerConnectionを生成
    peerConnection = prepareNewConnection()
    // Offerの設定 今回は映像も音声も受け取る
    let constraints = RTCMediaConstraints(
        mandatoryConstraints: [
            "OfferToReceiveAudio": "true",
            "OfferToReceiveVideo": "true"
            ], optionalConstraints: nil)
    let offerCompletion = {
        (offer: RTCSessionDescription?, error: Error?) in
        // Offerの生成が完了した際の処理
        if error != nil { return }
        self.LOG("createOffer() succsess")

        let setLocalDescCompletion = {(error: Error?) in
            // setLocalDescCompletionが完了した際の処理
            if error != nil { return }
            self.LOG("setLocalDescription() succsess")
            // 相手に送る
            self.sendSDP(offer!)
        }
        // 生成したOfferを自分のSDPとして設定
        self.peerConnection.setLocalDescription(offer!,
            completionHandler: setLocalDescCompletion)
    }
    // Offerを生成
    self.peerConnection.offer(for: constraints,
        completionHandler: offerCompletion)
}
シーケンス通りの処理順になっているか確認してみてください
ポイント: RTCMediaConstraints
映像、音声の送受信設定が出てきましたね。受け取ると言っているだけなので、相手が送ってくれるかは別の話です。
// Offerの設定 今回は映像も音声も受け取る
let constraints = RTCMediaConstraints(
    mandatoryConstraints: [
        "OfferToReceiveAudio": "true",
        "OfferToReceiveVideo": "true"
        ], optionalConstraints: nil)
makeOffer の呼び出し
電話をかけた場合の処理になります。Connectボタンを押した時に呼ぶようにしましょう。
@IBAction func connectButtonAction(_ sender: Any) {
    // Connectボタンを押した時
    if peerConnection == nil {
        LOG("make Offer")
        makeOffer()
    } else {
        LOG("peer already exist.")
    }
}
すでに、peerConnectionがある時には呼ばない配慮もあるといいですね。
setAnswer
シーケンス図によるとAnswerが帰ってくるので受け取る処理も必要になります。今回はsetAnswerにまとめておきましょう。
func setAnswer(_ answer: RTCSessionDescription) {
    if peerConnection == nil {
        LOG("peerConnection NOT exist!")
        return
    }
    // 受け取ったSDPを相手のSDPとして設定
    self.peerConnection.setRemoteDescription(answer,
        completionHandler: {
        (error: Error?) in
        if error == nil {
            self.LOG("setRemoteDescription(answer) succsess")
        } else {
            self.LOG("setRemoteDescription(answer) ERROR: " + error.debugDescription)
        }
    })
}
受け取ったanswerを相手のSDPとして設定するだけです。この時PeerConnectionはすでにあるはずなので、冒頭でチェックしておきましょう。
setAnswer の呼び出し
answerは相手からWebSocketで送られてくるため、届いた時にはwebsocketDidReceiveMessageが呼ばれます。
メッセージはJSONで送られてくるので、これをパースします。また、複数の異なるtypeのメッセージが届くため、typeによってswitchで処理を分けるようにしておきましょう。
func websocketDidReceiveMessage(
        socket: WebSocket, text: String) {
    LOG("message: \(text)")
    // 受け取ったメッセージをJSONとしてパース
    let jsonMessage = JSON.parse(text)
    let type = jsonMessage["type"].stringValue
    switch (type) {
    case "answer":
        // answerを受け取った時の処理
        LOG("Received answer ...")
        let answer = RTCSessionDescription(
            type: RTCSessionDescription.type(for: type),
            sdp: jsonMessage["sdp"].stringValue)
        setAnswer(answer)
    default:
        return
    }
}
answerが届いた際にはJSONのパース結果からRTCSessionDescriptionを生成して、setAnswerに渡してあげるようにすればOKです。
onaddstream
シーケンス図にonaddstreamという記載がありました。このイベントは受け取ったSDPの中に映像、音声のストリーム情報が含まれていた場合に発生します。iOSの場合は記述済みのPeerConnectionDelegateのイベントから下記が発火します。
func peerConnection(_ peerConnection: RTCPeerConnection, didAdd stream: RTCMediaStream) {
    // 映像/音声が追加された際に呼ばれます
    LOG("-- peer.onaddstream()")
    DispatchQueue.main.async(execute: { () -> Void in
        // mainスレッドで実行
        if (stream.videoTracks.count > 0) {
            // ビデオのトラックを取り出して
            self.remoteVideoTrack = stream.videoTracks[0]
            // remoteVideoViewに紐づける
            self.remoteVideoTrack?.add(self.remoteVideoView)
        }
    })
}
発生したタイミングでストリームが渡されてきますが、ストリームには複数のトラックが格納できます。
今回はVideoTrackが1つ入っているはずなので、これを取り出して作成済みのremoteVideoViewに表示するようにしましょう。
呼び出し元がメインスレッドではないので、メインスレッドで実行するようにDispatchQueue.main.asyncで囲っています。
remoteVideoTrackが赤くなったはずです。Trackはメンバ変数として参照を保持しましょう。remoteVideoViewが更新されなくなってしまいます。
var peerConnectionFactory: RTCPeerConnectionFactory! = nil
var peerConnection: RTCPeerConnection! = nil
var remoteVideoTrack: RTCVideoTrack?
これで、受け取った映像がremoteVideoViewに表示されるようになります。
hangUp処理の追加
メンバ変数を追加すると必ず生じるのが解放処理の追加です。hangUpにremoteVideoTrackの解放処理を追記しましょう
func hangUp() {
    if peerConnection != nil {
        if peerConnection.iceConnectionState != RTCIceConnectionState.closed {
            peerConnection.close()
        }
        if remoteVideoTrack != nil {
            remoteVideoTrack?.remove(remoteVideoView)
        }
        remoteVideoTrack = nil
        peerConnection = nil
        LOG("peerConnection is closed.")
    }
}
remoteVideoTrackが設定されていた場合、remoteVideoViewの設定を解除してpeerConnectionの解放前にremoteVideoTrackを解放するようにします。
candidateを送る処理
シーケンス図を見ると最後にcandidateを送りあっています。これには接続先候補情報が含まれていて、これがなければ相互接続は難しくなります。
これを相手に送るsendIceCandidate関数を書きましょう。
func sendIceCandidate(_ candidate: RTCIceCandidate) {
    LOG("---sending ICE candidate ---")
    let jsonCandidate: JSON = [
        "type": "candidate",
        "ice": [
            "candidate": candidate.sdp,
            "sdpMLineIndex": candidate.sdpMLineIndex,
            "sdpMid": candidate.sdpMid!
        ]
    ]
    let message = jsonCandidate.rawString()!
    LOG("sending candidate=" + message)
    websocket.write(string: message)
}
SDPと同様にRTCIceCandidate型で渡されたcandidateをJSONにして相手に送るようにします。
candidateの発生
candidateはsetLocalDescriptionを呼んだ段階から収集されていて、見つかると記述済みのPeerConnectionDelegateのイベントから下記が発火します。
引数でcandidateが渡されるので、これをsendIceCandidateで相手に送るようにしましょう。
func peerConnection(_ peerConnection: RTCPeerConnection, didGenerate candidate: RTCIceCandidate) {
    // Candidate(自分への接続先候補情報)が生成された際に呼ばれます
    if candidate.sdpMid != nil {
        sendIceCandidate(candidate)
    } else {
        LOG("empty ice event")
    }
}
収集が終わると空のイベントが発火しますが、今回はこれは使いません。
candidateを受け取る処理
相手から送られてきたcandidateを受け取る処理も必要です。answer同様にwebsocketで送られてくるので、websocketDidReceiveMessageのtype別caseに下記を追記します。
case "candidate":
    LOG("Received ICE candidate ...")
    let candidate = RTCIceCandidate(
        sdp: jsonMessage["ice"]["candidate"].stringValue,
        sdpMLineIndex:
            jsonMessage["ice"]["sdpMLineIndex"].int32Value,
        sdpMid: jsonMessage["ice"]["sdpMid"].stringValue)
    addIceCandidate(candidate)
answer同様にJSONからRTCIceCandidateに戻してaddIceCandidate関数に渡します。
addIceCandidate関数は下記のように実装します。
func addIceCandidate(_ candidate: RTCIceCandidate) {
    if peerConnection != nil {
        peerConnection.add(candidate)
    } else {
        LOG("PeerConnection not exist!")
    }
}
渡されたcandidateをpeerConnectionがある時にaddするだけです。
動作テスト
これで、かける場合の一連の処理が実装できました。実際に試してみましょう。
下記のURLの末尾をwebsocketを初期化した際にURLに記述したIDに変更してChromeブラウザで開いてください。
https://conf.space/WebRTCHandsOn/**[YourID]**
**[Start Video]を押して、カメラの取得を許可してください、自画像が表示されたら、iOS側は自画像が出ている状態で、[Connect]**を押してください。映像音声が繋がるはずです。
現状ではiOS側の[Connect]しか使えません。
STEP6 かかってきた処理の実装
処理の流れ
長いハンズオンも、いよいよ最後です。
実装前に、接続処理の流れを確認しておきます。
かかってきた処理は次のようなシーケンスになります。
シーケンス通りに実装していきましょう
setOffer
setOfferはsetAnswerとほとんど同じですが下記の二点が異なります。
- peerConnectionの生成を行う
- setRemoteDescriptionに成功した場合にanswerを作る処理を呼ぶ
func setOffer(_ offer: RTCSessionDescription) {
    if peerConnection != nil {
        LOG("peerConnection alreay exist!")
    }
    // PeerConnectionを生成する
    peerConnection = prepareNewConnection()
    self.peerConnection.setRemoteDescription(offer, completionHandler: {(error: Error?) in
        if error == nil {
            self.LOG("setRemoteDescription(offer) succsess")
            // setRemoteDescriptionが成功したらAnswerを作る
            self.makeAnswer()
        } else {
            self.LOG("setRemoteDescription(offer) ERROR: " + error.debugDescription)
        }
    })
}
冒頭のpeerConnectionのチェックも異なるので注意してください。
makeAnswer
makeAnswerもまた、makeOfferと非常によく似ていますが、下記の点が異なります。
- RTCMediaConstraints がない
- PeerConnectionはある前提(作らない)
- offerじゃなくてanswerを作っている
func makeAnswer() {
    LOG("sending Answer. Creating remote session description...")
    if peerConnection == nil {
        LOG("peerConnection NOT exist!")
        return
    }
    let constraints = RTCMediaConstraints(mandatoryConstraints: nil, optionalConstraints: nil)
    let answerCompletion = { (answer: RTCSessionDescription?, error: Error?) in
        if error != nil { return }
        self.LOG("createAnswer() succsess")
        let setLocalDescCompletion = {(error: Error?) in
            if error != nil { return }
            self.LOG("setLocalDescription() succsess")
            // 相手に送る
            self.sendSDP(answer!)
        }
        self.peerConnection.setLocalDescription(answer!, completionHandler: setLocalDescCompletion)
    }
    // Answerを生成
    self.peerConnection.answer(for: constraints, completionHandler: answerCompletion)
}
completionHandlerは同一なので共通化しても良いと思います。今回はログのために分けました。
setOfferの呼び出し
先にmakeAnswerを作ってしまいましたが、相手からofferがきた際にsetOfferを呼び出すようにしなければなりません。
例によってwebsocketDidReceiveMessageのcaseを追加します。answerとほとんど同じです。
case "offer":
    // offerを受け取った時の処理
    LOG("Received offer ...")
    let offer = RTCSessionDescription(
        type: RTCSessionDescription.type(for: type),
        sdp: jsonMessage["sdp"].stringValue)
    setOffer(offer)
これで、ブラウザ側でConnectを押した際にも繋がるようになりました。
一連の接続実装ができました。WebRTCの実装としては、ここまでで完了ですが、もう少しお付き合いください。
切断の高速化
ブラウザと同様の切断処理を実装しておきましょう。
hangUpが呼ばれた際にWebSocketでtype:closeを相手に送るようにします。
func hangUp() {
    if peerConnection != nil {
        if peerConnection.iceConnectionState != RTCIceConnectionState.closed {
            peerConnection.close()
            let jsonClose: JSON = [
                "type": "close"
            ]
            LOG("sending close message")
            websocket.write(string: jsonClose.rawString()!)
        }
        if remoteVideoTrack != nil {
        ...
同様にwebsocketDidReceiveMessageにcloseがきた際にhangUp()を呼ぶようにしましょう。
case "close":
    LOG("peer is closed ...")
    hangUp()
アスペクト比の調整
先ほどテストした際には、iOS側で顔が縦長になって表示されました。これを修正する処理を入れておきます。
ChatViewControllerの継承元にRTCEAGLVideoViewDelegateを追加してください。
class ChatViewController: UIViewController,
                            WebSocketDelegate,
                            RTCPeerConnectionDelegate,
                            RTCEAGLVideoViewDelegate {
このDelegateはRTCEAGLVideoViewに送られてくるフレームのサイズが変わった際に下記のイベントを発火します。
func videoView(_ videoView: RTCEAGLVideoView,
        didChangeVideoSize size: CGSize) {
    let width = self.view.frame.width
    let height =
        self.view.frame.width * size.height / size.width
    videoView.frame = CGRect(
        x: 0,
        y: (self.view.frame.height - height) / 2,
        width: width,
        height: height)
}
フレームサイズはsizeに入れて渡されるので、今回はフレームが横長の前提で画面の横幅に合わせて、アスペクト比をそのままになるよう縦幅を変えて、RTCEAGLVideoViewのframeを変えるようにします。
最後にviewDidLoad内でremoteVideoViewのdelegateにselfを指定しましょう
override func viewDidLoad() {
    super.viewDidLoad()

    remoteVideoView.delegate = self
    // RTCPeerConnectionFactoryの初期化
    peerConnectionFactory = RTCPeerConnectionFactory()
動作テスト
大変お疲れ様でした。最後の動作テストです。
ブラウザとiOSの双方で自画像が表示されている状態にして、**[connect]**を押してみてください。ブラウザ側からも繋がったかと思います。
また、iOS上の表示のアスペクト比も修正され、iOS側のHangUpを押せばブラウザの画面がリセットされるはずです。
以上で動作テストは完了です。
HangUpを押してもiOS側の表示が残るのは、このアプリでは仕様となります。
やっぱり辛い逃げよう
- Skyway
- 時雨堂