この記事の目的
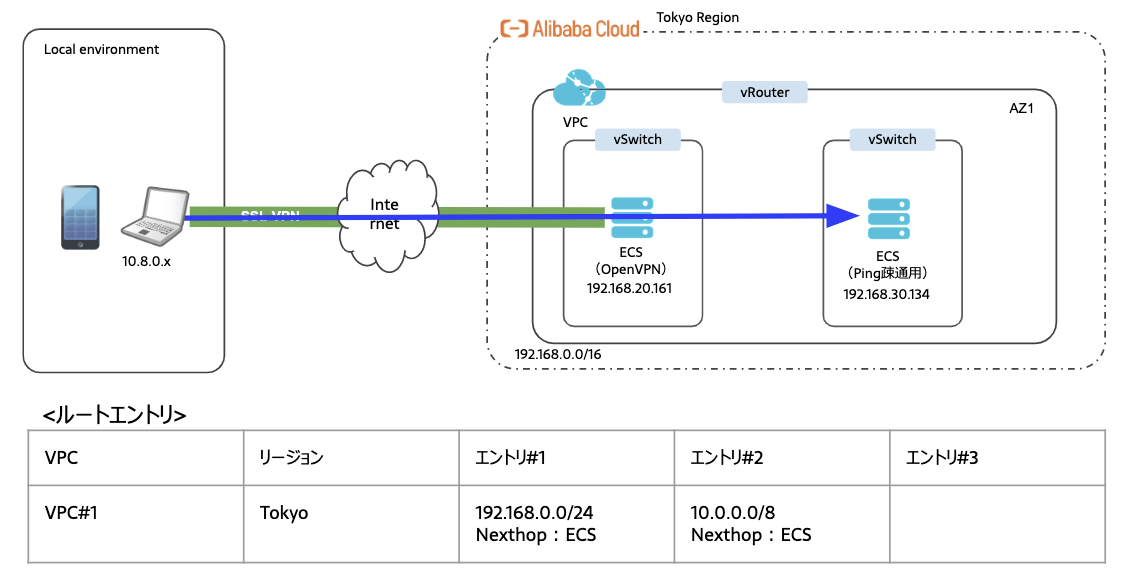
Alibaba Cloud ECSにOpenVPNサーバを建ててSSL-VPNでクライアントPCからVPC内リソースにアクセスします。
以下検証環境
・クライアント端末:Mac OS.X
・クライアントソフト:Tunnel Blick
・OS:CentOS Linux release 7.6.1810 (Core)
・SSL-VPN接続Port:1194
・SSL-VPN接続プロトコル:UDP
Alibaba Cloudとは

中国最大手のパブリッククラウド。シェアは5割を超える。
取り扱いパートナーのbeyondさんのBlogがわかりやすかったのでlinkる
https://beyondjapan.com/blog/2018/05/alibaba-cloud/
■ 中国最大のパブリッククラウドサービス。(中国ではシェア1位)
■ 中国ECサイト市場 最大の商戦日 11月11日「独身の日」
(ダブルイレブン、W11、双11 とも言われる) のインフラで使われており、
3分売上100億元(約1700億円)、1日売上2.8兆円の流通規模のトラフィックを捌いている。
※ この2.8兆円というのは、楽天の
1年間の売上に近い金額。
■ アリババが運営するスマホ決済「アリペイ」のインフラでも使われている。
(中国でのスマホ決済サービスで60%近いシェア)
■ オリンピックのオフィシャルクラウドサービス。(2028年まで長期契約)
■ 世界各国にある 18リージョン のデータセンター。
■ 日本語サポート・日本円請求。請求書払いも可能。(海外リージョン環境も日本円で購入可能)
■ コントロールパネルは、日本語・中国語(簡体字)・英語に翻訳対応されている。
■ 中国を含む各国リージョンのサービスを1つのアカウントで利用可能。
■ 中国でWebサイトを展開するときに必要な「ICP登録・ICPライセンス取得」が
Alibaba Cloud で1アカウント(1契約)あれば、そのままICP申請代行をしてくれる。
(中国国内でWebサイトを開設する際は「事前申請手続き(ICP登録)」が必要)
※ ICPライセンスに関する記事については【こちらから】
■ パッケージメニューだと、インスタンス(Out)のデータ転送料金が定額で利用できる。
(ただしこの場合はデータ転送量の上限値あり)
■ パッケージメニューでは「サイバーセキュリティ保険」が無償で付帯されており、
賠償補償:最大500万円、費用補償:最大20万円 が適応される。
(弁護士費用、お詫び広告掲載費用、復旧に関わる人件費、原因調査費用 など)
OpenVPN 概要

- オープンソースのVPN(Virtual Private Network)のソフトウェアで、GPLLicenceによって公開されている
- 公式サイトはこちら(https://openvpn.net/)
- 比較的かんたんに構築が可能
- インターネットに接続しているPCが1台あれば、VPNサーバが設置可能。
- 特定インターネットプロバイダの制約もない
- 個人ユーザーや中小企業、拠点接続などの導入適している
- iPhone/Androidもクライアントアプリケーションを介してSSL-VPNを利用可能
- 堅牢なセキュリティと安定性
- 2002年4月以降にリリースされたバージョン1.1.0以降、重大な脆弱性の指摘を受けたことが無い
- さまざまな環境DataFrame連動稼働している実績があるのでアプリケーションとしての動作も非常に安定
- Alibaba CloudのSSL-VPNの裏も実はOpenVPNを採用している
- OpenVPNのスタートガイド
- Qiitaなどの記事も充実しているが、OpenVPN.JPサイトの情報が一番確実
- URL:https://www.openvpn.jp/document/
OpenVPN構築
OpenVPNの構築を進めて行きます。例のごとくECSは最小スペックで購入します。
今回はAPIでコマンドで作っていきます。
cliツールに興味ある人は、以下記事をご参照ください。
【備忘録】Alibaba Cloud_aliyuncliコマンド集
https://qiita.com/tnoce/items/86cf7bc3f3e4773c81c8
ECS作成
以下コマンドでOpenVPN用ECSとPing用ECSを作成します。
aliyun ecs CreateInstance \
             --InstanceName "test-aliyun" \
             --ZoneId ap-northeast-1a \
             --VSwitchId  "vsw-xxxxxxxxxxxxxxxxxxxxxx" \
             --SecurityGroupId "sg-xxxxxxxxxxxxxxxxxxxxxx" \
             --ImageId "centos_7_06_64_20G_alibase_20190711.vhd" \
             --InstanceType "ecs.t5-lc1m1.small" \
             --SystemDisk.Size "20" \
             --InternetChargeType "PayByTraffic"
クエリ結果
{"InstanceId":"i-xxxxxxxxxxxxxxxxxxxxxx","RequestId":"35EC2B2F-8144-4955-8F42-88A77FEA9EE8"}
作成しただけではインスタンスが起動していないので。1つ前のクエリ結果で出力されたECSのInstanceIdをOptionの引数にしてスタートのクエリを投げます。
aliyun ecs StartInstance --InstanceId i-xxxxxxxxxxxxxxxxxxxxxx
OpenVPNの構築
epleリポジトリの追加
$ sudo yum install epel-release -y
パッケージのインストール
$ sudo yum --enablerepo=epel -y install openvpn easy-rsa
認証局(CA)の設置
$ mkdir /etc/openvpn/easy-rsa
$ cp /usr/share/easy-rsa/3.0.3/* /etc/openvpn/easy-rsa/ -R
作業ディレクトリの移動
$ cd /etc/openvpn/easy-rsa
初期化
$ sudo ./easyrsa init-pki
※pkiディレクトリが作成される
認証局の作成(※任意のPasswordを設定)
$ sudo ./easyrsa build-ca
Generating a 2048 bit RSA private key
.......................................+++
.............................................................................+++
writing new private key to '/etc/openvpn/easy-rsa/pki/private/ca.key.UzE5bd0SCu'
Enter PEM pass phrase: <任意のパスフレーズを入力>
Verifying - Enter PEM pass phrase: <もう一度入力>
-----
You are about to be asked to enter information that will be incorporated
into your certificate request.
What you are about to enter is what is called a Distinguished Name or a DN.
There are quite a few fields but you can leave some blank
For some fields there will be a default value,
If you enter '.', the field will be left blank.
-----
Common Name (eg: your user, host, or server name) [Easy-RSA CA]: <任意の名前を入力>

CA creation complete and you may now import and sign cert requests.
Your new CA certificate file for publishing is at:
/etc/openvpn/easy-rsa/pki/ca.crt
DHパラメータの作成
$ sudo ./easyrsa gen-dh
サーバ用証明書と秘密鍵の作成
$ sudo ./easyrsa build-server-full server_r nopass
Generating a 2048 bit RSA private key
....+++
.......................................................+++
writing new private key to '/etc/openvpn/easy-rsa/pki/private/server_r.key.O3l2ARzsse'
-----
Using configuration from ./openssl-1.0.cnf
Enter pass phrase for /etc/openvpn/easy-rsa/pki/private/ca.key: <ca秘密鍵(ca.key)のパスフレーズを入力>
Check that the request matches the signature
Signature ok
The Subject's Distinguished Name is as follows
commonName            :ASN.1 12:'server_r'
Certificate is to be certified until Mar 28 17:05:59 2028 GMT (3650 days)

Write out database with 1 new entries
Data Base Updated
クライアント用の証明書と秘密鍵の作成
$ sudo ./easyrsa build-client-full client1 nopass
Generating a 2048 bit RSA private key
................+++
..............................................................................................................+++
writing new private key to '/etc/openvpn/easy-rsa/pki/private/client1.key.MY2YPyBgBr'
-----
Using configuration from ./openssl-1.0.cnf
Enter pass phrase for /etc/openvpn/easy-rsa/pki/private/ca.key:<ca秘密鍵(ca.key)のパスフレーズを入力>
Check that the request matches the signature
Signature ok
The Subject's Distinguished Name is as follows
commonName            :ASN.1 12:'client1'
Certificate is to be certified until Mar 28 17:17:18 2028 GMT (3650 days)

Write out database with 1 new entries
Data Base Updated
OpenVPNのコンフィグ設定
・作業ディレクトリの変更
$ cd /etc/openvpn/
・サーバのコンフィグファイルのひな型をコピー
$ cp /usr/share/doc/openvpn*/sample/sample-config-files/server.conf server_r.conf
・IPv4パケット転送を有効化
net.ipv4.ip_forward = 1
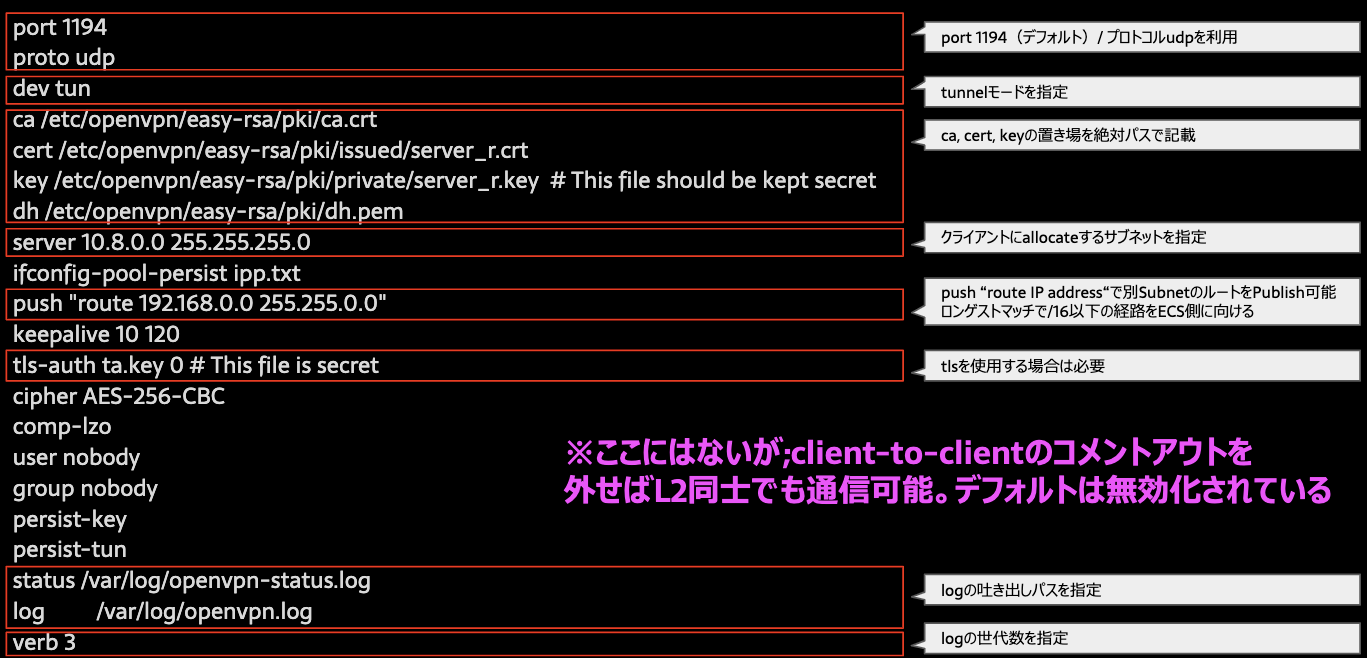
・vimでserver_r.confを設定(※コメントアウトは除外してます)
port 1194
proto udp
dev tun
ca /etc/openvpn/easy-rsa/pki/ca.crt
cert /etc/openvpn/easy-rsa/pki/issued/server_r.crt
key /etc/openvpn/easy-rsa/pki/private/server_r.key  # This file should be kept secret
dh /etc/openvpn/easy-rsa/pki/dh.pem
server 10.8.0.0 255.255.255.0
ifconfig-pool-persist ipp.txt
push "route 192.168.0.0 255.255.0.0"
keepalive 10 120
tls-auth ta.key 0 # This file is secret
cipher AES-256-CBC
comp-lzo
user nobody
group nobody
persist-key
persist-tun
status /var/log/openvpn-status.log
log         /var/log/openvpn.log
verb 3
Config設定項目の主要な機能を記してみました。
・ローカルからsftpログインし、必要なcartファイルなどを取得
$ sftp -oIdentityFile='YOUR PEM.KEY' root@'YOUR ECS GLOBAL IP ADRRESS’
sftp > get -r /etc/openvpn/easy-rsa
sftp > get /etc/openvpn/ta.key
-> 指定ローカルディレクトリに対象ディレクトリとta.keyが格納
・ローカル(今回はMac)に適当なディレクトリを作成
・必要ファイルを1つのディレクトリにまとめておく
$ ls
ca.crt       client1.crt  client1.key  mac.ovpn    ta.key
・テキストエディタで.ovpn拡張子のファイルを作成
client
remote ‘YOUR ECS GLOBAL IP ADDRESS’ 1194
proto udp
dev tun
port 1194
tls-client
ca ca.crt
cert client1.crt
key client1.key
key-direction 1
tls-auth ta.key
comp-lzo
keepalive 10 120
ping-timer-rem
persist-tun
persist-key
・TunnelBlickに.ovpn拡張子ファイルを設定(ファイルのダブルクリックで読み込まれます)
・接続ステータスがOKになるのを確認
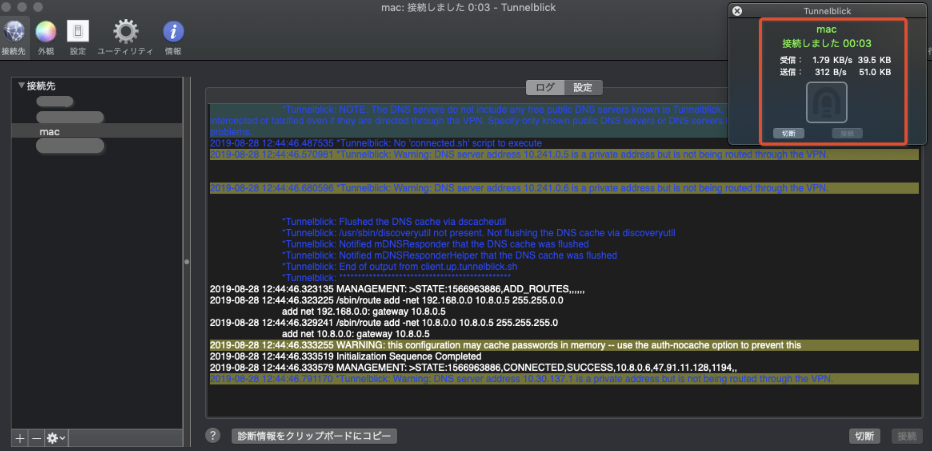
・ローカルに割り当てられているIPアドレスと仮想NICのデフォゲを確認
- クライアントにallocateされたP-IP:10.8.0.6
- デフォゲ:10.8.0.5
ifconfig | grep inet
inet 127.0.0.1 netmask 0xff000000
inet6 ::1 prefixlen 128
inet6 fe80::1%lo0 prefixlen 64 scopeid 0x1
inet6 fe80::aede:48ff:fe00:1122%en5 prefixlen 64 scopeid 0x7
inet6 fe80::144e:ff37:efc3:654%en0 prefixlen 64 secured scopeid 0x8
inet 10.217.57.213 netmask 0xfffffc00 broadcast 10.217.59.255
inet6 fe80::68f4:f0ff:fe52:461c%awdl0 prefixlen 64 scopeid 0xa
inet6 fe80::1ad7:d854:8818:3a6d%utun0 prefixlen 64 scopeid 0x10
inet6 fe80::3a1b:6318:8abb:f5d%utun1 prefixlen 64 scopeid 0x11
inet6 fe80::25a9:6851:788f:1905%utun2 prefixlen 64 scopeid 0x12
inet6 fe80::a6ce:e794:cded:87dc%utun3 prefixlen 64 scopeid 0x13
inet6 fe80::2ae0:e4f7:f211:b67a%utun6 prefixlen 64 scopeid 0x16
inet 10.8.0.6 --> 10.8.0.5 netmask 0xffffffff
リソースへのPing確認
VPCのルーティングテーブルに以下ルートエントリを追加
・192.168.0.0/24 nexthop ECS
・10.0.0.0/8 nexthop ECS
NexthopのECSはGatewayとして作成したECSを指定ください。
もしPingが通らない場合は、ECSのセキュリティグループでICMPとUDP 1194 Portが空いているかチェックしてください。
・192.168.30.134 に向けてPingをします
ping -c10 192.168.30.134
PING 192.168.30.134 (192.168.30.134): 56 data bytes
64 bytes from 192.168.30.134: icmp_seq=0 ttl=63 time=7.206 ms
64 bytes from 192.168.30.134: icmp_seq=1 ttl=63 time=5.935 ms
64 bytes from 192.168.30.134: icmp_seq=2 ttl=63 time=4.667 ms
64 bytes from 192.168.30.134: icmp_seq=3 ttl=63 time=5.284 ms
64 bytes from 192.168.30.134: icmp_seq=4 ttl=63 time=3.810 ms
64 bytes from 192.168.30.134: icmp_seq=5 ttl=63 time=4.058 ms
64 bytes from 192.168.30.134: icmp_seq=6 ttl=63 time=5.229 ms
64 bytes from 192.168.30.134: icmp_seq=7 ttl=63 time=5.113 ms
64 bytes from 192.168.30.134: icmp_seq=8 ttl=63 time=5.155 ms
64 bytes from 192.168.30.134: icmp_seq=9 ttl=63 time=4.270 ms

--- 192.168.30.134 ping statistics ---
10 packets transmitted, 10 packets received, 0.0% packet loss
round-trip min/avg/max/stddev = 3.810/5.073/7.206/0.938 ms
・192.168/16向けのルートが適切にPublishされているか確認します
route -n get 192.168.30.134
route to: 192.168.30.134
destination: 192.168.0.0
mask: 255.255.0.0
gateway: 10.8.0.5
interface: utun4
flags: <UP,GATEWAY,DONE,STATIC,PRCLONING>
recvpipe  sendpipe  ssthresh  rtt,msec    rttvar  hopcount      mtu     expire
0         0         0         0         0         0      1500         0
最後に
マネージドのVPN-Gatewayがあるから、あんま出番ないかなあ。
L2同士の接続を制御できるので、接続させたくないときとか、自前で建ててもいいかもです。とほほ。
参考にしたQiita記事(助かりました)
https://qiita.com/horus19761108/items/9c7879149218d9325c5e
https://qiita.com/horus19761108/items/86c4ae1f44707d5d847e