はじめに
リアクティブプログラミングとメッセージングのお勉強で,JAX-RS の SSE (Server-Sent Events) API と Redis の Pub/Sub を使って簡単なチャットアプリを作ったのでメモ.
アーキテクチャ
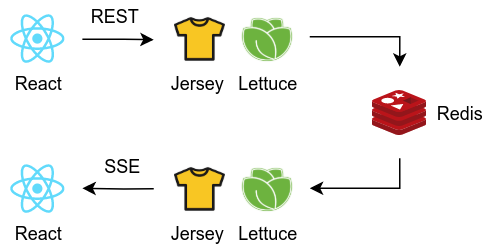
フロントエンドには React,バックエンドには Jersey (JAX-RS) などの Java EE 系フレームワークを使用しています.
また,メッセージブローカとして Redis の Pub/Sub 機能を利用し,Redis への接続には Lettuce を使用しています.
以下のようなフレームワーク/ライブラリを使用しています.
フロントエンドとバックエンドとの通信については,メッセージの投稿には通常の REST API を使用し,タイムラインの取得には SSE を使用します.
SSE を使用することで AP サーバ側からのプッシュでタイムラインの更新が送られてくるため,ポーリングする場合とは異なり,ほぼタイムラグなく新着のメッセージを確認することができます.
なお,今回は JAX-RS の API を試したかったので SSE を使っていますが,非同期通信を実現する技術には SSE の他にもいろいろあるので,現実にはそうした選択肢の中から技術選定することになります.
例えば,単純なポーリング,Comet,WebSocket も選択肢のひとつとなりますし,最近では,HTTP/2 のストリーム通信やその恩恵をあずかることのできる gRPC を利用するという選択肢もあります.
ソースコード
ソースコードは GitHub に置いてあります.
ビルド方法と実行方法はリポジトリの README に書いてありますが,ここにも簡単に説明を書いておきます.
アプリケーションのビルドと実行には JDK と Maven が必要です.
% java --version
openjdk 11.0.2 2019-01-15
OpenJDK Runtime Environment 18.9 (build 11.0.2+9)
OpenJDK 64-Bit Server VM 18.9 (build 11.0.2+9, mixed mode)
% mvn --version
Apache Maven 3.6.3 (cecedd343002696d0abb50b32b541b8a6ba2883f)
Maven home: /opt/apache-maven-3.6.3
Java version: 11.0.2, vendor: Oracle Corporation, runtime: /opt/jdk-11.0.2
Default locale: en_US, platform encoding: UTF-8
OS name: "linux", version: "5.3.0-51-generic", arch: "amd64", family: "unix"
リポジトリをクローンして,クローンしたディレクトリに入ります.
% git clone git@github.com:wgag/chat-sse-redis.git
% cd chat-sse-redis
Maven でアプリケーションをビルドします.
% mvn package
アプリケーションは以下の場所にビルドされます.
target/chat.jar
アプリケーションを実行する前に,Redis を起動しておきます.
% docker run -p 6379:6379 redis:6.0.1
Java コマンドで,ビルドした JAR ファイルを起動します.これでアプリケーションが起動します.
% java -jar target/chat.jar
ブラウザで http://localhost:8080/ にアクセスすると,チャット UI が開きます.
Chrome や Firefox などの SSE に対応しているブラウザで開いてください.(IE は SSE 未対応です!)
JAX-RS の Server-Sent Events API
JAX-RS 2.1 から Server-Sent Events (SSE) の API が使えるようになりました.
SSE API は javax.ws.rs.sse パッケージにあります.
これは SSE API を使用した最も単純な JAX-RS アプリケーションの例です (Jersey User Guide より).
@Path("events")
public static class SseResource {

    @GET
    @Produces(MediaType.SERVER_SENT_EVENTS)
    public void getServerSentEvents(@Context SseEventSink eventSink, @Context Sse sse) {
        new Thread(() -> {
            for (int i = 0; i < 10; i++) {
                // ... code that waits 1 second
                final OutboundSseEvent event = sse.newEventBuilder()
                    .name("message-to-client")
                    .data(String.class, "Hello world " + i + "!")
                    .build();
                eventSink.send(event);
            }
        }).start();
    }
}
この例では,1 秒ごとに "Hello world 0!" から "Hello world 9!" までのデータをクライアントに送信しています.
getServerSentEvents メソッドがリターンした後もコネクションは維持されて,eventSink.send(event); が実行されるタイミングで実際にデータがサーバ側からクライアント側に送信されます.
今回のチャットアプリでも,ほぼ同様のコードとなっています.こちらがそのコードです.
@Path("/timeline")
@RequestScoped
public class TimelineResource {
    @Inject
    RedisSubscribeBean redisSubscribeBean;

    @GET
    @Produces(MediaType.SERVER_SENT_EVENTS)
    public void timeline(@Context SseEventSink eventSink, @Context Sse sse) {
        redisSubscribeBean.listener(message -> {
            OutboundSseEvent event = sse.newEventBuilder()
                    .mediaType(MediaType.APPLICATION_JSON_TYPE)
                    .data(Message.class, message)
                    .build();
            eventSink.send(event);
        });
    }
}
先ほどの単純な例では,イベントソースは自分が作ったスレッドのループ処理でしたが,今回のチャットアプリでは Redis がイベントソースとなります.
そのため,Redis からメッセージの購読をする CDI Bean にコールバック処理を登録し,メッセージが来たらイベントを作って eventSink.send(event); するという中身になっています.
Redis にアクセスする CDI Bean の定義はこのようになっています.
@ApplicationScoped
public class RedisSubscribeBean {
    private RedisClient client;
    private StatefulRedisPubSubConnection<String, String> connection;
    private RedisPubSubReactiveCommands<String, String> commands;

    ...

    public void listener(Consumer<Message> callback) {
        commands.observeChannels().doOnNext(message -> {
            try {
                String payload = message.getMessage();
                callback.accept(new ObjectMapper().readValue(payload, Message.class));
            } catch (JsonProcessingException e) {
                throw new RuntimeException(e);
            }
        }).subscribe();
    }
}
Message は 2 つのフィールド user と text からなる POJO です.
POJO から JSON への変換は,Jersey と Jackson がよろしくやってくれます.
public class Message {
    private String user;
    private String text;

    // getters and setters
}
クライアント側のコード (JavaScript のコード) は,以下のようになっています.
const evtSource = new EventSource(endpoint); でイベントソースを取得し,evtSource.onmessage にイベントハンドラを登録します.
こうすることで,サーバからデータが送られてくるたびに,登録したイベントハンドラでデータを処理できるようになります.
    componentDidMount() {
        const endpoint = '/api/timeline';
        const evtSource = new EventSource(endpoint);

        evtSource.onerror = event => {
            console.error('Error in accessing ' + endpoint);
            evtSource.close();
        };

        evtSource.onmessage = event => {
            console.log('Received ' + event.data);

            const { user, text } = JSON.parse(event.data);
            const messages = this.state.messages;

            messages.push({
                'user': user,
                'text': text,
            });

            this.setState({
                messages: messages
            });
        };
    }
Lettuce を使った Redis Pub/Sub 通信
今回は Redis の Pub/Sub 機能をメッセージブローカとして使用してみました.
Java から Redis を使うためのライブラリには Lettuce ("レタス" と読むらしい) を使っています.
Lettuce の使い方は,こちらの記事によくまとまっています.
まずは,メッセージを Redis に発行する処理から見てみます.
今回のチャットアプリでは,このあたりの処理は以下のように CDI Bean に定義しています.
@ApplicationScoped
public class RedisPublishBean {
    private RedisClient client;
    private StatefulRedisPubSubConnection<String, String> connection;
    private RedisPubSubReactiveCommands<String, String> commands;

    @PostConstruct
    public void init() {
        client = RedisClient.create("redis://localhost:6379");
        connection = client.connectPubSub();
        commands = connection.reactive();
    }

    @PreDestroy
    public void teardown() {
        connection.close();
        client.shutdown();
    }

    public void publish(Message message) {
        try {
            String json = new ObjectMapper().writeValueAsString(message);
            commands.publish("channel", json).subscribe();
        } catch (JsonProcessingException e) {
            throw new RuntimeException(e);
        }
    }
}
初期化処理は init メソッドの 3 行です.
最後の connection.reactive() で返される RedisPubSubReactiveCommands を使って,メッセージの発行や購読の処理を行います.
    @PostConstruct
    public void init() {
        client = RedisClient.create("redis://localhost:6379");
        connection = client.connectPubSub();
        commands = connection.reactive();
    }
メッセージの発行処理は,以下のようになっています.
JSON から文字列への変換処理が入っているのでやや見づらくなっていますが,実質的には commands.publish("channel", json).subscribe(); の 1 行だけです.
    public void publish(Message message) {
        try {
            String json = new ObjectMapper().writeValueAsString(message);
            commands.publish("channel", json).subscribe();
        } catch (JsonProcessingException e) {
            throw new RuntimeException(e);
        }
    }
後始末は teardown メソッドの 2 行です.
    @PreDestroy
    public void teardown() {
        connection.close();
        client.shutdown();
    }
さて,メッセージを購読するほうの CDI Bean は次のようになっています.
@ApplicationScoped
public class RedisSubscribeBean {
    private RedisClient client;
    private StatefulRedisPubSubConnection<String, String> connection;
    private RedisPubSubReactiveCommands<String, String> commands;

    @PostConstruct
    public void init() {
        client = RedisClient.create("redis://localhost:6379");
        connection = client.connectPubSub();
        commands = connection.reactive();
        commands.subscribe("channel").block();
    }

    @PreDestroy
    public void teardown() {
        commands.unsubscribe("channel");
        connection.close();
        client.shutdown();
    }

    public void listener(Consumer<Message> callback) {
        commands.observeChannels().doOnNext(message -> {
            try {
                String payload = message.getMessage();
                callback.accept(new ObjectMapper().readValue(payload, Message.class));
            } catch (JsonProcessingException e) {
                throw new RuntimeException(e);
            }
        }).subscribe();
    }
}
初期化処理はメッセージの発行の場合とほぼ同じですが,commands.subscribe("channel").block(); の 1 行が追加されているところだけが違います.
ここでは,メッセージの発行時に使ったものとおなじ "channel" をキーとして,メッセージの購読を開始します.
    @PostConstruct
    public void init() {
        client = RedisClient.create("redis://localhost:6379");
        connection = client.connectPubSub();
        commands = connection.reactive();
        commands.subscribe("channel").block();
    }
以下の listener メソッドでは,メッセージが現れたときに実行されるべきコールバックの登録をしています.
例外処理などが入っていて見づらいですが,本質的には単純なメソッドチェーン commands.observeChannels().doOnNext(...).subscribe(); でコールバックを登録しているだけです.
    public void listener(Consumer<Message> callback) {
        commands.observeChannels().doOnNext(message -> {
            try {
                String payload = message.getMessage();
                callback.accept(new ObjectMapper().readValue(payload, Message.class));
            } catch (JsonProcessingException e) {
                throw new RuntimeException(e);
            }
        }).subscribe();
    }
後始末の処理もメッセージの発行の場合とほぼ同じですが,購読解除処理の 1 行 commands.unsubscribe("channel"); が追加されるところだけが違います.
    @PreDestroy
    public void teardown() {
        commands.unsubscribe("channel");
        connection.close();
        client.shutdown();
    }
その他
Jetty/Jersey/Weld コンテナの起動
Jersey や Weld を使うなら普通は GlassFish や Helidon を使えばいいと思いますが,今回は試しに GlassFish なしでコンテナを立ち上げてみました.
Weld は以下の 4 行あれば起動できます.
ClassLoader ccl = Thread.currentThread().getContextClassLoader();
Weld weld = new Weld();
weld.setClassLoader(ccl);
SeContainer weldContainer = weld.initialize();
Jersey の初期化処理は,Jetty を使うのであれば以下のように書けます.
ServletHolder jerseyServletHolder = new ServletHolder("jersey", ServletContainer.class);
context.addServlet(jerseyServletHolder, "/api/*");
jerseyServletHolder.setInitOrder(1);
jerseyServletHolder.setInitParameter("jersey.config.server.provider.packages",
        "com.example.rest");
Jetty を組込みのサーバとして使う方法については,こちらの記事に詳しく書かれています.
以下のコードを main メソッドから実行すれば,Java SE 上に組込みの Jetty が立ち上がります.
URL resourceBase = this.getClass().getResource("/webroot");
ServletContextHandler context =
        new ServletContextHandler(ServletContextHandler.SESSIONS);
context.setContextPath("/");
context.setResourceBase(resourceBase.toString());

server = new Server(8080);
server.setHandler(context);

ServletHolder defaultServletHolder = new ServletHolder("default", DefaultServlet.class);
context.addServlet(defaultServletHolder, "/*");

server.start();
server.join();
server.destroy();
React ベースのチャット UI
フロントエンドのチャット UI は,React で作っています.チャット UI の作成にあたっては,こちらの記事を参考にさせていただきました.
Maven での React アプリのビルド
今回のチャットアプリは,Maven で Java アプリと React アプリを統合的にビルドするという,少々凝ったことをしています.
Maven で React アプリをビルドするためには,frontent-maven-plugin という Maven プラグインが使えます.
以下のコードで,npm のインストール,npm install,npm run build を実現しています.
ここでは npm を使っていますが,yarn などの他のツールを使うこともできるようです.
<plugin>
    <groupId>com.github.eirslett</groupId>
    <artifactId>frontend-maven-plugin</artifactId>
    <version>1.9.1</version>
    <executions>
        <execution>
            <id>install node</id>
            <phase>initialize</phase>
            <goals>
                <goal>install-node-and-npm</goal>
            </goals>
        </execution>
        <execution>
            <id>npm install</id>
            <phase>initialize</phase>
            <goals>
                <goal>npm</goal>
            </goals>
            <configuration>
                <arguments>install</arguments>
            </configuration>
        </execution>
        <execution>
            <id>npm run build</id>
            <phase>generate-resources</phase>
            <goals>
                <goal>npm</goal>
            </goals>
            <configuration>
                <arguments>run build</arguments>
            </configuration>
        </execution>
    </executions>
    <configuration>
        <nodeVersion>v12.16.3</nodeVersion>
        <workingDirectory>src/main/app</workingDirectory>
    </configuration>
</plugin>
まとめ
簡単なチャットアプリの実装を通して,JAX-RS の Server-Sent Events API の使い方や,Lettuce 経由で Redis の Pub/Sub を利用する方法を眺めてみました.
複数のサービスから構成されるシステムを構築する場合には,サービス間のコミュニケーションをいかに円滑にとるかが課題となります.
マイクロサービスのように多くのサービスからなる場合には特に重要な課題であり,非同期通信は不可欠な技術ですので,これからも注視していきたいと思います.

