この記事は Scala Advent Calendar 2015 (Qiita版) の19日目の記事です。
「右から左」程度のあいまいな説明で済まされることの多い Scala のクラス線形化(線形化順序)について,言語仕様できちんと定義を確認して,心の中のもやもやを解消したいと思います。
線形化とは
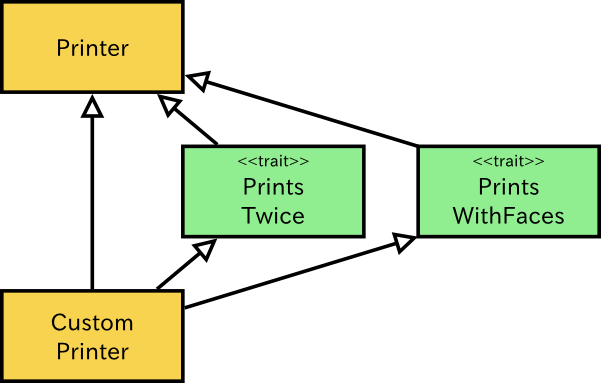
下図のように,あるクラスに複数のトレイトがミックスインされていて,同名のメソッドの異なる実装が複数のクラスやトレイトに存在する場合,どのメソッドの実装を呼び出すべきかという問題が発生します。この問題を解決するための一つの方法は,トレイトとクラスをある規則にしたがって一列に並べて,その並びにしたがって呼び出すメソッドを決めるという方法です。これがクラスの線形化です。

以下のプログラムは,上図と同様のクラスとトレイトを定義したプログラムです。CustomPrinter クラスは Printer を継承していて,PrintsTwice,PrintsWithFaces がこの順でミックスインされています。
class Printer {
  // 文字列をそのまま印字する
  def print(str: String) = println(str)
}


trait PrintsTwice extends Printer {
  // 文字列を2回分印字する
  override def print(str: String) =
    super.print(str * 2)
}

trait PrintsWithFaces extends Printer {
  // 文字列に顔文字を加えて印字する
  override def print(str: String) =
    super.print(str + "(^^)/")
}

class CustomPrinter
    extends Printer with PrintsTwice with PrintsWithFaces

val ptr = new CustomPrinter
val () = ptr.print("hello")
さて,このプログラムをコンパイルして走らせたときの挙動は以下のどれでしょうか?
-
helloと表示される(Printerの実装が呼び出される) -
hellohelloと表示される(PrintsTwice,Printerの実装がこの順で呼び出される) -
hello(^^)/と表示される(PrintsWithFaces,Printerの実装がこの順で呼び出される) -
hellohello(^^)/と表示される(PrintsTwice,PrintsWithFaces,Printerの実装がこの順で呼び出される) -
hello(^^)/hello(^^)/と表示される(PrintsWithFaces,PrintsTwice,Printerの実装がこの順で呼び出される) - そもそもこのプログラムはコンパイルを通らない
正解は5番目の「hello(^^)/hello(^^)/ と表示される」です。確かに,「右から左」に,PrintsWithFaces,PrintsTwice,Printer の実装がこの順で呼び出されていることがわかります。この例では,CustomPrinter とその祖先は以下のように線形化されます。
CustomPrinter -> PrintsWithFaces -> PrintsTwice -> Printer (-> AnyRef -> Any)
では,次の例の線形化はどうなるでしょうか? (答えは後半で)

なぜ「右から左」か
Scalaにおけるクラス線形化の定義を見る前に,なぜ「右から左」にクラスを探索していくのか考えてみましょう。
今回の例の CustomPrinter は以下のように定義されています。
class CustomPrinter
    extends Printer with PrintsTwice with PrintsWithFaces
一般に,キーワード with の直後に書かれるトレイトは,その with の左側で定義されるクラスへミックスインされます。この例では,CustomPrinter は「「「Printer を継承したクラス」に PrintsTwice をミックスインしてできたクラス」に PrintsWithFaces をミックスインしたクラス」であると定義されています。心の眼で括弧を補うと,このコードは次のように見えることでしょう。
((class CustomPrinter
    extends Printer) with PrintsTwice) with PrintsWithFaces
Scalaではこのようにミックスインの順序が定められているので,with の直後に書かれるトレイトは,その with の左側で定義されるクラスの外側に実装を持つべきです。今回の例で言えば,右端のトレイト PrintsWithFaces のメソッド print は一番外側で実装されるべきであることがわかります。
そして,メソッドの実装の探索は「外から内」すなわち「右から左」の順番に行われます.これが,線形化の順序が「右から左」である所以です。下の図が理解の助けになればいいのですが...。

線形化の定義
では実際にScalaにおけるクラス線形化の定義を仕様書で確認してみましょう。Scala Language Specification Version 2.11 によると,クラス線形化の定義は以下のようにあります(Section 5.1.2,訳は筆者による)。
定義: 線形化
$C$ をテンプレートC_1 with ... with C_n { stats }を持つクラスとする。$C$ の線形化 $\mathcal{L}(C)$ を以下のように定義する。\mathcal{L}(C) = C, \mathcal{L}(C_n) \mathop{\vec{+}} \cdots \mathop{\vec{+}} \mathcal{L}(C_1)ここで,$\vec{+}$ は連結を表す。ただし,この連結において,右オペランドの要素は左オペランドの同一の要素に取って代わる。
\begin{array}{r@{\;}ll}
a, A \mathop{\vec{+}} B & = a, (A \mathop{\vec{+}} B) & \text{if $a \notin B$} \\
 & = A \mathop{\vec{+}} B & \text{if $a \in B$} \\
\end{array}
前半はいわゆる「右から左」のルールを形式的に述べたものです。後半は親より子が先行するというルールに相当します。
実際の例に当てはめてみましょう。今回の例では $\mathcal{L}($CustomPrinter$)$ は以下のように計算されます(ここでは簡単のため AnyRef と Any の存在は無視しています)。
\begin{align*}
\mathcal{L}(\mathtt{CustomPrinter}) & = \mathtt{CustomPrinter}, \mathcal{L}(\mathtt{PrintsWithFaces}) \mathop{\vec{+}} \mathcal{L}(\mathtt{PrintsTwice}) \mathop{\vec{+}} \mathcal{L}(\mathtt{Printer})\\
 & = \mathtt{CustomPrinter}, \mathtt{PrintsWithFaces}, \mathcal{L}(\mathtt{Printer}) \mathop{\vec{+}} \mathtt{PrintsTwice}, \mathcal{L}(\mathtt{Printer}) \mathop{\vec{+}} \mathtt{Printer} \\
 & = \mathtt{CustomPrinter}, \mathtt{PrintsWithFaces}, \mathtt{Printer} \mathop{\vec{+}} \mathtt{PrintsTwice}, \mathtt{Printer} \mathop{\vec{+}} \mathtt{Printer} \\
 & = \mathtt{CustomPrinter}, \mathtt{PrintsWithFaces}, \mathtt{PrintsTwice}, \mathtt{Printer}
\end{align*}
すなわち,CustomPrinter とその祖先の線形化は以下のようになります。
CustomPrinter -> PrintsWithFaces -> PrintsTwice -> Printer (-> AnyRef -> Any)
さて,「答えは後半で」とだけ言い残した例の線形化ですが,定義に忠実に計算していけば答えを導くことができます。結果は以下の図のようになります(右肩に線形化後の順序の番号を振ってあります)。

余談ですが,total な関係(どの2つの要素を持ってきてもそれらが比較可能であるような関係)のことを linear な関係と呼んでいる文献を見たことがあります。今回の線形化もある意味で total な関係の構築であるわけで,linear な関係という表現との整合性がうまくとれているなとちょっと思ったりしました。
参考文献
- Scala Language Specification Version 2.11
- M. Odersky, L. Spoon, and B. Venners. Scala スケーラブルプログラミング 第2版. インプレス, 2011.