初めに
使い方が悪いだけかもしれませんが、Jiraって微妙に使いづらいな…と思った今日この頃。
同じことを思ったそんなあなたに、Jira拡張機能開発をお勧めします。
今回はJira拡張機能ってこんなこともできるんだよということを伝えたく、
npmパッケージのforgeを使用して、ReactにてJiraの拡張機能を作成していきます。
この記事ではforgeの導入、プロジェクトの作成、JiraにDeployまでを記載します。
開発環境
node:18.16.0
実現方法
forge導入~プロジェクト作成
-
forge/cliをインストールします。
npm install -g @forge/cli -
Atlassian API トークンを使用してログインします。
Atlassian API tokenにて、APIトークンを発行し、以下コマンドにてログインを行います。forge login -
forgeコマンドにてプロジェクトを作成します。forge create ? Enter a name for your app: sample_app Start with a template. Each template contains the required files to be a valid app. ? Select a category: Custom UI ? Select a template: jira-project-page √ Creating app... i Downloading template i Registering app i Creating environments i Installing dependencies √ Created sample_app Your app is ready to work on, deploy, and install. We created 3 environments you can deploy to: production, staging, development. Change to directory sample_app to see your app files.プロジェクトを作成する際、以下3点の設定をします。
- ? Enter a name for your app:
アプリの名前です。今回は「sample_app」としました。 - ? Select a category:
UI キットカテゴリを選択します。今回は「Custom UI」を選択しました。それぞれの所感をメモします。- Custom UI
- Reactでアプリを作成できる。カスタマイズ性◎
- Triggers and Validators
- 例えば課題が作成された際に起動等、発火タイミングを指定できる
- UI kit
- Jiraのデザインに沿ったUIが用意されており、開発が容易
- ただしカスタマイズ性は悪く文字色すら変えられない
- ユーザーからの改善要望に対応する必要がある場合や、追加開発が前提の場合はやめておいた方がいいかも
- Custom UI
- ? Select a template:
UI でのアプリモジュールの表示先を設定します。今回は表示がわかりやすい「jira-project-page」を選択しました。
参考: Display conditions
- ? Enter a name for your app:
-
プロジェクト作成完了
開発する
生成されたプロジェクト
|--node_module
|--.gitignore
|--.vscode
|  |--settings.json
|--manifest.yml
|--package.json
|--package-lock.json
|--README.md
|--src
|  |--index.js
|--static
|  |--hello-world
|  |  |--.gitignore
|  |  |--package.json
|  |  |--package-lock.json
|  |  |--public
|  |  |  |--index.html
|  |  |--src
|  |  |  |--App.js
|  |  |  |--index.js
開発にあたり、「manifest.yml」を確認するとよいでしょう。参考:Manifest
modules:
  jira:projectPage:
    - key: sample-app-hello-world-project-page
      resource: main
      resolver:
        function: resolver
      title: sample_app
  function:
    - key: resolver
      handler: index.handler
resources:
  - key: main
    path: static/hello-world/build
app:
  id: ari:cloud:ecosystem::app/2fefc7e6-XXXX-4862-XXXX-063bef7XXXXX
今回は「Custom UI」を選択したので、resourcesのキーが追加されています。
staticフォルダのhello-worldをbuildした際に生成されるbuildフォルダをJira拡張機能のリソースとしていることがわかります。
static/hello-world/ディレクトリ移動し、ReactアプリのBuildを行いましょう。
cd プロジェクト直下/static/hello-world/
npm install
npm run build
これでJira拡張機能として表示するリソースが作成されました。
続いて、環境にDeployし、動作を確認してみましょう。
Deployする
-
環境にデプロイ
cd プロジェクト直下
forge deploy
Deploying your app to the development environment. Press Ctrl+C to cancel. Running forge lint... No issues found. ✔ Deploying delete to development... ℹ Packaging app files ℹ Uploading app ℹ Validating manifest ℹ Snapshotting functions ℹ Deploying to environment ✔ Deployed Deployed delete to the development environment.Deployの成功を確認しましょう。
atlassian developerにログインし、My appsのリストに入力したプロンプト名が表示されていることが確認できればOKです。 -
アプリをJiraにインストール
forge install
Select the product your app uses.

? Select a product: (Use arrow keys)
> Jira
  Confluence
  Compass

Enter your site. For example, your-domain.atlassian.net
? Enter the site URL: https://jira-support-plugin-dev.atlassian.net/

Installing your app onto an Atlassian site.
Press Ctrl+C to cancel.

Your app will be installed with the following scopes:
- read:me (requires interactive consent)

The scopes or egress URLs in the manifest are different from the scopes in your most recent deployment to development. Try running forge deploy -e development before installing.

? Are you sure you want to continue installing the app? (y/N)

✔ Install complete!
installする際、以下3点の設定をします。
-
? Select a product: (Use arrow keys)
どの製品で使うか?ですね。今回は「Jira」です。 -
? Enter your site
どのサイトで使うか?今回は拡張機能開発用に作成したJiraサイトを指定します。 -
? Your app will be installed with the following scopes
今回インストールされるアプリの権限範囲の確認になります。yです。
Jiraを確認してみて、アプリが追加されていたら、完了です。
-
まとめ
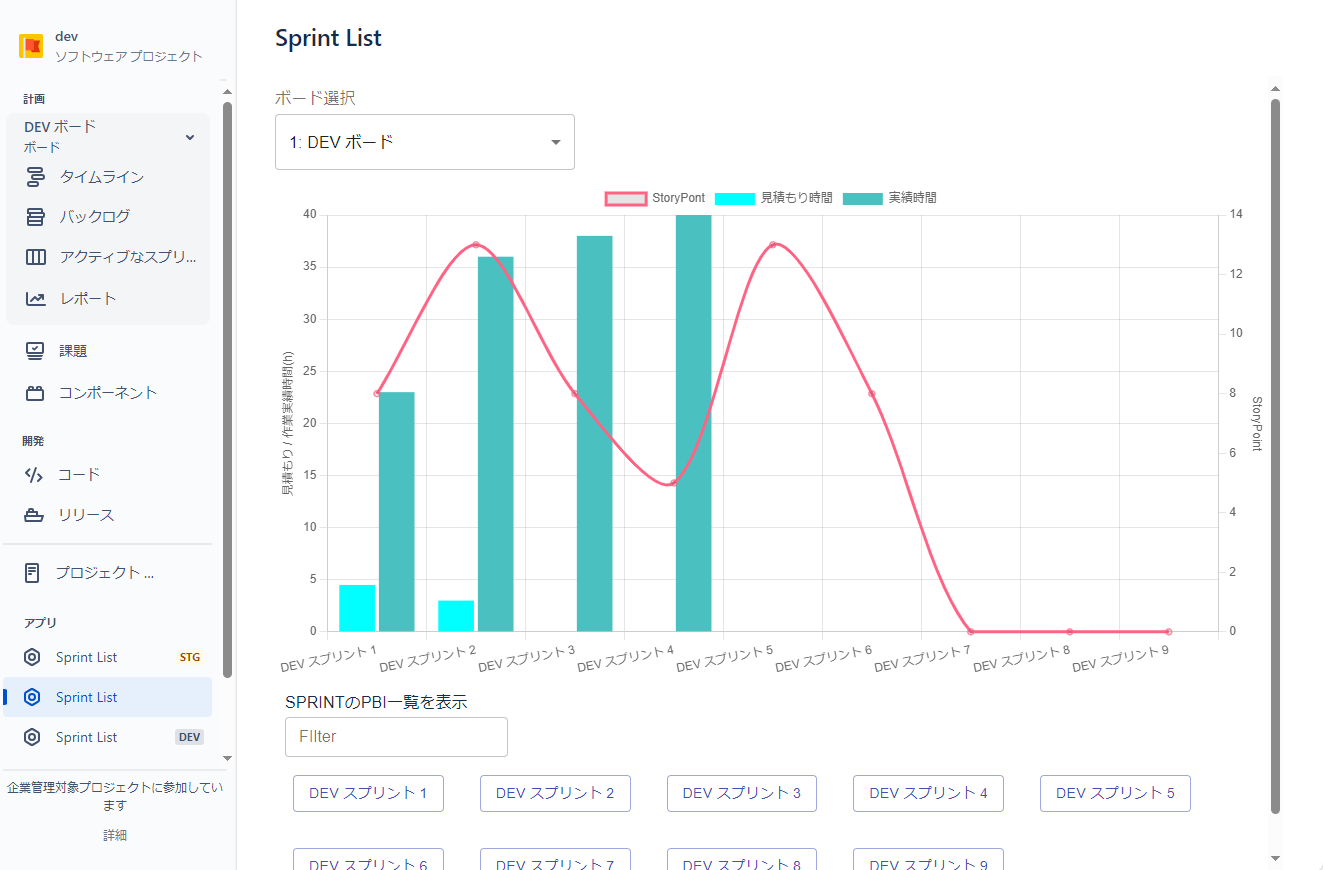
今回の記事ではJira拡張機能の作成までで、開発した拡張機能あまり言及していませんが、
実際に、スプリント毎にStoryPointと見積もり時間、稼働時間を取得し、集計したものをグラフ描画する拡張機能を開発してみました。
手順としては以下のようなものです。
- Forgeコマンドでプロジェクト作成
- Atlassian apiでデータ取得
- ReactでUI作成、データの表示
- ForgeコマンドでJiraにDeploy&Install
意外と簡単にできる。というのが感想です。
Forgeにてプロジェクト作成、Deploy、Install迄やってくれるので、
Reactをいじれば簡単に動くものが完成します。
開発していて気になった点は
ドキュメントがわかりづらい
APIの仕様がわかりづらい
といったものでした。
特にAPIの仕様について、POSTする際の必須パラメータがわかりづらい…
型の詳細な情報がとてもほしかったです。
全国のスクラムマスターに、ぜひ開発をお勧めします。
記事の内容に間違いがありましたら連絡ください!