はじめに
マイクロフロントエンドという言葉が流行っているものの、なんとなく具体的な実現方法がわかっていないので、勉強した結果をまとめます。
マイクロフロントエンドとは
「翻訳記事 マイクロフロントエンド」には、以下のように書いてあります。
それはマイクロサービスの考え方をフロントエンドに拡張したものです。
(中略)
開発をすすめていくと、特に複数のチームで管理している場合
フロントエンド層が肥大化して管理が難しくなりがちです。
これを「モノリシックなフロントエンド」と呼びます。マイクロフロントエンドの背景には
ページを独立したチームによって管理された機能の集合体と捉える考え方があります。
それぞれのチームは特定の領域やミッションに特化しています。
チームは組織横断的な作りになっていて、その機能を end-to-end
つまりデータベースから UI に至るまでをすべて実装します。
つまり、
- UIを単独のアプリケーションが担う(モノリシック)のではなく、
- 各マイクロサービスが提供する画面部品(コンポーネント)を結合することで、
- 単独のアプリケーションのように振る舞うもの
というようなものと考えられます。
具体的な実現手法
「Micro Frontends」で紹介されている実現方法について、メリット・デメリットとともにまとめてみます。
いずれの手法でも、各マイクロサービスが提供するコンポーネントをひとつのアプリケーションとして統合する、「コンテナアプリケーション」があることが前提となります。
なお、個人的な理解をまとめたものなので、原文とは意図や主張が異なる箇所があるかもしれません。
Server-side template composition
サーバーサイドでHTMLを描画する際に、必要となるHTML部品(フラグメント)を動的にincludeする方法です。各フラグメントの描画を各マイクロサービスに移譲することで、疎結合を実現します。
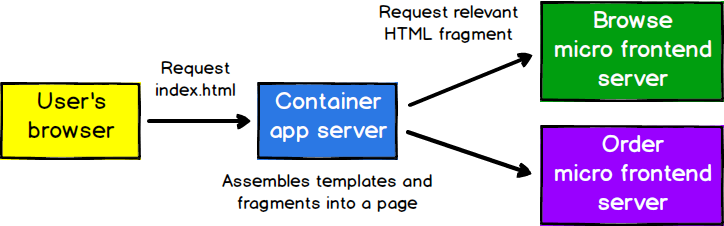
(Micro Frontendsより)
Build-time integration
各フラグメントを、フロントエンドのライブラリとして公開し、コンテナアプリケーションにライブラリ依存関係として含める方法です。
コンテナアプリケーションでは、単にそのコンポーネントを使うだけです。
{
  // ...省略...
  "dependencies": {
    "@sample-app/a-service-components",
    "@sample-app/b-service-components",
    // ...省略...
  }
}
<template>
  <div>
    <a-component>
      <!-- 省略-->
    </a-component>
    <b-component>
      <!-- 省略-->
    </b-component>
  </div>
</template>
<script>
  import { AComponent } from 'a-service-components';
  import { BComponent } from 'b-service-components';

  return {
    components: {
      AComponent,
      BComponent
    }
  };
</script>
Pros
- シンプルでわかりやすい
- バンドルが重複しない
Cons
- コンポーネントを修正する度に、コンテナアプリケーションのビルド・デプロイが必要
- フロントエンドライブラリを揃えておく必要がある
Run-time integration via iframe
各マイクロサービスのコンポーネントを<iframe>で読み込み、
条件に応じてsrc属性を更新する方法です。
<html>
  <head>
    <title>Feed me!</title>
  </head>
  <body>
    <h1>Welcome to Feed me!</h1>

    <iframe id="micro-frontend-container"></iframe>

    <script type="text/javascript">
      const microFrontendsByRoute = {
        '/': 'https://browse.example.com/index.html',
        '/order-food': 'https://order.example.com/index.html',
        '/user-profile': 'https://profile.example.com/index.html',
      };

      const iframe = document.getElementById('micro-frontend-container');
      iframe.src = microFrontendsByRoute[window.location.pathname];
    </script>
  </body>
</html>
(Micro Frontendsより)
Pros
- シンプルでわかりやすい
- スタイルやグローバル関数が干渉しない
Cons
- 他の手法に比べて描画が遅い(遅くなりがち)
- 柔軟性が低い
Run-time integration via JavaScript
各マイクロサービスのコンポーネントを描画する関数を<script>で読み込み、
条件に応じて動的に画面描画する方法です。
<html>
  <head>
    <title>Feed me!</title>
  </head>
  <body>
    <h1>Welcome to Feed me!</h1>

    <!-- These scripts don't render anything immediately -->
    <!-- Instead they attach entry-point functions to `window` -->
    <script src="https://browse.example.com/bundle.js"></script>
    <script src="https://order.example.com/bundle.js"></script>
    <script src="https://profile.example.com/bundle.js"></script>

    <div id="micro-frontend-root"></div>

    <script type="text/javascript">
      // These global functions are attached to window by the above scripts
      const microFrontendsByRoute = {
        '/': window.renderBrowseRestaurants,
        '/order-food': window.renderOrderFood,
        '/user-profile': window.renderUserProfile,
      };
      const renderFunction = microFrontendsByRoute[window.location.pathname];

      // Having determined the entry-point function, we now call it,
      // giving it the ID of the element where it should render itself
      renderFunction('micro-frontend-root');
    </script>
  </body>
</html>
(Micro Frontendsより)
Pros
- 柔軟
- コンポーネントが修正されても、コンテナアプリケーションのビルド・デプロイは不要
Cons
- バンドルが重複しやすい
Run-time integration via WebComponents
Run-time integration via JavaScriptの発展型で、
各マイクロサービスは、描画用の関数を公開するのではなく、
CustomElementを公開する方法です。
<html>
  <head>
    <title>Feed me!</title>
  </head>
  <body>
    <h1>Welcome to Feed me!</h1>

    <!-- These scripts don't render anything immediately -->
    <!-- Instead they each define a custom element type -->
    <script src="https://browse.example.com/bundle.js"></script>
    <script src="https://order.example.com/bundle.js"></script>
    <script src="https://profile.example.com/bundle.js"></script>

    <div id="micro-frontend-root"></div>

    <script type="text/javascript">
      // These element types are defined by the above scripts
      const webComponentsByRoute = {
        '/': 'micro-frontend-browse-restaurants',
        '/order-food': 'micro-frontend-order-food',
        '/user-profile': 'micro-frontend-user-profile',
      };
      const webComponentType = webComponentsByRoute[window.location.pathname];

      // Having determined the right web component custom element type,
      // we now create an instance of it and attach it to the document
      const root = document.getElementById('micro-frontend-root');
      const webComponent = document.createElement(webComponentType);
      root.appendChild(webComponent);
    </script>
  </body>
</html>
(Micro Frontendsより)
Pros
- HTMLの標準技術で実現できる
Cons
- すべてのブラウザがWebComponentsに対応しているわけではない
雑感
Micro Frontendsにもある通り、Run-time integration via JavaScriptの方式が、最も柔軟で拡張しやすい方法だと思います。
ただし、ある程度のフロントエンド技術の理解が必要になると思うので、
チーム内にフロントエンドに強いメンバーがいなければ、Server-side template compositionやRun-time integration via iframeを検討することになるかなと思います。
Run-time integration via WebComponentsも今後有力な選択肢になりそうですが、
既存のUIライブラリとの統合等のナレッジが少ないため、まだ時期尚早という感じがします。