はじめに
キー漏洩の事故を防ぐため、各種秘密鍵(API KeyやAWS SecretAccessKeyなど)をGitリポジトリに格納しない、というベストプラクティスは知られて久しいですが、これを運用ルール・手作業で徹底するのはかなり無理があります。
良く知られた方法として、git-cryptやgit-secretを利用し、Gitリポジトリ上のファイルを透過的に暗号化する、といったやり方がありますが、今回はgit-cryptを利用した方法をまとめます。
Windows/Linux(VirtualBox/Hyper-V等VM環境)の混在環境を想定しています。
ググってみるとmacOS上でセットアップする方法はいくつかありましたが、Windows+GitBash環境でのセットアップ方法は無かったので、書きました。
Why git-crypt?
透過的にファイルを暗号化/復号するためのツールで、有名なものはgit-secretとgit-cryptかと思います。git-secretの方がアクティブにメンテナンスされているのでこちらの方が好ましい気がしますが、今回はgit-cryptを採用しました。
https://git-secret.io/
https://github.com/AGWA/git-crypt
理由は簡単で、git-secretはWindowsを正式にサポートしていないからです。
Supported platforms
git-secret works with Mac OS X >= 10.9, Ubuntu >= 14.04, Debian >= 8.3, and Fedora. You can check the full list here. You can add your platform to this list, if all the tests pass for you. Cygwin support is planned.
WSLでは完全に動く、Cygwinでも動かせるとの報告はありましたが、今回は試していません。
https://github.com/sobolevn/git-secret/issues/252
https://github.com/sobolevn/git-secret/issues/40
検証した環境
対象鍵のExport/Importを確認し、別の環境でも透過的な暗号化/複合ができるかどうか確認したため、環境が2つあります。
メインの検証環境はWindows、もう一方の環境はLinuxとなります。
- Windows環境
- Windows 10 Pro Build 19041
- GitBash 2.27.0
- GnuPG 2.2.20-unknown
- git-crypt 0.6.0
- Linux環境
- Ubuntu 20.04 LTS
- GnuPG 2.2.19
- git-crypt 0.6.0
後述する手順は、両環境でそれぞれ以下のユーザが利用するという想定で作っています。
-
ユーザ1(Gitリポジトリ・git-cryptをセットアップする人):
- ユーザ名: user1
- your-user1@example.com
- 作業環境: 上記Windows環境
-
ユーザ2(ユーザ1がセットアップしたものを利用する人):
- ユーザ名: user2
- your-user2@example.com
- 作業環境: 上記Linux環境
手順概要
手順は概ね以下のようになります。
複数ユーザでgit-cryptを利用する方法は幾つかありますが、今回は対象鍵をExportし、全ユーザ共通で用いる方式としました。
この方式は、対象鍵の管理は気を付ける必要がありますが、利用する側の環境でGPG鍵ペアを作成する必要がないため、実際の開発プロジェクトでの導入ハードルが下がると思います。
-
実行環境のセットアップ(全ユーザ共通)
- GnuPGがインストールされていることを確認する
- git-cryptのインストール
-
Gitリポジトリに適用し、対象鍵を準備する(ユーザ1の作業)
- GPGの鍵ペアを作る
- Gitリポジトリを作成する
- Gitリポジトリにgit-cryptを適用する
- 暗号化したいファイルをCommit&Pushし、暗号化されるか試してみる
-
対象鍵をExportする(ユーザ1の作業)
-
対象鍵の利用(ユーザ2の作業)
- GitリポジトリをCloneする
- Exportされた対象鍵を利用できる状態にする(git-crypt unlock)
- 暗号化されたファイルを参照できることを試してみる
- 新たに暗号化したいファイルをCommit&Pushし、暗号化されるか試してみる
手順詳細
1. 実行環境のセットアップ(全ユーザ共通)
1-1. GnuPGがインストールされていることを確認する
"gpg --version" コマンドを実行し、GnuPGの有無とバージョンを確認します。
インストールされていなければ、別途インストールします。
GitBashであれば、最新版のインストールパッケージに含まれていると思います。
Ubuntuであれば "$ sudo apt install gnupg2" でインストールできると思います。
$ gpg --version
gpg (GnuPG) 2.2.20-unknown
libgcrypt 1.8.5
Copyright (C) 2020 Free Software Foundation, Inc.
License GPLv3+: GNU GPL version 3 or later <https://gnu.org/licenses/gpl.html>
This is free software: you are free to change and redistribute it.
There is NO WARRANTY, to the extent permitted by law.

Home: /c/Users/mta/.gnupg
Supported algorithms:
Pubkey: RSA, ELG, DSA, ECDH, ECDSA, EDDSA
Cipher: IDEA, 3DES, CAST5, BLOWFISH, AES, AES192, AES256, TWOFISH,
        CAMELLIA128, CAMELLIA192, CAMELLIA256
Hash: SHA1, RIPEMD160, SHA256, SHA384, SHA512, SHA224
Compression: Uncompressed, ZIP, ZLIB, BZIP2
gpg (GnuPG) 2.2.19
libgcrypt 1.8.5
Copyright (C) 2019 Free Software Foundation, Inc.
License GPLv3+: GNU GPL version 3 or later <https://gnu.org/licenses/gpl.html>
This is free software: you are free to change and redistribute it.
There is NO WARRANTY, to the extent permitted by law.

Home: /home/vagrant/.gnupg
Supported algorithms:
Pubkey: RSA, ELG, DSA, ECDH, ECDSA, EDDSA
Cipher: IDEA, 3DES, CAST5, BLOWFISH, AES, AES192, AES256, TWOFISH,
        CAMELLIA128, CAMELLIA192, CAMELLIA256
Hash: SHA1, RIPEMD160, SHA256, SHA384, SHA512, SHA224
Compression: Uncompressed, ZIP, ZLIB, BZIP2
1-2. git-cryptのインストール
各環境にgit-cryptをインストールします。分量が多くなったので別記事にまとめました。
下記を参照してください。
【小ネタ】git-cryptのインストール手順まとめ(Windows/AmazonLinux2/Ubuntu) - Qiita
各環境とも、git-cryptが実行できることを確認します。
$ git-crypt --version
git-crypt 0.6.0
2. Gitリポジトリに適用し、GPG対称鍵を準備する(ユーザ1の作業)
この作業はユーザ1で実施します。具体的に以下の作業を実施することとなります。
- git-cryptを有効化したGitリポジトリの作成
- git-cryptで暗号化する対象ファイルの指定
- 対象鍵のExport
2-1. GPGの鍵ペアを作る
まず、ユーザ1にてGPG鍵ペアを作成します。
以下のパラメータの入力を求められますので、実際の環境に合わせて入力します。
- Real name:
- Email address:
- Passphrase(※GPG鍵を保護するためのパスフレーズ)
$ gpg --generate-key
gpg (GnuPG) 2.2.20-unknown; Copyright (C) 2020 Free Software Foundation, Inc.
This is free software: you are free to change and redistribute it.
There is NO WARRANTY, to the extent permitted by law.

Note: Use "gpg --full-generate-key" for a full featured key generation dialog.

GnuPG needs to construct a user ID to identify your key.

Real name: user1
Email address: user1@example.com
You selected this USER-ID:
    "user1 <user1@example.com>"

Change (N)ame, (E)mail, or (O)kay/(Q)uit? o
We need to generate a lot of random bytes. It is a good idea to perform
some other action (type on the keyboard, move the mouse, utilize the
disks) during the prime generation; this gives the random number
generator a better chance to gain enough entropy.
We need to generate a lot of random bytes. It is a good idea to perform
some other action (type on the keyboard, move the mouse, utilize the
disks) during the prime generation; this gives the random number
generator a better chance to gain enough entropy.
gpg: /c/Users/user1/.gnupg/trustdb.gpg: trustdb created
gpg: key 678CED491B665A3C marked as ultimately trusted
gpg: directory '/c/Users/user1/.gnupg/openpgp-revocs.d' created
gpg: revocation certificate stored as '/c/Users/user1/.gnupg/openpgp-revocs.d/494C9CBC8F416964C1D2143D678CED491B665A3C.rev'
public and secret key created and signed.

pub   rsa2048 2020-07-08 [SC] [expires: 2022-07-08]
      494C9CBC8F416964C1D2143D678CED491B665A3C
uid                      user1 <user1@example.com>
sub   rsa2048 2020-07-08 [E] [expires: 2022-07-08]
2-2. Gitリポジトリを作成する
GitHubなりGitLabなり、複数人で利用するGitリポジトリを、通常の手順で作成します。
今回は「example-git-crypt」というリポジトリを作成しました。
2-3. Gitリポジトリにgit-cryptを適用する
GitリポジトリをCloneしたのち、 "$ git-crypt init" を実行します。
併せて、暗号化対象を指定するため、 ".gitattributes" ファイルを編集します。
$ git clone https://github.com/tmiki/example-git-crypt

$ cd ./example-git-crypt/

$ git-crypt.exe init
Generating key...
.gitattributesファイルを作成し、透過的な暗号化/復号が必要なファイルを指定します。今回は secretdir/ ディレクトリ内のファイルを全て暗号化するように設定します。
書式のサンプルは下記にあります。
https://github.com/AGWA/git-crypt#using-git-crypt
なお、あるディレクトリ内のファイル全てを指定する場合、 dir/ という指定では意図したとおりの動きにならないようです。**dir/****という様に指定する必要があるようです。
https://github.com/AGWA/git-crypt#gitattributes-file
$ vi .gitattributes

### 実際の用途・ファイル構成にあわせて編集する
secretdir/** filter=git-crypt diff=git-crypt
作成した.gitattributesをCommit&Pushします。
これで、Gitリポジトリの準備は完了です。
2-4. 暗号化したいファイルをCommit&Pushし、暗号化されるか試してみる
次に、 secretdir/ に保存したファイルが本当に暗号化されて格納されるか、確認してみます。
まず、暗号化対象のディレクトリ内に平文のテキストファイルを作成します。
$ mkdir ./secretdir/
$ echo "This file should be encrypted." > ./secretdir/encrypted_file1.txt

$ ls -lA ./secretdir/
total 1
-rw-r--r-- 1 mta 197121 31 Jul  8 11:25 encrypted_file1.txt
作成したファイルを、Commit&Pushします。
$ git add ./secretdir/encrypted_file1.txt
$ git commit
$ git push origin master
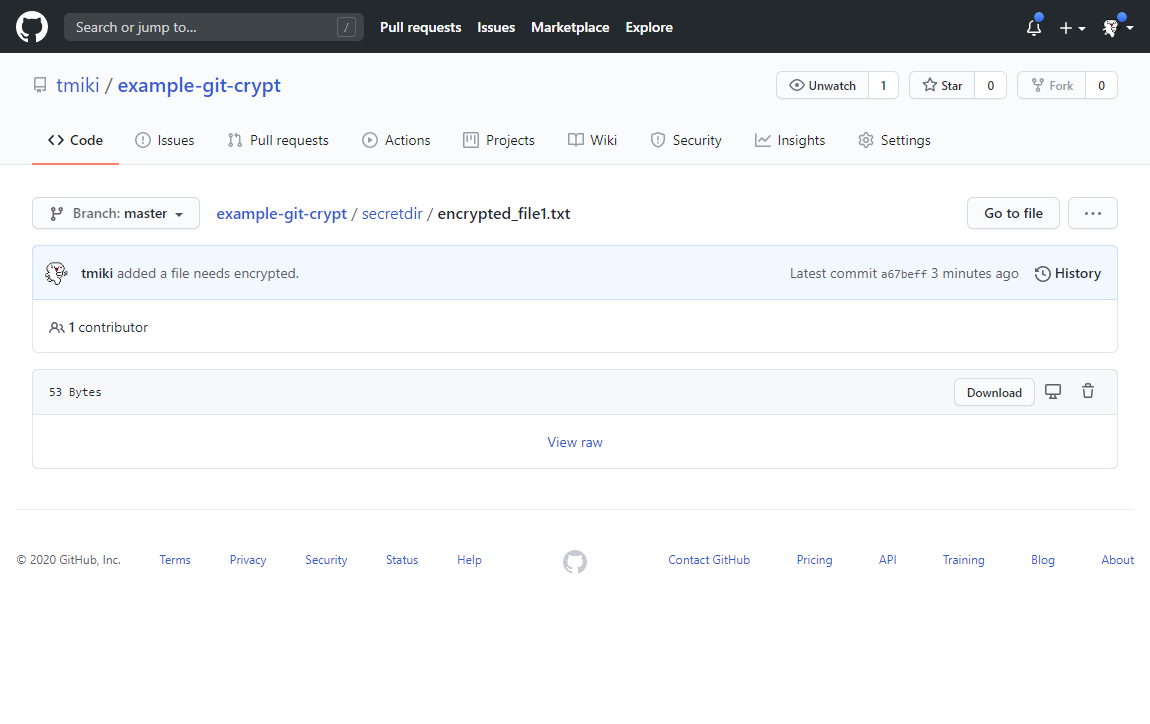
WebブラウザでGitHub上のファイルを参照します。サイズが違っていること、バイナリファイルとなっていることが確認できます。
3. 対象鍵をExportする(ユーザ1の作業)
上記までの作業を実施することで、ユーザ1の環境において、git-cryptを利用してファイルの透過的な暗号化/復号を実現することができました。
他のユーザも同様に利用できるようにする必要があります。
ユーザ1にて対象鍵をExportし、これを他のユーザで利用できる状態にする作業が必要となります。
対象鍵のExport手順は下記のとおりです。ユーザ1が実施します。
ホームディレクトリ直下に「user1_synmetric_key」というファイルが作成されますので、これを他のユーザに安全な手段で渡して、利用してもらうこととなります。
$ git-crypt export-key ~/user1_synmetric_key
4. 対象鍵の利用(ユーザ2の作業)
対象のGitリポジトリを利用するユーザの作業となります。具体的に以下の作業を実施することとなります。
- GitリポジトリのClone
- 対象鍵を利用できる状態にする
4-1. GitリポジトリをCloneする
先ほどユーザ1がセットアップしたGitリポジトリをCloneします。
$ git clone https://github.com/tmiki/example-git-crypt.git
併せて、先ほど暗号化して格納されたファイルを確認し、まだ暗号化された状態であることを確認します。
### ファイルサイズを確認し、平文のテキストの状態とは差異があることを確認
$ ls -l example-git-crypt/secretdir/encrypted_file1.txt
-rw-rw-r-- 1 vagrant vagrant 53 Jul  8 02:44 example-git-crypt/secretdir/encrypted_file1.txt

### fileコマンドでファイルの種類を確認し、バイナリファイルであることを確認
$ file example-git-crypt/secretdir/encrypted_file1.txt
example-git-crypt/secretdir/encrypted_file1.txt: data

### stringsコマンドで、文字列として表示できるキャラクタのみを表示
$ strings example-git-crypt/secretdir/encrypted_file1.txt
GITCRYPT
4-2. Exportされた対象鍵を利用できる状態にする(git-crypt unlock)
ユーザ1からExportされた対象鍵をもらい、ユーザ2の環境のホームディレクトリに配置します。
Gitリポジトリ内で "$ git-crypt unlock {{対象鍵}}" コマンドを実行することで、ユーザ2も同様に透過的な暗号化/複合が実現できます。
$ ls -l ~/user1_synmetric_key
-rwxr-xr-x 1 vagrant vagrant 148 Jul  8 02:41 /home/vagrant/user1_synmetric_key
$ cd example-git-crypt/
$ git-crypt unlock ~/user1_synmetric_key
これで、ユーザ2環境側のセットアップも完了です。
4-3. 暗号化されたファイルを参照できることを試してみる
先ほどGit cloneした直後には暗号化されていたファイルが、平文テキストとして参照できることを確認します。
### ファイルサイズを参照し、平文テキストの文字数相当であることを確認
$ ls -l ./secretdir/encrypted_file1.txt
-rw-rw-r-- 1 vagrant vagrant 31 Jul  8 02:59 ./secretdir/encrypted_file1.txt

### ファイル内容を確認
$ cat ./secretdir/encrypted_file1.txt
This file should be encrypted.
4-4. 新たに暗号化したいファイルをCommit&Pushし、暗号化されるか試してみる
念のため、ユーザ2でファイルを作成・格納し暗号化されること、ユーザ1から透過的に参照できることを確認します。
$ echo "This file is created by user2." > ./secretdir/encrypted_file2.txt
GitリポジトリにCommit&Pushします。
$ git add ./secretdir/encrypted_file2.txt
$ git commit
$ git push origin master
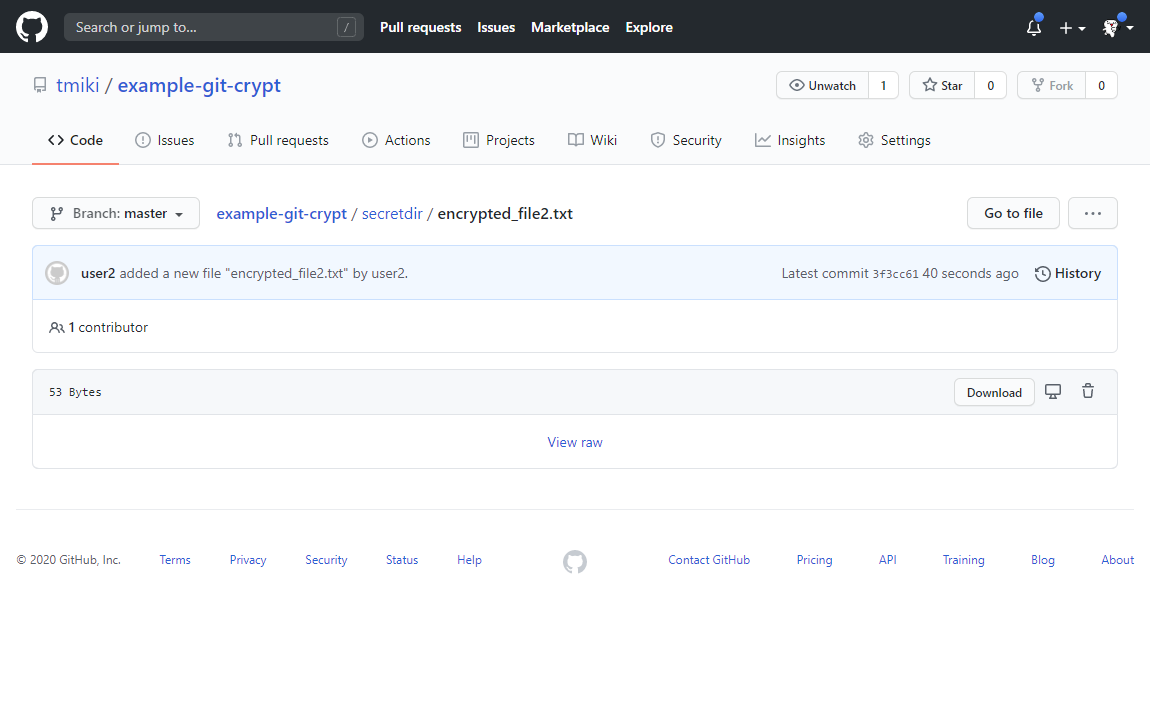
WebブラウザでGitHub上のファイルを参照します。先ほどと同様に、暗号化された状態で格納されていることを確認します。
次に、ユーザ1の環境で git pull を実行し、ユーザ2が格納した上記ファイルを平文で参照できることを確認します。
$ git pull
remote: Enumerating objects: 6, done.
remote: Counting objects: 100% (6/6), done.
remote: Compressing objects: 100% (3/3), done.
remote: Total 4 (delta 1), reused 4 (delta 1), pack-reused 0
Unpacking objects: 100% (4/4), 387 bytes | 15.00 KiB/s, done.
From https://github.com/tmiki/example-git-crypt
   a67beff..3f3cc61  master     -> origin/master
Updating a67beff..3f3cc61
Fast-forward
 secretdir/encrypted_file2.txt | Bin 0 -> 53 bytes
 1 file changed, 0 insertions(+), 0 deletions(-)
 create mode 100644 secretdir/encrypted_file2.txt
$ cat ./secretdir/encrypted_file2.txt
This file is created by user2.
これで、ユーザ1/ユーザ2とも、互いにファイルを格納し、透過的に暗号化/複合できることを確認できました。
トラブルシューティング
ユーザ2の環境で git clone したのち、git status等を実行すると下記のようなエラーが出力されることがあります。
"C:\\Users\\user1\\bin\\git-crypt.exe" smudge: 1: C:\Users\user1\bin\git-crypt.exe: not found
error: external filter '"C:\\Users\\user1\\bin\\git-crypt.exe" smudge' failed 127
error: external filter '"C:\\Users\\user1\\bin\\git-crypt.exe" smudge' failed
fatal: secretdir/encrypted_file1.txt: smudge filter git-crypt failed
これは、下記のように .git/config ファイル上のフィルタコマンドがフルパスで書かれていることが原因です。
リポジトリ作成後、 "git-crypt init" コマンドを実行すると、下記フィルタ設定が追加されますが、この際にフルパスになってしまうことがあるようです。
$ cat .git/config

[core]
        repositoryformatversion = 0
        filemode = true
        bare = false
        logallrefupdates = true
[remote "origin"]
        url = https://github.com/tmiki/example-git-crypt.git
        fetch = +refs/heads/*:refs/remotes/origin/*
[branch "master"]
        remote = origin
        merge = refs/heads/master

[filter "git-crypt"]
        smudge = \"C:\\\\Users\\\\user1\\\\bin\\\\git-crypt.exe\" smudge
        clean = \"C:\\\\Users\\\\user1\\\\bin\\\\git-crypt.exe\" clean
        required = true
[diff "git-crypt"]
        textconv = \"C:\\\\Users\\\\user1\\\\bin\\\\git-crypt.exe\" diff
実行コマンドはフルパスではなく、下記のように、コマンド名のみにすることで全環境対応することができます。
$ cat .git/config

[core]
        repositoryformatversion = 0
        filemode = true
        bare = false
        logallrefupdates = true
[remote "origin"]
        url = https://github.com/tmiki/example-git-crypt.git
        fetch = +refs/heads/*:refs/remotes/origin/*
[branch "master"]
        remote = origin
        merge = refs/heads/master
[filter "git-crypt"]
       smudge = \"git-crypt\" smudge
       clean = \"git-crypt\" clean
       required = true
[diff "git-crypt"]
       textconv = \"git-crypt\" diff
おわりに
いくつか下記のような課題が残っていますが、まずはAPI KeyやAWS SecretAccessKeyをそのままGitリポジトリに格納することを回避できるようになったため、良しとします。
- 対象鍵の管理をどうするか
- CI/CDによるデプロイをどうするか
- git-secretの方がメンテナンスされているので良いのではないか
- 他のツールの方が良いのではないか
- 対象ファイルはバイナリ扱いになり、差分の更新ができなくなるため、大きなファイルの扱いを考慮する必要がある
他に類似のツールとして以下のようなものがありますが、これらもそのうち試してみたいと思います。