K3sとは
Rancherによる軽量Kubernetesディストリビューション
https://k3s.io/
5 less than k8sといっているがいくつか追加で組み込まれている機能もある。
通常のK8sの要件は
2 GB or more of RAM per machine
となっているため、そこそこのVMでないと立てられないが、k3sは
512 MB of ram per server
200 MB of disk space
とだいぶ軽くなっている。
GCP無料枠
https://cloud.google.com/free/
無料枠で使えるGCEインスタンス(VM)は
1 f1-micro インスタンス(1 か月あたり、米国リージョン us-central1、us-east1、us-west1 のみ)
30 GB の HDD(期間合計)
5 GB のスナップショット(期間合計、一部のリージョン)
1 GB の北米から全リージョン宛ての下りネットワーク(1 か月あたり、中国とオーストラリアを除く)
f1-microはvCPU x 1、メモリ 0.6 GBなのでk3sならいけるはず!
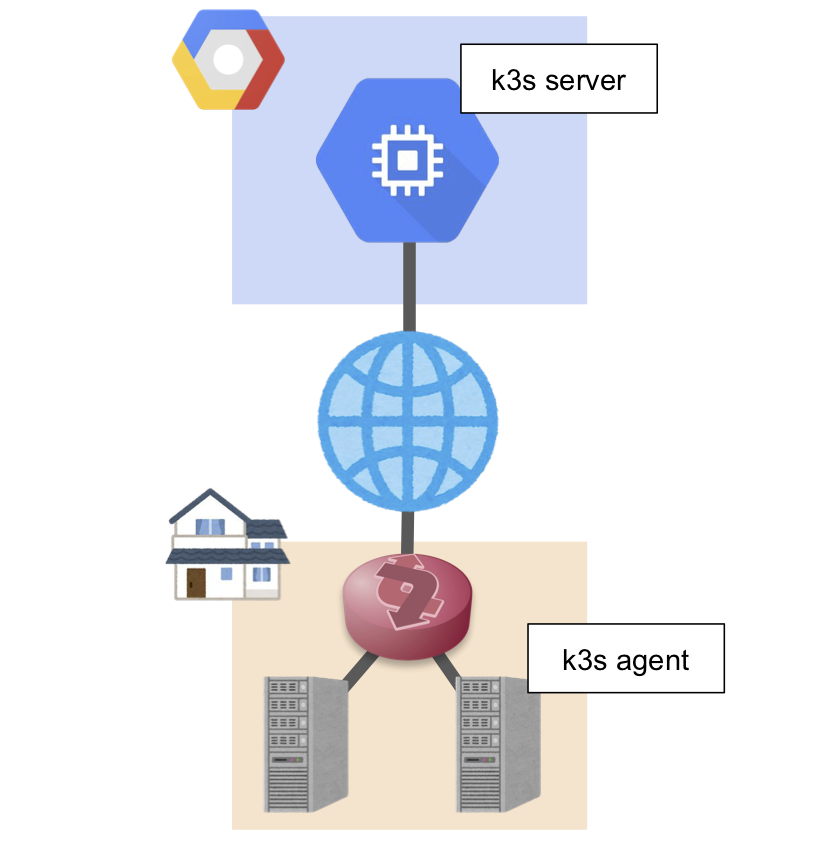
全体構成

GCE上にはK8sのコントロールプレーンをデプロイし、グローバルIPを持つ。おうちのサーバはワーカーノードとして動かす。おうちなのでNAT配下にありプライベートIPしか持たない。
構築
k3s server
まずコントロールプレーンを構築する。
今回は以下のスペックで作成した。
- f1-micro
- 10GB HDD
- us-west1
- Debian
外部からアクセスするためにはTCP6443ポートを開けておく必要があるので、ファイアーウォールを開けておく。
- Firewall Rule: 0.0.0.0/0 tcp:6443
インストール
$ curl -sfL https://get.k3s.io | INSTALL_K3S_EXEC="--disable-agent" sh -
SANの追加
k3sはデフォルトでは自分から見えているIFのIP(プライベートIP)しかTLSのSANに追加しないので、オプションでグローバルIPを追加しておく。
[Unit]
Description=Lightweight Kubernetes
Documentation=https://k3s.io
After=network.target
[Service]
Type=notify
EnvironmentFile=/etc/systemd/system/k3s.service.env
ExecStartPre=-/sbin/modprobe br_netfilter
ExecStartPre=-/sbin/modprobe overlay
- ExecStart=/usr/local/bin/k3s server --disable-agent
+ ExecStart=/usr/local/bin/k3s server --disable-agent --tls-san {GLOBAL_IP}
KillMode=process
Delegate=yes
LimitNOFILE=infinity
LimitNPROC=infinity
LimitCORE=infinity
TasksMax=infinity
[Install]
WantedBy=multi-user.target
$ sudo systemctl daemon-reload
$ sudo systemctl restart k3s
トークンのチェック
agentを追加するときのトークンをチェックしておく。
$ cat /var/lib/rancher/k3s/server/node-token
k3s agent
おうちのインターネットにつながる好きなマシンで以下のようにしてagentをインストールする。
$ curl -sfL https://get.k3s.io | K3S_TOKEN={TOKEN} K3S_URL=https://{GLOBAL_IP}:6443 sh -
確認
うまく行っていればこれでちゃんと構築できているはず。
$ k3s kubectl get nodes
ちなみにk3sは立派なK8sなので、普通に他のPCからkubectlなどで操作できる。
コントロールプレーンにあるkubeconfigのserverのlocalhostをグローバルIPに変えて、普段使っているラップトップなどに入れてみよう。
 apiVersion: v1
 clusters:
 - cluster:
     certificate-authority-data: xxxxxx
-    server: https://localhost:6443
+    server: https://{GLOBAL_IP}:6443
   name: default
 contexts:
 - context:
     cluster: default
     user: default
   name: default
 current-context: default
 kind: Config
 preferences: {}
 users:
 - name: default
   user:
     password: xxxxxxx
     username: admin
これでどこでもおうちにあるK8sをVPNなしにいつでも操作できる!
注意点
- デフォルトではユーザー認証がpasswordになっているので少し弱いかも
- 無料枠がUSにしかないのでRTT厳しい
- 何もしてなくてもコントロールプレーンの通信がインターネットまたぎでされるので通信料に注意
- Kubeletの通信はTunnel Proxyでされるものの、コンテナネットワークにはノード同士のリーチャビリティが必要なのでそこのハイブリッドはもう少し色々考えないと難しい