5. RotorHazardのインストール
インストール後の確認
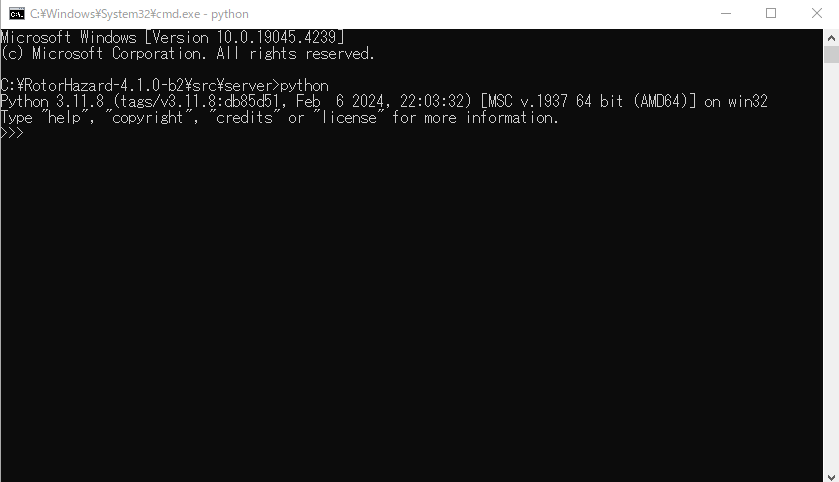
Python for Windowsをインストールしたら、バージョン確認等のコマンドでPathもちゃんと有効かを確認していきましょう。


そのまま C:¥RotorHazard-4.1.0-b2¥src¥server のパスでコマンドプロンプトが起動します。

ここで python とだけ打ち込みEnterし、下記のようにバージョン情報のお返事が返ってくればOKです。
RotorHazardプログラムのインストール
動きが確認できたら ctrl+Z なのでPythonのモードから抜け、先ほどのコマンドプロンプトにて下記を打ち込んでください。
python -m pip install -r reqsNonPi.txt
インストールがスタートしますと、意外と時間はかかりますのでゆっくり眺めてくださいねw ワイの環境では、後半途中でWarningが出ましたが、重要ではないかな?と思いスルーしてしまっています。

WARNINGメッセージは下記が出ていました。
WARNING: The script wsdump.exe is installed in 'C:\Users\mac\AppData\Roming\Python\Python311\Scripts' which is not no PATH.
Consider adding this directory to PATH or, if you prefer to suppress this warning. use --no-warn-script-location.
6. RotorHazardシステムの起動
設定ファイル (config.json) の準備と編集
いよいよRotorHazardシステムを起動しますが、最初にベース設定を実施します。エクスプローラで RotorHazar¥src¥server 以下にある config-dist.json を見つけてコピー、ファイル名を config.json に変更します。

そしてこの config.json ファイルを開いてまずは内容を確認します。
4行目、5行目はご自身が忘れないような管理者アカウントを記載してください。(セキュリティ上、必ず変更しましょう)

RotorHazardプログラムの起動
先ほどのコマンドプロンプトを用いて下記コマンドを打ち込みましょう。
python server.py
初期の起動では、Windows Defender Firewallが反応してポップアップが表示されるものと思います。ここは素直に 【アクセスを許可する】 をクリックしてください。

つづきはこちら