button要素にはtype属性を設定すべし
ボタン要素のtype属性を設定しなかった場合、デフォルト値であるsubmitが適用されます。
これはtype属性を設定していないボタンがフォームに含まれる場合、そのボタンの押下によって意図せずフォームデータが送信されるということです。
特にフォーム内において、そのボタンがフォームデータの送信のためのボタンではない単なるボタンである場合、type属性をbuttonに設定するべきです。
<form action="/test" method="post">
    <!-- 以下の2つのボタンはフォームデータを送信します -->
    <button type="submit" id="order" name="order">送信</button>
    <button id="hoge" name="hoge" onclick="hoge()">hoge</button>
    <!-- 以下のボタンはフォームデータを送信しません -->
    <button type="submit" id="huge" name="huge" onclick="huge()">huge</button>
</form>
type
このボタンの既定の動作です。以下の値が指定可能です。
submit: このボタンはフォームのデータをサーバーへ送信します。これはこの属性が <form> に関連付けられたボタンに指定されていない場合、またはこの属性が空であったり不正な値であったりした場合の既定値です。
(https://developer.mozilla.org/ja/docs/Web/HTML/Element/button より引用)
ボタンがサーバーにデータを送信するためのものでない場合は、 type 属性を button に設定することを忘れないでください。さもないと、フォームデータを送信して(存在しない)レスポンスを読み込み、文書の現在の状態を破棄してしまうおそれがあります。
(https://developer.mozilla.org/ja/docs/Web/HTML/Element/button より引用)
検証
type属性を設定していないボタンの押下によりフォームデータが送信されるか、簡単な画面を作って検証します。
3種類のボタンを設置します。
- お届け先を編集可能にするための【変更するボタン】
- クーポンを適用するための【適用するボタン】
- 注文情報を送信するための【注文確定ボタン】
フォームデータを送信するのは注文確定ボタンの役割です。フォームデータの送信先は自身とします。
<!-- 商品名、金額、決済方法の記述は省略します。 -->
<form method="post" action="">
    <div>
        <label for="customerInfo">お届け先:</label>
        <input type="text" id="customerInfo" name="customerInfo" value="<?= $customerInfo ?>" readonly>
        <button type="button" onclick="toggleEditMode('customerInfo')">変更する</button>
    </div>

    <label for="couponCode">クーポンコード:</label>
    <input type="text" id="couponCode" name="couponCode" value="<?= $couponCode ?>">
    <button type="button" onclick="applyCoupon()">適用する</button>

    <button type="submit" id="order" name="order">注文確定</button>
</form>
リクエストメソッドがPOSTであればアラートを表示するようにします。アラートはPOSTされたフォームデータを表示します。
// 商品名などのデフォルトの値は割愛します

// アラート表示
if ($_SERVER["REQUEST_METHOD"] == "POST") {
    $resultProductName = $_POST["productName"];
    $resultAmount = $_POST["amount"];
    $resultCustomerInfo = $_POST["customerInfo"];
    $resultPaymentMethod = $_POST["paymentMethod"];
    $resultCouponCode = $_POST["couponCode"];

    echo '<script>';
    echo 'alert("注文ありがとうございます。\n\n';
    echo '商品名: ' . $resultProductName . '\n';
    echo '金額: ¥' . $resultAmount . '\n';
    echo 'お届け先: ' . $resultCustomerInfo . '\n';
    echo '決済方法: ' . $resultPaymentMethod . '\n';
    echo 'クーポンコード: ' . $resultCouponCode . '");';
    echo '</script>';
}
変更するボタン、適用するボタンは検証用の簡単な作りとします。
変更するボタンはお届け先のreadonly属性を外し、お届け先の編集を可能にします。
適用するボタンは入力されたクーポンコードを適用して割引を行うボタンです。今回はクーポンコードによらず、金額を100円引きするようにします。
function toggleEditMode(elementId) {
    var element = document.getElementById(elementId);
    var button = element.nextElementSibling;
    element.readOnly = !element.readOnly;
    button.textContent = element.readOnly ? "変更する" : "保存する";
}

function applyCoupon() {
    var amountElement = document.getElementById('amountDisplay');
    var currentAmount = parseInt(amountElement.innerText.replace('¥', ''));
    var newAmount = currentAmount - 100;
    amountElement.innerText = '¥' + newAmount;
}
以下の手順を踏むことにより検証します。
- お届け先を編集する
- クーポンコードを入力して適用する
- 注文を確定する
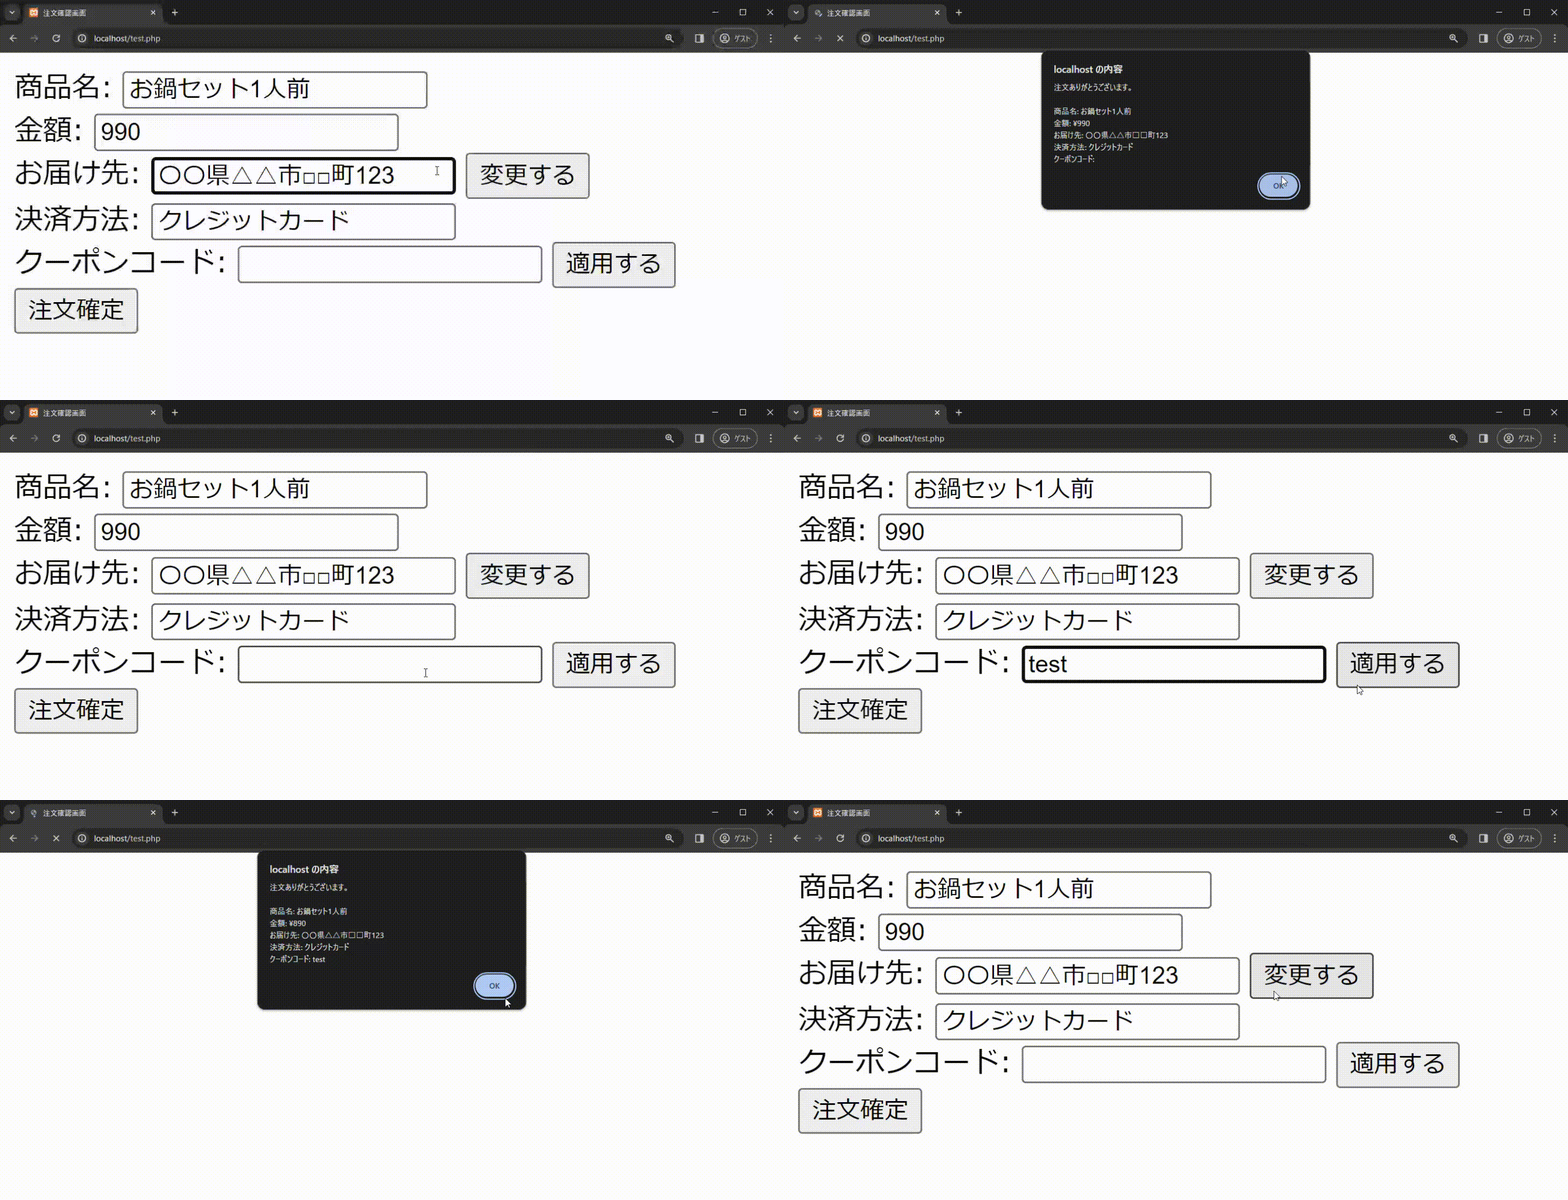
まずは変更するボタン、適用するボタンにtype="button"を設定して検証します。

問題なく手順を踏むことができました。
次に変更するボタン、適用するボタンのtype="button"を外して検証します。
<!-- 商品名、金額、決済方法の記述は省略します。 -->
<form method="post" action="">
    <div>
        <label for="customerInfo">お届け先:</label>
        <input type="text" id="customerInfo" name="customerInfo" value="<?= $customerInfo ?>" readonly>
        <button onclick="toggleEditMode('customerInfo')">変更する</button>
    </div>

    <label for="couponCode">クーポンコード:</label>
    <input type="text" id="couponCode" name="couponCode" value="<?= $couponCode ?>">
    <button onclick="applyCoupon()">適用する</button><br>

    <button type="submit" id="order" name="order">注文確定</button>
</form>
変更するボタンの押下後にフォームデータが送信されました。適用するボタンも同様です。これはtype属性にデフォルト値であるsubmitが適用され、フォームデータの送信が行われたということです。
これら2つのボタンによって注文が確定してはなりません。フォームデータの送信を意図しないボタンには、type="button"を設定する必要があることが分かります。
感想
仮にデフォルト値を把握していて意図的に省略したとしても、未来の自分を含む誰かがコピペしてやらかす可能性は0ではないと思いますので、明示的に設定した方が良いのではないでしょうか。
検証では注文確認画面というセンシティブな画面を敢えて選びました。この類の画面は念入りに試験されると思いますが、万が一のことがあればと思うと、血の気が引きますね。
ボタンを設置する際の参考にしていただければ幸いです。

