概要
WindowsServerをなんども作り直す際に、毎回パスワード設定やエディション選択をするのが、面倒だったので手動操作無くインストールを完了したいと思った。
Windowsには自動応答ファイルというものがあるらしく、それを使ってWindowsServerの自動インストールを実施してみた際のメモ。
環境
- ISO作成環境:Windows11
- ISOテスト環境:Hyper-V (Windows11上)
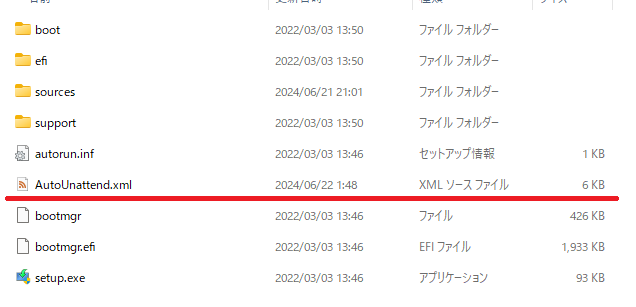
(1)インストールイメージからファイルを取り出す
まずは、WindowsのインストールイメージのISOからファイルを取り出す(7zipなどで)
解凍した直下にAutoUnattend.xml (これから作っていく)という名前で自動応答ファイルを配置することで記載した内容をキー入力なしで設定することが可能となる
WindowsServer2022だと以下のような形になる
(2)WindowsADKのインストール
公式ページよりダウンロードしてくる
今回必要となるツールは以下の2つで、いずれもWindowsADKのDeploymentToolsに含まれている
- Windowsシステムイメージマネージャー (自動応答ファイルの作成に利用)
- oscdimg (カスタマイズしたISOを作成する際に使用)
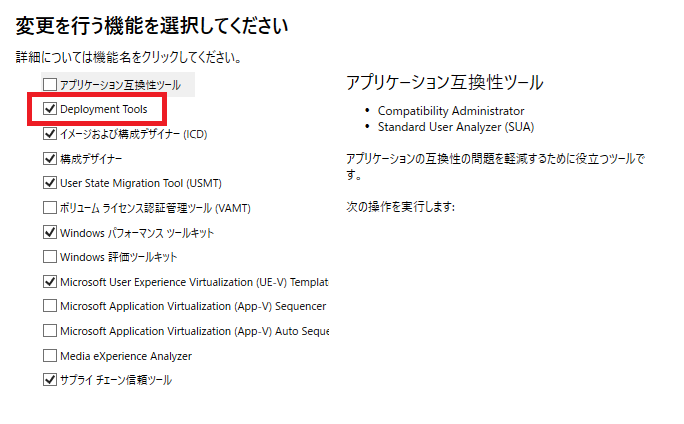
インストールが終わるとWindowsシステムイメージマネージャーが利用可能になっている

(3)自動応答ファイルの作成
自動応答ファイルの形式はXML形式のため、正しい内容を記載すれば動作はするのだが、
直感的な内容ではないのでWindowsシステムイメージマネージャーを使って作成とテストを行う。
筆者はベースをChatGPTで生成し、微修正しなから、WindowsSIMで読み込んでテストを行うというループである程度目的とする機能の実装ができた。(作成した自動応答ファイルを読み込むとテストされる)
WindowsServer2022 Standardエディション(Core)を評価版ライセンスでインストールまでができた例は以下となる
<?xml version="1.0" encoding="utf-8"?>
<unattend xmlns="urn:schemas-microsoft-com:unattend" xmlns:wcm="http://schemas.microsoft.com/WMIConfig/2002/State" xmlns:xsi="http://www.w3.org/2001/XMLSchema-instance">
   <settings pass="windowsPE">
       <component name="Microsoft-Windows-Setup" processorArchitecture="amd64" publicKeyToken="31bf3856ad364e35" language="neutral" versionScope="nonSxS">
           <ImageInstall>
               <OSImage>
                   <InstallFrom>
                       <MetaData wcm:action="add">
                           <Key>/IMAGE/NAME</Key>
                           <Value>Windows Server 2022 SERVERSTANDARDCORE</Value>
                       </MetaData>
                   </InstallFrom>
                   <InstallTo>
                       <DiskID>0</DiskID>
                       <PartitionID>1</PartitionID>
                   </InstallTo>
                   <WillShowUI>OnError</WillShowUI>
               </OSImage>
           </ImageInstall>
           <DiskConfiguration>
               <WillShowUI>OnError</WillShowUI>
               <Disk wcm:action="add">
                   <DiskID>0</DiskID>
                   <WillWipeDisk>true</WillWipeDisk>
                   <CreatePartitions>
                       <CreatePartition wcm:action="add">
                           <Order>1</Order>
                           <Type>Primary</Type>
                           <Extend>true</Extend>
                       </CreatePartition>
                   </CreatePartitions>
                   <ModifyPartitions>
                       <ModifyPartition wcm:action="add">
                           <Active>true</Active>
                           <Format>NTFS</Format>
                           <Label>System</Label>
                           <Order>1</Order>
                           <PartitionID>1</PartitionID>
                       </ModifyPartition>
                   </ModifyPartitions>
               </Disk>
           </DiskConfiguration>
           <UserData>
               <AcceptEula>true</AcceptEula>
               <FullName>Administrator</FullName>
               <Organization>★★★★★★★★</Organization>
           </UserData>
       </component>
       <component name="Microsoft-Windows-International-Core-WinPE" processorArchitecture="amd64" publicKeyToken="31bf3856ad364e35" language="neutral" versionScope="nonSxS">
           <SetupUILanguage>
               <UILanguage>ja-JP</UILanguage>
           </SetupUILanguage>
           <InputLocale>ja-JP</InputLocale>
           <SystemLocale>ja-JP</SystemLocale>
           <UILanguage>ja-JP</UILanguage>
           <UserLocale>ja-JP</UserLocale>
       </component>
   </settings>
   <settings pass="specialize">
       <component name="Microsoft-Windows-International-Core" processorArchitecture="amd64" publicKeyToken="31bf3856ad364e35" language="neutral" versionScope="nonSxS">
           <InputLocale>ja-JP</InputLocale>
           <SystemLocale>ja-JP</SystemLocale>
           <UILanguage>ja-JP</UILanguage>
           <UILanguageFallback>en-US</UILanguageFallback>
           <UserLocale>ja-JP</UserLocale>
       </component>
       <component name="Microsoft-Windows-Shell-Setup" processorArchitecture="amd64" publicKeyToken="31bf3856ad364e35" language="neutral" versionScope="nonSxS">
           <TimeZone>Tokyo Standard Time</TimeZone>
       </component>
   </settings>
   <settings pass="oobeSystem">
       <component name="Microsoft-Windows-International-Core" processorArchitecture="amd64" publicKeyToken="31bf3856ad364e35" language="neutral" versionScope="nonSxS">
           <InputLocale>ja-JP</InputLocale>
           <SystemLocale>ja-JP</SystemLocale>
           <UILanguage>ja-JP</UILanguage>
           <UserLocale>ja-JP</UserLocale>
       </component>
       <component name="Microsoft-Windows-Shell-Setup" processorArchitecture="amd64" publicKeyToken="31bf3856ad364e35" language="neutral" versionScope="nonSxS">
           <OOBE>
               <HideEULAPage>true</HideEULAPage>
               <HideWirelessSetupInOOBE>true</HideWirelessSetupInOOBE>
               <ProtectYourPC>1</ProtectYourPC>
           </OOBE>
           <UserAccounts>
               <AdministratorPassword>
                   <Value>★★★★★★★★★★★★=</Value>
                   <PlainText>false</PlainText>
               </AdministratorPassword>
           </UserAccounts>
           <TimeZone>Tokyo Standard Time</TimeZone>
       </component>
   </settings>
   <cpi:offlineImage cpi:source="wim:c:/iso/win2022/sources/install.wim#Windows Server 2022 SERVERSTANDARDCORE" xmlns:cpi="urn:schemas-microsoft-com:cpi" />
</unattend>
AdministratorのパスワードはWindowsシステムイメージマネージャーに入力(普通に設定したい文字列)して自動応答ファイルを、保存すれば適した形式に変換して自動応答ファイルを出力してくれる

(4)ISOを作る
起動可能なISOを作る必要があり、oscdimgというツールを使う
筆者の環境では環境変数で以下にパスを通した
C:\Program Files (x86)\Windows Kits\10\Assessment and Deployment Kit\Deployment Tools\amd64\Oscdimg
コマンドの構造は、以下のようなイメージで、
oscdimg [フォーマットなどの細々としたオプション] [作成するISOのデータを置いている場所のetfsboot.com] [ISOに入れたいファイルの場所] [作成するISOの保存先と名前]
以下のようなコマンドで作成することができた
oscdimg -m -o -u2 -udfver102 -bootdata:2#p0,e,bC:\ISO\win2022\boot\etfsboot.com#pEF,e,bC:\ISO\win2022\efi\microsoft\boot\efisys.bin C:\ISO\win2022 C:\ISO\Win2022_Custom.iso

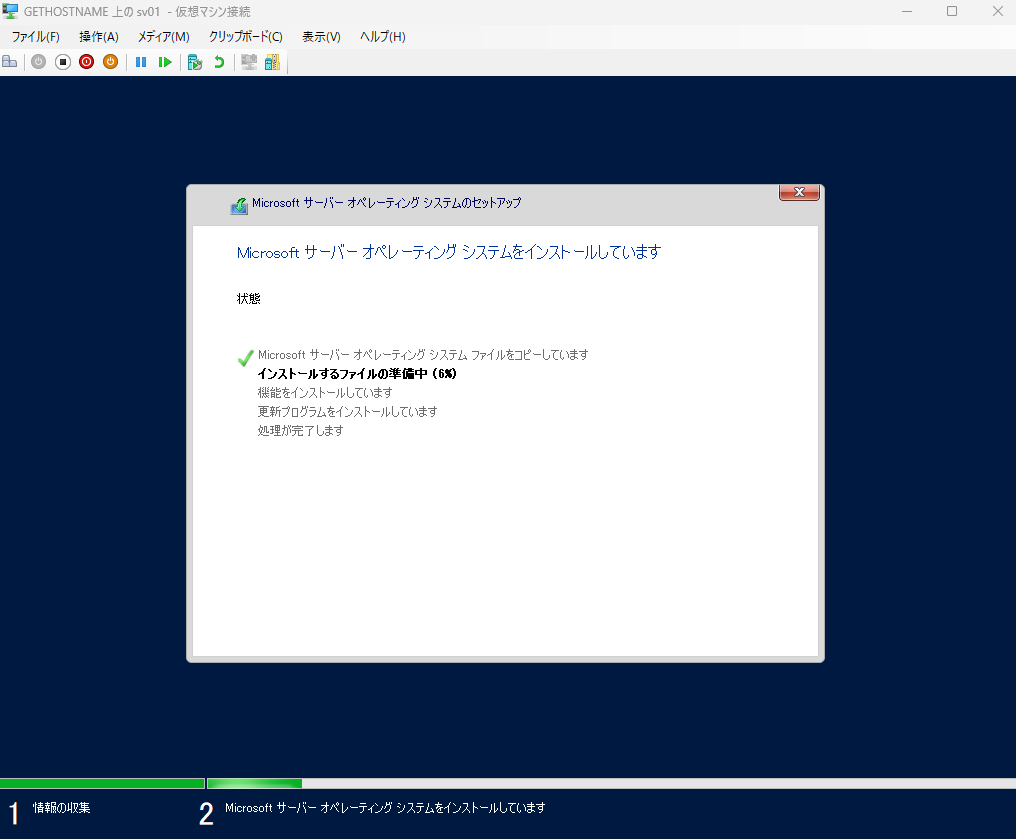
(5)テスト
正常に作成できていれば、特にキー操作することなくインストールが実行され必要に応じて再起動等されてインストールが完了する

(おまけ)初回ログイン時実行コマンドでHyper-Vのインストールを足してみた
FirstLogonCommandsというものを足すと初回ログイン時に任意コマンドが実行可能で、以下のような形でHyper-Vのインストールができた。(TimeZoneの下あたりに足す)
            <FirstLogonCommands>
                <SynchronousCommand wcm:action="add">
                    <Order>1</Order>
                    <CommandLine>cmd /c "powershell -ExecutionPolicy Bypass -Command Install-WindowsFeature -Name Hyper-V -IncludeManagementTools"</CommandLine>
                    <Description>Install Hyper-V and Management Tools</Description>
                </SynchronousCommand>
            </FirstLogonCommands>