概要
PythonのフレームワークであるDjangoでアプリを作ってherokuに更改するまでをまとめてみた。
今回は参考用のため必要最低限のことしか記載しておりません。
前提
仮想環境で構築しておりますが、仮想環境以外でも同様の事が可能です。
Python 3.7.12
手順
djangoのインスストール
% cd (作業用のディレクトリ)
% pip install django
Djangoプロジェクトを始める
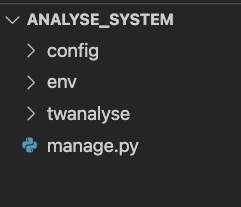
$django-admin startproject config .
これはconfigというフォルダ名で、Djangoプロジェクトをスタートするコマンドです。
フォルダ名はconfig出なくてもOK
最後の「.」は現在のディレクトリで作成するためオプション
これによりmanage.pyなどのファイルができる

アプリケーションを開始する
python manage.py startapp twanalyse
twanalyseは使用するアプリケーション名※任意
config/settings.pyの初期設定
事前にapps.pyのクラス名を確認しておく
class TwanalyseConfig(AppConfig):
    default_auto_field = 'django.db.models.BigAutoField'
    name = 'twanalyse'
先ほどのクラス名を含めた読み込ませる設定とその他の設定を行う
# 以下の項目を日本設定に書き換える
LANGUAGE_CODE = 'ja'
TIME_ZONE = 'Asia/Tokyo'

#追記する
INSTALLED_APPS = [
    'django.contrib.admin',
         ・・・
    'twanalyse.apps.TwanalyseConfig',
]
データベースを構築する
Djangoでデータベースを扱うには、以下の手順を実行する必要があります。
①models.pyでモデルを定義
②マイグレーションファイルを作成
③データベースのテーブルに反映
①models.pyでモデルを定義
使用するデータベースを作成する ※ログイン用のID、パスワードは別途作成するのでここでは作らない
# Create your models here.
class Post(models.Model):
  # ユーザーIDを入力するフィールド
  userId = models.CharField(max_length = 100)
  # auto_now_add=Trueでデータを作成した時に現在の日付を自動で設定する
  acquisition_date = models.DateTimeField(auto_now_add=True)
②マイグレーションファイルを作成
% python manage.py makemigrations
% python manage.py migrate
ここでDBを管理するためのスーパーユーザーを作成しておく
% python manage.py createsuperuser
③データベースのテーブルに反映
作成したテーブルを管理画面で使うための追加設定
from django.contrib import admin
# Postクラスを読み込む(Postはデータベースのカラムを定義したクラス)
from twanalyse.models import Post

# Register your models here.
admin.site.register(Post)
HTMLファイル(トップページ)を作成する
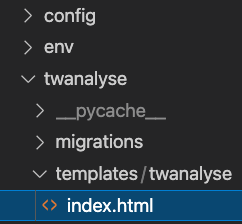
アプリケーションフォルダ/templates/アプリケーション名とフォルダを作りその中にHTMLファイルを作成する

中身を記載する
<h1>テスト</h1>
HTMLファイルを開くための設定をする
ユーザーがアクセスしてきた時にアプリケーションフォルダ内のurlsファイルを開く
from django.contrib import admin
from django.urls import path,include

urlpatterns = [
    path('admin/', admin.site.urls),
    # アプリケーションフォルダ内のurlsファイルを開く
    path("", include("twanalyse.urls"))
]
アプリケーション名/urls.pyを手動で作成し以下を記載する
from django.urls import path
from twanalyse.views import toppage

urlpatterns = [
  path("",toppage.as_view(),name="toppage")
]
アプリケーション名/views.pyにhtmlを描写するための記載をする
from django.shortcuts import render
from django.views.generic.base import TemplateView

# Create your views here.
class toppage(TemplateView):
  template_name = "twanalyse/index.html"
これで一応HTMLファイルの表示ができるようになる。
以下のコマンドで自前のローカルサーバーを起動する
% python manage.py runserver
これで「http://127.0.0.1:8000/」を開けばHTMLファイルの内容が表示されているのがわかる

これで一応ページが表示されるようになったが、このままではherokuにはあげられないため以下の設定をする(※詳しいデプロイ方法は次回以降に記載予定)
.gitignoreを設定する(必要に応じて)
gitやherokuで使用するためにgitignoreの設定をする
.env
*.pyc
db.sqlite3
myvenv
__pycache__
local_settings.py
Procfileを作成する
アプリーケーションフォルダ直下にProcfileファイルを作成する
以下の内容を記載する
web: gunicorn config.wsgi
あとはherokuの設定などをしていく