Filesystem in Userspace (FUSE) で、FUSE のカーネルモジュールとデーモン (Filesystem daemon) がどう通信しているかについて調べました。内容は Ubuntu 20.10 1 にて確認しました。
カーネルとデーモンの通信
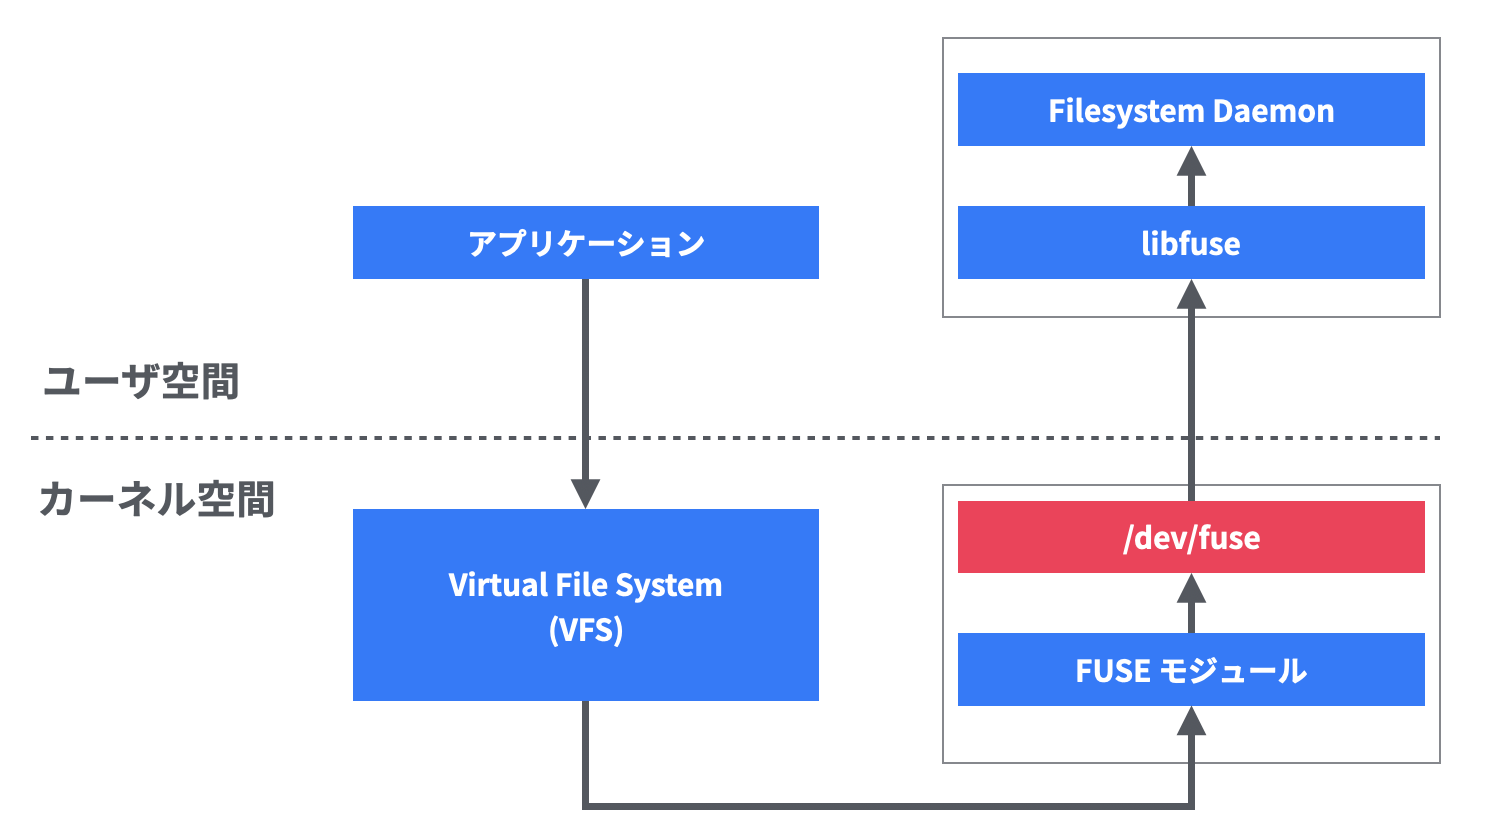
FUSE のカーネルモジュールと、デーモン (Filesystem Daemon) の通信は /dev/fuse という特別なキャラクタデバイスの読み書きによって行われます。
| コンポーネント | 内容 |
|---|---|
| アプリケーション | ファイル操作を行う実際のアプリケーション (e.g. ls, cat) |
| Virtual File System (VFS) | ファイルシステムの抽象化層。ファイル操作(open, stat, read など)のインタフェースを提供しており、それを実装したファイルシステムが ext4, tmpfs, fuse など |
| FUSE モジュール | FUSE を処理するカーネルモジュール。/dev/fuse を通して、ユーザ空間の Filesystem Daemon とやりとりする。Linux カーネルのレポジトリで管理されている
|
/dev/fuse |
カーネルと Filesystem Daemon のやり取りを中継する特別なデバイスファイル。詳細は後述 |
| libfuse |
/dev/fuse を読み書きし、Filesystem Daemon で定義されたファイル操作命令の関数を呼び出してくれるライブラリ |
| Filesystem Daemon | ユーザ空間で動く FUSE の実際のファイルシステム処理を担うデーモン (e.g. sshfs, s3fs) |
/dev/fuse の読み書き
/dev/fuse は group, other からも read/write できるパーミッション (666) となっています。fusermount (fusermount3) コマンドに Sticky bit が設定されていることと合わせて、非特権ユーザによる FUSE のマウントを可能としています。
$ ls -l /dev/fuse
crw-rw-rw- 1 root root 10, 229 Nov 30 00:23 /dev/fuse

$ ls -l /usr/bin/fusermount3
-rwsr-xr-x 1 root root 39144 Aug 20 13:16 /usr/bin/fusermount3
/dev/fuse にはmajor 10, minor 229 のデバイス番号が割り当てられており、デバイスのソースコードは Linux カーネルの fs/fuse/dev.c になります。
大まかな読み書きの流れは以下のループで行われます (libfuse の fuse_do_work)。
- Filesystem Daemon は libfuse を通して
/dev/fuseを read しブロックされた状態で操作リクエストを待つ (fuse_session_receive_buf_int) - 操作リクエストがあると read の内容としてリクエストの情報が読まれ、libfuse が定義された関数を呼び出す (fuse_session_process_buf_int)
- 操作の結果を
/dev/fuseに write で書き込む
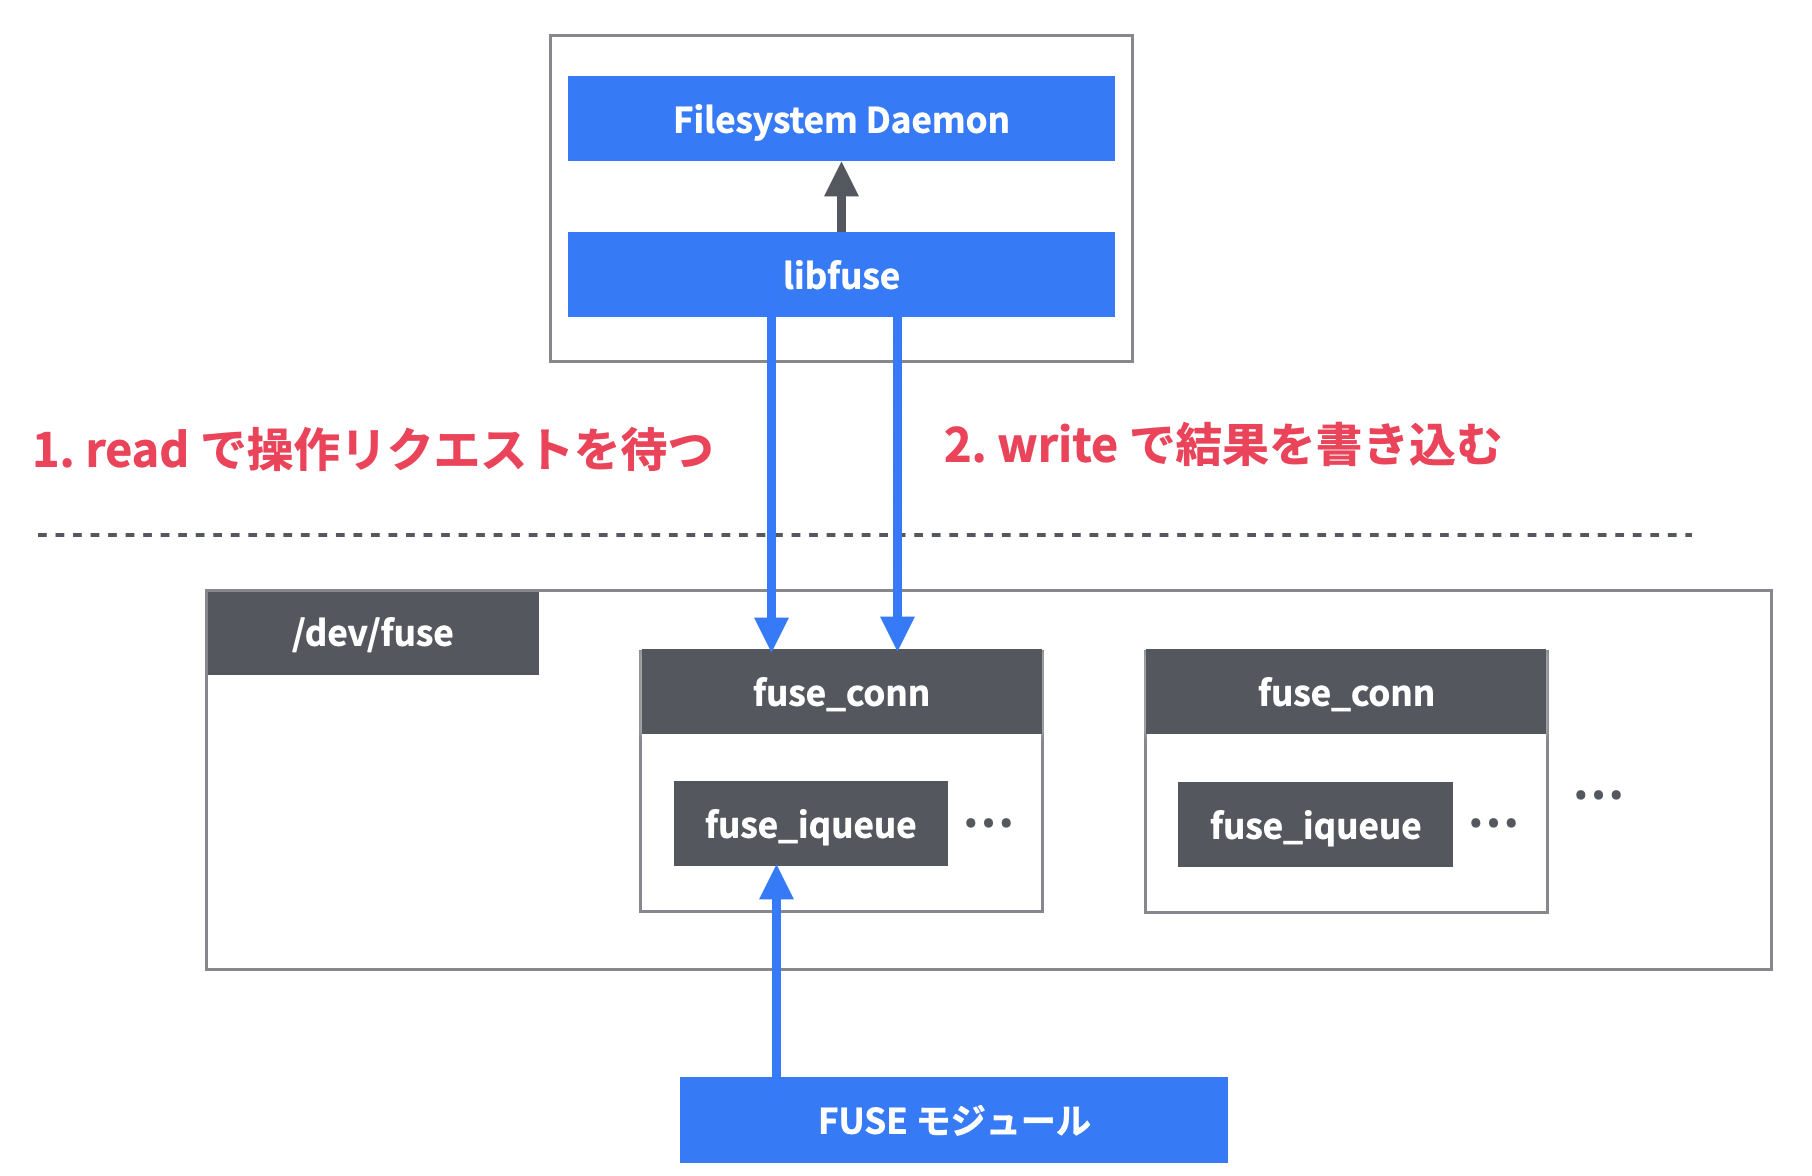
内部的には fuse_conn という構造体で、Filesystem Daemon とのコネクションを管理しています。このコネクションは Filesystem Daemon ごとに作成されます。コネクションは fuse_iqueue という入力キューを持っており、ファイル操作のリクエストを管理しています。
このコネクションの状態の一部は /sys/fs/fuse/connections/ で確認できます (fs/fuse/control.c)。
$ tree /sys/fs/fuse/connections/
/sys/fs/fuse/connections/
└── 51
    ├── abort
    ├── congestion_threshold
    ├── max_background
    └── waiting
データのプロトコル
/dev/fuse を読み書きする際のデータのプロトコルは以下のようになっています。個別のデータ部分に関しては include/fuse_kernel.h にある各種構造体をご覧ください。
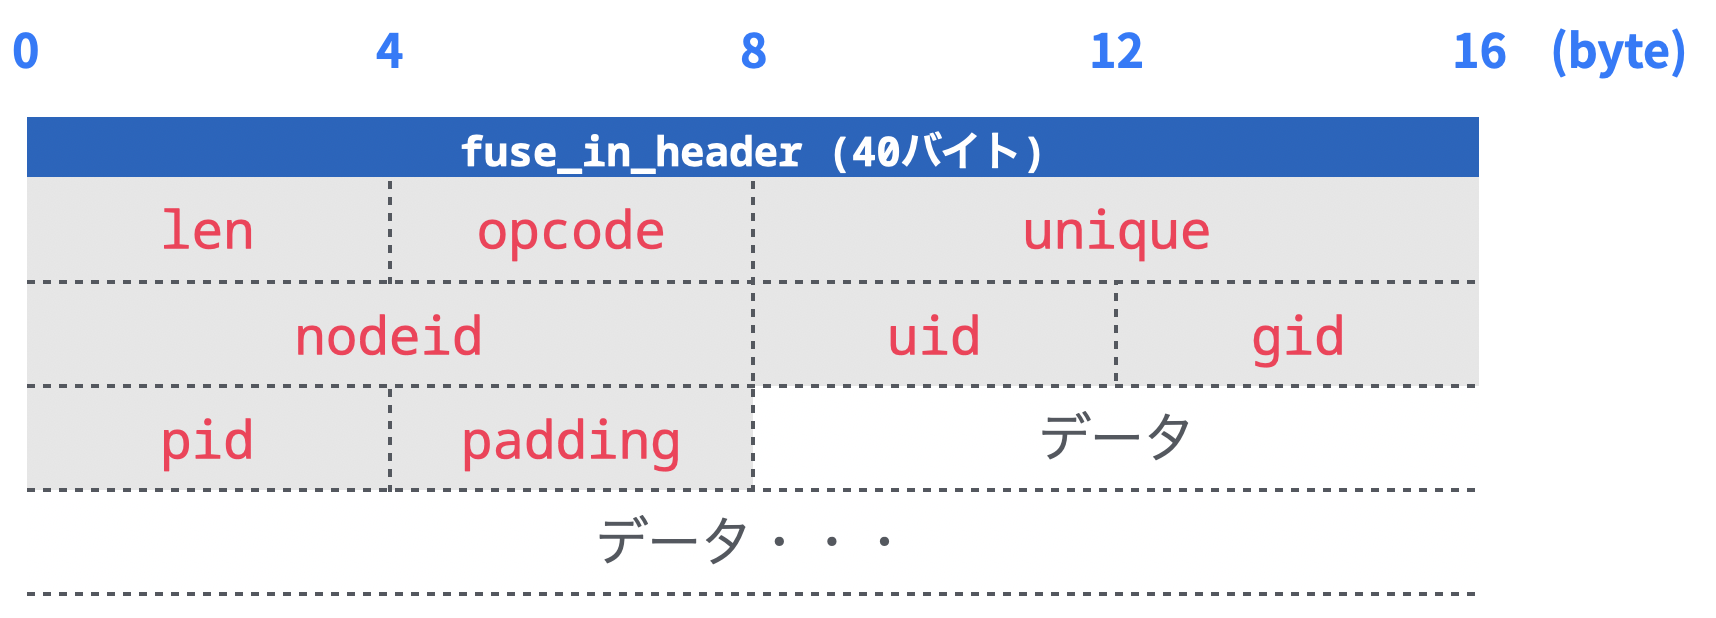
read
read は fuse_in_header という 40 バイトのヘッダに、処理ごとの個別データが続きます。
| 型 | フィールド | 内容 |
|---|---|---|
| uint32_t | len | ヘッダを含めたデータ長 |
| uint32_t | opcode | 操作の種類。一覧は enum fuse_opcode を参照 |
| uint64_t | unique | リクエストのユニークな数値。レスポンスにこの値を使う |
| uint64_t | nodeid | 操作するオブジェクトの Node ID |
| uint32_t | uid | 実行したユーザの UID |
| uint32_t | gid | 実行したユーザの GID |
| uint32_t | pid | 実行したプロセスの PID |
| uint32_t | padding | パディング |
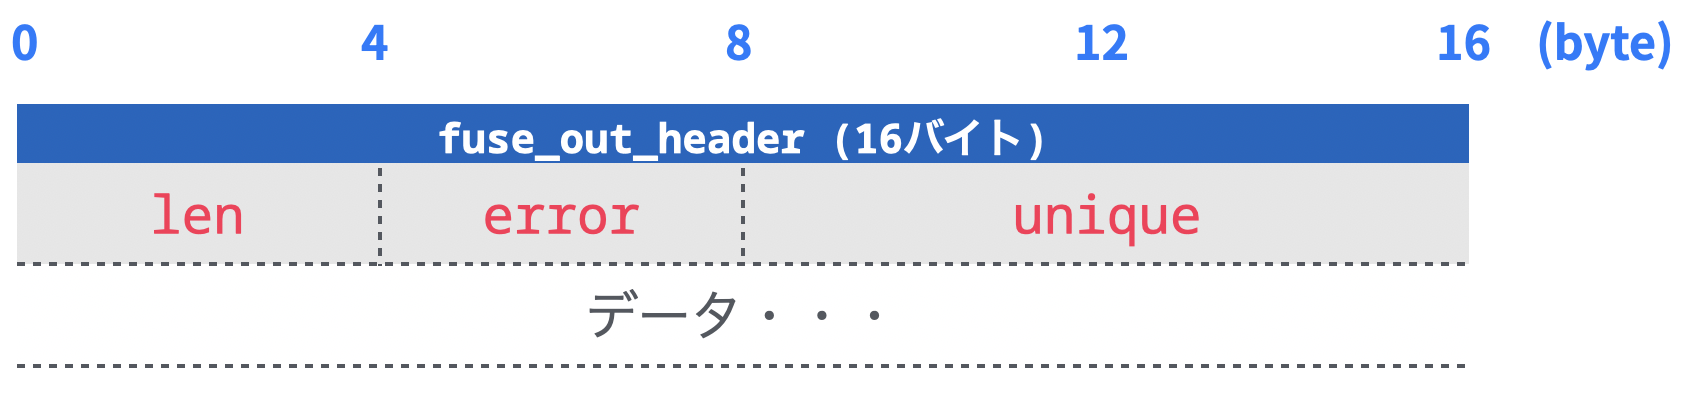
write
write は fuse_out_header という 16 バイトのヘッダに、処理ごとの個別データが続きます。
| 型 | フィールド | 内容 |
|---|---|---|
| uint32_t | len | ヘッダを含めたデータ長 |
| uint32_t | error |
errno に相当するエラー種別。正常な場合 0 |
| uint64_t | unique | リクエストのユニークな数値。レスポンスにこの値を使う |
実際に通信の内容を確認してみる
実際に strace で /dev/fuse の通信の内容を見てみました。
FUSE の hello world
今回は libfuse の Hello World 的なサンプルである example/hello.c を利用します。
以下のように fuse_operations 構造体にいくつかのファイル操作の関数が登録されています。なお登録できるファイル操作の一覧は include/fuse.h の fuse_operations 構造体の定義をご覧ください。
static const struct fuse_operations hello_oper = {
	.init       = hello_init,
	.getattr	= hello_getattr,
	.readdir	= hello_readdir,
	.open		= hello_open,
	.read		= hello_read,
};
FUSE デーモンを準備する
コンパイルに必要な依存パッケージをインストールします。(Ubuntu の例)
$ sudo apt install gcc pkg-config libfuse3-dev fuse3
example/hello.c を取得します。
$ mkdir -p work/hello-fuse
$ cd work/hello-fuse
$ curl https://raw.githubusercontent.com/libfuse/libfuse/master/example/hello.c -o hello.c
コンパイルします。
$ gcc -Wall hello.c `pkg-config fuse3 --cflags --libs` -o hello
基本動作を確認する
FUSE デーモン hello をマウントしてみます。
# マウント先を作成
$ mkdir -p $HOME/mount/hello

# FUSE デーモンを起動しマウント
$ ./hello $HOME/mount/hello
example/hello.c で定義された内容が見えることを確認します。
$ ls -l $HOME/mount/hello
total 0
-r--r--r-- 1 root root 13 Jan  1  1970 hello

$ cat $HOME/mount/hello/hello
Hello World!
定義されていないファイル操作は Function not implemented (ENOSYS) が返ります。
$ touch $HOME/mnt/hello/dummy
touch: cannot touch '/home/vagrant/mnt/hello/dummy': Function not implemented
一度アンマウントしておきます。
$ umount $HOME/mnt/hello
デバッグに便利なオプションを指定する
Filesystem Daemon の内容を確認したい場合、libfuse が用意している次のオプションを指定すると便利です。
| オプション | 内容 |
|---|---|
-d |
デバッグ表示を有効 (ファイル操作のリクエストが見える) |
-f |
フォアグラウンド実行 |
-s |
マルチスレッドを無効 |
このオプションを指定して、再度 ./hello を実行します。
$ ./hello -d -s -f $HOME/mnt/hello
別ターミナルで ls -l $HOME/mnt/hello を実行すると、複数のファイル操作の命令が来ていることが確認できます。
unique: 34, opcode: GETATTR (3), nodeid: 1, insize: 56, pid: 14333
getattr[NULL] /
   unique: 34, success, outsize: 120
unique: 36, opcode: OPENDIR (27), nodeid: 1, insize: 48, pid: 14333
   unique: 36, success, outsize: 32
unique: 38, opcode: READDIRPLUS (44), nodeid: 1, insize: 80, pid: 14333
readdirplus[0] from 0
   unique: 38, success, outsize: 496
unique: 40, opcode: LOOKUP (1), nodeid: 1, insize: 46, pid: 14333
LOOKUP /hello
getattr[NULL] /hello
   NODEID: 2
   unique: 40, success, outsize: 144
unique: 42, opcode: READDIR (28), nodeid: 1, insize: 80, pid: 14333
   unique: 42, success, outsize: 16
unique: 44, opcode: RELEASEDIR (29), nodeid: 1, insize: 64, pid: 0
   unique: 44, success, outsize: 16
/dev/fuse で読み書きした内容を見てみる
まず lsof を使って、このデーモンが /dev/fuse を開いていることを確認します。ファイルディスクリプタが 3 であることも確認できます。
$ lsof -p $(pgrep hello) | grep /dev/fuse
hello   14445 vagrant    3u   CHR 10,229      0t0     87 /dev/fuse
次に strace を実行します。--read, --write オプションで指定している 3 は /dev/fuse のファイルディスクリプタです。
$ sudo strace --read 3 --write 3 -p $(pgrep hello)
デーモンが /dev/fuse の FD 3 の read でブロックされていることがわかります。
read(3,
次に stat $HOME/mnt/hello/hello を実行して、ファイルの属性情報のみを表示してみます。stat は 1 ファイル操作命令で完了するので見やすいです。strace で以下を確認できます。
# ブロックされていた read がデータを読み込む
read(3,".\0\0\0\1\0\0\0\16\0\0\0\0\0\0\0\1\0\0\0\0\0\0\0\350\3\0\0\350\3\0\0"..., 1052672) = 46
 | 00000  2e 00 00 00 01 00 00 00  0e 00 00 00 00 00 00 00  ................ |
 | 00010  01 00 00 00 00 00 00 00  e8 03 00 00 e8 03 00 00  ................ |
 | 00020  4f 3a 00 00 00 00 00 00  68 65 6c 6c 6f 00        O:......hello.   |

# libfuse のデバッグ表示
write(2, "unique: 14, opcode: LOOKUP (1), "..., 66) = 66
write(2, "LOOKUP /hello\n", 14)         = 14
write(2, "getattr[NULL] /hello\n", 21)  = 21
write(2, "   NODEID: 2\n", 13)          = 13
write(2, "   unique: 14, success, outsize:"..., 37) = 37

# ファイルの属性情報を書き込む
writev(3, [{iov_base="\220\0\0\0\0\0\0\0\16\0\0\0\0\0\0\0", iov_len=16}, {iov_base="\2\0\0\0\0\0\0\0\0\0\0\0\0\0\0\0\1\0\0\0\0\0\0\0\1\0\0\0\0\0\0\0"..., iov_len=128}], 2) = 144
 * 16 bytes in buffer 0
 | 00000  90 00 00 00 00 00 00 00  0e 00 00 00 00 00 00 00  ................ |
 * 128 bytes in buffer 1
 | 00000  02 00 00 00 00 00 00 00  00 00 00 00 00 00 00 00  ................ |
 | 00010  01 00 00 00 00 00 00 00  01 00 00 00 00 00 00 00  ................ |
 | 00020  00 00 00 00 00 00 00 00  02 00 00 00 00 00 00 00  ................ |
 | 00030  0d 00 00 00 00 00 00 00  00 00 00 00 00 00 00 00  ................ |
 | 00040  00 00 00 00 00 00 00 00  00 00 00 00 00 00 00 00  ................ |
 | 00050  00 00 00 00 00 00 00 00  00 00 00 00 00 00 00 00  ................ |
 | 00060  00 00 00 00 24 81 00 00  01 00 00 00 00 00 00 00  ....$........... |
 | 00070  00 00 00 00 00 00 00 00  00 00 00 00 00 00 00 00  ................ |

# 次のリクエスト待ち
read(3,
以下で read, write の内容をそれぞれ見ていきます。
read のリクエスト内容
最初の read が操作のリクエストになります。
# ブロックされていた read がデータを読み込む
read(3,".\0\0\0\1\0\0\0\16\0\0\0\0\0\0\0\1\0\0\0\0\0\0\0\350\3\0\0\350\3\0\0"..., 1052672) = 46
 | 00000  2e 00 00 00 01 00 00 00  0e 00 00 00 00 00 00 00  ................ |
 | 00010  01 00 00 00 00 00 00 00  e8 03 00 00 e8 03 00 00  ................ |
 | 00020  4f 3a 00 00 00 00 00 00  68 65 6c 6c 6f 00        O:......hello.   |
データの最初には fuse_in_header という 40 バイトのヘッダが付きます。
struct fuse_in_header { // 合計 40 バイト
	uint32_t	len;     // 2e 00 00 00 = 46 バイト (ヘッダ 40 バイト + データ 6 バイト)
	uint32_t	opcode;  // 01 00 00 00 = 1 は FUSE_LOOKUP を表す
	uint64_t	unique;  // 0e 00 00 00 00 00 00 00 = 14 リクエストごとにユニークな数値
	uint64_t	nodeid;  // 01 00 00 00 00 00 00 00 = 1 Inode ID
	uint32_t	uid;     // e8 03 00 00 = 1000 (実行したユーザの UID)
	uint32_t	gid;     // e8 03 00 00 = 1000 (実行したユーザの GID)
	uint32_t	pid;     // 4f 3a 00 00 = 14927 (実行したプロセスの PID)
	uint32_t	padding; // 00 00 00 00 パディング
};
残りのデータは操作 (opcode) ごとに扱いが違います。FUSE_LOOKUP の場合は、残りのデータファイル名として渡されます (do_lookup)。ここではヘッダの len に入る 46 バイトからヘッダの 40 バイトを引いた 6 バイトがデータ部分になります。
static void do_lookup(fuse_req_t req, fuse_ino_t nodeid, const void *inarg)
{
	char *name = (char *) inarg; // 68 65 6c 6c 6f 00 = hello + NULL
write のレスポンス内容
write の内容が操作リクエストに対するレスポンスになります。
writev(3, [{iov_base="\220\0\0\0\0\0\0\0\16\0\0\0\0\0\0\0", iov_len=16}, {iov_base="\2\0\0\0\0\0\0\0\0\0\0\0\0\0\0\0\1\0\0\0\0\0\0\0\1\0\0\0\0\0\0\0"..., iov_len=128}], 2) = 144
 * 16 bytes in buffer 0
 | 00000  90 00 00 00 00 00 00 00  0e 00 00 00 00 00 00 00  ................ |
 * 128 bytes in buffer 1
 | 00000  02 00 00 00 00 00 00 00  00 00 00 00 00 00 00 00  ................ |
 | 00010  01 00 00 00 00 00 00 00  01 00 00 00 00 00 00 00  ................ |
 | 00020  00 00 00 00 00 00 00 00  02 00 00 00 00 00 00 00  ................ |
 | 00030  0d 00 00 00 00 00 00 00  00 00 00 00 00 00 00 00  ................ |
 | 00040  00 00 00 00 00 00 00 00  00 00 00 00 00 00 00 00  ................ |
 | 00050  00 00 00 00 00 00 00 00  00 00 00 00 00 00 00 00  ................ |
 | 00060  00 00 00 00 24 81 00 00  01 00 00 00 00 00 00 00  ....$........... |
 | 00070  00 00 00 00 00 00 00 00  00 00 00 00 00 00 00 00  ................ |
データの最初には fuse_out_header という 16 バイトのヘッダが付きます。
struct fuse_out_header {
	uint32_t	len;      // 90 00 00 00 = 144 バイト (ヘッダ 16 バイト + データ 128 バイト)
	int32_t		error;    // 00 00 00 00 = 0 エラーなし (errno 相当)
	uint64_t	unique;   // 0e 00 00 00 00 00 00 00 = 14 リクエストに対応するユニークな数値
};
残りは残りのデータは操作 (opcode) ごとに扱いが違います。FUSE_LOOKUP の場合は、fuse_entry_out 構造体 (128 バイト)が返却されます。hello.c で stat 構造体に設定した値が fuse_attr フィールドの構造体に入っていることがわかります。
struct fuse_entry_out {
	uint64_t	nodeid;           // 02 00 00 00 00 00 00 00
	uint64_t	generation;       // 00 00 00 00 00 00 00 00
	uint64_t	entry_valid;      // 01 00 00 00 00 00 00 00 name のキャッシュタイムアウト
	uint64_t	attr_valid;       // 01 00 00 00 00 00 00 00 属性のキャッシュタイムアウト
	uint32_t	entry_valid_nsec; // 00 00 00 00
	uint32_t	attr_valid_nsec;  // 00 00 00 00
	struct fuse_attr attr;        // 属性を表す構造体 (88バイト)
};

struct fuse_attr {
	uint64_t	ino;        // 02 00 00 00 00 00 00 00
	uint64_t	size;       // 0d 00 00 00 00 00 00 00 = 13 = "Hello World!\n" の長さ
	uint64_t	blocks;     // 00 00 00 00 00 00 00 00
	uint64_t	atime;      // 00 00 00 00 00 00 00 00
	uint64_t	mtime;      // 00 00 00 00 00 00 00 00
	uint64_t	ctime;      // 00 00 00 00 00 00 00 00
	uint32_t	atimensec;  // 00 00 00 00
	uint32_t	mtimensec;  // 00 00 00 00
	uint32_t	ctimensec;  // 00 00 00 00
	uint32_t	mode;       // 24 81 00 00 = 33060 = S_IFREG (0100000) + 0444
	uint32_t	nlink;      // 01 00 00 00 = stbuf->st_nlink = 1
	uint32_t	uid;        // 00 00 00 00
	uint32_t	gid;        // 00 00 00 00
	uint32_t	rdev;       // 00 00 00 00
	uint32_t	blksize;    // 00 00 00 00
	uint32_t	padding;    // 00 00 00 00
};
さいごに
example/hello.c のような FUSE Daemon の実装を見てから、/dev/fuse でのやり取りを見てみることで、libfuse がうまくこの層を抽象化していることを実感しました。
FUSE 周りの実装の詳細とパフォーマンスについては、FAST '17 の発表 To FUSE or Not to FUSE: Performance of User-Space File Systems が非常に参考になりました。試験されているワークロードの多くでは、ネイティブの Ext4 に比べて 5 % の間に収まっているというのは驚きでした。FUSE の最適化についても述べられているので、ぜひご覧ください。
-
Linux 5.8.0-29, fuse3 3.9.3-1 ↩