はじめに
この投稿で実施してみたこと
Robot Frameworkというテスト自動化のフレームワークを使ってネットワーク関連の自動化をやってみました。
どんなことをしたのか
Cisco IOS-XRのルーターに対して、
・Robot Framework
・Netmiko
・textfsm
を用いて、簡単なネットワーク関連テストの自動化を実施してみました
各種プラットフォーム・ライブラリ紹介
Robot Framework
https://github.com/robotframework/robotframework
Python製のテスト自動化プラットフォームです。自分は以下の点に魅力を感じて今回試してみます
・テスト結果を綺麗にhtml形式で出力してくれること
・Pythonにてライブラリを拡張できること
特に一番上が大きくて、テスト結果を人に説明するときに、いちいちパワーポイントとかにまとめる必要がなくなるとか最高じゃね?って思って今回試してみました。
Netmiko
https://github.com/ktbyers/netmiko
マルチベンダーのネットワーク機器操作用のPythonライブラリです。
例えば、Cisco IOS-XR機器に対して、
・SSHでログインして
・showコマンドを叩いて
・configをcommitする
などができます、しかもマルチベンダーで!
textfsm
https://github.com/google/textfsm
Google先生が公開しているテンプレートベースのパーサーライブラリです。
これを用いて、ネットワーク機器から出力されるログをパースし、必要な情報のみを抜き出すことができます。
参考:http://kooshin.hateblo.jp/entry/2017/11/28/000800
テスト環境と試験シナリオ
テスト環境
今回は単純にCiscoのIOS XRvのdemo版を使ってテスト環境を構築しました。
僕のMacBook Proの性能が貧弱なので、XRvは1個のみ立ち上げています。
試験シナリオ
XRvが1個しかないので、以下のシナリオにて試験を実施します
- ルーター(XRv)にログインする
- Interface(Gi0/0/0/0)がupしていることを確認する
- Interface(Gi0/0/0/0)をshutdownする
- Interface(Gi0/0/0/0)がdownしていることを確認する
- Interface(Gi0/0/0/0)をno shutdownする
- Interface(Gi0/0/0/0)がupしていることを確認する
- ルーター(XRv)からログアウトする
Netmiko + textfsm部分の実装
何を実装すればよいのか?
上の試験シナリオを実施するためには、以下の機構が必要です
・ルーターにログイン/ログアウトすること
・ルーターにshowコマンド(show interface Gi0/0/0/0とか)を入力して、出力結果を受け取ること
・上記コマンドの出力結果から、Interfaceの状態がupしているかdownしているか判定すること
・ルーターのInterfaceをshutdown/no shutdownすること
どう実装したのか?
https://github.com/tktkban/rfdemo
にコードをおいておきました。以下なんとなくの詳細です。
クラス構造
class NetmikoOperator():
    ROBOT_LIBRARY_SCOPE = 'TEST SUITE'

    def __init__(self):
        self.net_connect = {}
dict型のself.net_connectには各ルーターのhostnameをkeyにした、NetmikoのHandlerを格納するようにしています。(詳細は後のopen_sessionメソッドを見てください)
これは、単一のルーターだけでなく、複数のルーターに同時にログインして試験をすることを意識しています。
今回の環境は僕の貧弱なPCのおかげで1台しか試験対象がいないためこの恩恵を得ることはできないですが、通常では複数台のルーターを用いて試験をしますよね!
Robot Framework用に、pythonを用いてライブラリを拡張するときにはhttp://robotframework.org/robotframework/latest/RobotFrameworkUserGuide.html#test-library-names
にあるように、pythonのファイル名とクラス変数名を一緒にしなければいけないという制約があるので、そこだけ気をつけてください。
また、途中にある、ROBOT_LIBRARY_SCOPE = 'TEST SUITE'は、
http://robotframework.org/robotframework/latest/RobotFrameworkUserGuide.html#test-library-scope
にあるtest libraryのscopeの定義です。デフォルトではTEST CASEというscopeなのですが、これでは各Test Case毎にインスタンスを生成しなおしてしまいます。。
つまり、
- ルーター(XRv)にログインする
- Interface(Gi0/0/0/0)がupしていることを確認する
というTest Caseのときに、1番目のTest CaseでNetmikoOperator()のインスタンスを作成して、NetmikoのHandlerを格納したとしても、次のTest Caseで再びインスタンスを生成する=初期化されるので、せっかくログインしたNetmikoのHandlerが削除され、ルーターからログアウトしてしまうのです!
これを解決するために、ROBOT_LIBRARY_SCOPE = 'TEST SUITE'としてTest Suite単位でインスタンスを生成する=Test Case毎にインスタンスを初期化しないようにしています。
ルーターにログイン/ログアウトする
    def open_session(self,ip,username,password,device,hostname):
        # open session to target device
        if hostname in self.net_connect:
            pass
        else:
            # make SSH session to router
            handler = {
                'device_type': device,
                'ip': ip,
                'username': username,
                'password': password,
                }
            self.net_connect[hostname] = ConnectHandler(**handler)
            print("[INFO] Successfully make SSH connection to {}".format(hostname))


    def close_session(self,hostname):
        # close existing session
        self.net_connect[hostname].disconnect()
        del self.net_connect[hostname]
        print("[INFO] Successfully close SSH connection to {}".format(hostname))
ここでは単純に与えられたIPアドレス、ユーザーネーム、パスワードを用いて、ルーターにログイン/ログアウトしているだけですね。
ルーターのInterfaceをshutdown/no shutdownする
    def commit_configlist(self,config,comment,hostname):
        # commit config to IOS-XR device
        output1 = self.net_connect[hostname].send_config_set(config)
        output2 = self.net_connect[hostname].send_command("show configuration")
        output3 = self.net_connect[hostname].commit(comment=comment)
        output4 = self.net_connect[hostname].exit_config_mode()
        print("[INFO] Successfully change config on {}".format(hostname))
        print("="*30)
        print(output1)
        print(output2)
        print(output3)
        print(output4)
        print("="*30)


    def shutdown_interface(self,ifname,comment,hostname):
        # shutdown interface
        configs = []
        configs.append("interface {}".format(ifname))
        configs.append(' shutdown')
        self.commit_configlist(configs,comment,hostname)
        print("[INFO] Successfully shutdown interface<{}> of {}".format(ifname,hostname))


    def noshutdown_interface(self,ifname,comment,hostname):
        # no shutdown interface
        configs = []
        configs.append("interface {}".format(ifname))
        configs.append(' no shutdown')
        self.commit_configlist(configs,comment,hostname)
        print("[INFO] Successfully unshutdown interface<{}> of {}".format(ifname,hostname))
単純にIOS-XRルーターのInterfaceをshutdown/no shutdownしているだけです。
Interfaceの状態を確認する
    def send_command(self,command,hostname):
        # send command to target device
        out = self.net_connect[hostname].send_command(command)
        print("[INFO] Successfully get output of command<{}> from {}".format(command,hostname))
        print("="*30)
        print(out)
        print("="*30)
        return out


    def check_if_state(self,ifname,hostname):
        # check target interface's state
        # return
        #  True  : if the interface is up
        #  False : if the interface is not up
        command = 'show interface %s' % format(ifname)
        ifstate_ouput = self.send_command(command,hostname)
        cli_table = clitable.CliTable('index', './template')
        attributes = {'Command': 'show interfaces', 'Vendor':'cisco_xr'}
        cli_table.ParseCmd(ifstate_ouput, attributes)
        ifstate_dict =  self.clitable_to_dict(cli_table)
        if ifstate_dict[0]["link_status"] == "up":
            return True
        else:
            return False


    def clitable_to_dict(self,cli_table):
        objs = []
        for row in cli_table:
            temp_dict = {}
            for index, element in enumerate(row):
                temp_dict[cli_table.header[index].lower()] = element
            objs.append(temp_dict)
        return objs
実際にInterfaceの状態を確認しているのは、def check_if_state()です。
実装としては単純に以下をしています
- IOS-XRルーターに"show interface [IF name]"を入力
- 出力結果をtextfsmを用いてパースして、辞書型の出力結果を得る
- Interfaceのlink_statusがupであれば、Trueを返す、そうでなければFalseを返す
textfsmの部分は以下です。
# First line is the header fields for columns and is mandatory.
# Regular expressions are supported in all fields except the first.
# Last field supports variable length command completion.
# abc[[xyz]] is expanded to abc(x(y(z)?)?)?, regexp inside [[]] is not supported
#
Template, Hostname, Vendor, Command
cisco_xr_show_interfaces.template, .*, cisco_xr, sh[[ow]] inte[[rfaces]]
Value Required INTERFACE (\S+)
Value LINK_STATUS (up|down|administratively down)
Value ADMIN_STATE (up|down|administratively down)
Value HARDWARE_TYPE (\w+)
Value ADDRESS ([a-zA-Z0-9]+.[a-zA-Z0-9]+.[a-zA-Z0-9]+)
Value BIA ([a-zA-Z0-9]+.[a-zA-Z0-9]+.[a-zA-Z0-9]+)
Value DESCRIPTION (.*)
Value IP_ADDRESS (\d+\.\d+\.\d+\.\d+\/\d+)
Value MTU (\d+)
Value DUPLEX (.+?)
Value SPEED (.+?)
Value BANDWIDTH (\d+\s+\w+)
Value ENCAPSULATION (\w+)

Start
  ^${INTERFACE}\sis\s+${LINK_STATUS},\s+line\sprotocol\sis\s+${ADMIN_STATE}
  ^\s+Hardware\s+is\s+${HARDWARE_TYPE}(\s+)?(Ethernet)?(,)?(\s+address\s+is\s+${ADDRESS}\s+\(bia\s+${BIA})?
  ^\s+Description:\s+${DESCRIPTION}
  ^\s+Internet\s+Address\s+is\s+${IP_ADDRESS}
  ^\s+MTU\s+${MTU}.*BW\s+${BANDWIDTH}
  ^\s+${DUPLEX}, ${SPEED},.+link
  ^\s+Encapsulation\s+${ENCAPSULATION}
  ^\s+Last -> Record
Robot Framworkを用いたテスト自動化
テストシナリオの実装
*** Settings ***
Library    OperatingSystem
Library    NetmikoOperator.py

*** Test Cases ***
Login to router
    OPEN SESSION    ${IP}    ${user}    ${pass}    cisco_xr    ${hostname}

Check if state : Initial check
    ${return}=    CHECK IF STATE    ${ifname}    ${hostname}
    Should Be True    ${return}

Shutdown Interface
    SHUTDOWN INTERFACE    ${ifname}    shutdown-interface    ${hostname}

Check if state : after shutdown
    ${return}=    CHECK IF STATE    ${ifname}    ${hostname}
    Should Not Be True    ${return}

No Shutdown Interface
    NOSHUTDOWN INTERFACE    ${ifname}    shutdown-interface    ${hostname}

Check if state : after no shutdown
    ${return}=    CHECK IF STATE    ${ifname}    ${hostname}
    Should Be True    ${return}

Logout from router
    CLOSE SESSION    ${hostname}
まずはSettingsの部分において、自身の作成したpythonファイルを読み込みます。
そのあとは非常にシンプルに、一番はじめに決めておいたテストケースを実装しているだけです。
Robot Frameworkの記法ははじめはわかりにくいかもしれないですが、上のテストケースは以下のpythonを実行していることと変わりません。
from NetmikoOperator import NetmikoOperator

# インスタンスを生成
hoge = NetmikoOperator()

# Login to router
hoge.open_session('192.168.1.34','test','test','cisco_xr','xrv1')

# Check if state : Initial check
out = hoge.check_if_state('Gi0/0/0/0','xrv1')
if out is True:
    print('PASS!')

# Shutdown Interface
hoge.shutdown_interface('Gi0/0/0/0','shutdown-interface','xrv1')

# Check if state : after shutdown
out = hoge.check_if_state('Gi0/0/0/0','xrv1')
if out is False:
    print('PASS!')

# No Shutdown Interface
hoge.noshutdown_interface('Gi0/0/0/0','shutdown-interface','xrv1')

# Check if state : after no shutdown
out = hoge.check_if_state('Gi0/0/0/0','xrv1')
if out is True:
    print('PASS!')

# Logout from router
hoge.close_session('xrv1')
こう見るとわかりやすいですよね??でも、同じことがpythonで定義できるなら、robot frameworkの意味とは?と思うかもしれません。では実際に起動してみましょう。
テストシナリオの実行
% robot -v IP:192.168.1.34 -v user:test -v pass:test -v hostname:xrv1 -v ifname:Gi0/0/0/0 ifshut_noshut.robot
==============================================================================
Ifshut Noshut
==============================================================================
Login to router                                                       | PASS |
------------------------------------------------------------------------------
Check if state : Initial check                                        | PASS |
------------------------------------------------------------------------------
Shutdown Interface                                                    | PASS |
------------------------------------------------------------------------------
Check if state : after shutdown                                       | PASS |
------------------------------------------------------------------------------
No Shutdown Interface                                                 | PASS |
------------------------------------------------------------------------------
Check if state : after no shutdown                                    | PASS |
------------------------------------------------------------------------------
Logout from router                                                    | PASS |
------------------------------------------------------------------------------
Ifshut Noshut                                                         | PASS |
7 critical tests, 7 passed, 0 failed
7 tests total, 7 passed, 0 failed
==============================================================================
Output:  /rfdemo/output.xml
Log:     /rfdemo/log.html
Report:  /rfdemo/report.html
上記のような出力結果で実行されます。各テストケースにおいて、PASS/FAILが表示され、最終的にどれだけPASS/FAILしたのか表示し、実行結果をxml/htmlにて出力します。
先に定義したrobotファイルでは、ルーターの情報(IPアドレス、ユーザーネーム、パスワードなど)は実行時に入力する必要があるので、-vにて各変数に値を入力しています。
では、出力された結果である、log.htmlを見てみましょう。
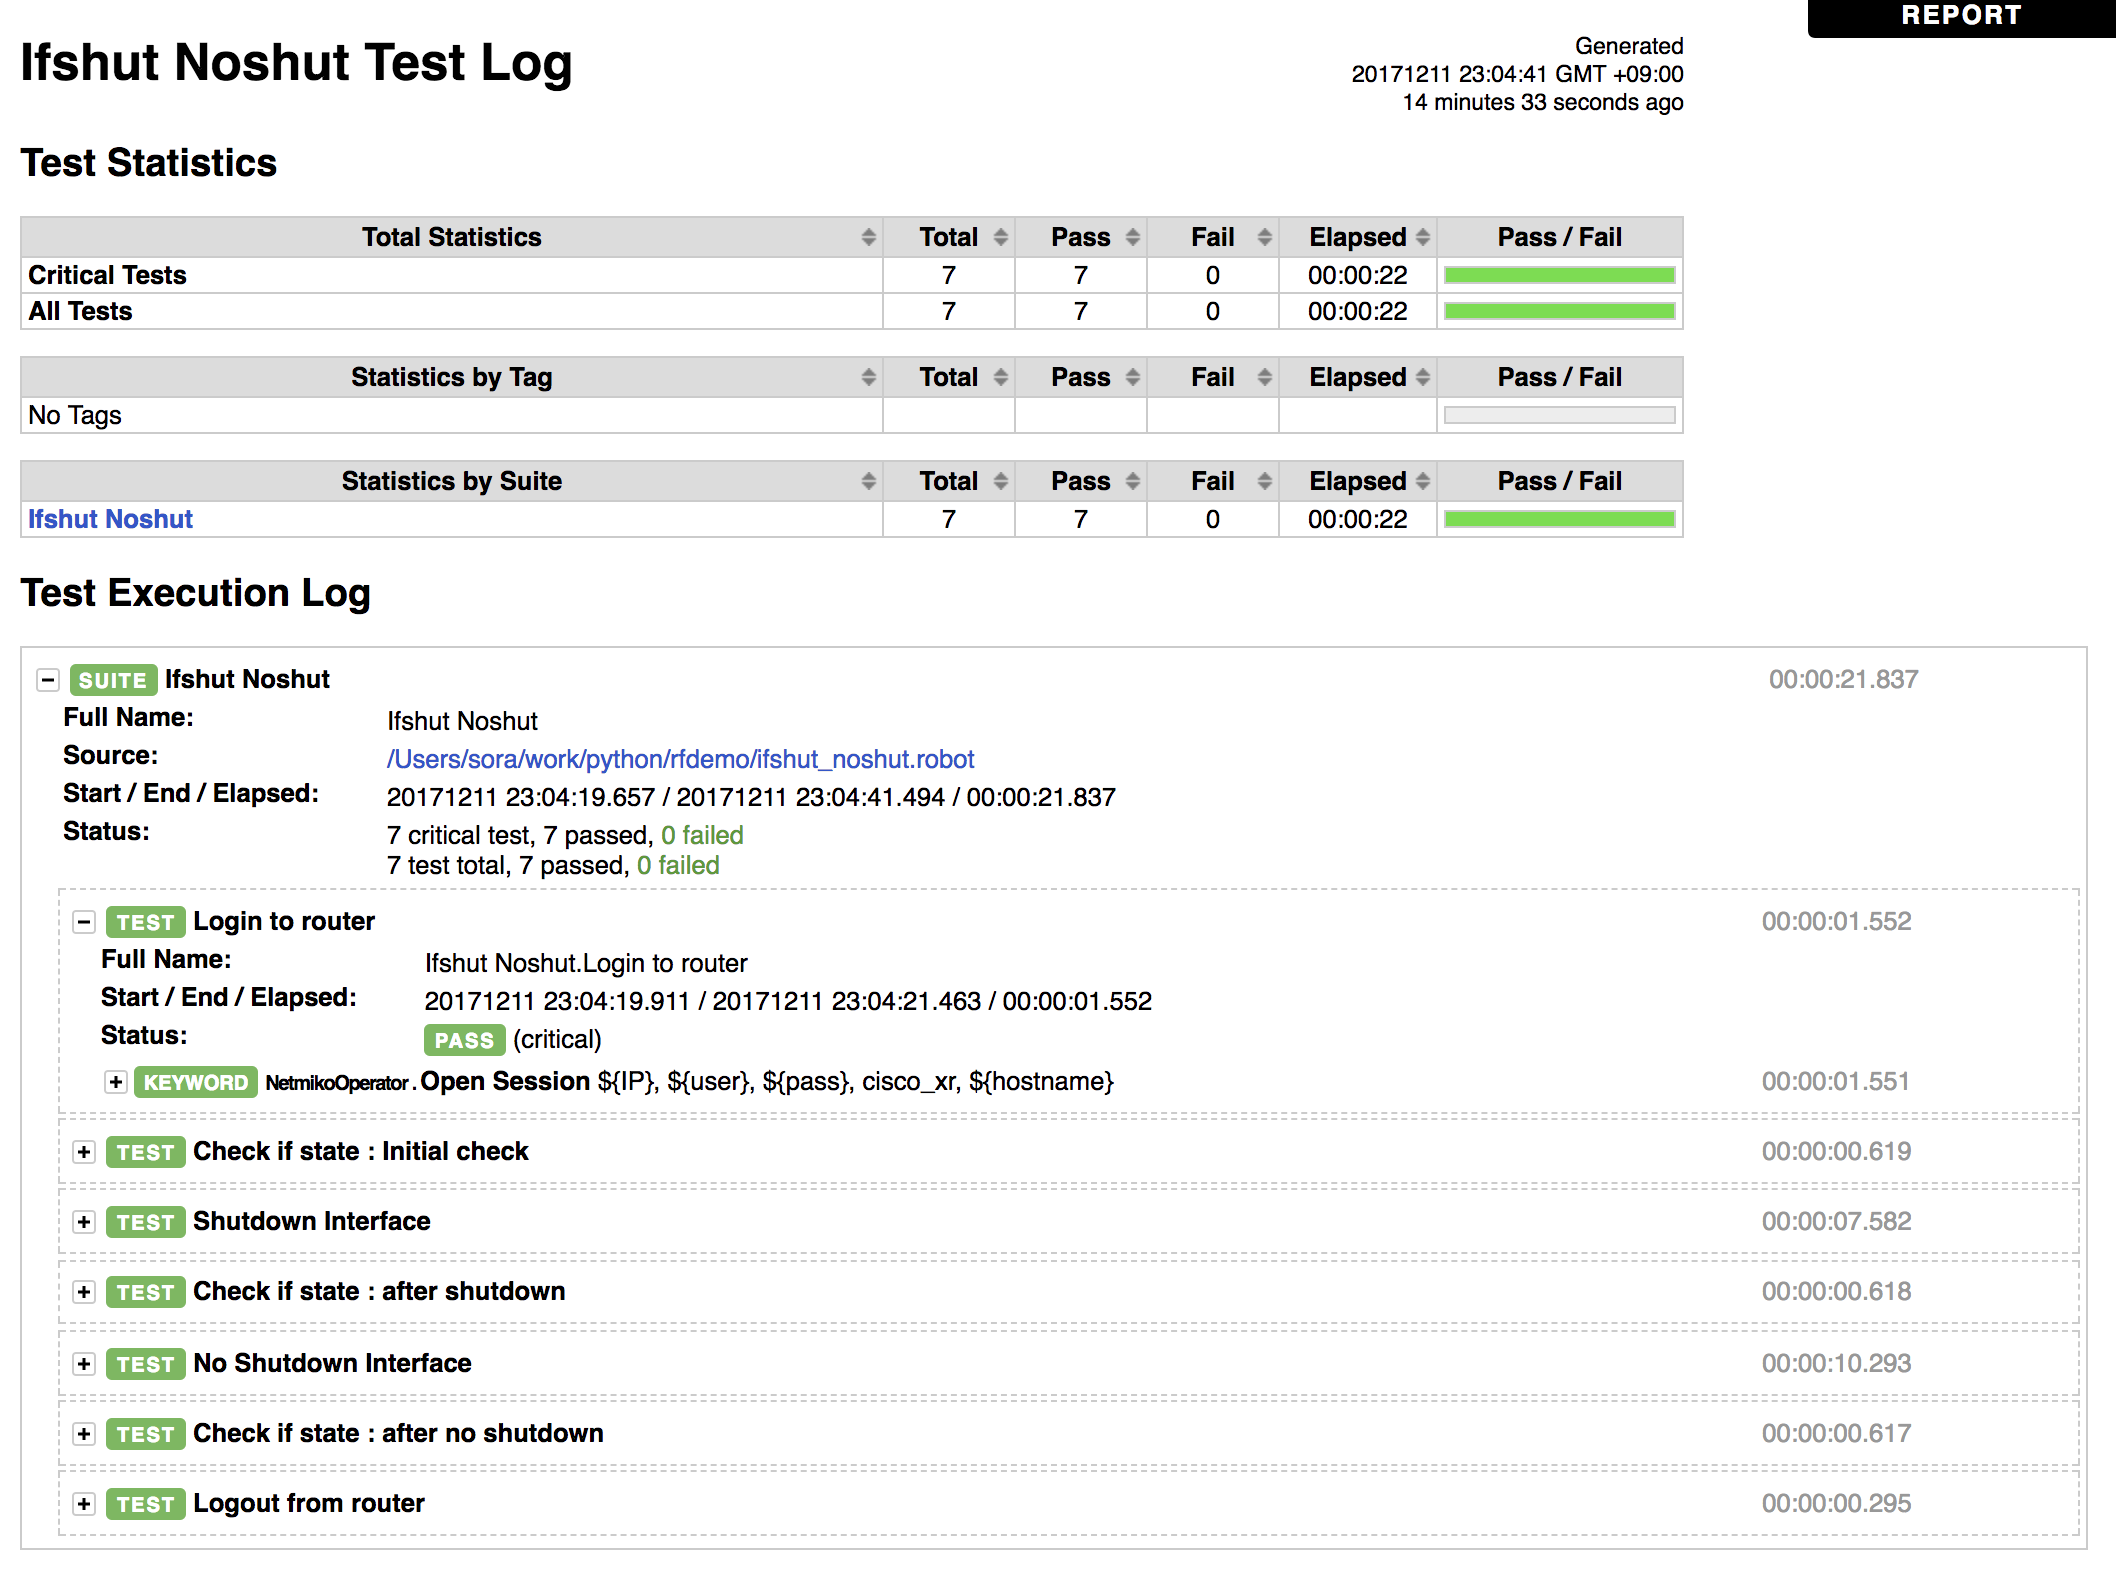
このように、テスト全体の結果のサマリーと各テストケースの詳細を見ることができます。今回のテストでは全てPASSしていますが、FAILがあったときに、どこのテストケースでFAILしているかすぐわかると思います。
また、例えばInterfaceをshutdownするテストケースを見てみると、
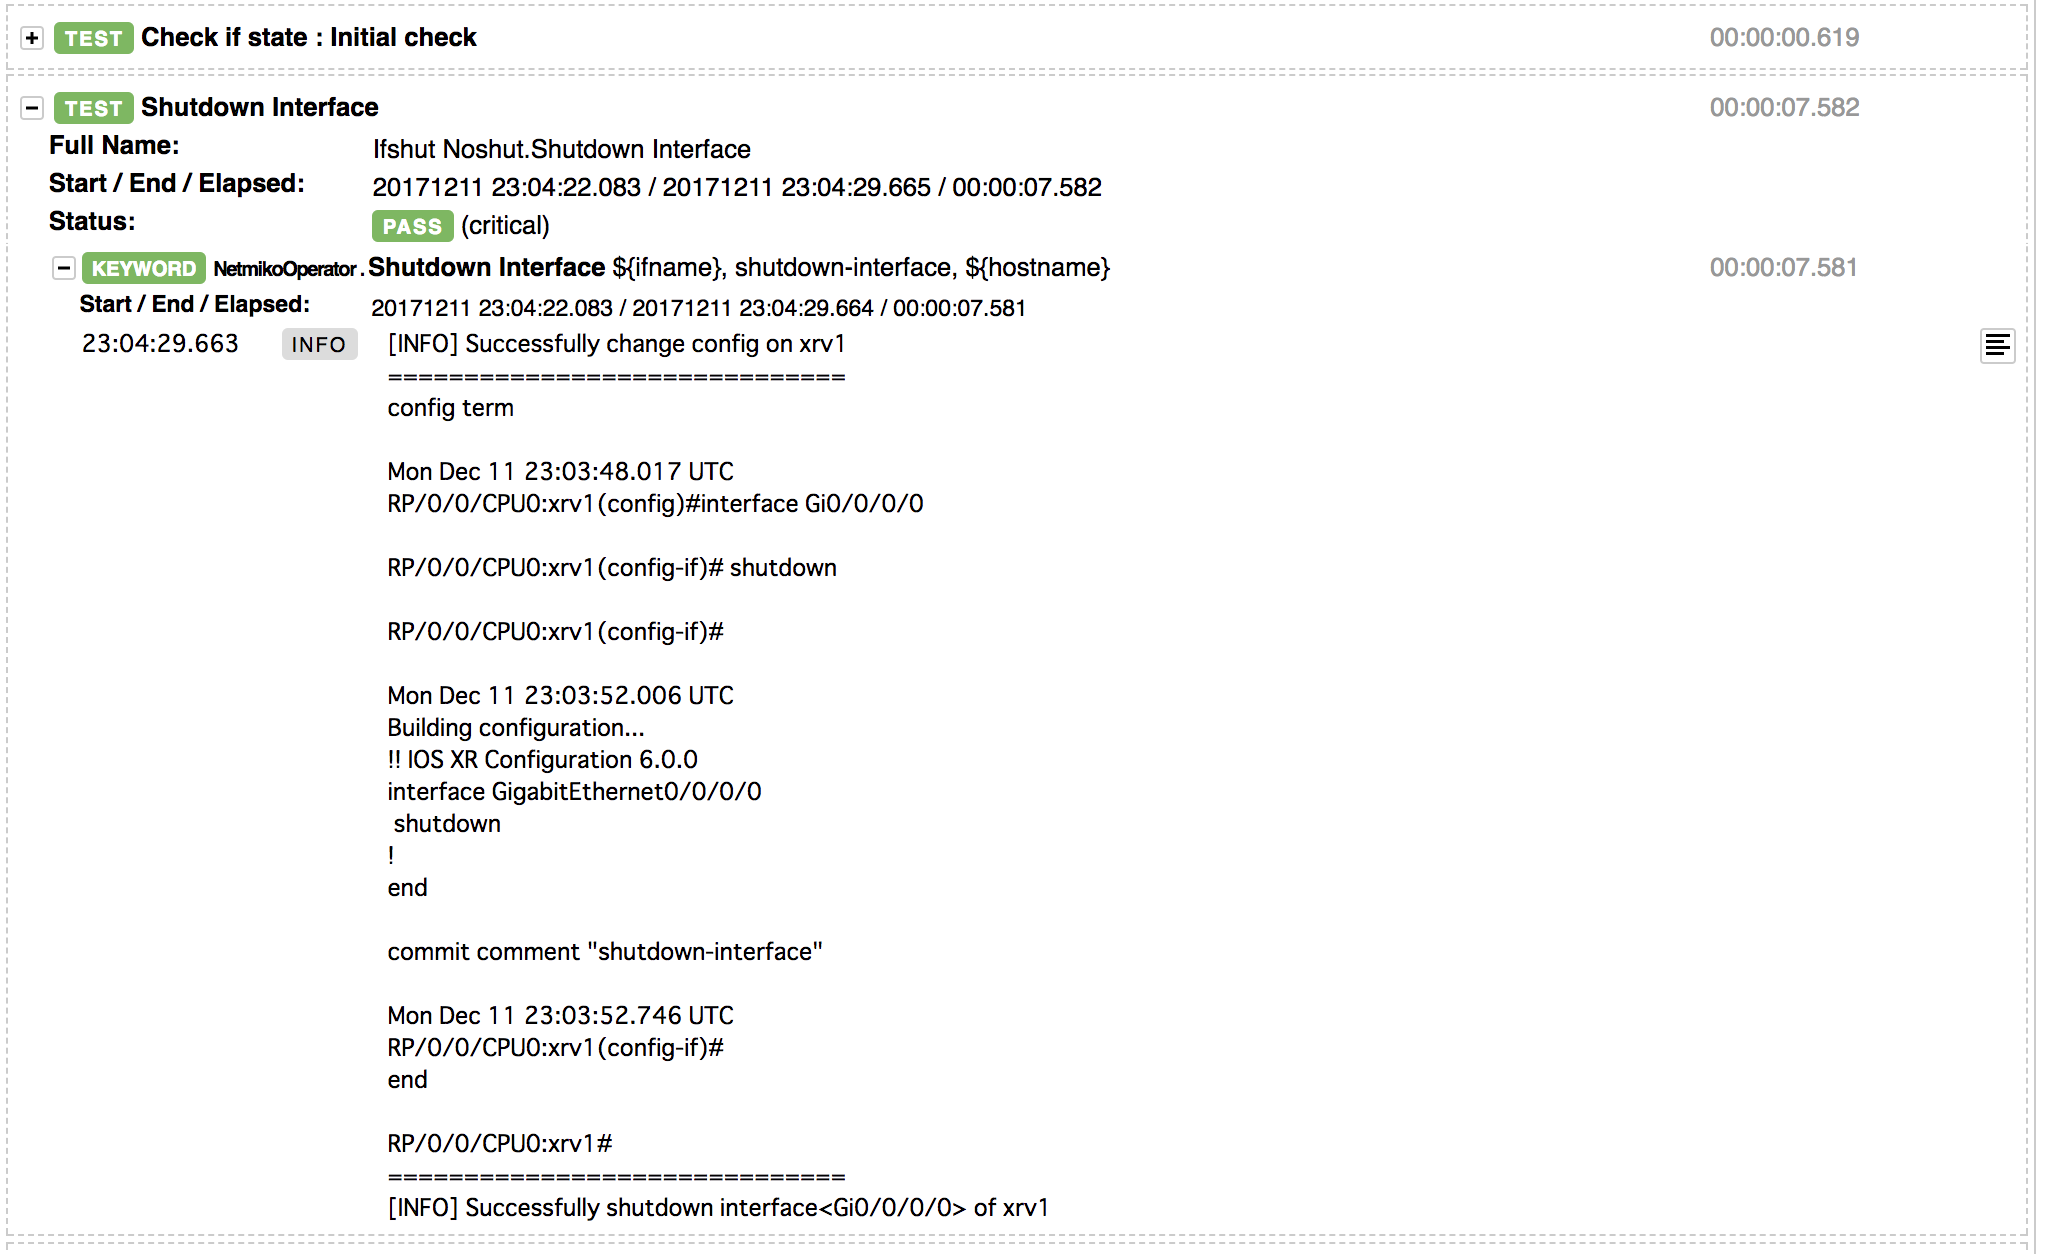
このように詳細を確認することができます。
INFOとして表示されているものは、元のpythonにてprintした文字列となります。
Python側でprintしておくことで、どうしてFAILしたのか?など原因の調査もできると思います。
おわりに
以上で、Robot Framework + Netmiko + textfsmを用いたネットワーク機器のテスト自動化を試してみた記録のおしまいです!
3時間ほどで実装して記事を書いてみたので、適当な内容だったですが、なんとなくRobot Frameworkがどういうものか伝わるといいなーと思います。
コードはhttps://github.com/tktkban/rfdemo において見たので是非試してみてください!