概要
Amazon CloudWatchを使用してOCI上に起動したComputeのCPU/Memory/Disk監視やlog取得を行います。
構成

設定手順
SSM Agent導入
以下の手順で対象Computeをセットアップします
CloudWatch Agent導入
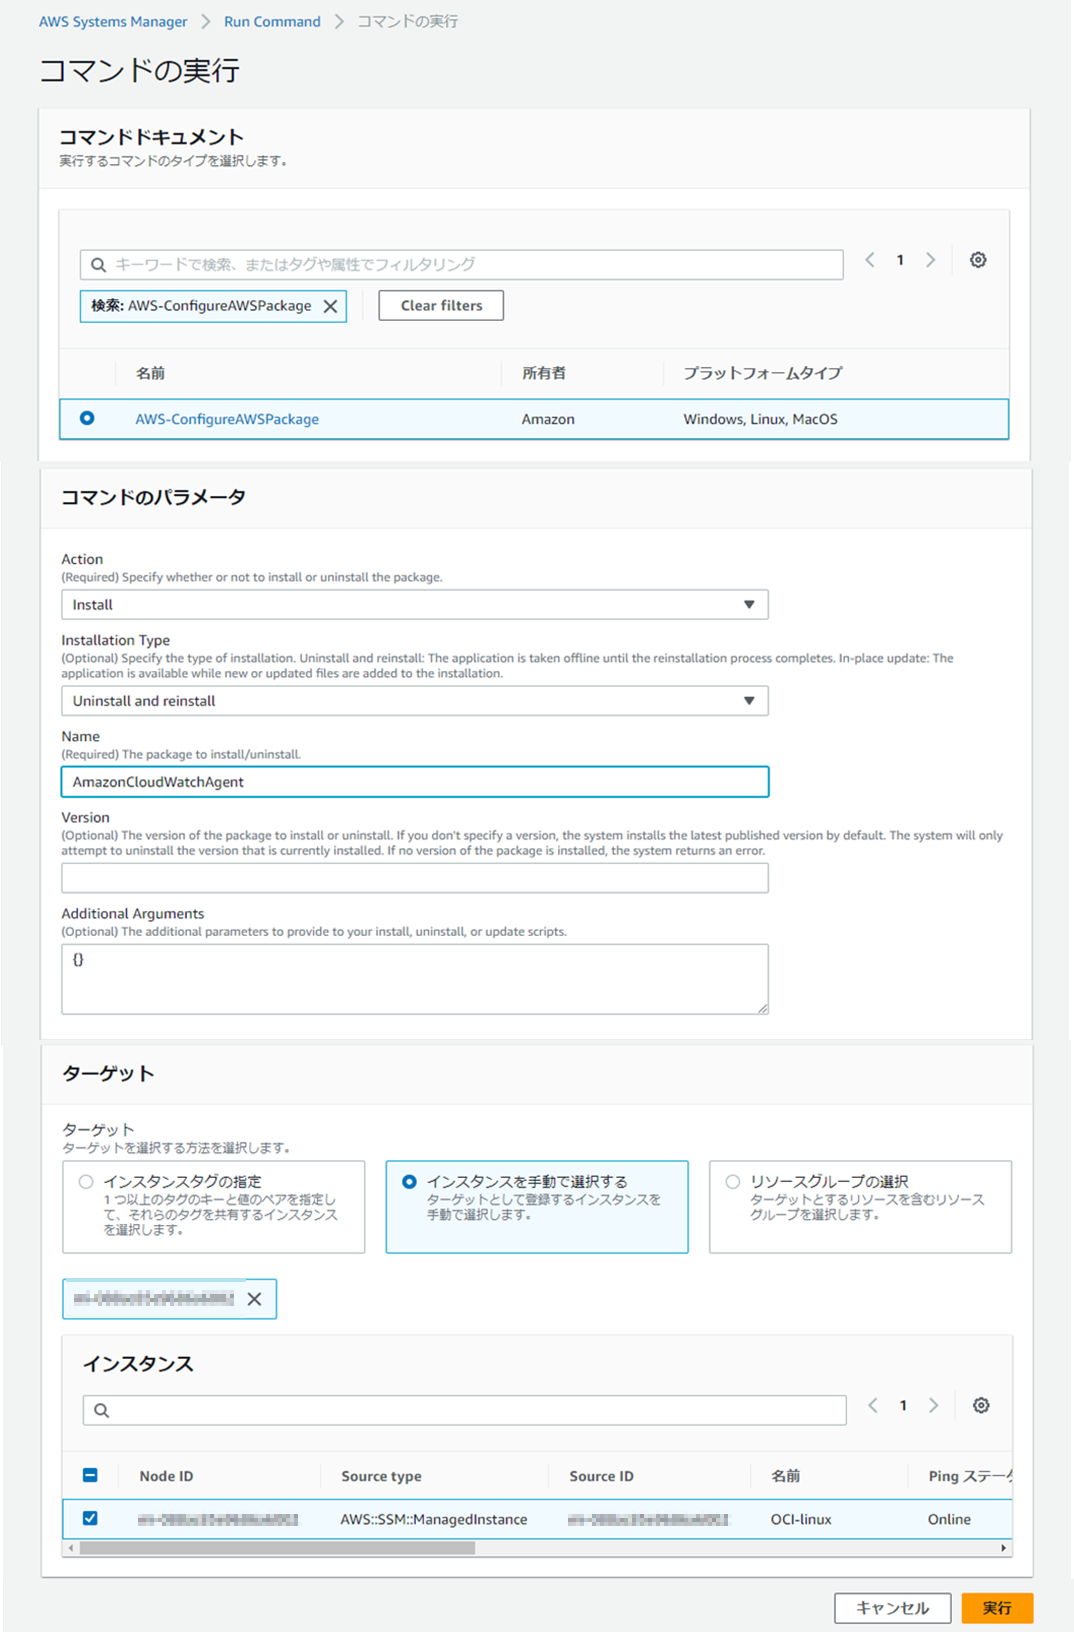
AWS Systems Managerを使用してCloudWatch Agentを導入します。
参考
AWS Systems Manager を使用した CloudWatch エージェントのインストール
- AWS マネジメントコンソールにログインして、AWS Systems Manager > Run commandでRun commandを押下
- コマンド実行画面において以下のように入力
- コマンドドキュメント:AWS-ConfigureAWSPackage
- コマンドパラメータ Action:Install
- コマンドパラメータ Name:AmazonCloudWatchAgent
- ターゲット:インスタンスを手動で選択するを選択して対象インスタンスを選択
- 実行ボタンを押下します
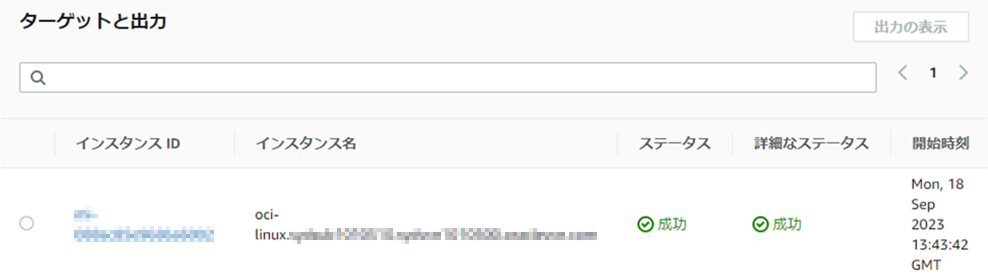
進行中

成功しました
AWSユーザー作成
OCI ComputeからCloudWatchにデータPushするためのユーザーを作成します。
-
AWS マネジメントコンソールにログインして、IAM > ユーザーでユーザーの作成を押下

-
ユーザー名を入力

-
許可のオプションでポリシーを直接アタッチするを選択し以下のポリシーを許可
AmazonSSMManagedInstanceCore
CloudWatchAgentAdminPolicy
CloudWatchAgentServerPolicy

-
内容を確認してユーザーの作成を押下

-
ユーザーIDが作成されましたらセキュリティ認証情報を選択しアクセスキーを作成を押下

-
AWSの外部で実行されるアプリケーションを選択

-
必要に応じて説明タグを設定

-
アクセスキーが表示されるのでコピー

AWS CLIセットアップ
- OCI ComputeにログインしてAWS CLIをインストールします
curl "https://awscli.amazonaws.com/awscli-exe-linux-x86_64.zip" -o "awscliv2.zip"
unzip awscliv2.zip
sudo ./aws/install
- インストールできたらユーザーIDの資格情報を元にconfig作成します
[user@oci-linux]$ aws configure
AWS Access Key ID [None]: 【アクセスキー】
AWS Secret Access Key [None]: 【シークレットアクセスキー】
Default region name [None]: ap-northeast-1
Default output format [None]:
CloudWatchセットアップ
以下のコマンドでconfig起動します
sudo /opt/aws/amazon-cloudwatch-agent/bin/amazon-cloudwatch-agent-config-wizard
- CloudWatch設定
On which OS are you planning to use the agent?
1. linux
2. windows
3. darwin
default choice: [1]:

Trying to fetch the default region based on ec2 metadata...
Are you using EC2 or On-Premises hosts?
1. EC2
2. On-Premises
default choice: [2]:

Please make sure the credentials and region set correctly on your hosts.
Refer to http://docs.aws.amazon.com/cli/latest/userguide/cli-chap-getting-started.html
Which user are you planning to run the agent?
1. root
2. cwagent
3. others
default choice: [1]:

Do you want to turn on StatsD daemon?
1. yes
2. no
default choice: [1]:

Which port do you want StatsD daemon to listen to?
default choice: [8125]

What is the collect interval for StatsD daemon?
1. 10s
2. 30s
3. 60s
default choice: [1]:

What is the aggregation interval for metrics collected by StatsD daemon?
1. Do not aggregate
2. 10s
3. 30s
4. 60s
default choice: [4]:

Do you want to monitor metrics from CollectD? WARNING: CollectD must be installed or the Agent will fail to start
1. yes
2. no
default choice: [1]:
2
Do you want to monitor any host metrics? e.g. CPU, memory, etc.
1. yes
2. no
default choice: [1]:

Do you want to monitor cpu metrics per core?
1. yes
2. no
default choice: [1]:

Would you like to collect your metrics at high resolution (sub-minute resolution)? This enables sub-minute resolution for all metrics, but you can customize for specific metrics in the output json file.
1. 1s
2. 10s
3. 30s
4. 60s
default choice: [4]:

Which default metrics config do you want?
1. Basic
2. Standard
3. Advanced
4. None
default choice: [1]:

Current config as follows:
略
Are you satisfied with the above config? Note: it can be manually customized after the wizard completes to add additional items.
1. yes
2. no
default choice: [1]:
- CloudWatch log設定
Do you have any existing CloudWatch Log Agent (http://docs.aws.amazon.com/AmazonCloudWatch/latest/logs/AgentReference.html) configuration file to import for migration?
1. yes
2. no
default choice: [2]:

Do you want to monitor any log files?
1. yes
2. no
default choice: [1]:

Log file path:
/var/log/messages
Log group name:
default choice: [messages]

Log stream name:
default choice: [{hostname}]

Log Group Retention in days
1. -1
2. 1
3. 3
略

default choice: [1]:
3
Do you want to specify any additional log files to monitor?
1. yes
2. no
default choice: [1]:
2
Saved config file to /opt/aws/amazon-cloudwatch-agent/bin/config.json successfully.
Current config as follows:
略

Please check the above content of the config.
The config file is also located at /opt/aws/amazon-cloudwatch-agent/bin/config.json.
Edit it manually if needed.
Do you want to store the config in the SSM parameter store?
1. yes
2. no
default choice: [1]:

What parameter store name do you want to use to store your config? (Use 'AmazonCloudWatch-' prefix if you use our managed AWS policy)
default choice: [AmazonCloudWatch-linux]

Which region do you want to store the config in the parameter store?
default choice: [us-east-1]
ap-northeast-1
Which AWS credential should be used to send json config to parameter store?
1. ***************(From SDK)
2. Other
default choice: [1]:
2
Please provide credentials to upload the json config file to parameter store.
AWS Access Key:
***************
AWS Secret Key:
***************
Successfully put config to parameter store AmazonCloudWatch-linux.
Program exits now.
- CloudWatch agentのconfigファイルを編集しAWS資格情報を指定
[user@oci-linux ~]$ sudo cp -p /opt/aws/amazon-cloudwatch-agent/etc/common-config.toml /opt/aws/amazon-cloudwatch-agent/etc/common-config.t
oml.org
[user@oci-linux ~]$ sudo vi /opt/aws/amazon-cloudwatch-agent/etc/common-config.toml
common-config.tomlに以下を追加
[credentials]
   shared_credential_profile = "default"
   shared_credential_file = "/home/opc/.aws/credentials"
- CloudWatch agentを起動
[user@oci-linux ~]$ sudo /opt/aws/amazon-cloudwatch-agent/bin/amazon-cloudwatch-agent-ctl -a fetch-config -m onPremise -s -c file:/opt/aws/amazon-cloudwatch-agent/bin/config.json
- CloudWatch agentの稼働Activeを確認
[user@oci-linux ~]$ systemctl status amazon-cloudwatch-agent
 Amazon-cloudwatch-agent.service - Amazon CloudWatch Agent
   Loaded: loaded (/etc/systemd/system/amazon-cloudwatch-agent.service; enabled; vendor preset: disabled)
   Active: active (running) since Mon 2023-09-18 14:10:27 GMT; 11s ago
 Main PID: 11457 (amazon-cloudwat)
    Tasks: 8 (limit: 22532)
   Memory: 30.3M
稼働確認
-
CloudWatch log
/var/log/messagesの内容が確認できます

-
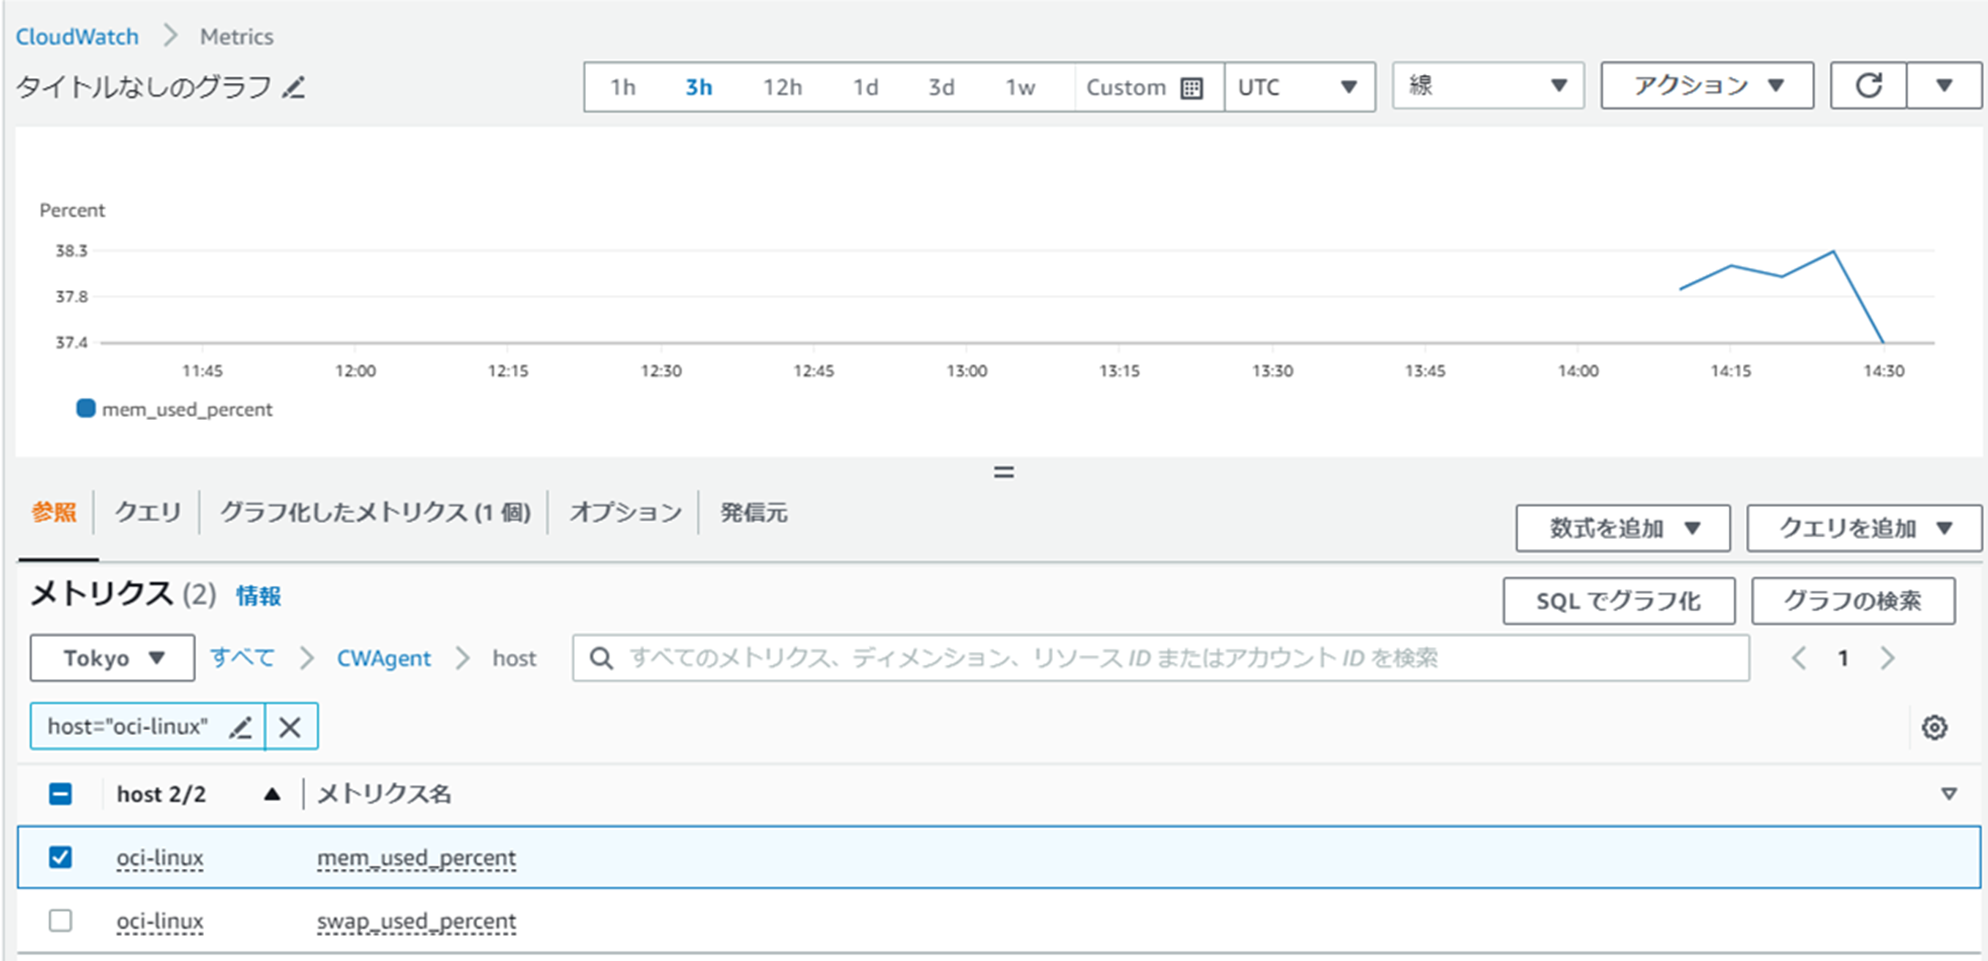
CloudWatch Metrics
CPU/Memory/Diskについてメトリックが確認できます。- CPU

- Memory
- Disk

- CPU