概要
以前Oracle Cloud Infrastructure(OCI)のインスタンス Run command機能を使用してJob管理を検証しました
このケースではJob管理ツールを自営で立てる必要がありましたが
今回はOCI Resource Scheduler機能を使用してサーバーレスを目指しています
何がいいの?
Run commandによりインスタンスにログインして操作しなくてもコマンドやJobを実行できます
さらにOCI Resource Schedulerによりスケジュール管理が可能になります
- オペレータにてログイン不要でJob実行
- OCI Resource Schedulerにより時刻起動
- 複数のインスタンスに対して変更や配布実施

構成
起動スケジュールはOCI Resource Schedulerで管理します
インスタンスにて実行するScriptや実行結果のOutputはObject storageを介して行われます
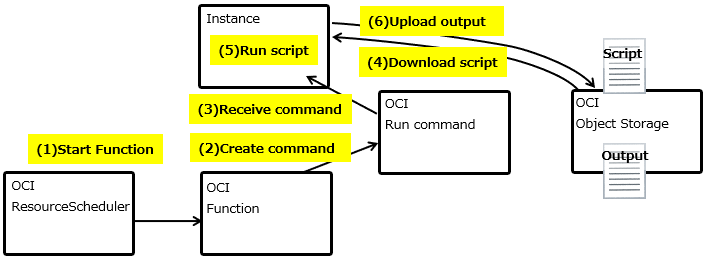
(1) OCI Resource Shcedulerで設定した時間にOCI Functionを起動
(2) FunctionはRun commandを作成し実行
(3) OCI内の対象インスタンスのエージェントがOCI Run commandの内容を受信
(4) エージェントがOCI Object Storageに保管されたScriptをダウンロード
(5) エージェントにてScriptを実行
(6) エージェントがScript実行結果(Output)をObject Storageにアップロード
作成
情報取得
以下の情報を入手します。
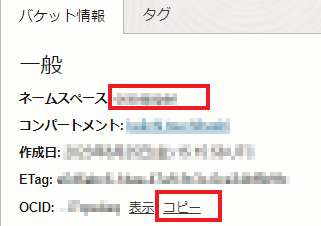
- コンパートメントOCID
OCIコンソールの検索窓からコンパートメント名を入力するとコンパートメントが表示されるのでクリック

コンパートメント内容が表示されるのでOCIDをコピー

- Object Storageのネームスペースおよびバケット名
OCIナビゲーションメニュー ストレージ>>バケット名から対象バケットを選択してネームスペースをメモ、バケットOCIDをコピー
- インスタンスOCID
Run commandを実行するインスタンスの情報を取得します。
OCIナビゲーションメニューからコンピュート>>インスタンスから対象インスタンスを選択してOCIDをコピー

インスタンス環境準備
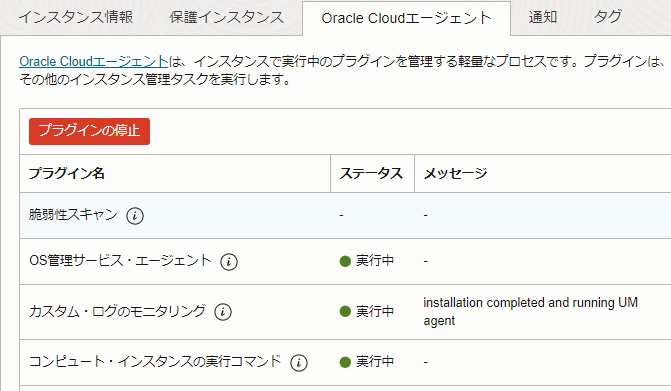
- OCIナビゲーションメニューからコンピュート>>インスタンスから対象インスタンスを選択,Oracle Cloudエージェントタブを選択してコンピュートインスタンスの実行コマンドプラグインが実行中であることを確認
- 管理者権限でScript実行する場合は以下を実行
管理者権限でのコマンドの実行
-ユーザーOCARUNに管理者権限を付与します
-付与後にインスタンス再起動をおすすめします
Script準備
インスタンスで実行するScriptを準備します。
今回実施するScriptはnginxの起動と起動確認です。
Script内の改行はWindowsはCR+LF, LinuxはLFで作成してください。
- Script作成
Windows
echo %date%
echo %time%

cd c:\nginx
start nginx

ping 127.0.0.1
curl -s -o nul -w "%%{http_code}" http://127.0.0.1
exit /b
Linux
date

sudo systemctl start nginx

ping -c 4 127.0.0.1
curl -s -o /dev/nul -w "%{http_code}" http://127.0.0.1
exit 0
- Object Storageにアップロード
OCIナビゲーションメニュー>>ストレージ>>バケット名から対象バケットを選択してアップロード

OCIポリシー
Run command実行可能にするためポリシーを追加します。
## Replace << >> with the appropriate value
Allow dynamic-group <<group-name>> to manage objects in compartment <<compartment-name>>
- FunctionsにRun command実行許可を付与
## Replace << >> with the appropriate value
Allow service FaaS to use instance-agent-command-execution-family in compartment <<compartment-name>>
- Resource SchedulerにFunction実行許可を付与
request.principal.idも特定する場合はResource Scheduler設定後にresourceschedule OCIDを取得して設定します
## Replace << >> with the appropriate value
Allow any-user to manage functions-family in compartment <<compartment-name>> where all {request.principal.type = 'resourceschedule', request.principal.id='<<ocid1.resourceschedule...>>'}
Function作成
runcommandを発行するFunctionを作成しdeployします
## Replace << >> with the appropriate value
import io
import json
import logging
import oci
from datetime import datetime

def handler(ctx, data: io.BytesIO = None):
    try:
        # Get value from parameter
        body = json.loads(data.getvalue())
        source_object_name=body.get("source_object_name")
        compartment_id=body.get("compartment_id")
        instance_id=body.get("instance_id")

        # Generate timestamp
        timestamp = datetime.now().strftime("%Y%m%d%H%M%S")
        # Combine with prefix
        display_name=f"run_{timestamp}"
        # Create output file name
        prefix="runcommand/output/output"
        output_object_name=f"{prefix}_{timestamp}.log"

        namespace_name="<<namespace name>>"
        bucket_name="<<bucket name>>"

        # Resource principal
        signer = oci.auth.signers.get_resource_principals_signer()

        # Initialize service client
        compute_instance_agent_client = oci.compute_instance_agent.ComputeInstanceAgentClient(
            config={},signer=signer)

        # Create runcommand
        create_instance_agent_command_response = compute_instance_agent_client.create_instance_agent_command(
            create_instance_agent_command_details=oci.compute_instance_agent.models.CreateInstanceAgentCommandDetails(
                compartment_id=compartment_id,
                execution_time_out_in_seconds=300,
                target=oci.compute_instance_agent.models.InstanceAgentCommandTarget(
                    instance_id=instance_id
                ),
                display_name=display_name,
                content=oci.compute_instance_agent.models.InstanceAgentCommandContent(
                    source=oci.compute_instance_agent.models.InstanceAgentCommandSourceViaObjectStorageTupleDetails(
                        source_type="OBJECT_STORAGE_TUPLE",
                        namespace_name=namespace_name,
                        bucket_name=bucket_name,
                        object_name=source_object_name
                    ),
                    output=oci.compute_instance_agent.models.InstanceAgentCommandOutputViaObjectStorageTupleDetails(
                        output_type="OBJECT_STORAGE_TUPLE",
                        namespace_name=namespace_name,
                        bucket_name=bucket_name,
                        object_name=output_object_name
                    )
                )
            )
        )
        # Get the data from response
        print(create_instance_agent_command_response.data)

    except Exception as e:
        print('ERROR: bad Event!', flush=True)
        raise
schema_version: 20180708
name: fnruncommand
version: 0.0.1
runtime: python
build_image: fnproject/python:3.11-dev
run_image: fnproject/python:3.11
entrypoint: /python/bin/fdk /function/func.py handler
memory: 256
fdk>=0.1.83
oci
参考:JSONファイルについて
[user@linux]$ oci instance-agent command create --generate-full-command-json-input
{
  "compartmentId": "string",
  "content": {
    "output": [
      "This parameter should actually be a JSON object rather than an array - pick one of the following object variants to use",
      {
        "bucketName": "string",
        "namespaceName": "string",
        "objectName": "string",
        "outputType": "OBJECT_STORAGE_TUPLE"
      },
      {
        "outputType": "OBJECT_STORAGE_URI",
        "outputUri": "string"
      },
      {
        "outputType": "TEXT"
      }
    ],
    "source": [
      "This parameter should actually be a JSON object rather than an array - pick one of the following object variants to use",
      {
        "bucketName": "string",
        "namespaceName": "string",
        "objectName": "string",
        "sourceType": "OBJECT_STORAGE_TUPLE"
      },
      {
        "sourceType": "OBJECT_STORAGE_URI",
        "sourceUri": "string"
      },
      {
        "sourceType": "TEXT",
        "text": "string",
        "textSha256": "string"
      }
    ]
  },
  "displayName": "string",
  "target": {
    "instanceId": "string"
  },
  "timeoutInSeconds": "string"
}
Resource Scheduler設定
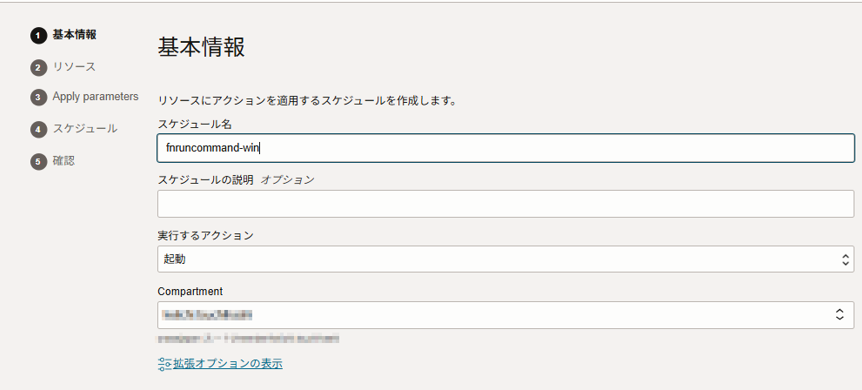
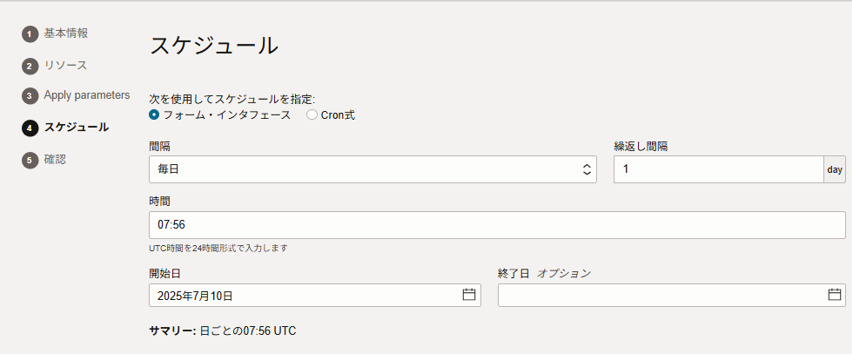
Resource Schedulerを使用して時刻起動設定します
OCIナビゲーションメニュー>>ガバナンスと管理>>リソース・スケジューラ>>スケジュールからスケジュールの作成を押下して必要な値を入力
- スケジュール名
- 実行するアクション:起動
- Compartment
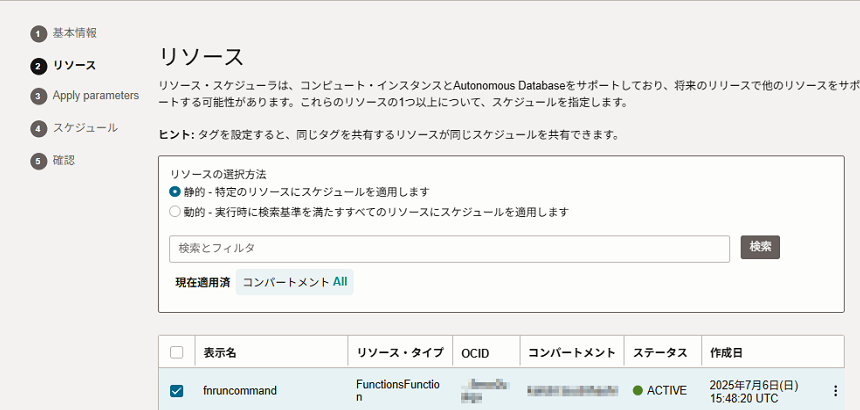
- リソース:作成したFunctionを指定
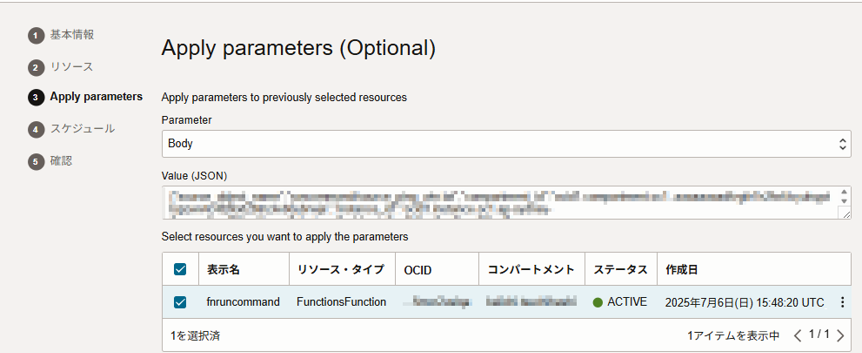
- Parameter Body:Body
- Value (JSON):JSON形式でScript,コンパートメントおよび実行するインスタンスのOCIDを指定
## Replace << >> with the appropriate value
{"source_object_name":"runcommand/source_nginxstart_win.txt","compartment_id":"<<ocid1.compartment.oc1.....>>","instance_id":"<<ocid1.instance.oc1.....>>"}
- 実行する時間を設定
実行
設定した時刻になるとFunctionが起動します
OCIコンソールナビゲーションメニュー>>インスタンスから対象インスタンスを選択して左下のリソースメニューから実行コマンドを選択すると実行コマンドの状況が確認できます。
コマンド成功時

OutputはObject storageからダウンロードして確認可能です。
C:\Windows\system32>echo Thu 07/10/2025
Thu 07/10/2025

C:\Windows\system32>echo 16:58:47.06
16:58:47.06

C:\Windows\system32>cd c:\nginx

c:\nginx>start nginx

c:\nginx>ping 127.0.0.1

Pinging 127.0.0.1 with 32 bytes of data:
Reply from 127.0.0.1: bytes=32 time<1ms TTL=128
Reply from 127.0.0.1: bytes=32 time<1ms TTL=128
Reply from 127.0.0.1: bytes=32 time<1ms TTL=128
Reply from 127.0.0.1: bytes=32 time<1ms TTL=128

Ping statistics for 127.0.0.1:
    Packets: Sent = 4, Received = 4, Lost = 0 (0% loss),
Approximate round trip times in milli-seconds:
    Minimum = 0ms, Maximum = 0ms, Average = 0ms

c:\nginx>curl -s -o nul -w "%{http_code}" http://127.0.0.1
200
c:\nginx>exit /b
Linux
Thu Jul 10 17:24:12 JST 2025
PING 127.0.0.1 (127.0.0.1) 56(84) bytes of data.
64 bytes from 127.0.0.1: icmp_seq=1 ttl=64 time=0.112 ms
64 bytes from 127.0.0.1: icmp_seq=2 ttl=64 time=0.056 ms
64 bytes from 127.0.0.1: icmp_seq=3 ttl=64 time=0.060 ms
64 bytes from 127.0.0.1: icmp_seq=4 ttl=64 time=0.056 ms

--- 127.0.0.1 ping statistics ---
4 packets transmitted, 4 received, 0% packet loss, time 3086ms
rtt min/avg/max/mdev = 0.056/0.071/0.112/0.023 ms
200
Windows,Linuxともにnginxの起動と起動確認ができました。
(オプション)Runcommand終了コード
バッチのリターンコードを渡すことによってRuncommandの終了コードに反映することが可能です。
- Windows Script
@echo off
echo %date%
echo %time%

cd c:\nginx
start nginx

ping 127.0.0.1
for /f %%A in ('curl -s -o nul -w "%%{http_code}" http://127.0.0.1') do set HTTP_CODE=%%A
echo %HTTP_CODE%
if "%HTTP_CODE%"=="200" (
    exit /b 0
) else (
    exit /b 1
)
実行ステータス:成功、終了コード 0 のOutput
Sat 07/12/2025
 0:38:54.90

Pinging 127.0.0.1 with 32 bytes of data:
Reply from 127.0.0.1: bytes=32 time<1ms TTL=128
Reply from 127.0.0.1: bytes=32 time<1ms TTL=128
Reply from 127.0.0.1: bytes=32 time<1ms TTL=128
Reply from 127.0.0.1: bytes=32 time<1ms TTL=128

Ping statistics for 127.0.0.1:
    Packets: Sent = 4, Received = 4, Lost = 0 (0% loss),
Approximate round trip times in milli-seconds:
    Minimum = 0ms, Maximum = 0ms, Average = 0ms
200
実行ステータス:失敗、終了コード:1 のOutput
Sat 07/12/2025
 1:02:14.79

Pinging 127.0.0.1 with 32 bytes of data:
Reply from 127.0.0.1: bytes=32 time<1ms TTL=128
Reply from 127.0.0.1: bytes=32 time<1ms TTL=128
Reply from 127.0.0.1: bytes=32 time<1ms TTL=128
Reply from 127.0.0.1: bytes=32 time<1ms TTL=128

Ping statistics for 127.0.0.1:
    Packets: Sent = 4, Received = 4, Lost = 0 (0% loss),
Approximate round trip times in milli-seconds:
    Minimum = 0ms, Maximum = 0ms, Average = 0ms
000

- linux Script
#!/bin/bash

date

sudo systemctl start nginx

HTTP_CODE=$(curl -s -o /dev/null -w "%{http_code}" http://127.0.0.1)
echo "$HTTP_CODE"

if [ "$HTTP_CODE" = "200" ]; then
    exit 0
else
    exit 1
fi
実行ステータス:成功、終了コード 0 のOutput
Sat Jul 12 00:44:20 JST 2025
200
実行ステータス:失敗、終了コード 1 のOutput
Sat Jul 12 00:56:44 JST 2025
000
