はじめに
リストなどを作成するとき、ListView Widget を使いますよね。
ListView.builder もよく見ます。
何が違うの?コンストラクター?って感じの理解度だったので、それぞれの簡単な説明から実際に簡単なリストの作成、コードなどをまとめてみました。
ListView で使えるコンストラクターについては下記の3つ。
- ListView.builder
- ListView.separated
- ListView.custom
ぼんやりでも、どういう時にどのコンストラクターを使うのか考えられる所までを今回のゴールとする。
- 【前提】コンストラクターとは
オブジェクト指向型言語で使われる用語の1つ。
コンストラクタは、クラスからインスタンスを生成する際に呼び出される特別なメソッド。
コンストラクタを使用すると、新しく生成されたオブジェクトの初期化を行う。
これにより、オブジェクトは最初から必要な情報を持っている状態でスタートできる。
使い方
基本的な ListView
- サンプルコード
import 'package:flutter/material.dart';

// 1.エントリーポイントのmain関数
void main() {
  // 2.MyAppを呼び出す
  runApp(const MyApp());
}

// MyApp のクラス
class MyApp extends StatelessWidget {
  const MyApp({super.key});

  @override
  Widget build(BuildContext context) {
    // MaterialApp を追加
    return MaterialApp(
      home: Scaffold(
          // 画面上部のタイトル部分
          appBar: AppBar(
            backgroundColor: Theme.of(context).colorScheme.inversePrimary,
            title: const Text("ListView Test"),
          ),
          body: ListView(
            children: const <Widget>[
              ListTile(
                leading: Icon(Icons.fiber_manual_record),
                title: Text('アイテム 1'),
                trailing: Icon(Icons.arrow_forward_ios),
              ),
              ListTile(
                leading: Icon(Icons.fiber_manual_record),
                title: Text('アイテム 2'),
                trailing: Icon(Icons.arrow_forward_ios),
              ),
              ListTile(
                leading: Icon(Icons.fiber_manual_record),
                title: Text('アイテム 3'),
                trailing: Icon(Icons.arrow_forward_ios),
              ),
            ],
          )),
    );
  }
}
- 実行結果

ListView.builder
動的にリストを作成したい時に使う。
表示するリストがある時に、そのリストを生成する。
数が決まっておらず、大量のリストが予想される場合に使うのが適している。
(例)LINE のメッセージや Twitter などの DM など
- サンプルコード
import 'package:flutter/material.dart';

// 1.エントリーポイントのmain関数
void main() {
  // 2.MyAppを呼び出す
  runApp(const MyApp());
}

// MyApp のクラス
class MyApp extends StatelessWidget {
  const MyApp({super.key});

  @override
  Widget build(BuildContext context) {
    // MaterialApp を追加
    return MaterialApp(
      home: Scaffold(
        // 画面上部のタイトル部分
        appBar: AppBar(
          backgroundColor: Theme.of(context).colorScheme.inversePrimary,
          title: const Text("ListView.builder Test"),
        ),
        body: ListView.builder(
          itemCount: 10,
          itemBuilder: (BuildContext context, int index) {
            return Container(
              color: index % 2 == 0 ? Colors.blue[50] : Colors.grey[200],
              child: ListTile(
                leading: const Icon(Icons.list),
                title: Text('アイテム $index'),
                trailing: const Icon(Icons.arrow_forward_ios),
              ),
            );
          },
        ),
      ),
    );
  }
}
- 実行結果

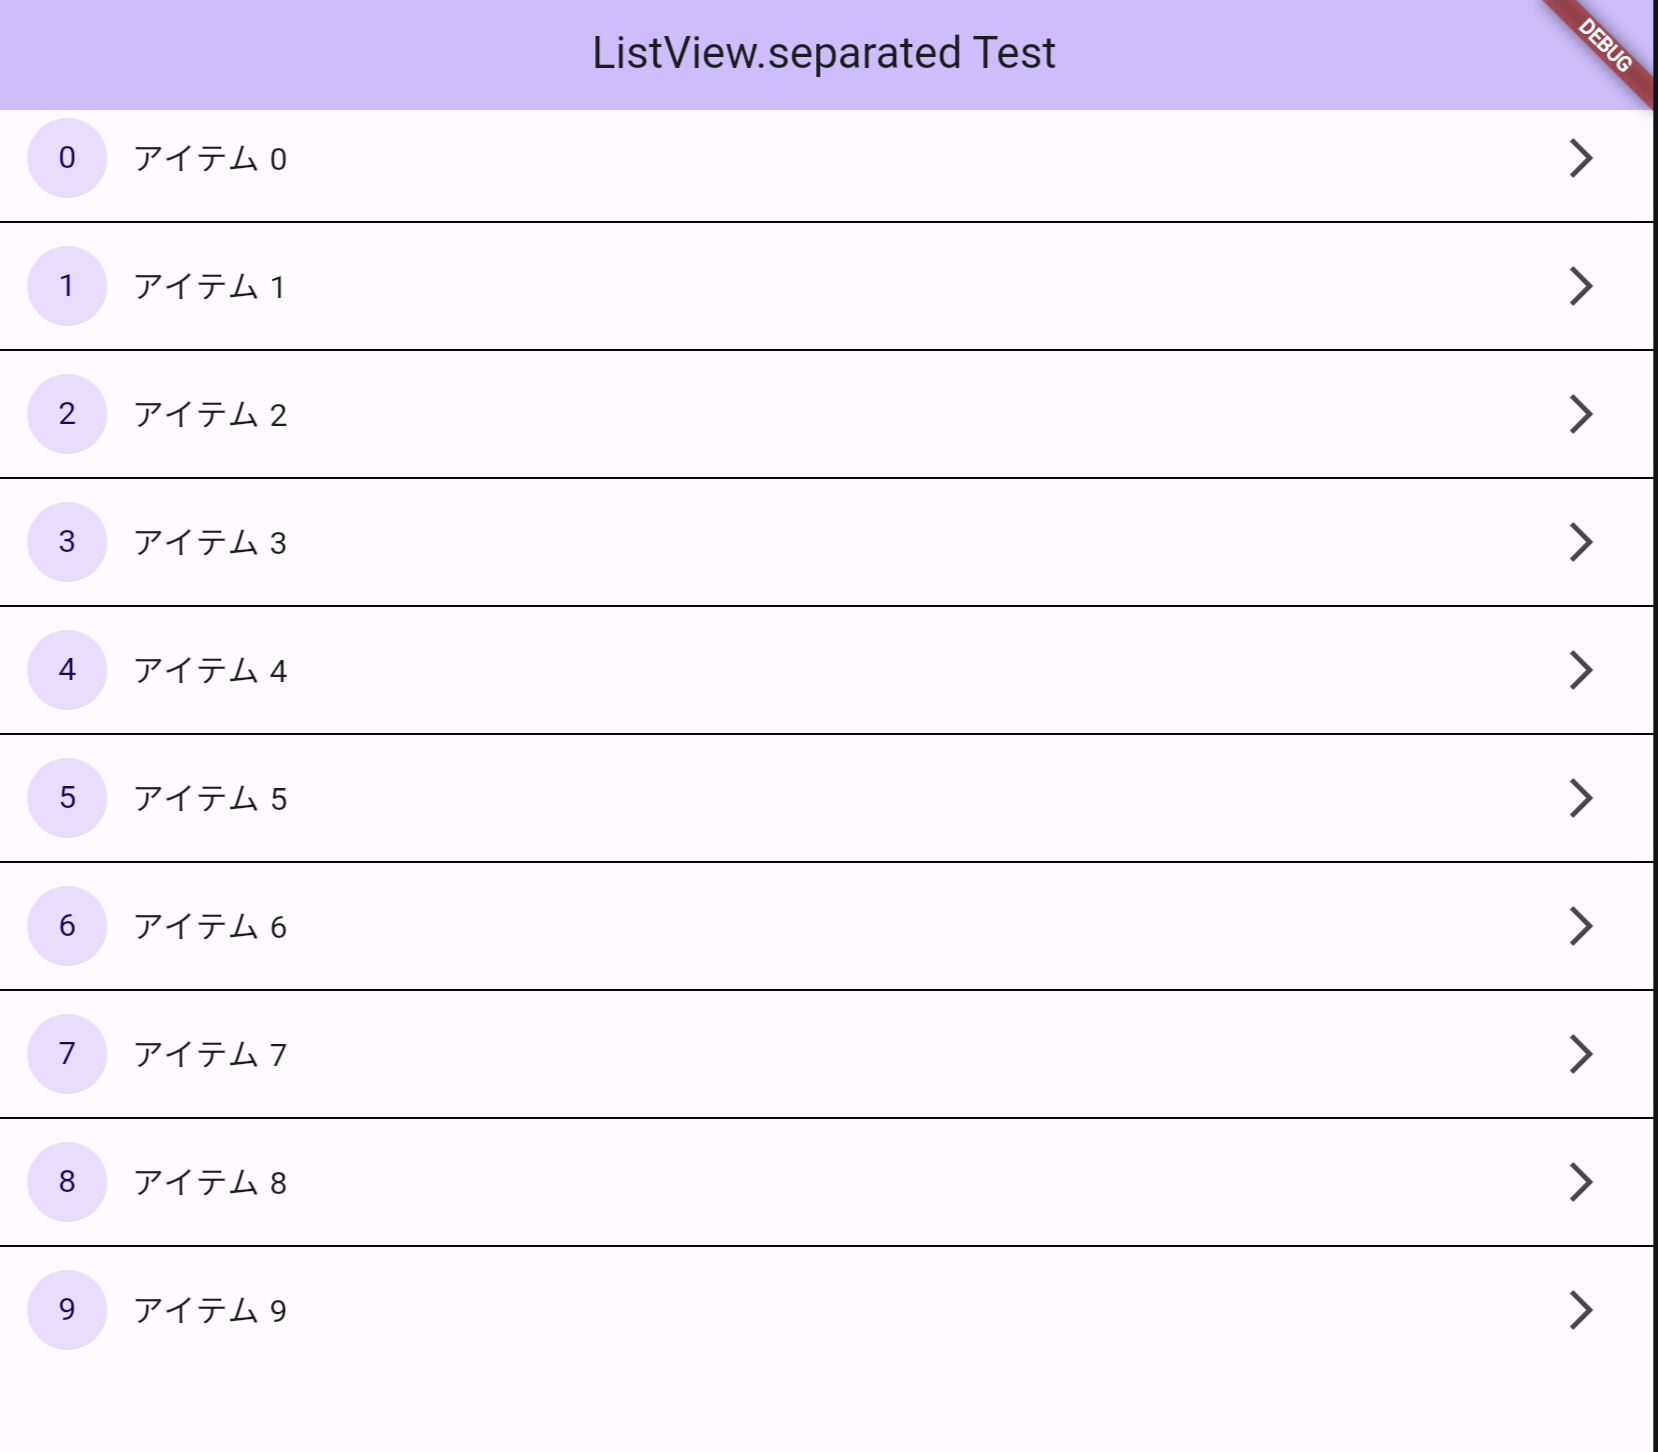
ListView.separated
リストの間に区切り線を入れる事が出来る。
それ以外は、基本的に ListView.builder に似ている。
- サンプルコード
import 'package:flutter/material.dart';

// 1.エントリーポイントのmain関数
void main() {
  // 2.MyAppを呼び出す
  runApp(const MyApp());
}

// MyApp のクラス
class MyApp extends StatelessWidget {
  const MyApp({super.key});

  @override
  Widget build(BuildContext context) {
    // MaterialApp を追加
    return MaterialApp(
      home: Scaffold(
          // 画面上部のタイトル部分
          appBar: AppBar(
            backgroundColor: Theme.of(context).colorScheme.inversePrimary,
            title: const Text("ListView.separated Test"),
          ),
          body: ListView.separated(
            itemCount: 10,
            itemBuilder: (BuildContext context, int index) {
              return ListTile(
                leading: CircleAvatar(
                  child: Text('$index'),
                ),
                title: Text('アイテム $index'),
                trailing: const Icon(Icons.arrow_forward_ios),
              );
            },
            separatorBuilder: (BuildContext context, int index) =>
                const Divider(color: Colors.black),
          )),
    );
  }
}
- 実行結果
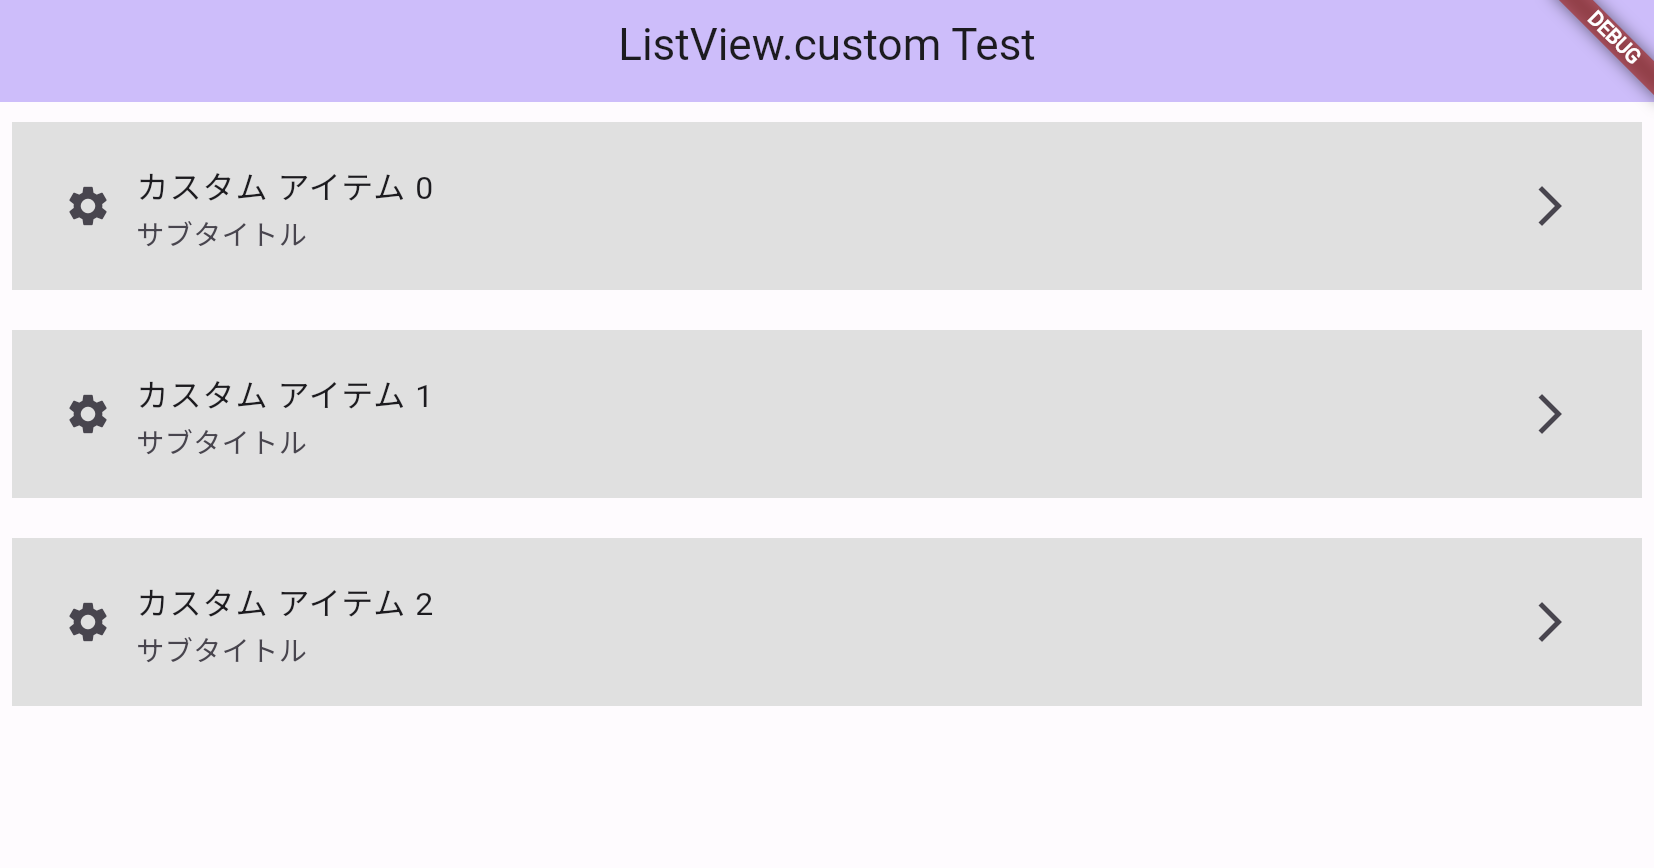
ListView.custom
最も柔軟性に優れたリスト。
複雑なレイアウトだったり特殊なカスタマイズが必要だったり特殊な振る舞いが必要な場合に使用する。
- サンプルコード
import 'package:flutter/material.dart';

// 1.エントリーポイントのmain関数
void main() {
  // 2.MyAppを呼び出す
  runApp(const MyApp());
}

// MyApp のクラス
class MyApp extends StatelessWidget {
  const MyApp({super.key});

  @override
  Widget build(BuildContext context) {
    // MaterialApp を追加
    return MaterialApp(
      home: Scaffold(
          // 画面上部のタイトル部分
          appBar: AppBar(
            backgroundColor: Theme.of(context).colorScheme.inversePrimary,
            title: const Text("ListView.custom Test"),
          ),
          body: ListView.custom(
            childrenDelegate: SliverChildBuilderDelegate(
              (BuildContext context, int index) {
                return Container(
                  margin: const EdgeInsets.all(10),
                  padding: const EdgeInsets.all(10),
                  color: const Color(0xFFE0E0E0),
                  child: ListTile(
                    leading: const Icon(Icons.settings),
                    title: Text('カスタム アイテム $index'),
                    subtitle: const Text('サブタイトル'),
                    trailing: const Icon(Icons.arrow_forward_ios),
                  ),
                );
              },
              childCount: 3, // 生成する子の数
            ),
          )),
    );
  }
}
- 実行結果
まとめ
まとめると以下のような対応表になる。
| Name | Description | URL |
|---|---|---|
| ListView | コンストラクターがつかないパターン。予め数が決まっていて少数のリストを作成する時に使う。 | https://api.flutter.dev/flutter/widgets/ListView/ListView.html |
| ListView.builder | 動的にリストを作成したい時に使う。表示するリストがある時に、そのリストを生成する。数が決まっておらず、大量のリストが予想される場合に使うのが適している。(例)LINE のメッセージや Twitter などの DM など | https://api.flutter.dev/flutter/widgets/ListView/ListView.builder.html |
| ListView.separated | リストの間に区切り線を入れる事が出来る。それ以外は、基本的に ListView.builder に似ている。 | https://api.flutter.dev/flutter/widgets/ListView/ListView.separated.html |
| ListView.custom | 最も柔軟性に優れたリスト。複雑なレイアウトだったり特殊なカスタマイズが必要だったり特殊な振る舞いが必要な場合に使用する。 | https://api.flutter.dev/flutter/widgets/ListView/ListView.custom.html |
個人的に .builder と .separated は使う場面が多そう。
.custom はあまり場面がなさそう。というイメージ。
以上。
参考文献