前書き
OGPの生成などnode.jsで画像生成をしたいというケースは最近増えてきているのでは無いでしょうか。その中でもクライアントで実行可能なCanvasを利用したいケースというのも同様に多いと思います。
またサーバーレスの台頭と共にデプロイにserverlessを利用しているケースもあると思います。
私自身がその様な環境で試す中、実行するまでに躓いた箇所があったので実際に動く簡単なアプリを作りながら途中の問題の解決法を解説していこうと思います。
実行環境
デプロイ: serverless(テンプレート: aws-nodejs-typescript)
実行環境: AWS Lambda (node.js v14)
ライブラリ: node-canvas
その他: GitHub Actions
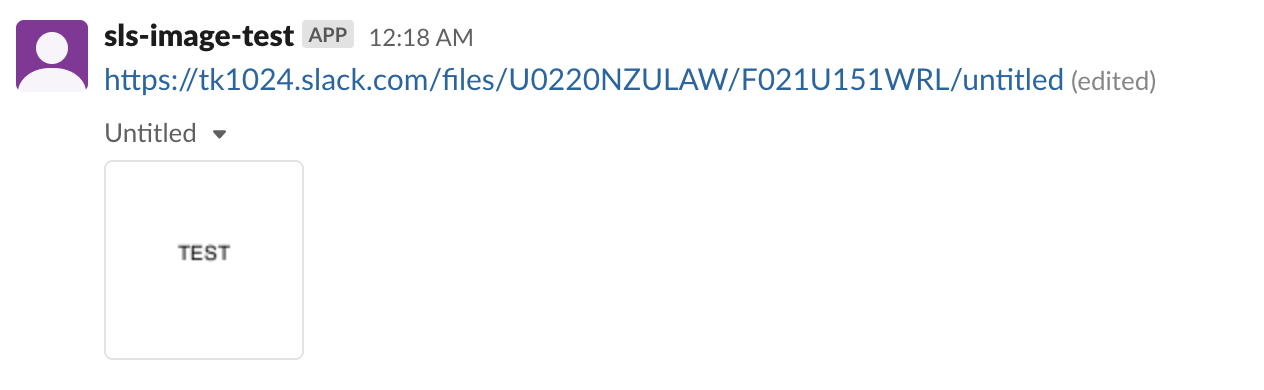
完成形
AWS Lambdaで関数を実行するとSlackにnode-canvasで生成した画像が投稿されるBotを作ります。
手順
1. serverlessテンプレートから雛形を生成
※ serverlessが導入されていなければ npm install -g serverless を実行
sls create -t aws-nodejs-typescript -p sls-node-canvas-test
大体このような構成で生成されます。
.
├── handler.ts
├── package.json
├── serverless.ts
├── tsconfig.json
└── webpack.config.js
2. テンプレートの不要部分削除とruntimeの更新
- api-gateway 部分を削除
- runtime を node.14 に変更
適用後の serverless.ts ↓
import type { Serverless } from 'serverless/aws';

const serverlessConfiguration: Serverless = {
  service: {
    name: 'sls-node-canvas-test',
    // app and org for use with dashboard.serverless.com
    // app: your-app-name,
    // org: your-org-name,
  },
  frameworkVersion: '>=1.72.0',
  custom: {
    webpack: {
      webpackConfig: './webpack.config.js',
      includeModules: true
    }
  },
  // Add the serverless-webpack plugin
  plugins: ['serverless-webpack'],
  provider: {
    name: 'aws',
    runtime: 'nodejs14.x',
  },
  functions: {
    hello: {
      handler: 'handler.hello'
    }
  }
}

module.exports = serverlessConfiguration;
3. 依存関係のインストール
npm install node-canvas @slack/web-api
npm install
4. コードの実装
handler.ts を以下のように実装します。
SlackのOAuth Access Tokenを取得して各自入れてください
必要な権限は chat:write chat:write.public files:write です
import 'source-map-support/register'
import { createCanvas } from 'canvas'
import { WebClient } from "@slack/web-api"

const token = "Your OAuth Access Token";

const web = new WebClient(token);

// 画像の生成
const createBufferImage = (): Buffer => {
  const canvas = createCanvas(100, 100)
  const ctx = canvas.getContext('2d')

  const text = "TEST"
  ctx.font = '30px'
  ctx.fillText(text, 50 - ctx.measureText(text).width / 2, 50)

  return Buffer.from(canvas.toDataURL().split(",")[1], "base64")
}

// slackにポスト
const postSlack = async (image: Buffer) => {
  const res = await web.files.upload({
    file: image,
  });

  await web.chat.postMessage({
    channel: "general",
    text: res.file.permalink,
  });
}

export const hello = async () => {
  const image = createBufferImage()
  await postSlack(image)
}
5. ローカルで実行する
以下のコマンドでローカルで動いているか実行してみます。
sls invoke local -f hello
うまく行けば↓のように投稿されます。
6. とりあえず、デプロイしてみる
私はMacで開発してますが、以下のコマンドでとりあえずデプロイしてみます。
sls deploy
デプロイできましたが、実行した所でエラーが発生しました。
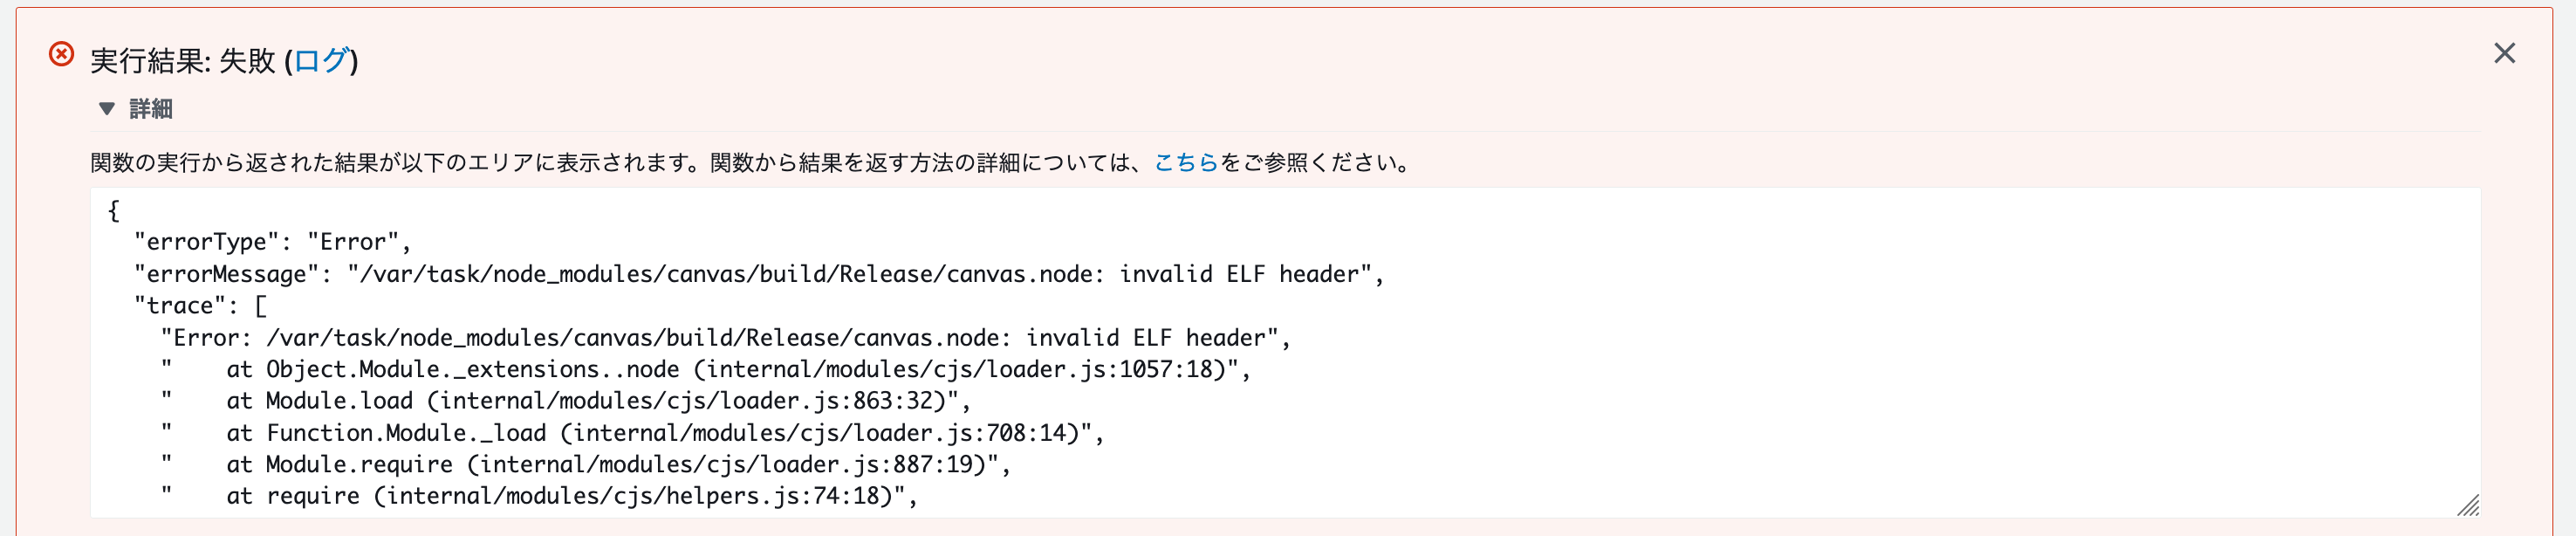
ネイティブコードを含んでいるため、Macでビルドした物はAWS Lambda上では動きませんでした。
7. GitHub Actions でデプロイする
node-gypのビルド処理がOSにより分かれるのでLinux系のOS上でビルドします。
Dockerでも良いですが、デプロイの自動化も同時にできるので今回は GitHub Actions を利用します。
.github/workflows/ci.yml に↓のファイルを作成する事で main ブランチにプッシュすると自動でデプロイされるようになります。
※ 事前にGitHubリポジトリの設定ページからsecretにAWSのキーを登録しておいてください
name: Deploy

on:
  push:
    branches: [main]

defaults:
  run:
    shell: bash

jobs:
  deploy:
    runs-on: ubuntu-latest

    strategy:
      matrix:
        node-version: [14.x]

    steps:
      - uses: actions/checkout@v2
      - name: Install dependencies & Deploy
        run:  |
          sudo apt-get install -y build-essential libcairo2-dev libpango1.0-dev libjpeg-dev libgif-dev librsvg2-dev
          npm ci
          npx serverless deploy --stage prod
        env:
          AWS_ACCESS_KEY_ID: ${{ secrets.AWS_ACCESS_KEY_ID }}
          AWS_SECRET_ACCESS_KEY: ${{ secrets.AWS_SECRET_ACCESS_KEY }}
デプロイされたので、実行してみます。今度は別のエラーが表示されました。
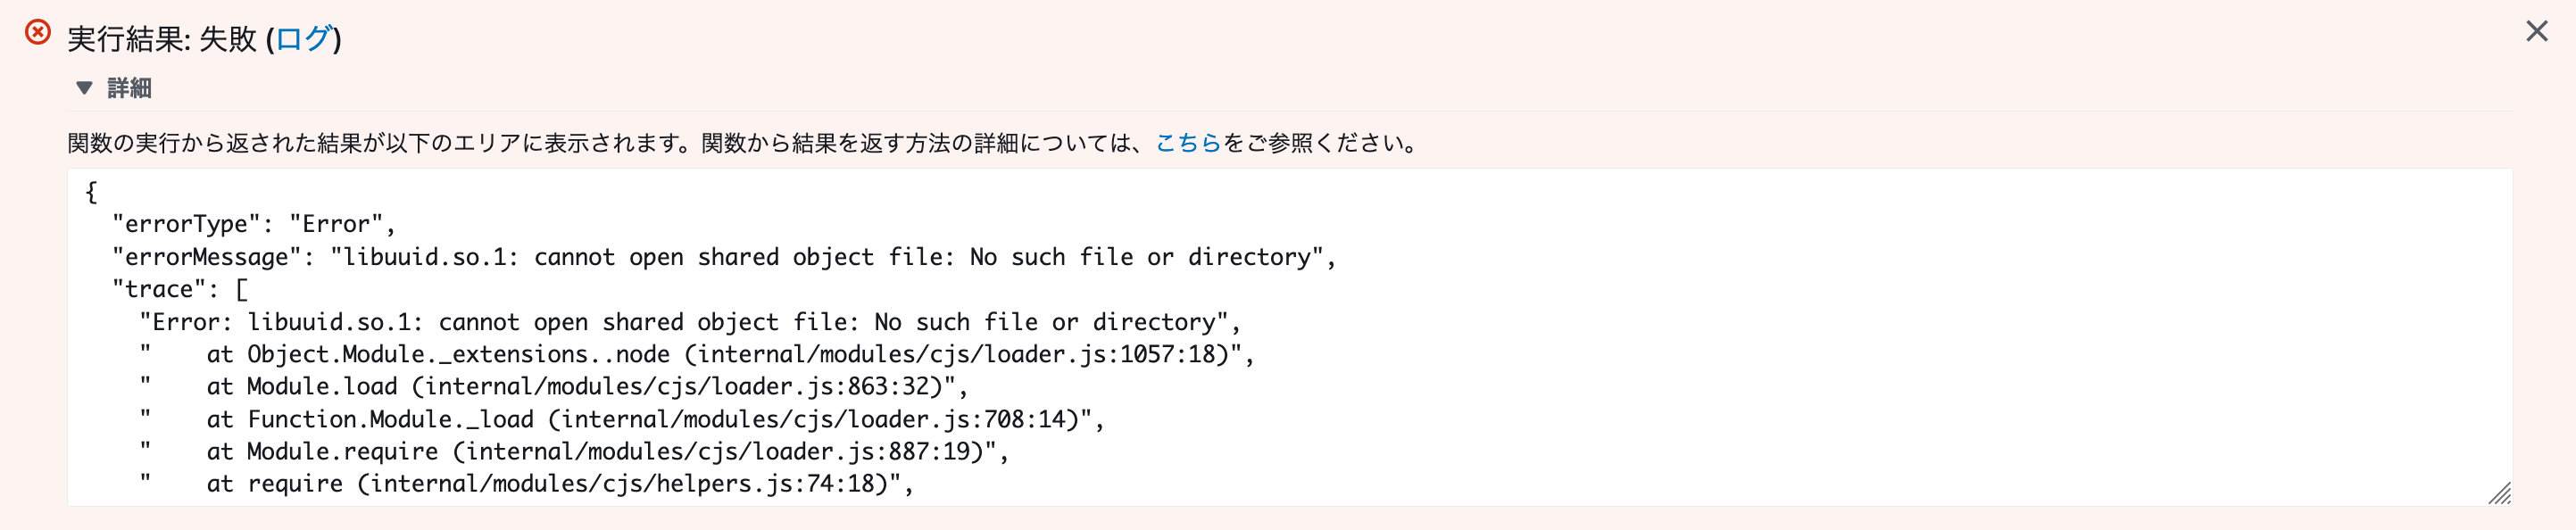
8. ビルド時に共有ライブラリをコピーする
手順7のエラーでは必要なsoファイルが見つからないとなっているので、sls deploy で実行されるwebpackのビルド時に含めるようにします。
libuuid.so.1 が見つからないとなっていますが、実際に追加すると libmount.so.1 と libblkid.so.1 も見つからないと同様のエラーが表示されるので追加します。
soファイルはディストリビューション等により置いてる場所は違いますが、GitHub Actionsの ubuntu-latest (ubuntu-20.04) では必要なファイルは /usr/lib/x86_64-linux-gnu/ に存在しているのでコピーします。
webpack.config.js にコピープラグインを追加して以下のように書き換えます。
npm install copy-webpack-plugin@6 --save-dev
const path = require('path');
const slsw = require('serverless-webpack');
const nodeExternals = require('webpack-node-externals');
const ForkTsCheckerWebpackPlugin = require('fork-ts-checker-webpack-plugin');
const CopyPlugin = require('copy-webpack-plugin');

module.exports = {
  context: __dirname,
  mode: slsw.lib.webpack.isLocal ? 'development' : 'production',
  entry: slsw.lib.entries,
  devtool: slsw.lib.webpack.isLocal ? 'cheap-module-eval-source-map' : 'source-map',
  resolve: {
    extensions: ['.mjs', '.json', '.ts'],
    symlinks: false,
    cacheWithContext: false,
  },
  output: {
    libraryTarget: 'commonjs',
    path: path.join(__dirname, '.webpack'),
    filename: '[name].js',
  },
  target: 'node',
  externals: [nodeExternals()],
  module: {
    rules: [
      // all files with a `.ts` or `.tsx` extension will be handled by `ts-loader`
      {
        test: /\.(tsx?)$/,
        loader: 'ts-loader',
        exclude: [
          [
            path.resolve(__dirname, 'node_modules'),
            path.resolve(__dirname, '.serverless'),
            path.resolve(__dirname, '.webpack'),
          ],
        ],
        options: {
          transpileOnly: true,
          experimentalWatchApi: true,
        },
      },
    ],
  },
  plugins: [
    new CopyPlugin({
      patterns: [
        { from: "/usr/lib/x86_64-linux-gnu/libuuid.so.1", to: "node_modules/canvas/build/Release/libuuid.so.1" },
        { from: "/usr/lib/x86_64-linux-gnu/libmount.so.1", to: "node_modules/canvas/build/Release/libmount.so.1" },
        { from: "/usr/lib/x86_64-linux-gnu/libblkid.so.1", to: "node_modules/canvas/build/Release/libblkid.so.1" },
      ],
    }),
  ],
};
これでデプロイして実行すると... 別のエラーが表示されます。
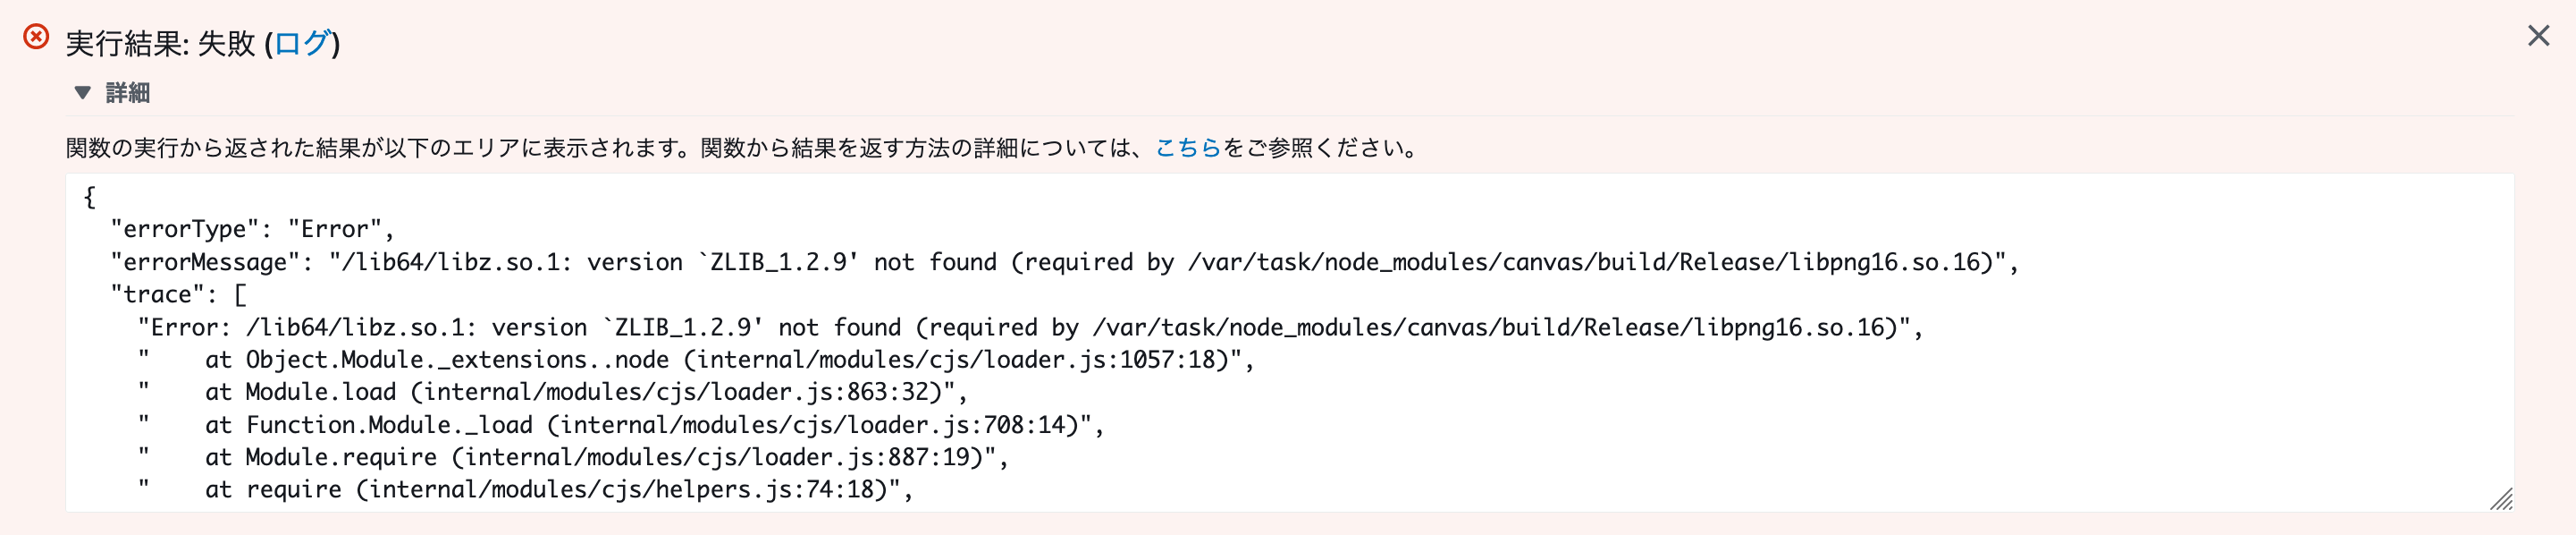
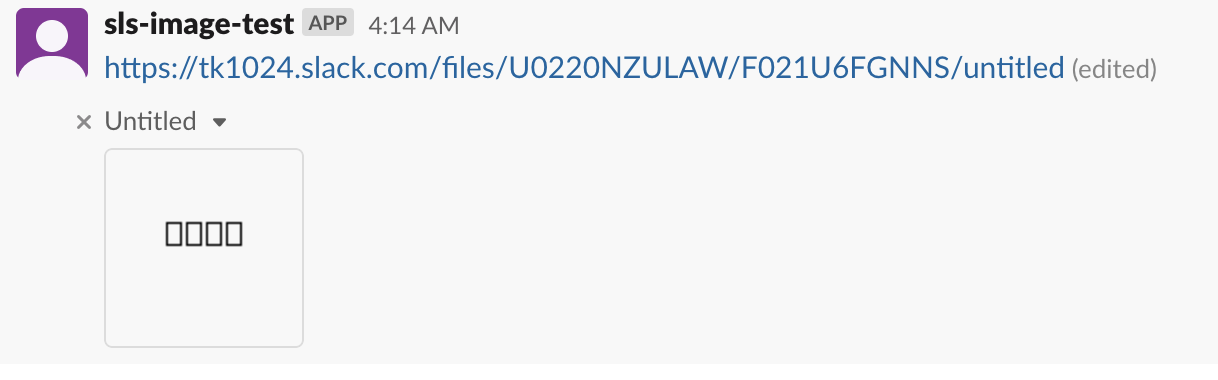
9. node-canvasのバージョンを2.6.1にする
2021年5月16日現在、node-canvasの最新バージョンはv2.7.0で特にバージョンを指定せずに入れるとv2.7.0が入ると思いますが、手順8のエラーが解決できなかったので1つ前のv2.6.1を指定して入れ直します。
これでデプロイして実行し直すと実行には成功しますが、lambdaにはデフォルトフォントが存在しないので文字部分が豆腐で表示されています。

10. フォントを導入する
特に指定はありませんが、今回はNoto Sansを利用したいと思います。ダウンロードして NotoSans-Regular.ttf を handler.ts と同じ階層に配置します。
NotoSans-Regular.ttf を registerFont を使いフォントを読み込むように更新します。
import 'source-map-support/register'
import { createCanvas, registerFont } from 'canvas'
import { WebClient } from "@slack/web-api"
// @ts-ignore
import ttf from "./NotoSans-Regular.ttf"

registerFont(ttf, { family: "Noto Sans" })

const token = "Your OAuth Access Token";

const web = new WebClient(token);

// 画像の生成
const createBufferImage = (): Buffer => {
  const canvas = createCanvas(100, 100)
  const ctx = canvas.getContext('2d')

  const text = "TEST"
  ctx.font = '30px'
  ctx.fillText(text, 50 - ctx.measureText(text).width / 2, 50)

  return Buffer.from(canvas.toDataURL().split(",")[1], "base64")
}

// slackにポスト
const postToSlack = async (image: Buffer) => {
  const res = await web.files.upload({
    file: image,
  });

  await web.chat.postMessage({
    channel: "general",
    text: res.file.permalink,
  });
}

export const hello = async () => {
  const image = createBufferImage()
  await postToSlack(image)
}
このままでは webpack でのビルド時にエラーが出るので file-loader を導入します。
npm install --save-dev file-loader
webpack.config.js で ttf ファイルを file-loader で処理するように記述を追加します。
const path = require('path');
const slsw = require('serverless-webpack');
const nodeExternals = require('webpack-node-externals');
const ForkTsCheckerWebpackPlugin = require('fork-ts-checker-webpack-plugin');
const CopyPlugin = require('copy-webpack-plugin');

module.exports = {
  context: __dirname,
  mode: slsw.lib.webpack.isLocal ? 'development' : 'production',
  entry: slsw.lib.entries,
  devtool: slsw.lib.webpack.isLocal ? 'cheap-module-eval-source-map' : 'source-map',
  resolve: {
    extensions: ['.mjs', '.json', '.ts'],
    symlinks: false,
    cacheWithContext: false,
  },
  output: {
    libraryTarget: 'commonjs',
    path: path.join(__dirname, '.webpack'),
    filename: '[name].js',
  },
  target: 'node',
  externals: [nodeExternals()],
  module: {
    rules: [
      // all files with a `.ts` or `.tsx` extension will be handled by `ts-loader`
      {
        test: /\.(tsx?)$/,
        loader: 'ts-loader',
        exclude: [
          [
            path.resolve(__dirname, 'node_modules'),
            path.resolve(__dirname, '.serverless'),
            path.resolve(__dirname, '.webpack'),
          ],
        ],
        options: {
          transpileOnly: true,
          experimentalWatchApi: true,
        },
      },
      {
        test: /\.ttf$/i,
        loader: 'file-loader',
      },
    ],
  },
  plugins: [
    new CopyPlugin({
      patterns: [
        { from: "/usr/lib/x86_64-linux-gnu/libuuid.so.1", to: "node_modules/canvas/build/Release/libuuid.so.1" },
        { from: "/usr/lib/x86_64-linux-gnu/libmount.so.1", to: "node_modules/canvas/build/Release/libmount.so.1" },
        { from: "/usr/lib/x86_64-linux-gnu/libblkid.so.1", to: "node_modules/canvas/build/Release/libblkid.so.1" },
      ],
    }),
  ],
};
デプロイして、実行...
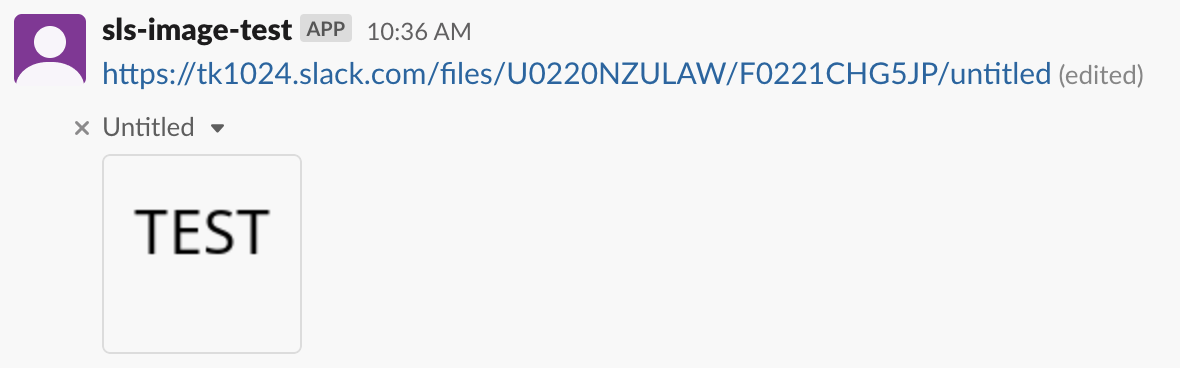
やっとできました。