この記事の狙い・目的
機械学習を取り入れたAIシステムの構築は、
①データセット作成(前処理)→ ②モデルの構築 → ③モデルの適用
というプロセスで行っていきます。
その際「データセット作成(前処理)」の段階では、正しくモデル構築できるよう、事前にデータを整備しておくことが求めらます。
このブログでは、その際用いられることのある「相互作用特徴量」の生成方法について解説していきます。
プログラムの実行環境
Python3
MacBook pro(端末)
PyCharm(IDE)
Jupyter Notebook(Chrome)
Google スライド(Chrome)
相互作用特徴量
相互作用特徴量の生成方法について、解説したいと思います。
相互作用特徴量とは、二つ以上の変数をかけ合わせた新しい変数を作る方法のことです。
特に、二つの特徴量の積で表された特徴量を「ペアワイズ交互作用特徴量」と言います。
メリット
二つ以上の特徴量の組み合わせにより、目的変数をうまく表現できる場合、単一の特徴量よりモデルの精度が高まる場合があります。
デメリット
元の項目数が「$n$個」の場合、特徴量の生成後はの項目数は「$n^2$乗個」となる為、学習コスト増大します。
これを回避する方法として、特徴選択があります
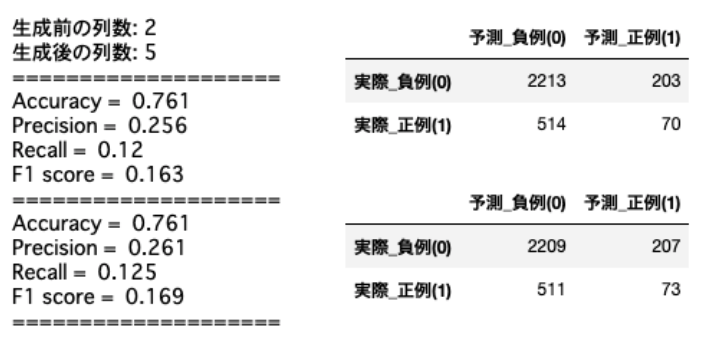
以下の結果では、精度の向上が見られはしますが、非常に微々たる変化です。特徴量を精査すれば更に改善が可能でしょう。
from sklearn.ensemble import RandomForestClassifier # ランダムフォレスト
from sklearn.metrics import accuracy_score, recall_score, precision_score, f1_score # 各評価指標
from sklearn.metrics import confusion_matrix # 混同行列
import sklearn.preprocessing as preproc
from sklearn.model_selection import train_test_split

def learning(X_train, X_test, y_train, y_test):
    model = RandomForestClassifier(random_state=42)
    model.fit(X_train, y_train)
    y_pred = model.predict(X_test)

    # 評価
    print('Accuracy = ', accuracy_score(y_true=y_test, y_pred=y_pred).round(decimals=3))
    print('Precision = ', precision_score(y_true=y_test, y_pred=y_pred).round(decimals=3))
    print('Recall = ', recall_score(y_true=y_test, y_pred=y_pred).round(decimals=3))
    print('F1 score = ', f1_score(y_true=y_test, y_pred=y_pred).round(decimals=3))
    print('='*20)

    # 混同行列
    y_pred = model.predict(X_test)
    matrix = plot_confusion_matrix(y_pred, y_test)
    return matrix

def plot_confusion_matrix(predict, y_test):
    pred =  np.where(predict > 0.5, 1, 0)
    cm = confusion_matrix(y_test, pred)
    matrix = pd.DataFrame(cm)
    matrix.columns = [['予測_負例(0)', '予測_正例(1)']]
    matrix.index = [['実際_負例(0)', '実際_正例(1)']]
    return matrix

# 特徴選択
Interaction = df.copy()
features = ['残高', 'クレジットカードスコア']
X1 = Interaction[features]
y = Interaction['退会区分']

# ペアワイズ交互作用特徴量
X2 = preproc.PolynomialFeatures(include_bias=False).fit_transform(X1)
print(f'生成前の列数: {X1.shape[1]}')
print(f'生成後の列数: {X2.shape[1]}')
print('='*20)

# 目的変数の抽出、データ分割
X1_train, X1_test, X2_train, X2_test, y_train, y_test = train_test_split(X1, X2, y, test_size=0.3, random_state=42)

# 学習、評価
matrix1 = learning(X1_train, X1_test, y_train, y_test)
matrix2 = learning(X2_train, X2_test, y_train, y_test)
matrix1
matrix2
まとめ
今回は相互作用特徴量の生成方法について、簡単に触れてきました。他にも多くの手法がるため、別途紹介とさせていただきます。また相互作用特徴量の精度評価も別記事で取り上げさせていただきます。
最後に
他の記事はこちらでまとめています。是非ご参照ください。
解析結果
実装結果:GitHub/churn_modeling.ipynb
データセット:Churn Modelling classification data set - kaggle
参考資料
