Project Clearwater
OPNFVなどNFVのコンテキストの中で仮想化ネットワークファンクション(VNF)として度々登場する Project Clearwater。
オープンソースのvIMS(visualized IP Multimedia Subsystem)としてよく登場していますが日本語ドキュメントも全くなく(少なくともわたしは見つけられない・・)、一体何者だろうという興味がここ半年ばかし。
そんななかで暇ができたので触ってみました。
IMSとは
IP Multimedia Subsystemの略で、3GPPなどで標準化された、端的に言えば「IP電話など」を扱うための標準化アーキテクチャです。
きっと、この記事を読んでいらっしゃる方(Clearwaterに興味を持たれる方)などには説明は不要かと思いますが、一応触れておきます。
IMSの特徴はSIP(Session Initiation Protocol)を主に使用し、その他様々なプロトコルを補完的に扱い、システムとしての概念を築きあげているという点。
SIPの標準ではセッションの確立などのいわゆる呼処理の手順を決めているのに対して、システム全体でどうやって電話網等を構成すべきか、ということを定義しているという感じでしょうか。
IMSは携帯電話用のネットワーク内でも、VoLTEなどで使用されていますね。
Open Source IMS
そんなIMSといえば通常であれば国内外の電気・通信メーカ、ソフトウェアベンダがプロプライエタリなソフトウェアとして通信キャリア向けに作っているもの。それがOSSで、しかもクラウドで動くというのがこのProject Clearwaterのすごいところ。一体誰得なのか?
世の中にはオープンソースのVoIPアプリケーションも多々ありますが、このIMSのアーキテクチャに従っている、というのがオープンソースのIP-PBXであるAsteriskなどとは大きく違うところでないでしょうか。
触ってみる
やっぱりこの手のものは実際に触ってみるのに限る。ということで公式ドキュメントを見てワンコール(SIPp)が通るまでとりあえずやってみました。
環境
- Host
- Cento OS 7
- Qemu-kvm
- CPU 2 core 4 th(Core i5)
- mem 4GB
こちらの環境でKVM上にProject Clearwaterを入れたVMを立てて、前後をシミュレータ(SIPp)で挟む構成でテストします。
構築(All In Oneイメージの取得)
ovaファイルが提供されているのでそちらをまずダウンロード。
http://vm-images.cw-ngv.com/cw-aio.ova
※2017-10-29現在
ovaファイルはVirtualBoxやVM wareには良いですが、
KVM環境の場合はコンバートがいるので変換します。
KVMじゃない人はよみとばし
tarで展開
ovaの実態はtarで固めただけなので解凍。
$ tar xvf cw-aio.ova
-rw-r--r-- root/root     11771 2017-09-11 20:58 cw-aio.ovf
-rw------- root/root 1100163072 2017-09-11 20:58 cw-aio-disk1.vmdk
-rw-r--r-- root/root        127 2017-09-11 20:58 cw-aio.mf
vmdkからqcow2へqemu-imgを使って変換します
$ qemu-img convert -f vmdk -O qcow2 cw-aio-disk1.vmdk ./cw-aio-disk1.qcow2
ディスクを移動
$ sudo mv cw-aio-disk1.qcow2 /var/lib/libvirt/images/.
kvm用のVM定義を作成
Guestの必要リソースはovaの場合下記の通りなので揃えておきます
- Guest
- vCPU 1
- メモリ1.6GB
以下にkvm用のXMLを貼っておきますが、あくまでも一例ということで。
<domain type='kvm'>
  <name>cw-aio</name>
  <uuid>12e91f11-05f7-4899-9600-1a925841e5d6</uuid>
  <memory unit='KiB'>1691648</memory>
  <currentMemory unit='KiB'>1691648</currentMemory>
  <vcpu placement='static'>1</vcpu>
  <os>
    <type arch='x86_64' machine='pc-i440fx-vivid'>hvm</type>
    <boot dev='hd'/>
  </os>
  <features>
    <acpi/>
    <apic/>
    <pae/>
  </features>
  <cpu mode='custom' match='exact'>
    <model fallback='allow'>SandyBridge</model>
  </cpu>
  <clock offset='utc'>
    <timer name='rtc' tickpolicy='catchup'/>
    <timer name='pit' tickpolicy='delay'/>
    <timer name='hpet' present='no'/>
  </clock>
  <on_poweroff>destroy</on_poweroff>
  <on_reboot>restart</on_reboot>
  <on_crash>restart</on_crash>
  <pm>
    <suspend-to-mem enabled='no'/>
    <suspend-to-disk enabled='no'/>
  </pm>
  <devices>
    <emulator>/usr/bin/kvm-spice</emulator>
    <disk type='file' device='disk'>
      <driver name='qemu' type='qcow2'/>
      <source file='/var/lib/libvirt/images/cw-aio-disk1.qcow2'/>
      <target dev='vda' bus='virtio'/>
      <address type='pci' domain='0x0000' bus='0x00' slot='0x07' function='0x0'/>
    </disk>
    <controller type='usb' index='0' model='ich9-ehci1'>
      <address type='pci' domain='0x0000' bus='0x00' slot='0x06' function='0x7'/>
    </controller>
    <controller type='usb' index='0' model='ich9-uhci1'>
      <master startport='0'/>
      <address type='pci' domain='0x0000' bus='0x00' slot='0x06' function='0x0' multifunction='on'/>
    </controller>
    <controller type='usb' index='0' model='ich9-uhci2'>
      <master startport='2'/>
      <address type='pci' domain='0x0000' bus='0x00' slot='0x06' function='0x1'/>
    </controller>
    <controller type='usb' index='0' model='ich9-uhci3'>
      <master startport='4'/>
      <address type='pci' domain='0x0000' bus='0x00' slot='0x06' function='0x2'/>
    </controller>
    <controller type='pci' index='0' model='pci-root'/>
    <controller type='virtio-serial' index='0'>
      <address type='pci' domain='0x0000' bus='0x00' slot='0x05' function='0x0'/>
    </controller>
    <interface type='network'>
      <mac address='08:00:27:8f:e4:17'/>
      <source network='default'/>
      <model type='virtio'/>
      <address type='pci' domain='0x0000' bus='0x00' slot='0x03' function='0x0'/>
    </interface>
    <serial type='pty'>
      <target port='0'/>
    </serial>
    <console type='pty'>
      <target type='serial' port='0'/>
    </console>
    <channel type='spicevmc'>
      <target type='virtio' name='com.redhat.spice.0'/>
      <address type='virtio-serial' controller='0' bus='0' port='1'/>
    </channel>
    <input type='mouse' bus='ps2'/>
    <input type='keyboard' bus='ps2'/>
    <graphics type='spice' autoport='yes'/>
    <sound model='ich6'>
      <address type='pci' domain='0x0000' bus='0x00' slot='0x04' function='0x0'/>
    </sound>
    <video>
      <model type='qxl' ram='65536' vram='65536' vgamem='16384' heads='1'/>
      <address type='pci' domain='0x0000' bus='0x00' slot='0x02' function='0x0'/>
    </video>
    <redirdev bus='usb' type='spicevmc'>
    </redirdev>
    <redirdev bus='usb' type='spicevmc'>
    </redirdev>
    <redirdev bus='usb' type='spicevmc'>
    </redirdev>
    <redirdev bus='usb' type='spicevmc'>
    </redirdev>
    <memballoon model='virtio'>
      <address type='pci' domain='0x0000' bus='0x00' slot='0x08' function='0x0'/>
    </memballoon>
  </devices>
</domain>
VMの起動
virsh start cw-aio
GUIがあればvirt-managerでも。コンソールが見れますし。
・・・・なぜか起動しない?
sudo virsh net-dhcp-leases default
んーなぜかDHCP割り当てられてない。
とりあえず reset。
sudo virsh reset cw-aio
 Expiry Time          MAC アドレス   Protocol  IP address                Hostname        Client ID or DUID
-------------------------------------------------------------------------------------------------------------------
 2017-10-24 22:49:34  08:00:27:8f:e4:17  ipv4      192.168.122.120/24         cw-aio          -
なんか起動しました。詳細不明。まあ起動したからいいや。
VMにアクセス
ssh にて、 ubuntu/cw-aioにてアクセス可能です。
普通にsudoもいけます。
とりあえずワンコールを。
せっかく作ったのでワンコール入れたいと思います。
ワンコールを通すためにも、まず加入者のデータを入れなければ。
プロビジョニングがよくわからなかったけど、
ドキュメントを見ればちゃんと書いてました。
ellisというコンポーネントがHTTPでのプロビジョニング支援ツールを提供しており、
そちらを使えばとりあえず加入者を作ることができます。
ellisにアクセスします。
http://[VMのIPアドレス]/でアクセスすると
Please log in
Enter your email address and password
と書かれたウェブページにアクセスできます。
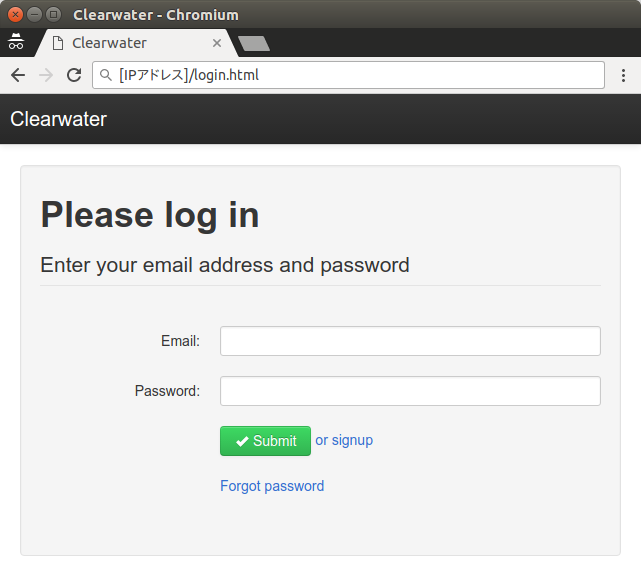
まずアカウントがないので signup を押して作ります。
適当なメールアドレス風のもので大丈夫でした。
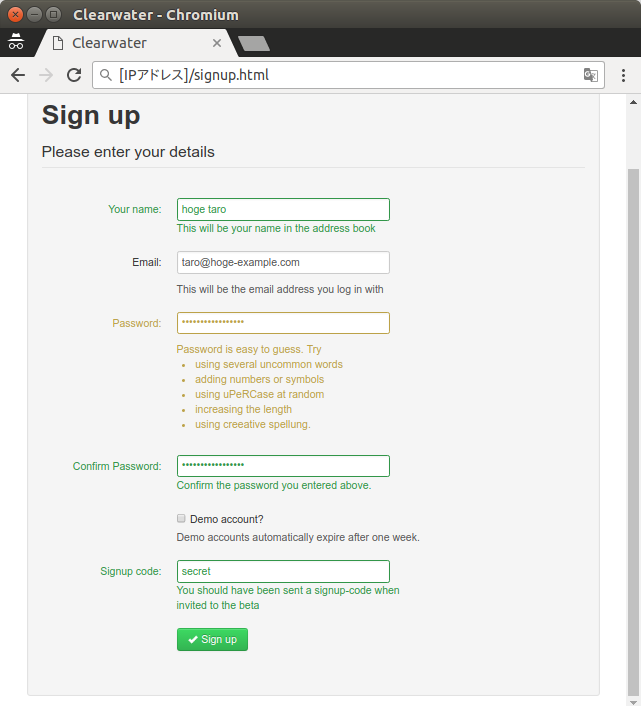
Signup codeは下記ドキュメント中に書いています
http://clearwater.readthedocs.io/en/stable/All_in_one_OVF_Installation.html#running-and-using-the-image
加入者の追加
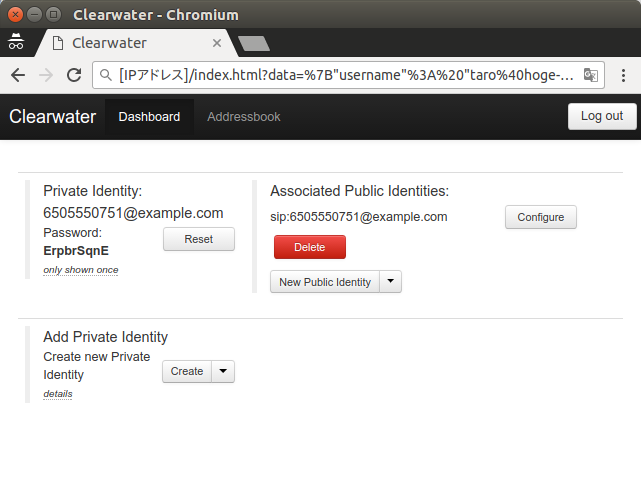
signup/signin するとこのような加入者情報が表示されます。
ここに表示された
- Private Identity:
- Password:
- Associated Public Identities:
これらがSIPの認証に必要なので書き留めておきます。
パスワードは一度しか表示されませんのでご注意を・・・。
忘れたらリセットする他ないです。
Add Private IdentityのCreateをクリックすると新しい加入者を追加できますのでもう1加入者追加しておきましょう。
ワンコール作成
実機でできればいいですが、VMで立ててしまったのでSIPpでワンコールを通したいと思います。
発着信双方でREGISTERをあげ、下記シナリオを流します。
クセモノなのがexample.comというドメインです。
デフォルトでこれが固定(設定ファイル中に注記されているようです)なのですが、example.comがdnsで解決出来てしまうため、下手をするとインターネットに飛んでいってしまうので/etc/hostsに書くなり、適宜うまいこと対処しましょう・・・
REGISTER
シナリオはググッて下記のシナリオを拝借
今回の端末に合わせて下記の要領でREGISTER用のデータを作ります
SEQUENTIAL
# user, domain, authentication
6505550751;example.com;[authentication username=6505550751@example.com password=ErpbrSqnE]
UAS
着信のために当然REGISTERが必要になります。
REGISTERがExpireしないように注意しながらUACの発呼を待つシナリオを起動します。
シナリオは先程と同じところを参考にさせていただきました。
https://github.com/saghul/sipp-scenarios/blob/master/sipp_uas_basic.xml
シナリオの例
CSCFからRecord-Routeが渡されてくるため、Record-Routeを付与してメッセージを返送するように変更してます。
--- uas-basic.orig.xml	2017-10-29 21:08:07.222390573 +0900
+++ uas-basic.xml	2017-10-29 20:38:32.083080746 +0900
@@ -23,7 +23,7 @@
   <!-- By adding rrs="true" (Record Route Sets), the route sets         -->
   <!-- are saved and used for following messages sent. Useful to test   -->
   <!-- against stateful SIP proxies/B2BUAs.                             -->
-  <recv request="INVITE" crlf="true">
+  <recv request="INVITE" crlf="true" rrs="true">
   </recv>

   <!-- The '[last_*]' keyword is replaced automatically by the          -->
@@ -45,6 +45,7 @@
       [last_To:];tag=[pid]SIPpTag01[call_number]
       [last_Call-ID:]
       [last_CSeq:]
+      [last_Record-Route:]
       Contact: <sip:[local_ip]:[local_port];transport=[transport]>
       Content-Length: 0
     ]]>
@@ -58,9 +59,11 @@
       [last_To:];tag=[pid]SIPpTag01[call_number]
       [last_Call-ID:]
       [last_CSeq:]
+      [last_Record-Route:]
       Contact: <sip:[local_ip]:[local_port];transport=[transport]>
       Content-Type: application/sdp
       Content-Length: [len]
+
       v=0
       o=user1 53655765 2353687637 IN IP[local_ip_type] [local_ip]
       s=-
@@ -88,6 +91,7 @@
       [last_To:]
       [last_Call-ID:]
       [last_CSeq:]
+      [last_Record-Route:]
       Contact: <sip:[local_ip]:[local_port];transport=[transport]>
       Content-Length: 0
     ]]>
UAC
REGISTERをあげない状態でINVITEを送っても403が帰ってきます。
着信の有無にかかわらずREGISTERを上げる必要があります。
またINVITEに対してもREGISTERが上がっている状態であれば特に認証不要でした。
シナリオは先程と同じくこちらを参考にさせていただきました。
https://github.com/saghul/sipp-scenarios/blob/master/sipp_uac_basic.xml
ドメイン名を固定したのとRouteSetが返されるのでRouteSetを付与するように変更してます。
シナリオの例
--- uac-basic.orig.xml	2017-10-29 20:51:27.965000000 +0900
+++ uac-basic.s.xml	2017-10-29 21:03:10.998000000 +0900
@@ -27,7 +27,7 @@
   -->
   <send retrans="500">
     <![CDATA[
-      INVITE sip:[service]@[remote_ip]:[remote_port] SIP/2.0
+      INVITE sip:[service]@example.com:[remote_port] SIP/2.0
       Via: SIP/2.0/[transport] [local_ip]:[local_port];branch=[branch]
       From: sipp <sip:sipp@[local_ip]:[local_port]>;tag=[pid]SIPpTag00[call_number]
       To: sut <sip:[service]@[remote_ip]:[remote_port]>
@@ -38,6 +38,7 @@
       Subject: Performance Test
       Content-Type: application/sdp
       Content-Length: [len]
+
       v=0
       o=user1 53655765 2353687637 IN IP[local_ip_type] [local_ip]
       s=-
@@ -47,7 +48,7 @@
       a=rtpmap:0 PCMU/8000
     ]]>
   </send>
-
+
   <recv response="100"
         optional="true">
   </recv>
@@ -61,19 +62,20 @@
   <!-- By adding rrs="true" (Record Route Sets), the route sets         -->
   <!-- are saved and used for following messages sent. Useful to test   -->
   <!-- against stateful SIP proxies/B2BUAs.                             -->
-  <recv response="200" rtd="true">
+  <recv response="200" rtd="true" rrs="true">
   </recv>

   <!-- Packet lost can be simulated in any send/recv message by         -->
   <!-- by adding the 'lost = "10"'. Value can be [1-100] percent.       -->
   <send>
     <![CDATA[
-      ACK sip:[service]@[remote_ip]:[remote_port] SIP/2.0
+      ACK [next_url] SIP/2.0
       Via: SIP/2.0/[transport] [local_ip]:[local_port];branch=[branch]
       From: sipp <sip:sipp@[local_ip]:[local_port]>;tag=[pid]SIPpTag00[call_number]
       To: sut <sip:[service]@[remote_ip]:[remote_port]>[peer_tag_param]
       Call-ID: [call_id]
       CSeq: 1 ACK
+      [routes]
       Contact: sip:sipp@[local_ip]:[local_port]
       Max-Forwards: 70
       Subject: Performance Test
@@ -83,17 +85,18 @@

   <!-- This delay can be customized by the -d command-line option       -->
   <!-- or by adding a 'milliseconds = "value"' option here.             -->
-  <pause/>
+  <pause milliseconds = "5000"/>

   <!-- The 'crlf' option inserts a blank line in the statistics report. -->
   <send retrans="500">
     <![CDATA[
-      BYE sip:[service]@[remote_ip]:[remote_port] SIP/2.0
+      BYE [next_url] SIP/2.0
       Via: SIP/2.0/[transport] [local_ip]:[local_port];branch=[branch]
       From: sipp <sip:sipp@[local_ip]:[local_port]>;tag=[pid]SIPpTag00[call_number]
       To: sut <sip:[service]@[remote_ip]:[remote_port]>[peer_tag_param]
       Call-ID: [call_id]
       CSeq: 2 BYE
+      [routes]
       Contact: sip:sipp@[local_ip]:[local_port]
       Max-Forwards: 70
       Subject: Performance Test
@@ -111,3 +114,5 @@
   <CallLengthRepartition value="10, 50, 100, 500, 1000, 5000, 10000"/>

 </scenario>
+
+
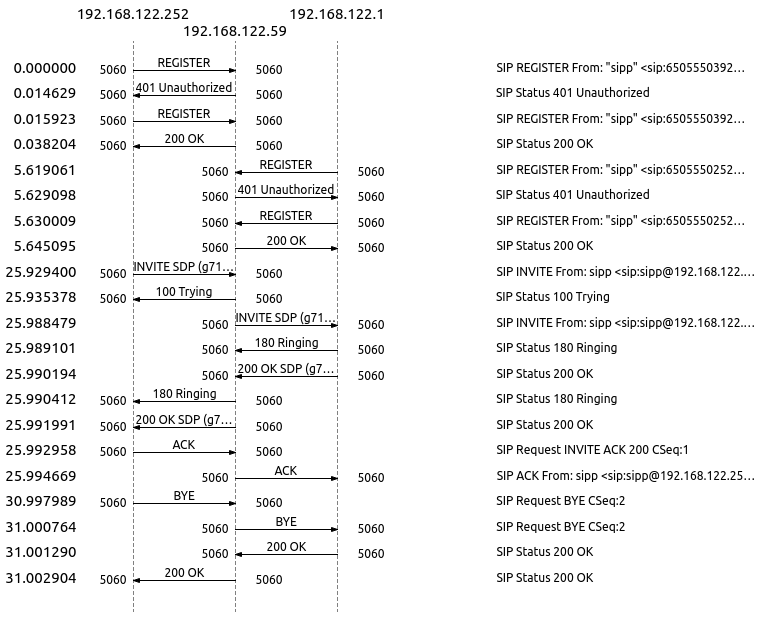
ワンコールの実施
やっとこさ準備がととのってワンコールが流せる状態になりましたので、
ここでワンコール実施。
アドレスや加入者情報が先ほどと違うのはご愛顧で。
わかりやすいように、sippのuas/uacは別のホストを設定しています。
送出INVITE
INVITE sip:6505550252@example.com:5060 SIP/2.0
Via: SIP/2.0/UDP 192.168.122.252:5060;branch=z9hG4bK-2172-1-0
From: sipp <sip:sipp@192.168.122.252:5060>;tag=2172SIPpTag001
To: sut <sip:6505550252@192.168.122.59:5060>
Call-ID: 1-2172@192.168.122.252
CSeq: 1 INVITE
Contact: sip:sipp@192.168.122.252:5060
Max-Forwards: 70
Subject: Performance Test
Content-Type: application/sdp
Content-Length:   141

v=0
o=user1 53655765 2353687637 IN IP4 192.168.122.252
s=-
c=IN IP4 192.168.122.252
t=0 0
m=audio 6000 RTP/AVP 0
a=rtpmap:0 PCMU/8000
受信INVITE
INVITE sip:sipp@192.168.122.1:5060 SIP/2.0
Via: SIP/2.0/UDP cw-aio:5060;rport;branch=z9hG4bKPjtRGVhve-YKG1vwgk.lnqbxzCSzlkrIr4
Record-Route: <sip:TuLT7/IzJo@cw-aio:5060;transport=UDP;lr>
Record-Route: <sip:192.168.122.59:5058;transport=TCP;lr>
Via: SIP/2.0/TCP 192.168.122.59:5052;rport=36093;received=192.168.122.59;branch=z9hG4bKPj4X3QJJRCKXTydXpHEaXCgN5MQgoQ35i7
Record-Route: <sip:scscf.cw-aio:5054;transport=TCP;lr;billing-role=charge-term>
Record-Route: <sip:scscf.cw-aio:5054;transport=TCP;lr;billing-role=charge-orig>
Via: SIP/2.0/TCP 192.168.122.59:5058;rport=58783;received=192.168.122.59;branch=z9hG4bKPj0CakBe.7HH1NdY2fCg0ZV5JVhmnXV.NA
Record-Route: <sip:192.168.122.59:5058;transport=TCP;lr>
Record-Route: <sip:uhPcmg5Jru@cw-aio:5060;transport=UDP;lr>
Via: SIP/2.0/UDP 192.168.122.252:5060;received=192.168.122.252;branch=z9hG4bK-2172-1-0
From: "sipp" <sip:sipp@192.168.122.252>;tag=2172SIPpTag001
To: "sut" <sip:6505550252@192.168.122.59>
Call-ID: 1-2172@192.168.122.252
CSeq: 1 INVITE
Contact: <sip:sipp@192.168.122.252:5060>
Max-Forwards: 63
Subject: Performance Test
P-Asserted-Identity: <sip:6505550392@example.com>
Session-Expires: 600
P-Called-Party-ID: <sip:6505550252@example.com>
Content-Type: application/sdp
Content-Length:   141

v=0
o=user1 53655765 2353687637 IN IP4 192.168.122.252
s=-
c=IN IP4 192.168.122.252
t=0 0
m=audio 6000 RTP/AVP 0
a=rtpmap:0 PCMU/8000
まとめ
all-in-one imageのおかげで非常に簡単にProject Clearwaterの構築ができました。
とっても簡単。設定いらずで試せるというのは素晴らしいですね。
各コンポーネントの中身はまだ追いかけきれていませんが、設定の変更や、各コンポーネントの処理の流れをもう少し追ってみたいと思います。
内部の処理をちょっとパケットキャプチャしてみましたが、Registerの処理などはSIPで受けて、裏ではHTTP/RESTライクなAPIで連携しているようです。
しかし、ここまできちんとしたものがオープンソースというのがすさまじいです。
でも一体誰が使うのか・・・?MVNOとか?商用導入の実績など気になります。