まとめ
家族のインフルエンザ予防のためにも、室内の温度・湿度を管理したくて作ってみました。
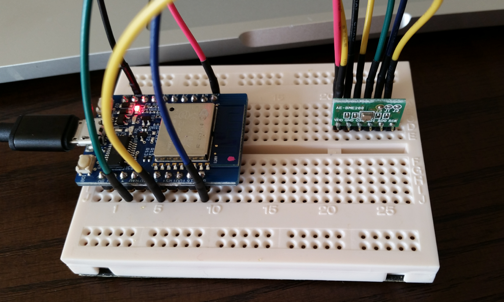
話題のESP8266がのってるSwitch ScienceのESP-WROOM-02開発ボードほしいのにずっと売り切れ・・と思いながら千石電商に行ってみたら普通に売っていたので買ってきました。
配線もほかのパーツも必要なく、ネットにつなぐのもすぐにできるし、この価格はゲームチェンジだなぁ、と感じています。
ただ、電源がないところで使おうとするとやっぱり電池の問題をどうするか、という問題は残るので、ディープスリープモードでどれぐらい連続稼働できるか試してみたい。
ディープスリープモードで復帰1s以内にWifiでPOSTできて、すぐにディープスリープモードに入るならtwe-liteよりも簡単に電池稼働のモニタリングシステムができるかも。
Blynkも素晴らしくて、省エネとか考えなければ簡単にモニタリング+表示するアプリを作ることができて、配布までできるので家庭内だとやりたいことが簡単に実現できてすばらしい。
秋葉原がもっと近くにあるか、Amazonで電子工作のパーツをPrimeで買えるようになると良いのですが、、、。
必要なもの
合計3000円ぐらいかな。ESP8266+ブレークアウトボードで作れば2000円ぐらいになるはず。ESP-WROOM-02開発ボードはUSBシリアル変換チップも乗ってるので、開発はこのボードでやって、運用は安い構成にしてスケッチを書き込む、が良いのかも。
秋月のBME280のモジュールキットは、プルアップ抵抗もオンボードになっていてブレッドボードに乗せる時もすっきりした感じになります。
作り方
http://todotani.cocolog-nifty.com/blog/2015/10/esp-wroom-02i2c.html
で紹介してくれてるのを参考に、
- IO4 -> SDI
- IO5 -> SCK
を繋いであげればOK。
スケッチも下記に紹介されてくれている通りでOK。ありがたや。
BME280, Blynkのライブラリはgithubからzipをダウンロードしてライブラリ追加しておけばOK。
コード
http://todotani.cocolog-nifty.com/blog/2015/10/esp-wroom-02i2c.html
で紹介してくれているコードのほとんどコピペです。
いくつかデバッグ用にPrint追加してあるぐらい。
/**************************************************************
 * Blynk is a platform with iOS and Android apps to control
 * Arduino, Raspberry Pi and the likes over the Internet.
 * You can easily build graphic interfaces for all your
 * projects by simply dragging and dropping widgets.
 *
 *   Downloads, docs, tutorials: http://www.blynk.cc
 *   Blynk community:            http://community.blynk.cc
 *   Social networks:            http://www.fb.com/blynkapp
 *                               http://twitter.com/blynk_app
 *
 * Blynk library is licensed under MIT license
 * This example code is in public domain.
 *
 **************************************************************
 * This example runs directly on ESP8266 chip.
 *
 * You need to install this for ESP8266 development:
 *   https://github.com/esp8266/Arduino
 *
 * Please be sure to select hte right ESP8266 module
 * in the Tools -> Board menu!
 *
 * Change WiFi ssid, pass, and Blynk auth token to run :)
 *
 **************************************************************/

# define BLYNK_PRINT Serial    // Comment this out to disable prints and save space
# include <ESP8266WiFi.h>
# include <BlynkSimpleEsp8266.h>
# include <BME280_MOD-1022.h>
# include <Wire.h>

// You should get Auth Token in the Blynk App.
// Go to the Project Settings (nut icon).
char auth[] = "blynk auth token";

unsigned long lastCheck = 0;
double tempMostAccurate, humidityMostAccurate, pressureMostAccurate;
char buff[50];

// Arduino needs this to pring pretty numbers

void printFormattedFloat(float x, uint8_t precision) {
  char buffer[10];

  dtostrf(x, 7, precision, buffer);
  Serial.print(buffer);
}

void setup()
{
  Serial.begin(115200);
  Blynk.begin(auth, "ssid", "pass");
  Wire.begin();
  pinMode(12, OUTPUT);

  // need to read the NVM compensation parameters
  BME280.readCompensationParams();

  BME280.writeStandbyTime(tsb_0p5ms);         // tsb = 0.5ms
  BME280.writeFilterCoefficient(fc_16);       // IIR Filter coefficient 16
  BME280.writeOversamplingPressure(os16x);    // pressure x16
  BME280.writeOversamplingTemperature(os2x);  // temperature x2
  BME280.writeOversamplingHumidity(os1x);     // humidity x1

  BME280.writeMode(smNormal);
}

void formattedFloat(float x, uint8_t precision, char *buff) {
  dtostrf(x, 7, precision, buff);
}

BLYNK_READ(V0)
{
  tempMostAccurate = BME280.getTemperatureMostAccurate();

  Serial.print("Temp ");
  printFormattedFloat(tempMostAccurate, 2);
  Serial.println();

  formattedFloat(tempMostAccurate, 2, buff);
  Blynk.virtualWrite(V0, buff);
}

BLYNK_READ(V1)
{
  humidityMostAccurate = BME280.getHumidityMostAccurate();

  Serial.print("humid ");
  printFormattedFloat(humidityMostAccurate, 2);
  Serial.println();


  formattedFloat(humidityMostAccurate, 2, buff);
  Blynk.virtualWrite(V1, buff);
}

BLYNK_READ(V2)
{
  pressureMostAccurate = BME280.getPressureMostAccurate();

  Serial.print("pressure ");
  printFormattedFloat(pressureMostAccurate, 2);
  Serial.println();

  formattedFloat(pressureMostAccurate, 2, buff);
  Blynk.virtualWrite(V2, buff);
}

void loop()
{
  Blynk.run();

  int diff = millis() - lastCheck;
  if (diff > 1000) {
    while (BME280.isMeasuring()) {

    }
    // read out the data - must do this before calling the getxxxxx routines
    BME280.readMeasurements();
    lastCheck = millis();
  } else if (diff < 0) {
    lastCheck = 0;
  }
}
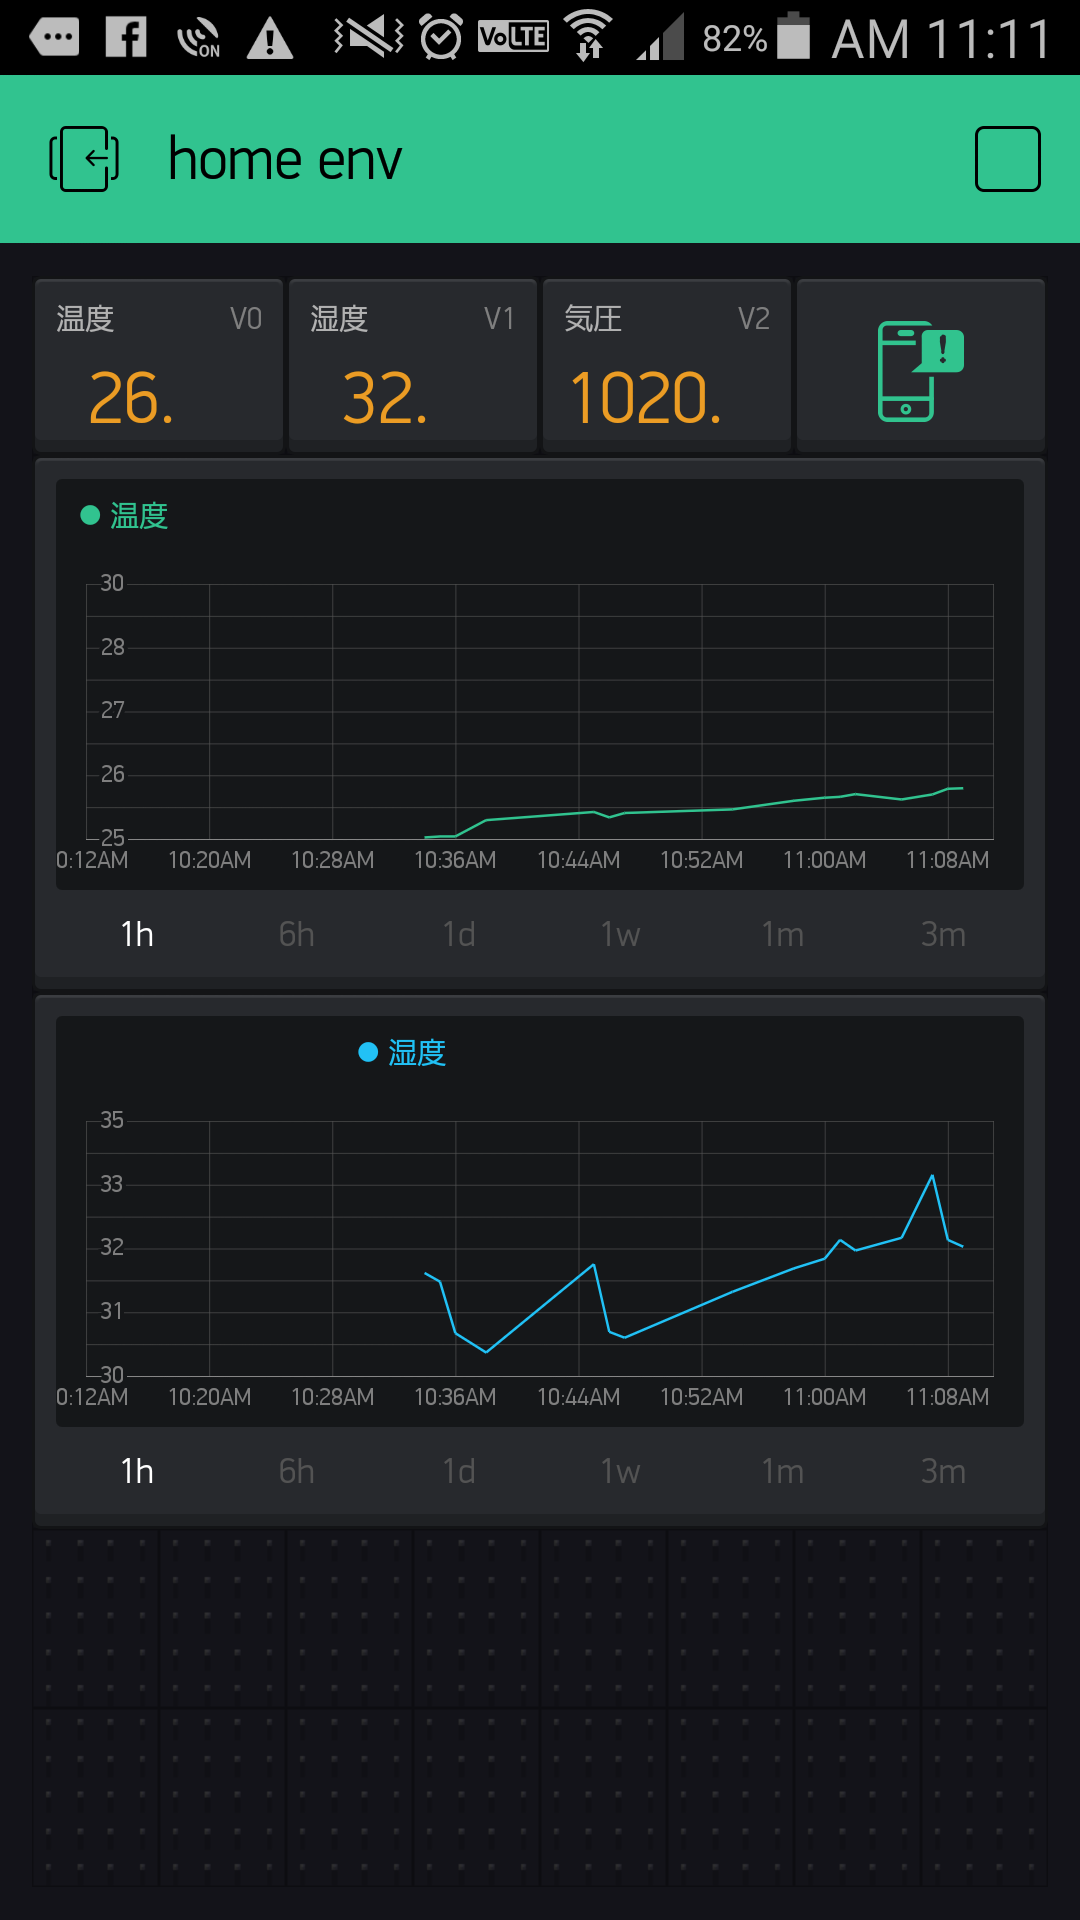
Blynkの表示
すぐにかっこいい感じで表示できる!いいなこれ。データを蓄積するのと、グラフで可視化したい、というのはよくあるケースなのでよくわかってるな、という感じがする。データを取り出すことはできないみたいなので、分析したい、みたいな用途には使えなそうだけど。
トラブル
ESP8266をプログラム書き込みモードにするには、IO0=Lにする必要があるのですが、IO0のスイッチを押しながらリセットするだけではダメで、書き込み開始をArduino IDE側で行うまでIO0のスイッチを押し続けて上げる感じでやるとうまくいきました。
最初なぜ書き込みモードにならないか全くわからずハマりました・・・。