RxDataSourcesを見ながら適当なTableViewを作る
手順
1. Modelの作成
以下のようなModelがあるとする。
struct CustomData {
    var str: String
}
TableViewのSectionを表すための構造体を作る
struct SectionOfCustomData {
    var header: String
    var items: [Item]
}

extension SectionOfCustomData: SectionModelType {
    typealias Item = CustomData

    init(original: SectionOfCustomData, items: [SectionOfCustomData.Item]) {
        self = original
        self.items = items
    }
}
SectionOfCustomDataはSectionModelTypeに準拠する必要がある。
2. ViewControllerの作成
StoryboardでViewControllerの上にTableViewをおく。
Storyboard上でdatasource/delegateの設定は行わないこと。
ViewControllerのコードは以下のようになる。
import UIKit
import RxSwift
import RxDataSources
class ViewController: UIViewController, UITableViewDelegate {
@IBOutlet weak var tableView: UITableView!
var dataSource: RxTableViewSectionedReloadDataSource<SectionOfCustomData>!
let d = DisposeBag()
override func viewDidLoad() {
super.viewDidLoad()
tableView.rx.setDelegate(self).disposed(by: d)
setupDataSource()
bindModels()
}
func setupDataSource() {
dataSource = RxTableViewSectionedReloadDataSource<SectionOfCustomData>(configureCell: {
(ds: TableViewSectionedDataSource<SectionOfCustomData>, tableView: UITableView, indexPath: IndexPath, model: CustomData) -> UITableViewCell in
let cell = tableView.dequeueReusableCell(withIdentifier: "Cell", for: indexPath)
cell.textLabel?.text = model.str
return cell
})
dataSource.titleForHeaderInSection = { ds, index in
return ds.sectionModels[index].header
}
}
func bindModels() {
let sections = [
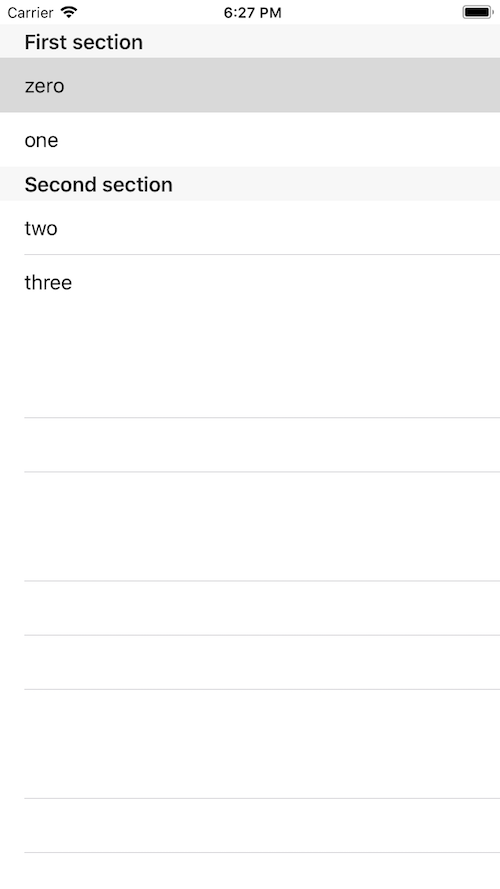
SectionOfCustomData(header: "First section",
items: [CustomData(str: "zero"),
CustomData(str: "one") ]),
SectionOfCustomData(header: "Second section",
items: [CustomData(str: "two"),
CustomData(str: "three") ])
]
Observable.just(sections)
.bind(to: tableView.rx.items(dataSource: dataSource))
.disposed(by: d)
}
}
DataSourceの設定をする
setupDataSource()では表示されるCellの設定をします。
以下のメンバにクロージャをセットします。
-
configureCell(required) : Cell -
titleForHeaderInSection: セクションヘッダ -
titleForFooterInSection: セクションフッタ - etc
ModelをBindする
Modelを適当に作って、SectionOfCustomDataを作成しDataSourceにBindします。
以上
UITableViewDelegate, UITableViewDataSourceを使ってみる
同じことをUITableViewDelegate, UITableViewDataSourceを使って書いてみた。
import UIKit

class ViewController: UIViewController {

    @IBOutlet weak var tableView: UITableView!
    let sections = [
        SectionOfCustomData(header: "First section",
                            items: [CustomData(str: "zero"),
                                    CustomData(str: "one") ]),
        SectionOfCustomData(header: "Second section",
                            items: [CustomData(str: "two"),
                                    CustomData(str: "three") ])
    ]

    override func viewDidLoad() {
        super.viewDidLoad()

        tableView.delegate = self
        tableView.dataSource = self
    }
}

extension ViewController: UITableViewDataSource {

    func numberOfSections(in tableView: UITableView) -> Int {
        return sections.count
    }

    func tableView(_ tableView: UITableView, numberOfRowsInSection section: Int) -> Int {
        return sections[section].items.count
    }

    func tableView(_ tableView: UITableView, cellForRowAt indexPath: IndexPath) -> UITableViewCell {
        let model = sections[indexPath.section].items[indexPath.row]
        let cell = tableView.dequeueReusableCell(withIdentifier: "Cell", for: indexPath)
        cell.textLabel?.text = model.str

        return cell
    }
}

extension ViewController: UITableViewDelegate {

    func tableView(_ tableView: UITableView, titleForHeaderInSection section: Int) -> String? {
        return sections[section].header
    }
}
個人的な感想
今回はCellやModelがシンプルなので一概には言えないけど
- なれている方が使いやすい。
- お作法的な書き方がやっぱり覚えやすくない。
- RxDataSource使えば
numberOfxxxとか書かなくてよくて楽。 - 書きながらデバッグして見た目を調整したい時とかは
UITableViewDelegate,UITableViewDataSource使う方が向いている気がする。 - いろんなCell, 同一Section内に複数種類のCellがあるときはまた今度試そうと思う。