chiselとは
WebSocketを使用したTCP Tunnelです。Goで書かれています。
https://github.com/jpillora/chisel
chiselというとこちらよりもScalaのツールのほうが有名ぽいですが、WebSocketを使用したTCP Tunnelのほうです。
特徴
WebSocketを使用したTCP Tunnelで、CONNECTをサポートするHTTPプロキシに対応しています。
WebSocket内部のTCP通信自体はSSH Channelを使用して暗号化されています。
またクライアントは自動的な再接続もサポートしており、再接続の際にはExponential Backoff(初期値: 100ms)を使用して再接続します。
認証にはサーバー側でjsonファイルとして管理し、ユーザー/パスワードをキーとして、ユーザー毎に接続先を配列(正規表現を文字列で設定)で指定できます。
目標
- chiselの利用方法を確認する
- 各種オプションの確認
- 動作の把握
- サーバーポートとしては、80/443を使用して、TCPトンネリングを行い。sshで80/443を使用して接続するという検証を行う。
- 最終的にはZabbixを背後において動かしたいが、とりあえずsshで確認してみます。
- HTTPプロキシ使用時の動作およびコンテンツフィルターの利用が想定される環境を検証する
検証環境
- 環境 : Azure B1s
- OS : Ubuntu 16.04 LTS / 18.04 LTSはまだAzureにきてなかった
- TZ : UTC
$ uname -a
Linux chiesel 4.13.0-1018-azure #21-Ubuntu SMP Thu May 17 13:58:38 UTC 2018 x86_64 x86_64 x86_64 GNU/Linux
セキュリティグループ や 仮想ネットワーク
とりあえず SSH / HTTP / HTTPS / 8080(chieselのデフォルトポート)を空けて、public IPアドレス/DNSラベルを付与しておきます。
今回はmy-chisel-vm.japaneast.cloudapp.azure.comを付与して、取得したドメインchisel-zabbix.tkにchisel.chisel-zabbix.tkにCNAMEとして設定しました。
インストール
README記載の下記の方法だと/usr/local/binに入れようとして失敗しているようです。
$ curl https://i.jpillora.com/chisel! | bash
Installing jpillora/chisel 1.2.3...
######################################################################## 100.0%
mv: cannot move './chisel' to '/usr/local/bin/chisel': Permission denied
一度保存して、実行するとうまくいきました。既定で$HOME/binにPATHが通っていたのでそこに移動します。
$ curl -o chisel_install https://i.jpillora.com/chisel
$ bash chisel_install
$ mkdir bin
$ mv chisel bin/
とりあえずversionを確認します。
$ chisel help

  Usage: chisel [command] [--help]

  Version: 1.2.3

  Commands:
    server - runs chisel in server mode
    client - runs chisel in client mode

  Read more:
    https://github.com/jpillora/chisel
サーバー
オプションを確認します。
- --host : listenするnetwork interface。既定では 0.0.0.0
- --port : listenするポートです。既定では 8080
- --proxy : chiselはWebSocketしか使わないので、通常のHTTPリクエストをバックエンドのhttpサーバーにプロキシすることができます。これはAzureのApplication LoadBalancerとか置くときにProbeでHTTPリクエストで確認するため、同一ホストにHTTPサーバーを立てておくとよいかもしれません。
- --pid : pidファイルを作ってくれるようです。サービスで起動するときなどに便利なのかもしれません。
- -v : 詳細なログがでるようです。
- --authfile : json形式でユーザーとパスワードおよび接続可能なホストを正規表現で指定できるようです。
- --key : 暗号化にはECDSAを使用しているようで、そのシードを指定するようです。ただこれで何ができるかよくわかりません。キーが環境変数に入れてあるとのことなのでポートを変えて起動するときに環境変数を使用して、複数プロセスを起動することで、多重化できるとかかもしれません。
起動すると下記のように8080で待ち受けます。
$ chisel server -v
2018/06/01 07:23:19 server: Fingerprint 95:27:2e:df:d6:68:63:8f:a9:ce:93:b5:8f:2e:d9:73
2018/06/01 07:23:19 server: Listening on 8080...
クライアント
オプションを確認します。
- --fingerprint : サーバー起動時のFingerprintを指定します。(めっちゃ推奨されています)
- --auth : サーバーでauthfileが指定されている場合にuser:passの形式で指定します。
- --proxy : HTTPプロキシを指定します。 CONNECTがサポートされていないといけません。
- --keepalive : 既定では無効(0s)になっていますが、プロキシに合わせて設定する内容です。
- --pid
- --help, This help text
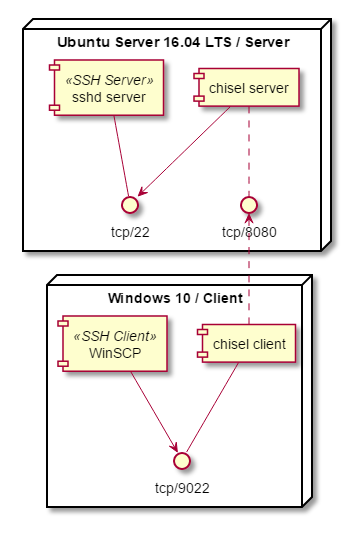
今回はWindowsでクライアントを起動し、WinSCPからchisel経由でsshdに接続します。
WinSCPの接続情報としては下記のように設定します。
ホスト : localhost
ポート : 9022
認証 : RSA証明書を使用
インストールはやはりリリースページからchisel_windows_amd64.exe.gzをダウンロードします。
サーバー側ではポート22でSSHサーバーが起動していたので、そちらにトンネルするようにします。
サーバーの指定はhttpで行いましたが、接続としてはWebSocketだからかwsで表示されます。
> .\chisel.exe client -v http://my-chisel-vm.japaneast.cloudapp.azure.com:8080/ localhost:9022:0.0.0.0:22
2018/06/01 16:30:14 client: Connecting to ws://my-chisel-vm.japaneast.cloudapp.azure.com:8080/
2018/06/01 16:30:14 client: tunnel#1 localhost:9022=>0.0.0.0:22: Listening
2018/06/01 16:30:14 client: Fingerprint 95:27:2e:df:d6:68:63:8f:a9:ce:93:b5:8f:2e:d9:73
2018/06/01 16:30:14 client: Connected (Latency 13.0934ms)
WinSCPからchiselのトンネルを使用して、接続してみると下記のように表示されます。
時刻が違うようにみえますが、サーバーのタイムゾーンがUTCのままだからです。
サーバー
2018/06/01 08:42:21 server: session#2: Open
2018/06/01 08:42:54 server: session#2:  tcp#00001: [1/1] Open
クライアント
2018/06/01 17:42:54 client: tunnel#1 localhost:9022=>0.0.0.0:22: conn#1: Open
このときのネットワークはこのような形になっています。
使用メモリ
psで確認すると大体10M位使用しているようです。
$ ps aux | grep chisel
chisel     1269  0.0  0.9  11432  9036 ?        Ssl  02:29   0:00 /opt/chisel/bin/chisel server
SSH接続数を10増やしたところ、+1Mという感じで、およそ接続あたり100k程度のメモリ使用量増でした。
chisel 1269 0.0 1.0 12556 9556 ? Ssl 02:29 0:00 /opt/chisel/bin/chisel server
クライアント側でのFingerprint指定するとどうなる?
サーバー起動時のFingerprintは下記のように表示されています。
2018/06/01 08:28:49 server: Fingerprint 9a:39:21:cb:e2:9f:ed:22:85:4e:5b:ac:7f:8f:d3:d9
Fingerprintの先頭の9aを8aに変えて接続してみました。予想通り接続できません。
> .\chisel.exe client -v  --fingerprint "8a:39:21:cb:e2:9f:ed:22:85:4e:5b:ac:7f:8f:d3:d9" http://my-chisel-vm.japaneast.cloudapp.azure.com:8080/ localhost:9022:0.0.0.0:22
2018/06/01 17:57:38 client: Connecting to ws://my-chisel-vm.japaneast.cloudapp.azure.com:8080/
2018/06/01 17:57:38 client: tunnel#1 localhost:9022=>0.0.0.0:22: Listening
2018/06/01 17:57:39 client: Handshaking...
2018/06/01 17:57:39 client: ssh: handshake failed: Invalid fingerprint (9a:39:21:cb:e2:9f:ed:22:85:4e:5b:ac:7f:8f:d3:d9)
サーバー側でもハンドシェイクに失敗しているのが表示されました。
2018/06/01 08:57:39 server: session#4: Handshaking...
2018/06/01 08:57:39 server: Failed to handshake (read tcp 10.1.0.4:8080->202.33.100.155:20603: read: connection reset by peer)
もちろん正しく設定されていれば接続できます。
> .\chisel.exe client -v  --fingerprint "9a:39:21:cb:e2:9f:ed:22:85:4e:5b:ac:7f:8f:d3:d9" h
ttp://my-chisel-vm.japaneast.cloudapp.azure.com:8080/ localhost:9022:0.0.0.0:22
2018/06/01 17:57:53 client: Connecting to ws://my-chisel-vm.japaneast.cloudapp.azure.com:8080/
2018/06/01 17:57:53 client: tunnel#1 localhost:9022=>0.0.0.0:22: Listening
2018/06/01 17:57:53 client: Handshaking...
2018/06/01 17:57:53 client: Fingerprint 9a:39:21:cb:e2:9f:ed:22:85:4e:5b:ac:7f:8f:d3:d9
2018/06/01 17:57:53 client: Sending config
切断時の復帰
$ chisel server -v
2018/06/01 07:23:19 server: Fingerprint 95:27:2e:df:d6:68:63:8f:a9:ce:93:b5:8f:2e:d9:73
2018/06/01 07:23:19 server: Listening on 8080...
2018/06/01 07:28:20.127 GET / 404 3µs 9B (103.234.226.47)
2018/06/01 07:30:14 server: session#1: Handshaking...
2018/06/01 07:30:14 server: session#1: Verifying configuration
2018/06/01 07:30:14 server: session#1: Open
2018/06/01 07:31:35 server: session#1:  tcp#00001: [1/1] Open
2018/06/01 07:32:32 server: session#1:  tcp#00002: [2/2] Open
2018/06/01 07:32:55.233 GET / 404 12µs 9B (46.181.70.79)
2018/06/01 07:33:43.505 GET / 404 2µs 9B (187.145.9.206)
2018/06/01 07:41:34 server: session#1:  tcp#00003: [3/3] Open
2018/06/01 07:41:42 server: session#1:  tcp#00003: [2/3] Close (sent 2.64KB received 0B)
2018/06/01 07:47:40.710 GET / 404 3µs 9B (194.213.212.36)
^C
(ここで一度サーバーを停止)

$ chisel server -v
2018/06/01 07:49:20 server: Fingerprint 9f:14:c4:83:27:11:38:a9:1f:5a:06:2a:6a:cf:9a:e2
2018/06/01 07:49:20 server: Listening on 8080...
2018/06/01 07:49:24 server: session#1: Handshaking...
2018/06/01 07:49:25 server: session#1: Verifying configuration
2018/06/01 07:49:25 server: session#1: Open
2018/06/01 07:49:31 server: session#1:  tcp#00001: [1/1] Open
サーバーが落ちてもクライアント側が自動的にリトライします。
Fingerprintもあたらしいのを受け取っていることが確認できます。
> .\chisel.exe client -v http://my-chisel-vm.japaneast.cloudapp.azure.com:8080/ localhost:9022:0.0.0.0:22
2018/06/01 16:30:14 client: Connecting to ws://my-chisel-vm.japaneast.cloudapp.azure.com:8080/
2018/06/01 16:30:14 client: tunnel#1 localhost:9022=>0.0.0.0:22: Listening
2018/06/01 16:30:14 client: Fingerprint 95:27:2e:df:d6:68:63:8f:a9:ce:93:b5:8f:2e:d9:73
2018/06/01 16:30:14 client: Connected (Latency 13.0934ms)
(ここでサーバーが一度落ちる)
2018/06/01 16:49:18 client: Retrying in 100ms...
2018/06/01 16:49:24 client: Fingerprint 9f:14:c4:83:27:11:38:a9:1f:5a:06:2a:6a:cf:9a:e2
2018/06/01 16:49:25 client: Connected (Latency 14.9981ms)
リトライはExponential Backoffで行っており倍々でリトライまでの時間が増えていきます。初期値は100msのようです。
2018/06/01 17:26:08 client: Retrying in 100ms...
2018/06/01 17:26:15 client: Retrying in 200ms...
2018/06/01 17:26:22 client: Retrying in 400ms...
2018/06/01 17:26:29 client: Retrying in 800ms...
2018/06/01 17:26:36 client: Retrying in 1.6s...
2018/06/01 17:26:44 client: Retrying in 3.2s...
2018/06/01 17:26:54 client: Retrying in 6.4s...
2018/06/01 17:27:07 client: Retrying in 12.8s...
サーバーが落ちた場合、クライアント側で--fingerprint指定がなければ、サーバーの新しいFingerprintを読み込んで再接続できますが、
サーバーでは証明書を指定するわけではないので、クライアント側で--fingerprint指定していた場合は下記のように再接続できません。
2018/06/01 18:08:11 client: tunnel#1 localhost:9022=>0.0.0.0:22: conn#2: No server connection
2018/06/01 18:08:11 client: Handshaking...
2018/06/01 18:08:11 client: ssh: handshake failed: Invalid fingerprint (f9:bb:7f:29:e3:af:c6:78:55:39:e8:56:1d:13:b9:08)
authfileを使った場合
認証用の設定は下記のように記述します。
jsonのキーに"<user>:<password>"で指定、値に許可する接続先を配列を指定します。配列の要素がない場合は制限なしとなります。配列の中身は正規表現の文字列です。
下記の例の場合、ユーザー foo, userは特に制限なし。httpはどのホストでも接続できますが、ポートは80しか接続できません。
sshはlocalhostのポート22のみ、127.0.0.1や0.0.0.0も正規表現で一致しないため、接続できません。
{
        "foo:bar" : [],
        "user:P@ssw0rd" : [],
        "http:P@ssw0rd" : [":80$"]
        "ssh:P@ss0rd" : ["^localhost:22$"],
}
serverでの起動は--authfile path/to/users.jsonで指定します。
$ chisel serve --authfile /opt/chisel/conf/users.json
client側では下記のように--authで"<user>:<password>"を指定し、起動します。
> .\chisel.exe client --auth ssh:P@ssw0rd -v http://my-chisel-vm.japaneast.cloudapp.azure.com:8080 -localhost:9022:localhost:22
正規表現に一致しない場合は、サーバーからaccess deniedとして返ってきます。
> .\chisel.exe client --auth ssh:P@ssw0rd -v http://my-chisel-vm.japaneast.cloudapp.azure.com:8080 -localhost:9022:127.0.0.1:22
2018/06/04 16:48:38 client: Connecting to ws://my-chisel-vm.japaneast.cloudapp.azure.com:80/chisel
2018/06/04 16:48:38 client: tunnel#1 localhost:9022=>127.0.0.1:22: Listening
2018/06/04 16:48:38 client: Handshaking...
2018/06/04 16:48:38 client: Fingerprint f1:3e:de:fc:c4:bd:cf:59:81:ef:0f:ba:7f:f2:15:b9
2018/06/04 16:48:38 client: Sending config
2018/06/04 16:48:38 client: server: access to '127.0.0.1:22' denied
80 / 443で動かすための方法
今回は別に8080で動かしたいわけではなく、80/443で動かしたい。
通常、1024以下のポートをroot以外のユーザーは使用できないし、使用する場合はいったんrootでポートを開いてforkしてユーザーを変更するなどの処理が必要になるchiselにはそれは期待できないので、今回は80/443は別のサービスやAzureのサービスに任せて、chisel自体は専用のユーザーで1025以上のポートで動かしたい。
通信自体はchisel側で暗号化されているので特に必要はないが、コンテンツフィルターの動きも含めるとhttpsで動かせると嬉しい。
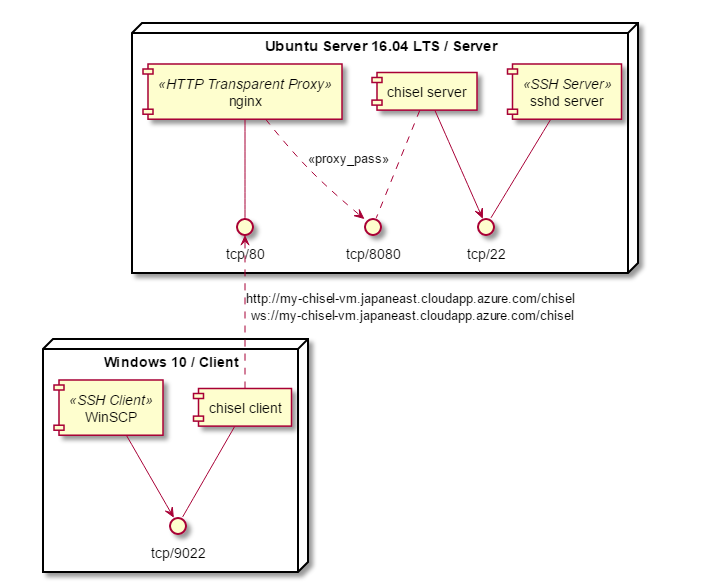
(server側で)nginxのプロキシを使用する
nginxにはwebsocketのプロキシがサポートされているのでそれを使用します。
まずはnginxのインストールを行う。バージョンはv1.3.13以降らしいのでバージョンも確認する。
$ apt-get install nginx
$ nginx -V
nginx version: nginx/1.10.3 (Ubuntu)
built with OpenSSL 1.0.2g  1 Mar 2016
TLS SNI support enabled
configure arguments: --with-cc-opt='-g -O2 -fPIE -fstack-protector-strong -Wformat -Werror=format-security -Wdate-time -D_FORTIFY_SOURCE=2' --with-ld-opt='-Wl,-Bsymbolic-functions -fPIE -pie -Wl,-z,relro -Wl,-z,now' --prefix=/usr/share/nginx --conf-path=/etc/nginx/nginx.conf --http-log-path=/var/log/nginx/access.log --error-log-path=/var/log/nginx/error.log --lock-path=/var/lock/nginx.lock --pid-path=/run/nginx.pid --http-client-body-temp-path=/var/lib/nginx/body --http-fastcgi-temp-path=/var/lib/nginx/fastcgi --http-proxy-temp-path=/var/lib/nginx/proxy --http-scgi-temp-path=/var/lib/nginx/scgi --http-uwsgi-temp-path=/var/lib/nginx/uwsgi --with-debug --with-pcre-jit --with-ipv6 --with-http_ssl_module --with-http_stub_status_module --with-http_realip_module --with-http_auth_request_module --with-http_addition_module --with-http_dav_module --with-http_geoip_module --with-http_gunzip_module --with-http_gzip_static_module --with-http_image_filter_module --with-http_v2_module --with-http_sub_module --with-http_xslt_module --with-stream --with-stream_ssl_module --with-mail --with-mail_ssl_module --with-threads
websocketをプロキシするように設定する。基本的にはhttp://uorat.hatenablog.com/entry/2016/09/19/203939を参考に設定すればよい。
今回は/etc/nginx/site-available/defaultを編集している。
upstream chisel {
        server localhost:8080;
}


server {
        listen 80 default_server;
        listen [::]:80 default_server;

        root /var/www/html;

        server_name _;

        location / {
                # First attempt to serve request as file, then
                # as directory, then fall back to displaying a 404.
                try_files $uri $uri/ =404;
        }

        location /chisel {
                proxy_pass http://chisel;
                proxy_http_version 1.1;
                proxy_set_header Upgrade $http_upgrade;
                proxy_set_header Connection "upgrade";
        }

}
これで設定後は/chiselにアクセスすることで接続できるようになる
> .\chisel.exe client -v http://my-chisel-vm.japaneast.cloudapp.azure.com/chisel localhost:9022:0.0.0.0:22
2018/06/01 20:04:01 client: Connecting to ws://my-chisel-vm.japaneast.cloudapp.azure.com:80/chisel
2018/06/01 20:04:01 client: tunnel#1 localhost:9022=>0.0.0.0:22: Listening
2018/06/01 20:04:01 client: Handshaking...
2018/06/01 20:04:01 client: Fingerprint 82:c5:81:80:d4:d4:c9:0d:c2:bb:5a:f2:b3:b3:8a:81
2018/06/01 20:04:01 client: Sending config
2018/06/01 20:04:01 client: Connected (Latency 11.1676ms)
2018/06/01 20:04:10 client: tunnel#1 localhost:9022=>0.0.0.0:22: conn#1: Open
2018/06/01 20:04:15 client: tunnel#1 localhost:9022=>0.0.0.0:22: conn#2: Open
この時のネットワークは下記のようになっています。
httpsでも同様に証明書、ドメイン等を用意して下記のようにnginxを設定します。
server {
        server_name chisel.chisel-zabbix.tk;
        listen 443 ssl;
        ssl on;
        ssl_certificate /etc/ssl/private/chisel.chisel-zabbix.tk.cer;
        ssl_certificate_key /etc/ssl/private/chisel.chisel-zabbix.tk.key;
        root /var/www/html;

        location /chisel {
                proxy_pass http://chisel;
                proxy_http_version 1.1;
                proxy_set_header Upgrade $http_upgrade;
                proxy_set_header Connection "upgrade";
        }
}
クライアントからは下記のようにhttpsで指定します。
接続としてはwssで接続することが分かります。
> .\chisel.exe client --auth ssh:P@ssw0rd -v https://chisel.chisel-zabbix.tk/chisel localhost:9022:localhost:22
2018/06/04 18:23:02 client: Connecting to wss://chisel.chisel-zabbix.tk:443/chisel
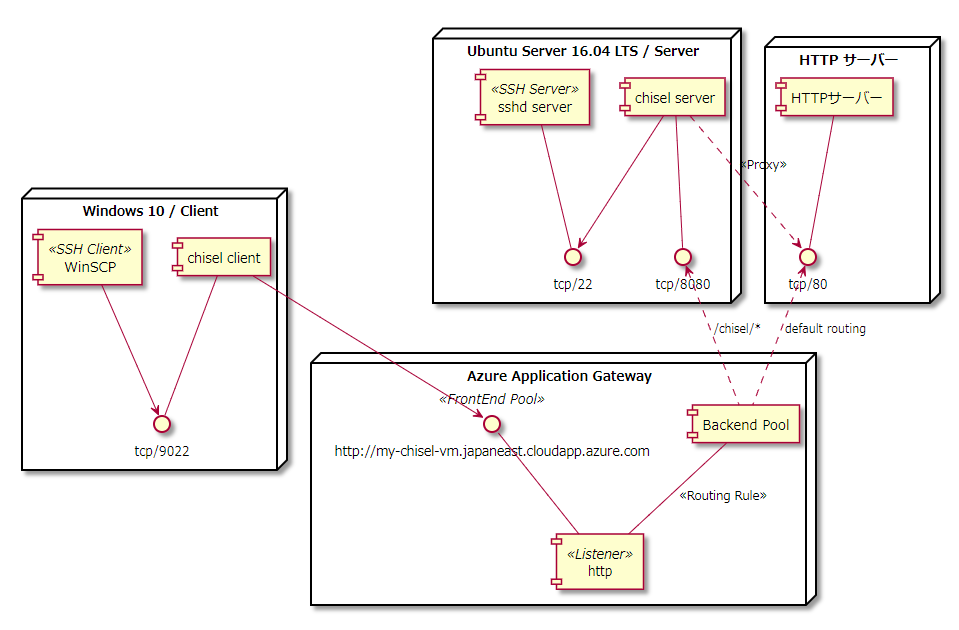
Azure Application Gatewayの背後で動かす
Azure Application Gateway WebSocketサポート
Azure上の仮想ネットワークにサブネットを作成します。Azure Application Gatewayは空(VMが存在しない)のサブネット上に構築する必要があります。
SSL終端する場合は、Azure Portalを使用してSSL終了でアプリケーション ゲートウェイを構成するを参考に設定します。
nginxでポート80をlistenし、内部でchisel(ポート 8080)にプロキシを行うことで上手くいきます。

Azure Application Gatewayから直接chiselに向けることも可能です。
ただし、HTTPによる正常性プローブが要件としてあるため、chisel側のHTTPプロキシ機能を有効にして、背後に一つHTTPサーバーを立ててあげる必要があります。
通常、正常性プローブはパスとしては/にアクセスし、HTTPステータスコード 200以上400未満を期待します。
chisel単体ではプロキシがない場合は404を返すため、単独では難しい状況です。
またPathベースのルーティング規則は/path/to/backend/*のように最後が/*で終わらないとダメなようです。
そのため、nginxで行ったような/chiselのような、末尾/で終わらないURLは設定することができず、/chisel/、もしくは/chisel/xxxのようにクライアントからは接続します。(ここはすこし嵌りどころでした)
Azure LoadBalancerの背後で動かす
こちらだとHTTPだけではなくTCPの正常性プローブが設定できるため、TCPでの正常性プローブを用意すればよいです。
ただし、httpsを使用する場合にはSSL終端の機能はないため、別の方法でsslの終端を行う必要があります。
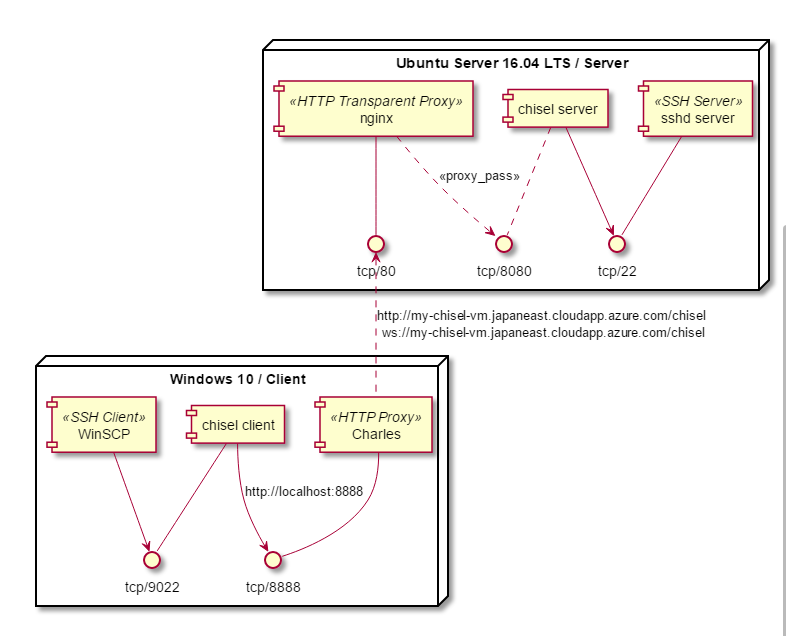
(client側の)HTTPプロキシの使用
Windows側でFiddlerなどでプロキシ接続を確認する。
HTTPプロキシとしてはCharlesを使用する。
Charlesの設定としては以下
- ポート : 8888
- SSL設定 : Enable SSL Proxyingがoff、もしくは接続するホスト(my-chisel-vm.japaneast.cloudapp.azure.com:80)が無効になっていることを確認します。
client側は--proxyオプションを付けて起動すればよいです。指定の際にはhttp形式で指定します(今回の場合はhttp://localhost:8888)。
> .\chisel.exe client -v --proxy http://localhost:8888 http://my-chisel-vm.japaneast.cloudapp.azure.com/chisel localhost:9022:0.0.0.0:22
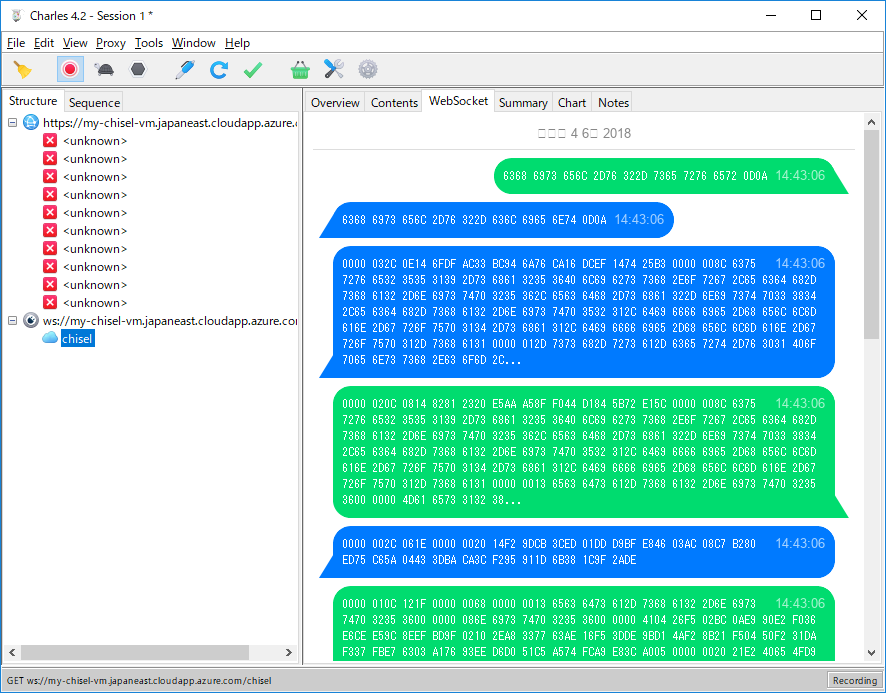
CharlesではWebSocketのやり取りも表示できるため、(内容は暗号化されており、やりとりもバイナリなのであまり参考にはなりませんが)下記のような内容が確認できます。
--keepaliveオプションを使用した場合(今回は20秒)、プロキシへのhttp接続が切れるわけではなく、20秒ごとにWebSocket上でPingPongが実行されます。
> .\chisel.exe client -v --keepalive 20s --proxy http://localhost:8888 http://my-chisel-vm.japaneast.cloudapp.azure.com/chisel localhost:9022:0.0.0.0:22
クライアントにオレオレ証明書をインストールしてhttpsの中身も検閲するコンテンツフィルターでの挙動も確認したい。
Charlesではhttpsの暗号化を解読して、リクエストを解析する機能があるため、これを仮想コンテンツフィルターとして想定します。
手順: Charlesから提供される証明書をルート証明書としてインストールします。Enable SSL Proxyingを有効にし、接続ホスト(今回はchisel.chisel-zabbix.tk:443)をリストに加え、チェックボックスをONにします。
特に問題なく接続できました。ルート証明書をインストールしない場合は証明書エラーが発生し接続できません。
Linuxの場合はディストリビューション毎に設定方法が違うのでそれぞれの設定方法を確認する必要があります。
Systemdで起動する
ユーザーの作成
$ sudo adduser --system --no-create-home --group chisel
サービス用のディレクトリの作成
$ sudo install -o chisel -g chisel -d /opt/chisel/bin
$ sudo install -o chisel -g chisel chisel /opt/chisel/bin
$ find /opt/chisel/
/opt/chisel/
/opt/chisel/bin
/opt/chisel/bin/chisel
ユニットファイルの作成
[Unit]
Description = chisel daemon

[Service]
User=chisel
ExecStart = /opt/chisel/bin/chisel server
Restart = always
Type = simple

[Install]
WantedBy = multi-user.target
(TODO) とりあえず作ってみたけど、ログとかどうすればよいだろうか?
Systemdの有効化
$ sudo systemctl list-unit-files --type=service | chisel
$ sudo systemctl enable chisel
$ sudo systemctl start chisel
authfileの管理
サーバーではauthfileで接続ホストは指定できるようなので、gitやsvnでauthfileを管理しておいて、起動前にcheckoutするとよさそうな気がします。
クライアント側の起動時にリモートホストをどう指定するかにすこしなやみます。内部に専用のDNSを立てて管理するのがよいのかもしれません。