やりたいこと
サンプルコード
test
using UnityEngine;

[RequireComponent(typeof(MeshFilter)),RequireComponent(typeof(MeshRenderer))]
public class LineGrid : MonoBehaviour
{
	Vector3[] verts;	//ポリゴンの頂点を入れる
	int[] triangles;	//三角形を描く際に、頂点の描画順を指定する
	GameObject camera;	//カメラ

	[SerializeField,Header("使用するMaterial")] Material material;
	[SerializeField,Header("大きさ")] Vector2Int size;
	[SerializeField,Header("線の太さ")] float lineSize;

	void Start()
    {
		//カメラを取得
		camera = GameObject.FindGameObjectWithTag("MainCamera");
	}

    // Update is called once per frame
    void Update()
    {
		CreateGlid();

		//カメラをグリッドの中心へ(必要ない場合はコメントアウトしてください)
		camera.transform.position = new Vector3((float)size.x / 2, ((float)size.y / 2) - 0.1f, -10);
	}

	void CreateGlid()
	{
		//新しいMeshを作成
		Mesh mesh = new Mesh();

		//頂点の番号をsize分確保、縦横の線が一本ずつなくなるので+2を入れる、一本の線は頂点6つで表示させるので*6
		triangles = new int[(size.x + size.y + 2) * 6];
		//頂点の座標をsize分確保
		verts = new Vector3[(size.x + size.y + 2) * 6];

		//頂点番号を割り当て
		for (int i = 0; i < triangles.Length; i++)
		{
			triangles[i] = i;
		}


		//何回for分が回ったかをカウントさせる
		int x = 0, y = 0;

		//縦線
		for (int i = 0; i < (size.x + 1) * 6; i += 6)
		{
			verts[i]	 = new Vector3(x, 0, 0);
			verts[i + 1] = new Vector3(x, size.y, 0);
			verts[i + 2] = new Vector3(lineSize + x, size.y, 0);
			verts[i + 3] = new Vector3(lineSize + x, size.y, 0);
			verts[i + 4] = new Vector3(lineSize + x, 0, 0);
			verts[i + 5] = new Vector3(x, 0, 0);
			x++;
		}

		//横線
		for (int i = (size.x+1) * 6; i < (size.x + size.y + 2) * 6; i+=6)
		{
			verts[i]   = new Vector3(0,y,0);
			verts[i+1] = new Vector3(size.x+lineSize, y, 0);
			verts[i+2] = new Vector3(0, y - lineSize, 0);
			verts[i+3] = new Vector3(size.x + lineSize, y, 0);
			verts[i+4] = new Vector3(size.x + lineSize, y - lineSize, 0);
			verts[i+5] = new Vector3(0, y - lineSize, 0);
			y++;
		}

		//作った頂点番号、座標データを作成したmeshに追加
		mesh.vertices = verts;
		mesh.triangles = triangles;

		//再計算()
		mesh.RecalculateBounds();
		mesh.RecalculateNormals();

		//再計算後に完成したMeshを追加
		GetComponent<MeshFilter>().mesh = mesh;
		//設定したMaterialを反映
		GetComponent<MeshRenderer>().material = material;
	}
}
コード解説1
test
		triangles = new int[(size.x + size.y + 2) * 6];
		verts = new Vector3[(size.x + size.y + 2) * 6];
なぜここで(+2)や(6)をしているかの解説です。
サンプルコードでVector2Int*が宣言されていますがこれはグリッドのマス目数を表いしています。
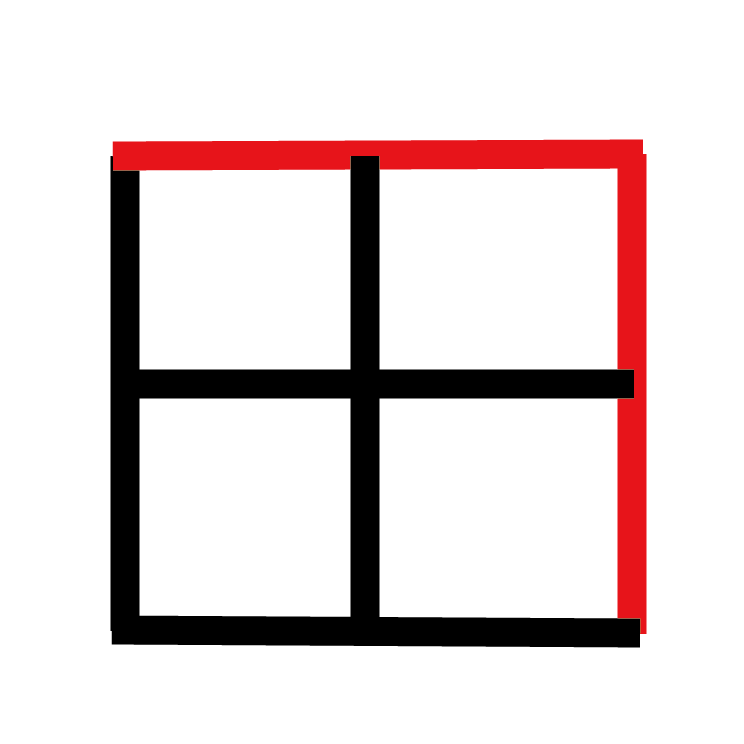
例えば(+2)をせずに処理をしたとするとVector2Intの中身がx=2,y=2の場合。

この赤の線のところが描画されなくなってしまいます。
コード解説2
test
		//何回for分が回ったかをカウントさせる
		int x = 0, y = 0;

		//縦線
		for (int i = 0; i < (size.x + 1) * 6; i += 6)
		{
			verts[i]	 = new Vector3(x, 0, 0);
			verts[i + 1] = new Vector3(x, size.y, 0);
			verts[i + 2] = new Vector3(lineSize + x, size.y, 0);
			verts[i + 3] = new Vector3(lineSize + x, size.y, 0);
			verts[i + 4] = new Vector3(lineSize + x, 0, 0);
			verts[i + 5] = new Vector3(x, 0, 0);
			x++;
		}

		//横線
		for (int i = (size.x+1) * 6; i < (size.x + size.y + 2) * 6; i+=6)
		{
			verts[i]   = new Vector3(0,y,0);
			verts[i+1] = new Vector3(size.x+lineSize, y, 0);
			verts[i+2] = new Vector3(0, y - lineSize, 0);
			verts[i+3] = new Vector3(size.x + lineSize, y, 0);
			verts[i+4] = new Vector3(size.x + lineSize, y - lineSize, 0);
			verts[i+5] = new Vector3(0, y - lineSize, 0);
			y++;
		}
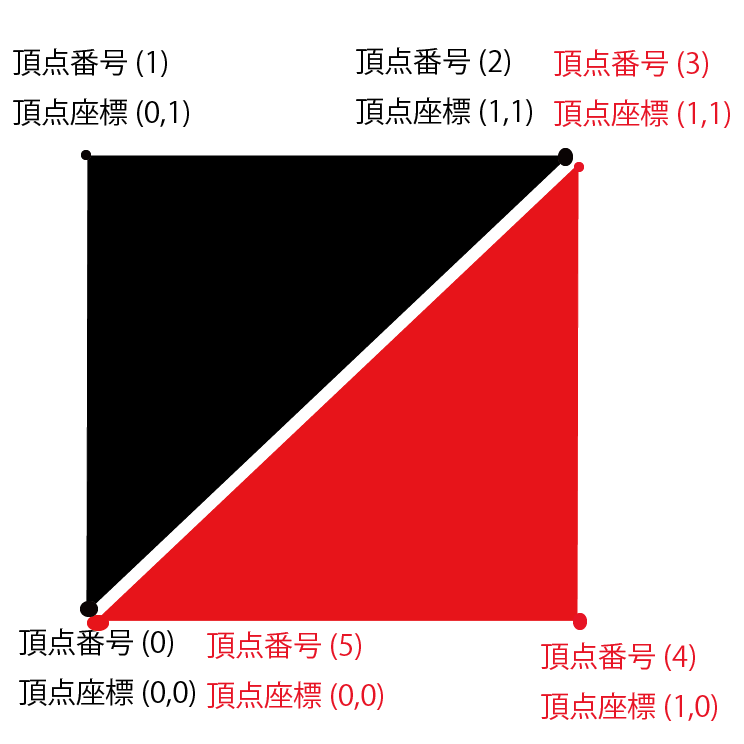
ここでは頂点座標を決めています。
頂点を下の図のように配置すると四角形が形成されます。
あとはこの四角形のx,yの長さを決めてあげれば線のように描画できます。


