はじめに
Windowsのネットワーク設定を変更したら仮想マシンが立ち上がったので、説明していきます!
VirtualBoxを6.1.22にアップデートにするとVirtualBox Host-Only Ethernet Adapterのデフォルトの設定でIPv6が有効になっているみたいです。
変更する箇所はIPv6とIPv4の2つあるので、よかったら最後まで読んでみてください!
エラーの内容
vagrant upを実行すると以下のようなエラーが出力され、仮想マシンが立ち上がらない・・・。
vagrant up
Bringing machine 'server1' up with 'virtualbox' provider...
Bringing machine 'server2' up with 'virtualbox' provider...
==> server1: Checking if box 'bento/centos-8.2' version '202010.22.0' is up to date...
==> server1: Clearing any previously set network interfaces...
There was an error while executing `VBoxManage`, a CLI used by Vagrant
for controlling VirtualBox. The command and stderr is shown below.

Command: ["hostonlyif", "create"]

Stderr: 0%...
Progress state: E_FAIL
VBoxManage.exe: error: Failed to create the host-only adapter
VBoxManage.exe: error: Operation canceled by the user
VBoxManage.exe: error: Details: code E_FAIL (0x80004005), component VirtualBoxWrap, interface IVirtualBox
VBoxManage.exe: error: Context: "enum RTEXITCODE __cdecl handleCreate(struct HandlerArg *)" at line 95 of file VBoxManageHostonly.cpp
前提条件
・端末:Windows10
・仮想マシン:CentOS8.2
・Vagrant 2.2.16
・VirtualBox-6.1.22
・Vagrantfileは以下の設定(サーバは2台あります)
Vagrant.configure("2") do |config|

  config.vm.box = "bento/centos-8.2"

  config.vm.define "server1" do |server1|
    server1.vm.network "private_network", ip: "192.168.33.10"
  end

  config.vm.define "server2" do |server2|
    server2.vm.network "private_network", ip: "192.168.33.11"
  end

  # 共有フォルダの設定
  config.vm.synced_folder ".", "/vagrant"
end
エラー解決方法1
まず1つ目はVirtualBox Host-Only Ethernet AdapterのIPv6の設定をオフにします!
☆ポイント☆
設定を変更したら、1度、無効にして、再度、有効にするということ!
【手順】
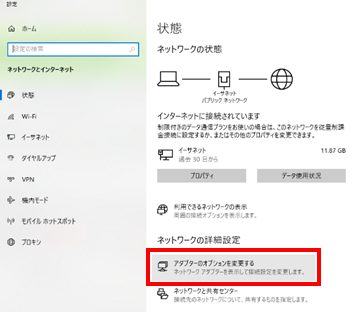
1.端末の「ネットワーク接続」画面を開きます

⇩

⇩
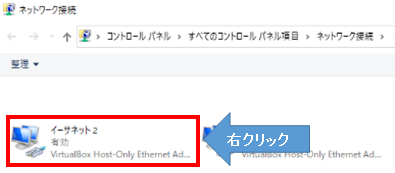
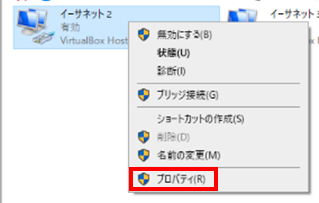
2.VirtualBox Host-Only Ethernet Adapterを右クリックしてプロパティを開きます
⇩
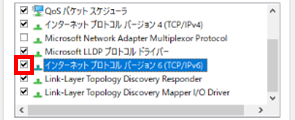
3.IPv6のチェック☑をクリックして、チェックマークを外してOKをクリック(まだ終わりじゃないよ!!)
⇩

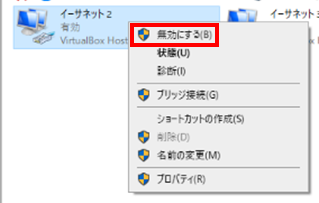
4.ここで!もう一度、VirtualBox Host-Only Ethernet Adapterを右クリックして無効にするをクリック(このあと、また有効にするよ!)
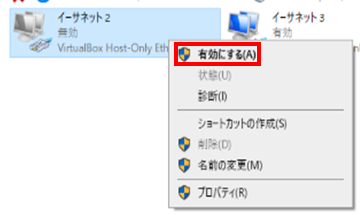
5.VirtualBox Host-Only Ethernet Adapterを右クリックして有効にするをクリック
もしサーバが2台ある場合はもう1つのVirtualBox Host-Only Ethernet Adapterも同じように変更してみてください!
さあ!vagrant upを実行!!
どうですか?
無事、仮想マシンが立ち上がったよ!という方はお疲れ様でした☆!
まだ同じようなエラーが出ます・・・という方はエラー解決方法2を見てみましょう!
エラー解決方法2
2つ目はVirtualBox Host-Only Ethernet AdapterのIPv4のIPアドレスがVagrantfileで設定したIPアドレスと同じネットワークになっているか確認していきます。
こちらも、エラー解決方法1と同じく!
☆ポイント☆
設定を変更したら、1度、無効にして、再度、有効にするということ!
【手順】
1.エラー解決方法1([手順]1~2)と同じように以下の画面を表示します

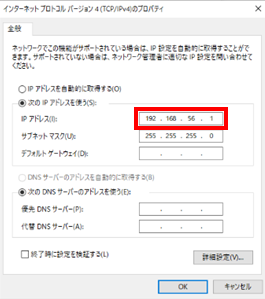
2.IPv4の文字をクリックして、青くなったらプロパティを開き、IPアドレスを確認します
Vagrantfileでは「192.168.33.10」に設定していますが、こちらは「192.168.56.1」になってますね
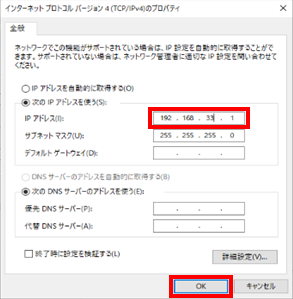
3.なので、こちらのIPアドレスをVagrantfileの設定に合わせて192.168.33.1に変更し、OKをクリック(しつこいけど!まだ終わりじゃないよ!!)
※もし、以下の画面が表示されたらいいえをクリックして、OKをクリック
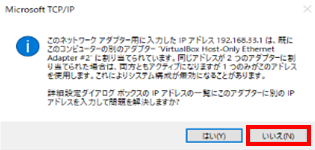
4.もう一度、VirtualBox Host-Only Ethernet Adapterを右クリックして無効にするをクリックし、再度有効にするをクリック
よし!vagrant upを実行してみましょうか!
少し時間はかかりますよね。。。
特にエラーはなく、vagrant statusを実行してrunningが確認できれば仮想マシンは立ち上がっていると思います!
お疲れ様でした~☆!
おわりに
最後まで読んでいただきありがとうございました。
エラーは無事、解決できましたでしょうか。
Vagrantはとても便利なのですが、エラーが発生すると手も足も出なくなりますよね。
とても苦しみました...⚡
そんな方に少しでも参考になると嬉しいです。
参考
https://qiita.com/hibohiboo/items/e02e0e02f5365e24ffb0
https://qiita.com/curupo/items/f547bc2c57718c45b6ab