Puredata(Pd) をソースからビルドしたのでその手順を記します。
ソースの取得
Pd コミュニティサイトから、バニラ版のソースを取得します。
バニラ版 (Pd-vanilla) は Pd の創始者ミラー・パケット氏によるディストリビューションで、スタンドアローンアプリケーションとしては最小の構成になっています。
(対して、音響プログラミングの世界で広く使われている Pd-Extended は、Pd-vanilla を元にコミュニティで拡張されたディストリビューションで、よく使うオブジェクトがあらかじめセットになっています)
wget http://sourceforge.net/projects/pure-data/files/pure-data/0.45.4/pd-0.45-4.src.tar.gz/download
tar xvfz download
ソースコードは Linux/MacOSX/Windows で共通のものとなっています。
ビルド
Tarball 中に INSTALL.txt があるので、まずはこれに目を通しましょう。
すると "pd-0.45-4" ディレクトリ下で ./autogen.sh - ./configure - make しろとの指示。
実際にためしてみると ./autogen.sh がリンクエラー。
代替策である src/makefile.mac でのビルドを試みます。
src$ make -f makefile.mac
(略)
make -C ../extra/bonk~    d_fat
make[1]: *** No rule to make target `d_fat'.  Stop.
make: *** [externs] Error 2
make がエラーとなったので、次に示す応急処置で切り抜けます。
(文面と場所からしてエクスターナルオブジェクトを ユニバーサルバイナリ版で作るとか作らないとかの指定とおもわれるので、どうでもいい!)
< 	make -C ../extra/bonk~    d_fat
> 	make -C ../extra/bonk~
晴れて make が通ると、bin/ の下に 4つの実行ファイルができました。
bin$ ls
pd          pd-watchdog pdreceive   pdsend

bin$ file *
pd:          Mach-O fat file with 2 architectures: [ I386: Mach-O i386 executable ] [ ]
pd-watchdog: Mach-O fat file with 2 architectures: [ I386: Mach-O i386 executable ] [ : Mach-O ppc_7400 executable ]
pdreceive:   Mach-O fat file with 2 architectures: [ I386: Mach-O i386 executable ] [ : Mach-O ppc_7400 executable ]
pdsend:      Mach-O fat file with 2 architectures: [ I386: Mach-O i386 executable ] [ : Mach-O ppc_7400 executable ]
make install でシステムにインストール。
微妙にエラーが出ていますが、結果オーライです。
src$ sudo make -f makefile.mac install
(略)
make: [install] Error 71 (ignored)
(略)
Pd install succeeded.
src$ which pd
/usr/local/bin/pd
メインのアプリケーションである pd のほか、
pdsend と pdreceive なる実行体も同時にインストールされます。
これらは pd とプロセス間通信するサンプルプログラムです。
使いかたなどはまた別の機会に紹介します。
動作確認
コマンドラインで動かします。
$ pd -version
Pd-0.45.4 ("") compiled 23:46:30 Jan 25 2014
$ pd -help
usage: pd [-flags] [file]...

audio configuration flags:
-r <n>           -- specify sample rate
-audioindev ...  -- audio in devices; e.g., "1,3" for first and third
(以下略)
$ pd
Pt_Start() called
プロセスリストはこんな感じ。
直接コマンドをたたいた pd プロセスと、その子プロセスで GUI が起動しているのが見て取れます。
$ ps -ef | grep pd | grep -v grep
  501 26486 22013   0   0:00.19 ttys001    0:00.30 pd
  501 26674 26486   0   0:00.14 ttys001    0:00.58 /System/Library/Frameworks/Tk.framework/Resources/Wish.app/Contents/MacOS/Wish /usr/local/lib/pd/tcl/pd-gui.tcl 5400
補足: Pd-Extended との差異
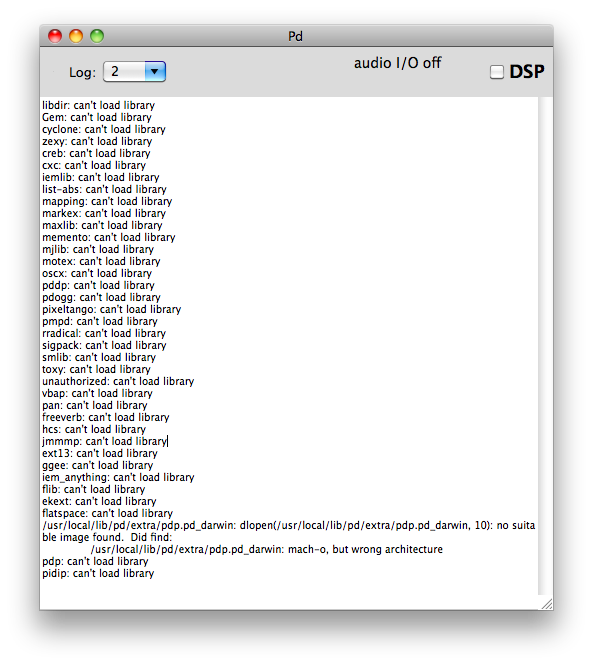
Pd コンソールに、ログ出力レベル変更用のプルダウンがついているのが、Pd-Extended と異なるところ。
(以下のキャプチャでは原因よくわからないですけど、Pd-Extended のエクスターナルをロードしにいってエラーになってます。vanillaを使う上で問題なしなので無視します)
適当なパッチを開いてみたところ。
ファイルを指定して開く場合は pd /path/to/file.pd で
(もちろん、GUI のメニューバーからも開けます)
フォントやアイコンなども微妙に違いますね。
参考まで、Pd-Extended の実行中のプロセスリストはこんな感じ。
$ ps -ef | grep pd | grep -v grep
  501 26694 26690   0   0:02.26 ??         0:02.98 /Applications/Pd-extended.app_0_43_4.app/Contents/Resources/Scripts/../bin/pd -guiport 52665
以上で pd-vanilla を使う環境が作られました。
次は、FUDIとその周辺を見てみます。