はじめに
この記事はシスコの有志による Cisco Systems Japan Advent Calendar 2024 (二枚目) の 12日目として投稿しています。
2017年版: https://qiita.com/advent-calendar/2017/cisco
2018年版: https://qiita.com/advent-calendar/2018/cisco
2019年版: https://qiita.com/advent-calendar/2019/cisco
2020年版: https://qiita.com/advent-calendar/2020/cisco
2020年版(2枚目): https://qiita.com/advent-calendar/2020/cisco2
2021年版: https://qiita.com/advent-calendar/2021/cisco
2021年版(2枚目): https://qiita.com/advent-calendar/2021/cisco2
2022年版(1,2): https://qiita.com/advent-calendar/2022/cisco
2023年版: https://qiita.com/advent-calendar/2023/cisco
2024年版: https://qiita.com/advent-calendar/2024/cisco<---こちら
CML2.8が登場!
2024/11からCML2.8がリリースされ、無料版が提供され話題になっています。
あわせて、Secure Firewall Management Center Virtual(旧 Firepower Management Center Virtual)およびSecure Firewall Threat Defense Virtual(旧 Firepower Threat Defense Virtual)ノードが標準で利用可能になっています。
従来はカスタム定義が必要でしたが、refplat.isoファイルをダウンロードすることで、すぐに利用できるようになっています。
これにより、手軽に次世代ファイアウォール機能や検証環境を構築できるようになったため、CMLだけでマルウェアを検出する環境を構築&テストを行いました。
構成
テストシナリオ:
1.端末AのUbuntu-PCが拠点BのUbuntu-ServerからEICARファイルをダウンロード
2.FTDvがマルウェア通信を検出し、ダウンロードをブロック
3.FMCにてマルウェアイベントを確認
対象機器:
・Cisco Secure Firewall Threat Defense for KVM(Ver7.6.0) ※拠点AのFTDv-0のみ設定
・Cisco Secure Firewall Management Center for KVM(Ver7.6.0)
・Ubuntu 24.04.1 LTS ×2
事前準備
・Ubuntu-Serverにて、テストで使用するEICARテストファイルを作成しておく
・端末からHTTPでファイルを取得するため、HTTPサーバを起動しておく
cisco@Ubuntu-Server:~$ echo -e "X5O\!P%23D6QHPgH6J4ZpC5E3vA1R5n4yCjKkFj5pF4g=H5hH6X8Z9R" > eicar.com
cisco@Ubuntu-Server:~$
cisco@Ubuntu-Server:~$ ls
eicar.com
cisco@Ubuntu-Server:~$
cisco@Ubuntu-Server:~$ python3 -m http.server 8000
Serving HTTP on 0.0.0.0 port 8000 (http://0.0.0.0:8000/) ...
1.EICARファイルのダウンロード
Ubuntu-PCからEICARテストファイルをwgetコマンドでダウンロードを試みます。
接続は確立されているが、途中でリセットされていることが確認できる
cisco@Ubuntu-PC:~$ sudo wget http://172.16.19.200:8000/eicar.com
--2024-12-11 15:27:37--  http://172.16.19.200:8000/eicar.com
Connecting to 172.16.19.200:8000... connected.
HTTP request sent, awaiting response... 200 OK
Length: 56 [application/x-msdos-program]
Saving to: ‘eicar.com’

eicar.com             0%[                    ]       0  --.-KB/s    in 1.9s

2024-12-11 15:27:40 (0.00 B/s) - Read error at byte 0/56 (Connection reset by peer). Retrying.

--2024-12-11 15:27:41--  (try: 2)  http://172.16.19.200:8000/eicar.com
Connecting to 172.16.19.200:8000... connected.
HTTP request sent, awaiting response... 200 OK
Length: 56 [application/x-msdos-program]
Saving to: ‘eicar.com’

eicar.com             0%[                    ]       0  --.-KB/s    in 0s

2024-12-11 15:27:42 (0.00 B/s) - Read error at byte 0/56 (Connection reset by peer). Retrying.
2.FMCでログ確認
Analytics > Files > Malware Events でマルウェアイベントが検出されていることを確認

設定手順
1.CMLでFMCv/FTDvノードを起動
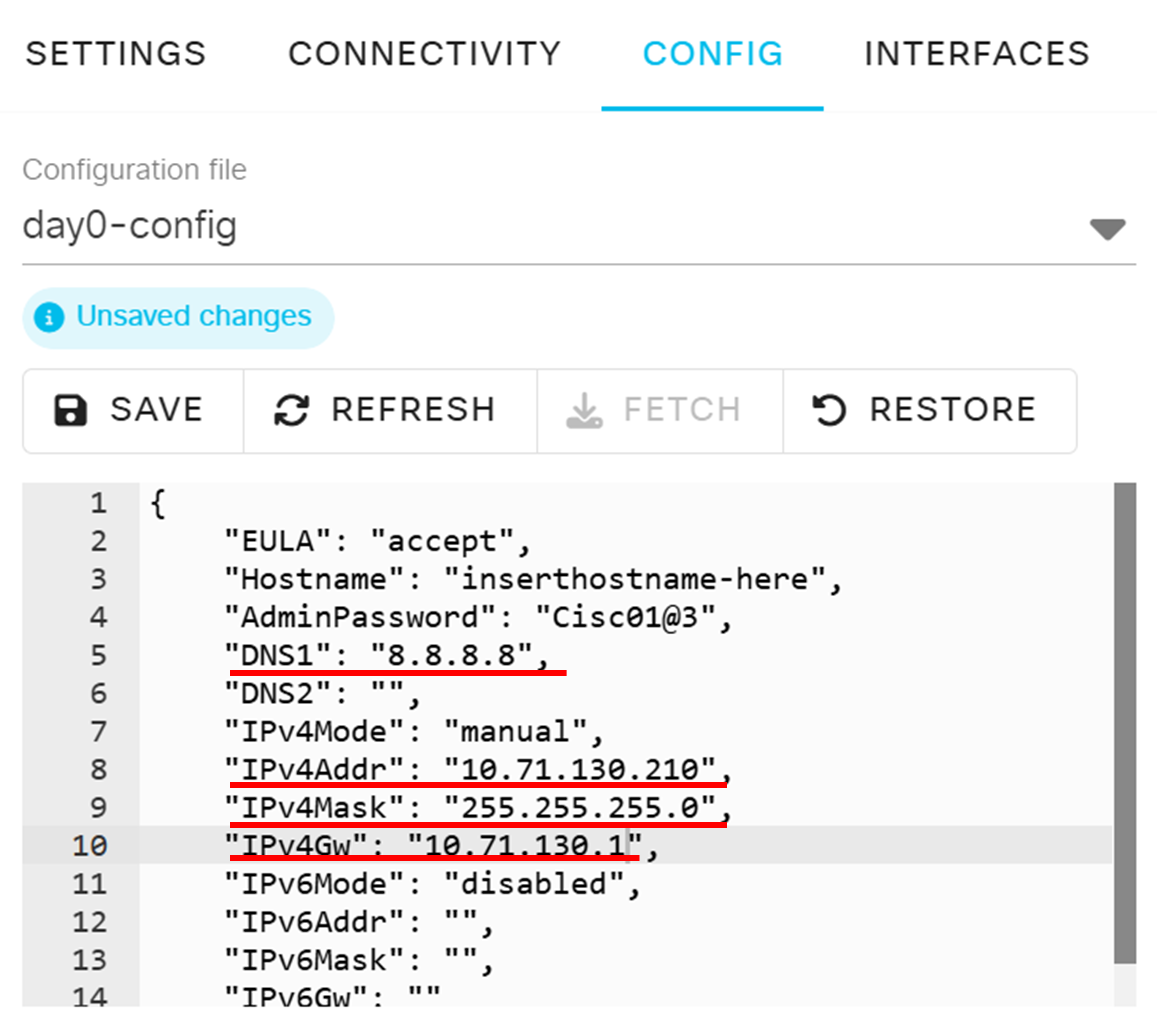
Day0-configを使用して、初期設定(IPアドレス、DNSなど)を入力してノードを起動します。
ここでは管理ポートのアドレスを設定しており、CLIによる初期設定を短縮できます
・FTDv
2.FTDvの初期設定(CLI)
・ノードが起動したら、FMCへのデバイス登録を行う
・登録キーとして "cisco" を設定。FMCからFTDを登録する際にも必要
> configure manager add 10.71.130.210 cisco

If you enabled any feature licenses, you must disable them in Secure Firewall Device Manager before deleting the local manager.
Otherwise, those licenses remain assigned to the device in Cisco Smart Software Manager.
Do you want to continue[yes/no]:yes
Local Manager successfully deleted.


No managers configured.

Manager 10.71.130.210 successfully configured.
Please make note of reg_key as this will be required while adding Device in FMC.

>
・必要に応じてhttpプロキシを設定
> configure network http-proxy

Manual proxy configuration
Enter HTTP Proxy address: xx.xx.xx.xx
Enter HTTP Proxy Port: 80
Use Proxy Authentication? (y/n) [n]: n


Configuration successfully saved.

>
3.FMCv初期設定(GUI)
3-1.デバイス登録
・Devices > DeviceManagement > からFTDvを登録
※Registration Keyは先ほどFTDvで登録したキーと同じもの
・デバイス登録時に、Access Control Policyを作成し割り当てる

(オプション)3-2.Proxy設定
Configuration > Management Interfaces > Proxy

本設定が完了すると、FMC上でFTDデバイスが管理できる
4.FTDvのネットワーク設定
4-1.インタフェース設定
Devices > Device Managemt > 対象のFTDv > Interface
・Inside/OutsideインタフェースにSecurity Zoneを割り当てる
・IPv4アドレスを割り当てる
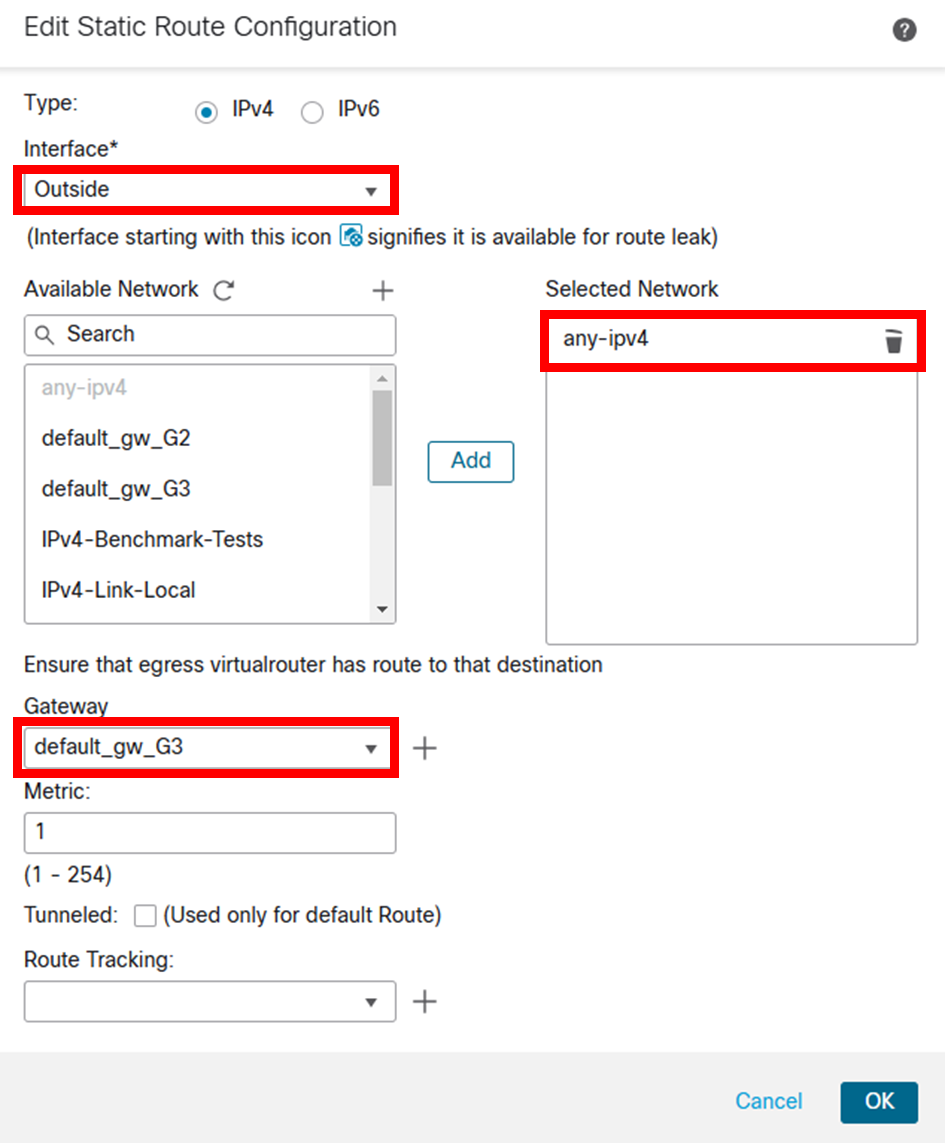
4-2.ルーティング設定
Devices > Device Management > 対象のFTDv > Routing > Static Route
・FTDがデータ通信を行うためにスタティックルートを追加する
・Gatewayオブジェクトを作成し割り当てる
5.Malware&File Policyの設定
Policy > Malware&File Policy
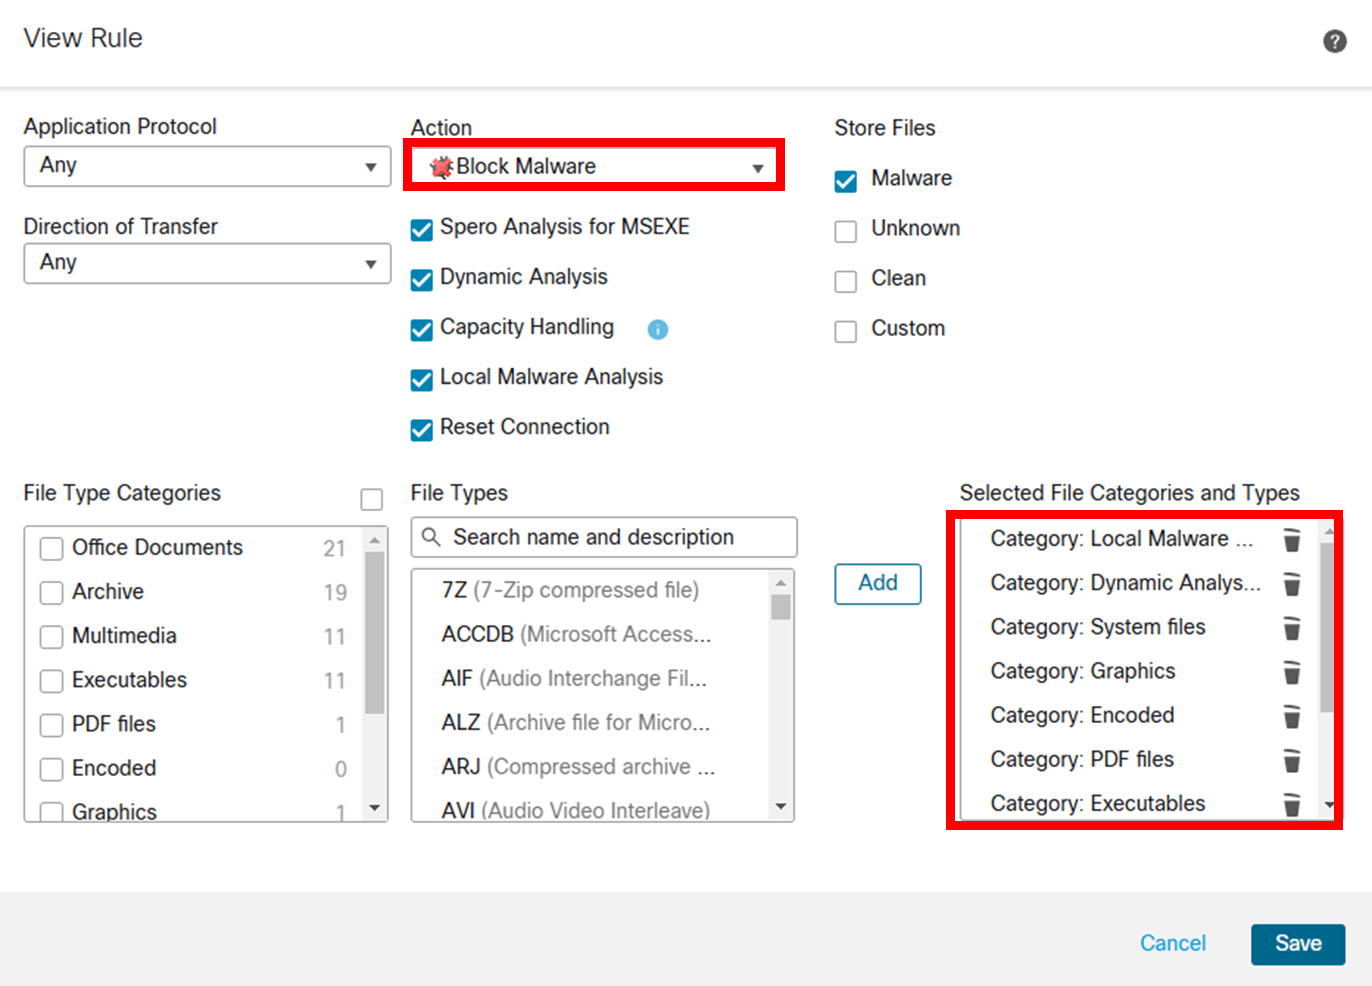
・テスト通信でマルウェアを検出するためのポリシーを作成する
・"Malware Policy"という名前のポリシーを作成し、ルールを追加する
・マルウェアが発生した場合、通信をブロックしたいので、Actionを"Block Malware"に設定
・File Typesは全て選択
6.Access Control Policyへの追加
Policy > Access Control > 対象rule
・Malware PolicyをAccess Control Policyへ適用することでマルウェアの検出が有効化
・File Policyとして、"Malware Policy"を選択
おわりに
今回はCML環境内で完結するシンプルなテストを行いましたが、複数拠点間の管理や冗長化など、より複雑なシナリオも再現できそうだと感じました。
また、今回は試せなかったISE連携、SGT(Security Group Tags)を使用した動的アクセス制御や隔離についても気になっているので、試してみたいと思います。
免責事項
本サイトおよび対応するコメントにおいて表明される意見は、投稿者本人の個人的意見であり、シスコの意見ではありません。本サイトの内容は、情報の提供のみを目的として掲載されており、シスコや他の関係者による推奨や表明を目的としたものではありません。各利用者は、本Webサイトへの掲載により、投稿、リンクその他の方法でアップロードした全ての情報の内容に対して全責任を負い、本Web サイトの利用に関するあらゆる責任からシスコを免責することに同意したものとします。


