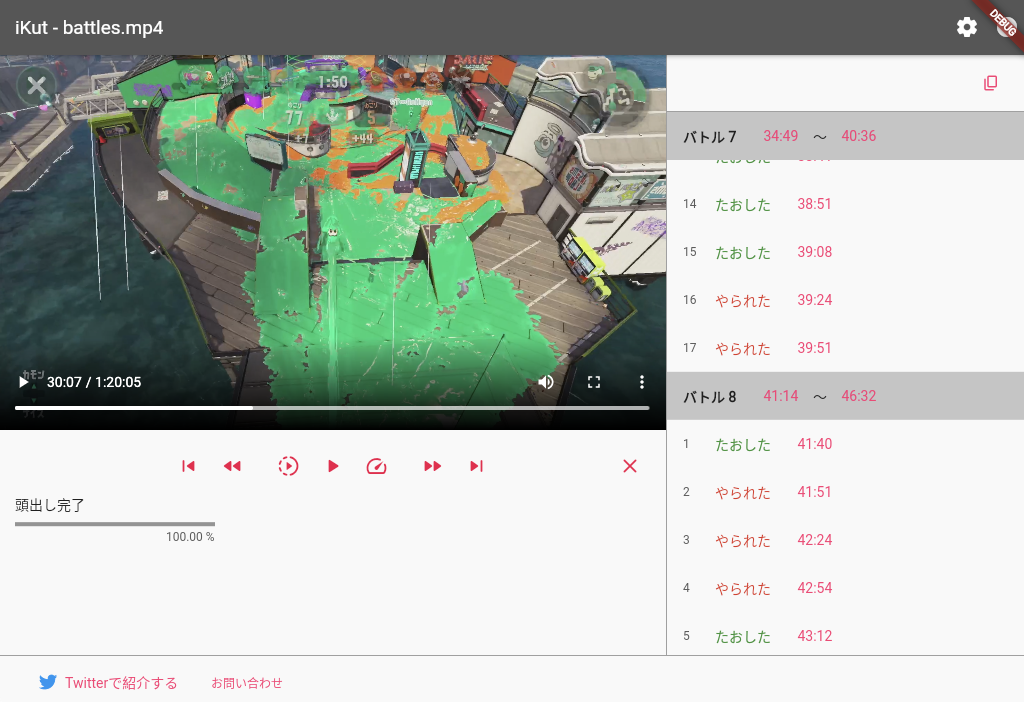
Flutter Webで動画プレイヤーアプリを作成したのですが、単体テストに dart:html ライブラリを含むと不都合があり、工夫が必要な場面があったので記事にしました。
dart:htmlライブラリを含むと単体テストが不便
アプリの概要
スプラトゥーン2のプレイヤー向けのシーン自動頭出し機能付きの動画プレイヤーアプリです。自動検出された特定シーンの時刻ボタンを押すと、その場所に飛びます。

※ 左上の動画は任天堂株式会社のスプラトゥーン2からの引用です。
※ 開発中の画面です。
使ってみたい方はこちら
単体テストの例
秒数をコロン区切りの時刻テキストに変換するutil系メソッドの単体テストがあります。
例: 192.0 → 3:12
実装
import 'package:sprintf/sprintf.dart';
/// 秒数を時間テキストにする
String toTimeString(double seconds) {
  int hour = seconds.toInt() ~/ 3600;
  int minute = (seconds.toInt() - hour * 3600) ~/ 60;
  int second = seconds.toInt() % 60;
  if (hour >= 1) {
    return sprintf("%d:%02d:%02d", [hour, minute, second]);
  } else {
    return sprintf("%d:%02d", [minute, second]);
  }
}
単体テスト
void main() {
  test('test toTimeString', () async {
    expect(toTimeString(0.0), '0:00');
    expect(toTimeString(59.9), '0:59');
    expect(toTimeString(60.0), '1:00');
    expect(toTimeString(9 * 60 + 59.9), '9:59');
    expect(toTimeString(10 * 60.0), '10:00');
    expect(toTimeString(59 * 60.0 + 59.9), '59:59');
    expect(toTimeString(3600.0), '1:00:00');
    expect(toTimeString(3600 + 59 * 60.0 + 59.9), '1:59:59');
    expect(toTimeString(7200.0), '2:00:00');
  });
}
コマンドラインでの単体テストの実行
これだけならば、このコマンドで単体テストを実行することができます。
flutter test
しかし、実は同じファイルにHTMLのvideo要素を作成、取得するメソッドが同居していました。なので、dart:htmlライブラリがインポートされています。
import 'dart:html';
// ↑ これが問題

import 'package:sprintf/sprintf.dart';

String toTimeString(double seconds) {
  int hour = seconds.toInt() ~/ 3600;
  int minute = (seconds.toInt() - hour * 3600) ~/ 60;
  int second = seconds.toInt() % 60;
  if (hour >= 1) {
    return sprintf("%d:%02d:%02d", [hour, minute, second]);
  } else {
    return sprintf("%d:%02d", [minute, second]);
  }
}

/// 1つしか無いvideo要素
VideoElement _ikutVideoElement;

/// 1つしかないvideo要素を取得する
VideoElement getVideoElement(BuildContext context) {
  if (_ikutVideoElement == null) {
    final videoElement = VideoElement();
    videoElement.controls = true;
    // リスナ設定などがあるが省略
    _ikutVideoElement = videoElement;
  }
  return _ikutVideoElement;
}
その場合は flutter test コマンドでテスト実行すると Not found: 'dart:html' エラーになってしまいます。
lib/util/util.dart:1:8: Error: Not found: 'dart:html'
import 'dart:html';
しかし --platform chrome 引数を付けるとエラーになりません。
flutter test --platform chrome
dart:html ライブラリの呼び出しにはChromeが必要なようです。
実行速度はChromeの起動時間が必要なので遅くなります。
flutter test で4秒の単体テスト実行が flutter test --platform chrome では30秒かかります。
GitHub Actionsでの動作
ちなみにGitHub ActionsでもChromeを使う単体テストは動作します。
name: check
on:
  push:
    branches:
      - main
  pull_request:
    types:
      - opened
      - synchronize
      - reopened
jobs:
  check:
    runs-on: ubuntu-latest
    steps:
      - uses: actions/checkout@v2
      - uses: asdf-vm/actions/install@v1
      - run: flutter pub get
      - run: flutter pub run build_runner build
      - run: flutter test --platform chrome
Android Studioで単体テストを実行する
開発していると1ファイルや1テストメソッドだけの単体テストを実行したいことは多いと思います。
Android Studioでは左側の Run test ボタンから単体テスト実行できます。
そのケースでもテストコードやテスト対象のコードに dart:html ライブラリを含んでいるとエラーになります。
Run/Debug Configurationsで --platform chrome を設定することができます。
しかしこの場合はChromeが開き「Flutter Test Browser Host」が出たまま止まってしまいました。
単体テストはdart:htmlライブラリを含まないようにして作る
前項の結果から単体テストは dart:html ライブラリを含まないようにして作ったほうが取り回しが良さそうです。
dart:html ライブラリを含むメソッド等は別ファイルに移動することにしました。
- toTimeStringメソッド(
dart:html不使用、テスト対象)はutil.dartファイルに設置。 - getVideoElementメソッド(
dart:html使用、テスト対象ではない)はweb_util.dartファイルに設置。
別のdart:htmlライブラリを含むProviderを使っているStateNotifierProviderの単体テストを作成する
このケースの場合はConditionally Importingを使う必要があったので紹介します。
該当部分の仕様
該当アプリには設定画面があり、頭出しされたシーンの再生は何秒前から開始するかや、スキップするときの秒数をスライダーを左右にドラッグすることで設定出来ます。設定はブラウザローカルに保存されて、次回同じブラウザでアプリを開いたときは復帰されます。
※ 開発中の画面です。
単体テスト指針
- 設定画面を構築するためのStateNotifierをテストする。
- StateNotifierは設定をブラウザローカルに保存する担当オブジェクトを持っている。それをモック化して呼び出され方を確認する。
アプリの実装
設定のモデルはこのようになっています。(freezedを使用)
@freezed
abstract class IkutConfig with _$IkutConfig {
  /// 設定情報
  /// [skipTime] スキップで進んだり戻ったりする秒数
  /// [deathBeforeTime] やられたシーンはN秒前から見たい
  /// [killBeforeTime] たおしたシーンはN秒前から見たい
  /// [endBeforeTime] 試合終了へのスキップはN秒前から見る
  /// [slowRatio] スロー再生のレシオ(分母)
  /// [fastRatio] 早送り再生のレシオ(分子)
  /// [extractDeathScene] やられたシーンを頭出しする
  /// [extractKillScene] たおしたシーンを頭出しする
  factory IkutConfig(
      int skipTime,
      int deathBeforeTime,
      int killBeforeTime,
      int endBeforeTime,
      int slowRatio,
      int fastRatio,
      bool extractDeathScene,
      bool extractKillScene) = _IkutConfig;
}
(endBeforeTimeフィールドとfastRatioフィールドは固定値を入力して使っています。)
それを使ってこのようにWidgetを構築しています。横にスライドして値を変更する部品にはSliderを使用しています。
Widget内で使用しているStateNotifierProviderであるikutConfigStateNotifierProviderの実装は次で説明します。
class ConfigContentWidget extends HookConsumerWidget {
  @override
  Widget build(BuildContext context, WidgetRef ref) {
    final config = ref.watch(ikutConfigStateNotifierProvider);
    final nameTextStyle = TextStyle(fontSize: 14, color: IkutColors.blackText);
    final sliderWidth = 400.0;

    return Column(
        mainAxisSize: MainAxisSize.min,
        crossAxisAlignment: CrossAxisAlignment.start,
        children: [
          // 進むときと戻るときの秒数
          SizedBox(height: 16),
          Text(sprintf(Strings.configSkipMinutes, [config.skipTime]),
              style: nameTextStyle),
          Container(
            width: sliderWidth,
            child: Slider(
                activeColor: Colors.pinkAccent.shade400,
                inactiveColor: Colors.pinkAccent.shade100,
                value: config.skipTime.toDouble(),
                min: 1.0,
                max: 10.0,
                divisions: 9,
                label: config.skipTime.toString() + Strings.seconds,
                onChanged: (value) {
                  final configStateNotifier =
                      ref.read(ikutConfigStateNotifierProvider.notifier);
                  configStateNotifier.setSkipTime(value.toInt());
                }),
          ),
          // やられたシーンは何秒前からみるか
          SizedBox(height: 16),
          Text(sprintf(Strings.configDeathBeforeTime, [config.deathBeforeTime]),
              style: nameTextStyle),
          Container(
            width: sliderWidth,
            child: Slider(
                activeColor: Colors.pinkAccent.shade400,
                inactiveColor: Colors.pinkAccent.shade100,
                value: config.deathBeforeTime.toDouble(),
                min: 3.0,
                max: 10.0,
                divisions: 7,
                label: config.deathBeforeTime.toString() + Strings.seconds,
                onChanged: (value) {
                  final configStateNotifier =
                      ref.read(ikutConfigStateNotifierProvider.notifier);
                  configStateNotifier.setDeathBeforeTime(value.toInt());
                }),
          ),
          // 残りの設定項目は省略
        ]);
  }
}
StateNotifierと、そのProviderはこのようになっています。
LocalStorageDataStoreが設定値のブラウザローカルへの保存と読込を担当しますが、次で説明します。
class IkutConfigStateNotifier extends StateNotifier<IkutConfig> {
  IkutConfigStateNotifier(
      this._dataStore, IkutConfig config)
      : super(config);

  IkutConfigStateNotifier.override(IkutConfig ikutConfig) : super(ikutConfig);

  /// Window.localStorageに設定値を保存する担当オブジェクト
  late LocalStorageDataStore _dataStore;

  /// 進むときと戻るときの秒数を設定する
  void setSkipTime(int skipTime) {
    state = state.copyWith(skipTime: skipTime);
    _dataStore.setInt(Strings.configNameSkipTime, skipTime);
  }

  /// やられたシーンは何秒前から見るを設定する
  void setDeathBeforeTime(int deathBeforeTime) {
    state = state.copyWith(deathBeforeTime: deathBeforeTime);
    _dataStore.setInt(Strings.configNameDeathBeforeTime, deathBeforeTime);
  }

  // あとの設定項目は省略する
}

// ignore: top_level_function_literal_block
final ikutConfigStateNotifierProvider =
    StateNotifierProvider<IkutConfigStateNotifier, IkutConfig>((context) {
  final dataStore = context.read(localStorageDataStoreProvider);
  final skipTime = dataStore.getInt(Strings.configNameSkipTime, 5);
  final deathBeforeTime =
      dataStore.getInt(Strings.configNameDeathBeforeTime, 4);
  final killBeforeTime = dataStore.getInt(Strings.configNameKillBeforeTime, 4);
  final slowRatio = dataStore.getInt(Strings.configNameSlowRatio, 2);
  final extractDeathScene =
      dataStore.getInt(Strings.configExtractDeathScene, 1) != 0;
  final extractKillScene =
      dataStore.getInt(Strings.configExtractKillScene, 1) != 0;
  return IkutConfigStateNotifier(
      dataStore,
      IkutConfig(skipTime, deathBeforeTime, killBeforeTime, 3, slowRatio, 2,
          extractDeathScene, extractKillScene));
});
設定値はWindow.localStorageを使い、ブラウザローカルに保存しています。しかしそのためには問題の dart:html ライブラリのインポートが必要です。よって、以下の3つをファイルを分けて作成します。
- インターフェース
- なにもしない実装
- 本番実装
インターフェースです。
/// Window.localStorageからデータを出し入れする機能のインターフェース
abstract class LocalStorageDataStore {
  /// int型の値を取得する
  /// [name] 保存キー
  /// [defaultValue] 未設定の時の返却値
  int getInt(String name, int defaultValue);

  /// 設定を保存する
  /// [name] 設定名
  /// [intValue] 設定値
  void setInt(String name, int intValue);
}
なにもしない実装です。
class LocalStorageDataStoreImpl implements LocalStorageDataStore {
  @override
  int getInt(String name, int defaultValue) {
    return defaultValue;
  }

  @override
  void setInt(String name, int intValue) {}
}
こちらが dart:html ライブラリを使う、本番で使われる実装です。
import 'dart:html';

import 'package:ikut/localDataStore/local_storage_data_store.dart';

/// Window.localStorageからデータを出し入れする機能の本番実装
class LocalStorageDataStoreImpl implements LocalStorageDataStore {
  /// int型の値を取得する
  /// [name] 保存キー
  /// [defaultValue] 未設定の時の返却値
  @override
  int getInt(String name, int defaultValue) {
    String value = window.localStorage[name];
    if (value == null) {
      return defaultValue;
    } else {
      return int.parse(value);
    }
  }

  /// 設定を保存する
  /// [name] 設定名
  /// [intValue] 設定値
  @override
  void setInt(String name, int intValue) {
    window.localStorage[name] = intValue.toString();
  }
}
実装の取得のために、RiverpodのProviderはこのように書きました。
import 'package:hooks_riverpod/hooks_riverpod.dart';

import 'local_storage_data_store.dart';
import 'local_storage_data_store_fake.dart'
    if (dart.library.html) 'local_storage_data_store_real.dart';

final localStorageDataStoreProvider =
// ignore: unnecessary_cast
    Provider((_) => LocalStorageDataStoreImpl() as LocalStorageDataStore);
重要な箇所は import 文の if (dart.library.html) の部分です。 dart:html ライブラリがあれば、 local_storage_data_store_real.dart が取り込まれ、無ければ local_storage_data_store_fake.dart が取り込まれます。Webアプリ実行時は dart:html ライブラリがあるので local_storage_data_store_real.dart が取り込まれ、単体テスト実行時は dart:html ライブラリが無いので local_storage_data_store_fake.dart が取り込まれます。
単体テストの実装
単体テストはこのようになります。モックオブジェクトの作成のために、mockitoを使用しました。
@GenerateMocks([LocalStorageDataStore, IkutConfigRepository])
void main() {
  // Window.localStorageへの保存をモック化したオブジェクト
  final dataStore = MockLocalStorageDataStore();

  test('test ikutConfigStateNotifier', () async {
    // 呼ばれるメソッドの実装を定義する
    when(dataStore.getInt(Strings.configNameSkipTime, 5)).thenReturn(5);
    when(dataStore.getInt(Strings.configNameDeathBeforeTime, 4)).thenReturn(4);
    when(dataStore.getInt(Strings.configNameKillBeforeTime, 4)).thenReturn(4);
    when(dataStore.getInt(Strings.configNameSlowRatio, 2)).thenReturn(2);
    when(dataStore.getInt(Strings.configExtractDeathScene, 1)).thenReturn(1);
    when(dataStore.getInt(Strings.configExtractKillScene, 1)).thenReturn(1);

    // LocalStorageDataStoreの実装をモックに差し替える
    final container = ProviderContainer(overrides: [
      localStorageDataStoreProvider.overrideWithValue(dataStore)
    ]);

    // StateNotifierを取得する
    final configStateNotifier =
        container.read(ikutConfigStateNotifierProvider.notifier);
    // 更新された状態を取得するラムダ
    final getState = () => container.read(ikutConfigStateNotifierProvider);
    // StateNotifierの初期値を確認
    expect(getState(), IkutConfig(5, 4, 4, 3, 2, 2, true, true));
    // skipTimeを5秒から3秒に変更
    configStateNotifier.setSkipTime(3);
    // dataStoreのメソッドが意図通り呼ばれたか確認する
    verify(dataStore.setInt(Strings.configNameSkipTime, 3));
    // StateNotifierの状態更新を確認する
    expect(getState(), IkutConfig(3, 4, 4, 3, 2, 2, true, true));
    // deathBeforeTimeを4秒から8秒に変更
    configStateNotifier.setDeathBeforeTime(8);
    // dataStoreのメソッドが意図通り呼ばれたか確認する
    verify(dataStore.setInt(Strings.configNameDeathBeforeTime, 8));
    // StateNotifierの状態更新を確認する
    expect(getState(), IkutConfig(3, 8, 4, 3, 2, 2, true, true));
    // 以下省略
  });
}
まとめ
dart:html ライブラリを含んだメソッドは単体テストの実行にChromeが必要で取り回しが悪いですが、単体テスト用の実装と本番実装を同じクラス名で作り、Conditionally Importingで取り込むファイルを切り替えることで、取り回しの良い単体テストを作ることができました。


