概要
Ubuntu 22.04が出たり,NVIDIAのリポジトリの公開鍵が更新されたりしたので新しく記事を作ってみます
手順
- NVIDIAドライバのインストール
- CUDAのインストール
- cuDNNのインストール
- PyTorch環境の構築
環境
- Ubuntu 20.04 LTS
- Ubuntu 22.04 LTS
NVIDIAドライバのインストール
ハードウェアに対応したNVIDIAドライバを探す
ubuntu-drivers devices
基本的はrecommendedと書いてあるやつをインストールすればOK.ハードウェアとの相性の関係で失敗することもありますが,バージョンを変えれば上手くいったりします
sudo add-apt-repository ppa:graphics-drivers/ppa
sudo apt update
sudo apt install nvidia-driver-515
インストールできたら再起動
reboot
インストールが上手く行かない場合は,元々入っているNVIDIA関連パッケージを削除してから入れ直してください
sudo apt --purge remove nvidia*
sudo apt --purge remove cuda*
インストール確認用のコマンド
nvidia-smi
ここで表示されている CUDA Version 12.0 というのはGPUに対応している最新のCUDAのバージョンです.すでにCUDAが入っているわけではありません
CUDAのインストール
CUDA Toolkit Archive から deb (network) を選択してインストール用コマンドを取得します
Ubuntu20.04でCUDA11.1をインストールする場合
wget https://developer.download.nvidia.com/compute/cuda/repos/ubuntu2004/x86_64/cuda-keyring_1.0-1_all.deb
sudo dpkg -i cuda-keyring_1.0-1_all.deb
sudo apt update
sudo apt install cuda-11-1
Ubuntu22.04でCUDA11.7をインストールする場合
wget https://developer.download.nvidia.com/compute/cuda/repos/ubuntu2204/x86_64/cuda-keyring_1.0-1_all.deb
sudo dpkg -i cuda-keyring_1.0-1_all.deb
sudo apt update
sudo apt install cuda-11-7
インストールできたら再起動
reboot
CUDAのパスを通す
-
~/.bashrcの末尾に以下を追記
export PATH=/usr/local/cuda:/usr/local/cuda/bin:$PATH
export LD_LIBRARY_PATH=/usr/local/lib:/usr/local/cuda/lib64:$LD_LIBRARY_PATH
source ~/.bashrc
インストール確認
nvcc -V
CUDA11.7が入っていますね
cuDNNのインストール (参考)
cuDNN Archiveからインストールするパッケージを選択 (NVIDIAアカウントの登録が必要です)
*はインストールしたバージョンに合わせて埋めてください
sudo dpkg -i <path/to/cudnn>
sudo cp /var/cudnn-local-repo-*/cudnn-local-*-keyring.gpg /usr/share/keyrings/
sudo apt update
sudo apt install libcudnn8=8.5.0.96-1+cuda11.7
sudo apt install libcudnn8-dev=8.5.0.96-1+cuda11.7
インストール確認
dpkg -l | grep cudnn
PyTorch環境の構築
python環境作成
とりあえずvenvで環境を作ってみます
sudo apt install python3-venv # venvのインストール
python3 -m venv <env_name> # 仮想環境の作成
source <env_name>/bin/activate # 仮想環境の有効化
pip3 install -U pip setuptools wheel # pipの更新
PyTorchのインストール
公式サイトからコマンドを取得するのが通例ですが,古いバージョンのtorchの情報を見つけるのに苦労します.今回はこのコマンドでインストールすれば大丈夫です
# Ubuntu 20.04の場合 (torch1.9.0, CUDA11.1を使っている場合)
pip3 install torch==1.9.0+cu111 torchvision==0.10.0+cu111 -f https://download.pytorch.org/whl/torch_stable.html

# Ubuntu 22.04の場合 (torch1.13.0, CUDA11.7を使っている場合)
pip3 install torch==1.13.0+cu117 torchvision==0.14.0+cu117 -f https://download.pytorch.org/whl/torch_stable.html
GPUが使用できるか確認
最後にPyTorchからGPUを認識できているか確認します
完了
おまけ
NVIDIAドライバの再インストール
もともと入っているドライバのせいでインストールがうまく行かなかったりします.NVIDIA関連パッケージをすべて消去してから入れ直すと上手くいくことがあります.
sudo apt --purge remove nvidia*
sudo apt --purge remove cuda*
sudo apt --purge remove cudnn*
sudo apt --purge remove libnvidia*
sudo apt --purge remove libcuda*
sudo apt --purge remove libcudnn*
sudo apt autoremove
sudo apt autoclean
sudo apt update
sudo rm -rf /usr/local/cuda*
CUDAのバージョン選択
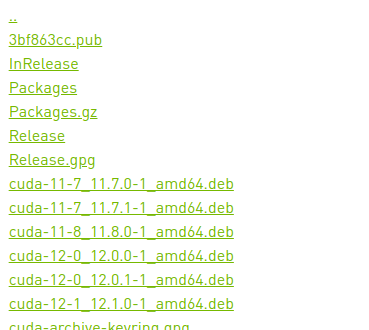
Ubuntu20.04, Ubuntu22.04 から探して下記コマンドのバージョンを合わせます.Ubuntu22.04用のリポジトリにはCUDA11.7~が入っています

sudo apt install cuda-11-7
PyTorchのバージョン選択
ここ から探します.CUDA11.7 (cu117)に合うtorchのバージョンを探してみるとcu117/torch-1.13.0%2Bcu117-cp38-cp38-linux_x86_64.whlというファイルが見つかります.どうやらtorch1.13.0ならインストールできそうです
インストール
pip3 install torch==1.13.0+cu117 torchvision==0.14.0+cu117 -f https://download.pytorch.org/whl/torch_stable.html
apt updateで「複数回設定されています」 という警告が出たとき
/etc/apt/sources.listの最後の2つをコメントアウト


