この記事でやりたいこと
LightGBMを使って学習、実験した結果をMLFlowを使ってちゃんと管理したい。
というわけでこの記事ではタイタニック生存予測のデータを使ってLightGBM+MLFlowを試してみる。
自分は普段Google Colabratory上で作業することが多いので、その場合にどうすればいいかも併せて考える。
この記事の前提知識
LightGBMおよびMLFlowについてはすでに既知のものとする。
少し調べればいくらでも分かりやすい記事が出てくるのでそちらを参考にして欲しい。
まずはタイタニックで普通にLightGBM
まずはよく使われるタイタニックの生存予測のデータで軽くLightGBMを回してみよう。
データを用意する方法はいろいろあるが、seabornから簡単に取ってこれるのでこれを使う。
import seaborn as sns
data = sns.load_dataset('titanic')
今回はMLFlowを使うのが目的なので、パラメータのチューニングやfeature engineeringなどは適当。
5foldでcross validationして、foldごとにaccuracyでも求めてみる。
import pandas as pd
import numpy as np
import warnings
warnings.filterwarnings('ignore')
from sklearn.model_selection import train_test_split, KFold
from sklearn.metrics import accuracy_score
from sklearn.preprocessing import LabelEncoder
import lightgbm as lgb

# Encode categorical features
le = LabelEncoder()
for col in ['sex', 'embarked', 'who', 'embark_town', 'alive']:
    data[col] = le.fit_transform(data[col])

# 特徴量とターゲットに分割
N_splits = 5
train = data.drop('survived', axis=1)
y = data['survived']

kfold = KFold(n_splits=N_splits, shuffle=True, random_state=42)
for fold, (trn_ind, val_ind) in enumerate(kfold.split(train)):
    print(' ')
    print('-'*50)
    print(f'Training fold {fold}/{N_splits}....')
    x_train, x_val = train.iloc[trn_ind], train.iloc[val_ind]
    y_train, y_val = y[trn_ind], y[val_ind]

    params = {
        'objective': 'binary',
        'metric': 'binary_logloss',
        'num_leaves': 31,
        'learning_rate': 0.1,
        'feature_fraction': 0.9,
        'verbosity': -1,
    }
    verbose_eval = 20

    lgb_train = lgb.Dataset(x_train, y_train)
    lgb_valid = lgb.Dataset(x_val, y_val, reference=lgb_train)

    model = lgb.train(
        params = params,
        train_set = lgb_train,
        num_boost_round = 100,
        valid_sets=[lgb_train, lgb_valid],
        callbacks=[lgb.early_stopping(stopping_rounds=20,  verbose=True),  lgb.log_evaluation(verbose_eval)]
    )

    y_pred = model.predict(x_val, num_iteration=model.best_iteration)
    accuracy = accuracy_score(y_val, np.round(y_pred))
    print(f'Fold {fold}, Accuracy: {accuracy}'
--------------------------------------------------
Training fold 0/5....
Training until validation scores don't improve for 20 rounds
[20]	training's binary_logloss: 0.0634963	valid_1's binary_logloss: 0.0647114
[40]	training's binary_logloss: 0.00832195	valid_1's binary_logloss: 0.00847608
[60]	training's binary_logloss: 0.00124187	valid_1's binary_logloss: 0.00127745
[80]	training's binary_logloss: 0.000188665	valid_1's binary_logloss: 0.000196309
[100]	training's binary_logloss: 2.9012e-05	valid_1's binary_logloss: 3.05808e-05
Did not meet early stopping. Best iteration is:
[100]	training's binary_logloss: 2.9012e-05	valid_1's binary_logloss: 3.05808e-05
Fold 0, Accuracy: 1.0

--------------------------------------------------
Training fold 1/5....
Training until validation scores don't improve for 20 rounds
[20]	training's binary_logloss: 0.0641125	valid_1's binary_logloss: 0.0638302
[40]	training's binary_logloss: 0.0084025	valid_1's binary_logloss: 0.00836669
[60]	training's binary_logloss: 0.00125139	valid_1's binary_logloss: 0.00127699
[80]	training's binary_logloss: 0.000189346	valid_1's binary_logloss: 0.000198416
[100]	training's binary_logloss: 2.90846e-05	valid_1's binary_logloss: 3.13019e-05
Did not meet early stopping. Best iteration is:
[100]	training's binary_logloss: 2.90846e-05	valid_1's binary_logloss: 3.13019e-05
Fold 1, Accuracy: 1.0

...(略)
とまぁこんな感じ。
LightGBM+MLFlowの最小構成(autologを使う)
LightGBMはよく使われるフレームワークなので、
Automatic Loggingという機能を使えばめちゃくちゃ簡単に実験を記録できる。
結論から言えばたった2行加えるだけでいい
参考:https://www.nogawanogawa.com/entry/mlflow_lgbm
上のコードおいて、import mlflowとmlflow.lightgbm.autolog()を2行加える。
環境によっては
$ pip install mlflow
を事前にしておく。
# 略
import mlflow # Added

le = LabelEncoder()
for col in ['sex', 'embarked', 'who', 'embark_town', 'alive']:
    data[col] = le.fit_transform(data[col])

# 特徴量とターゲットに分割
N_splits = 5
train = data.drop('survived', axis=1)
y = data['survived']

mlflow.lightgbm.autolog() # Added

kfold = KFold(n_splits=N_splits, shuffle=True, random_state=42)
for fold, (trn_ind, val_ind) in enumerate(kfold.split(train)):
    # 略
MLFLowの結果の確認
デフォルトだと./mlruns以下に実験データが保存される。
AWSやAzureなどのクラウド上に置くこともできるが、今回はlocal PCからlocalhostでMLFlowのUIを見てみよう。
./mlruns
が存在する状態で
$ mlflow ui
を実行する。
環境によって事前にmlflowをインストールしてこのコマンドが使えるようにしておく必要がある。
自分の場合はlocalのmacから行った。
うまくいけば
[INFO] Listening at: http://127.0.0.1:5000
のようなメッセージが出てくるので、適当なブラウザで以下のようなUIが見れる。
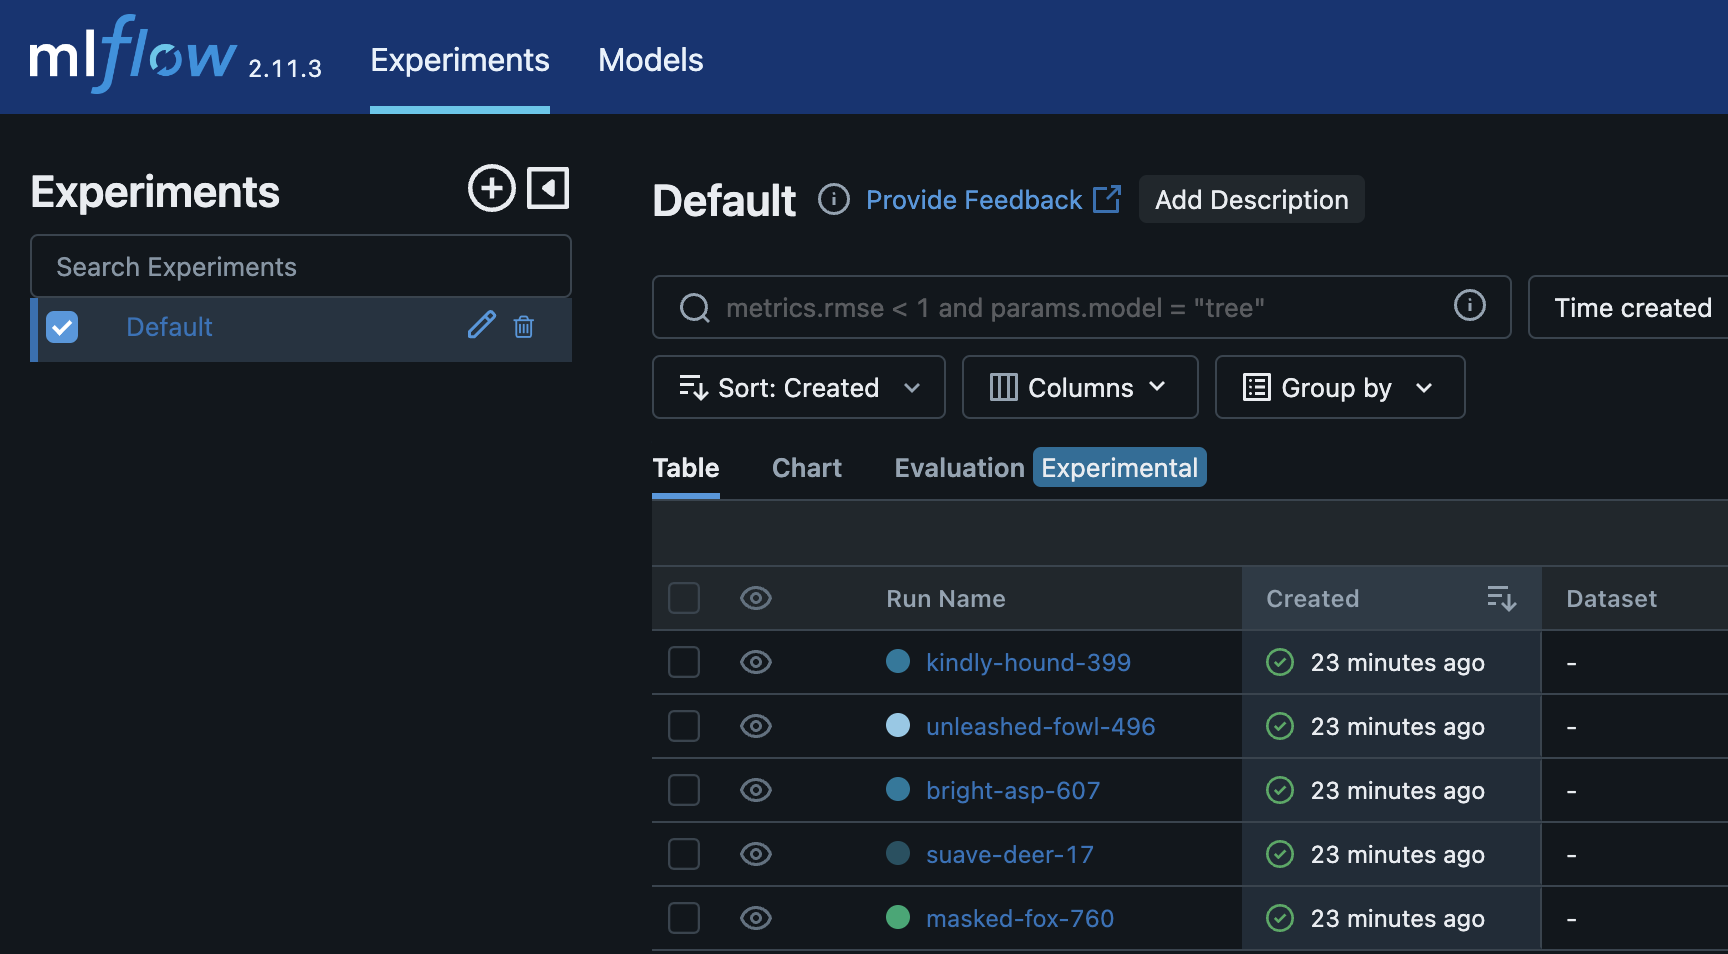
Experimentの名前などは特に指定していないので、Deafult (ExperimentID=0)となっている。
5foldで回していたので5つのrunが生成されていることがわかる。
適当にそのうちの一つをクリックしてみる。
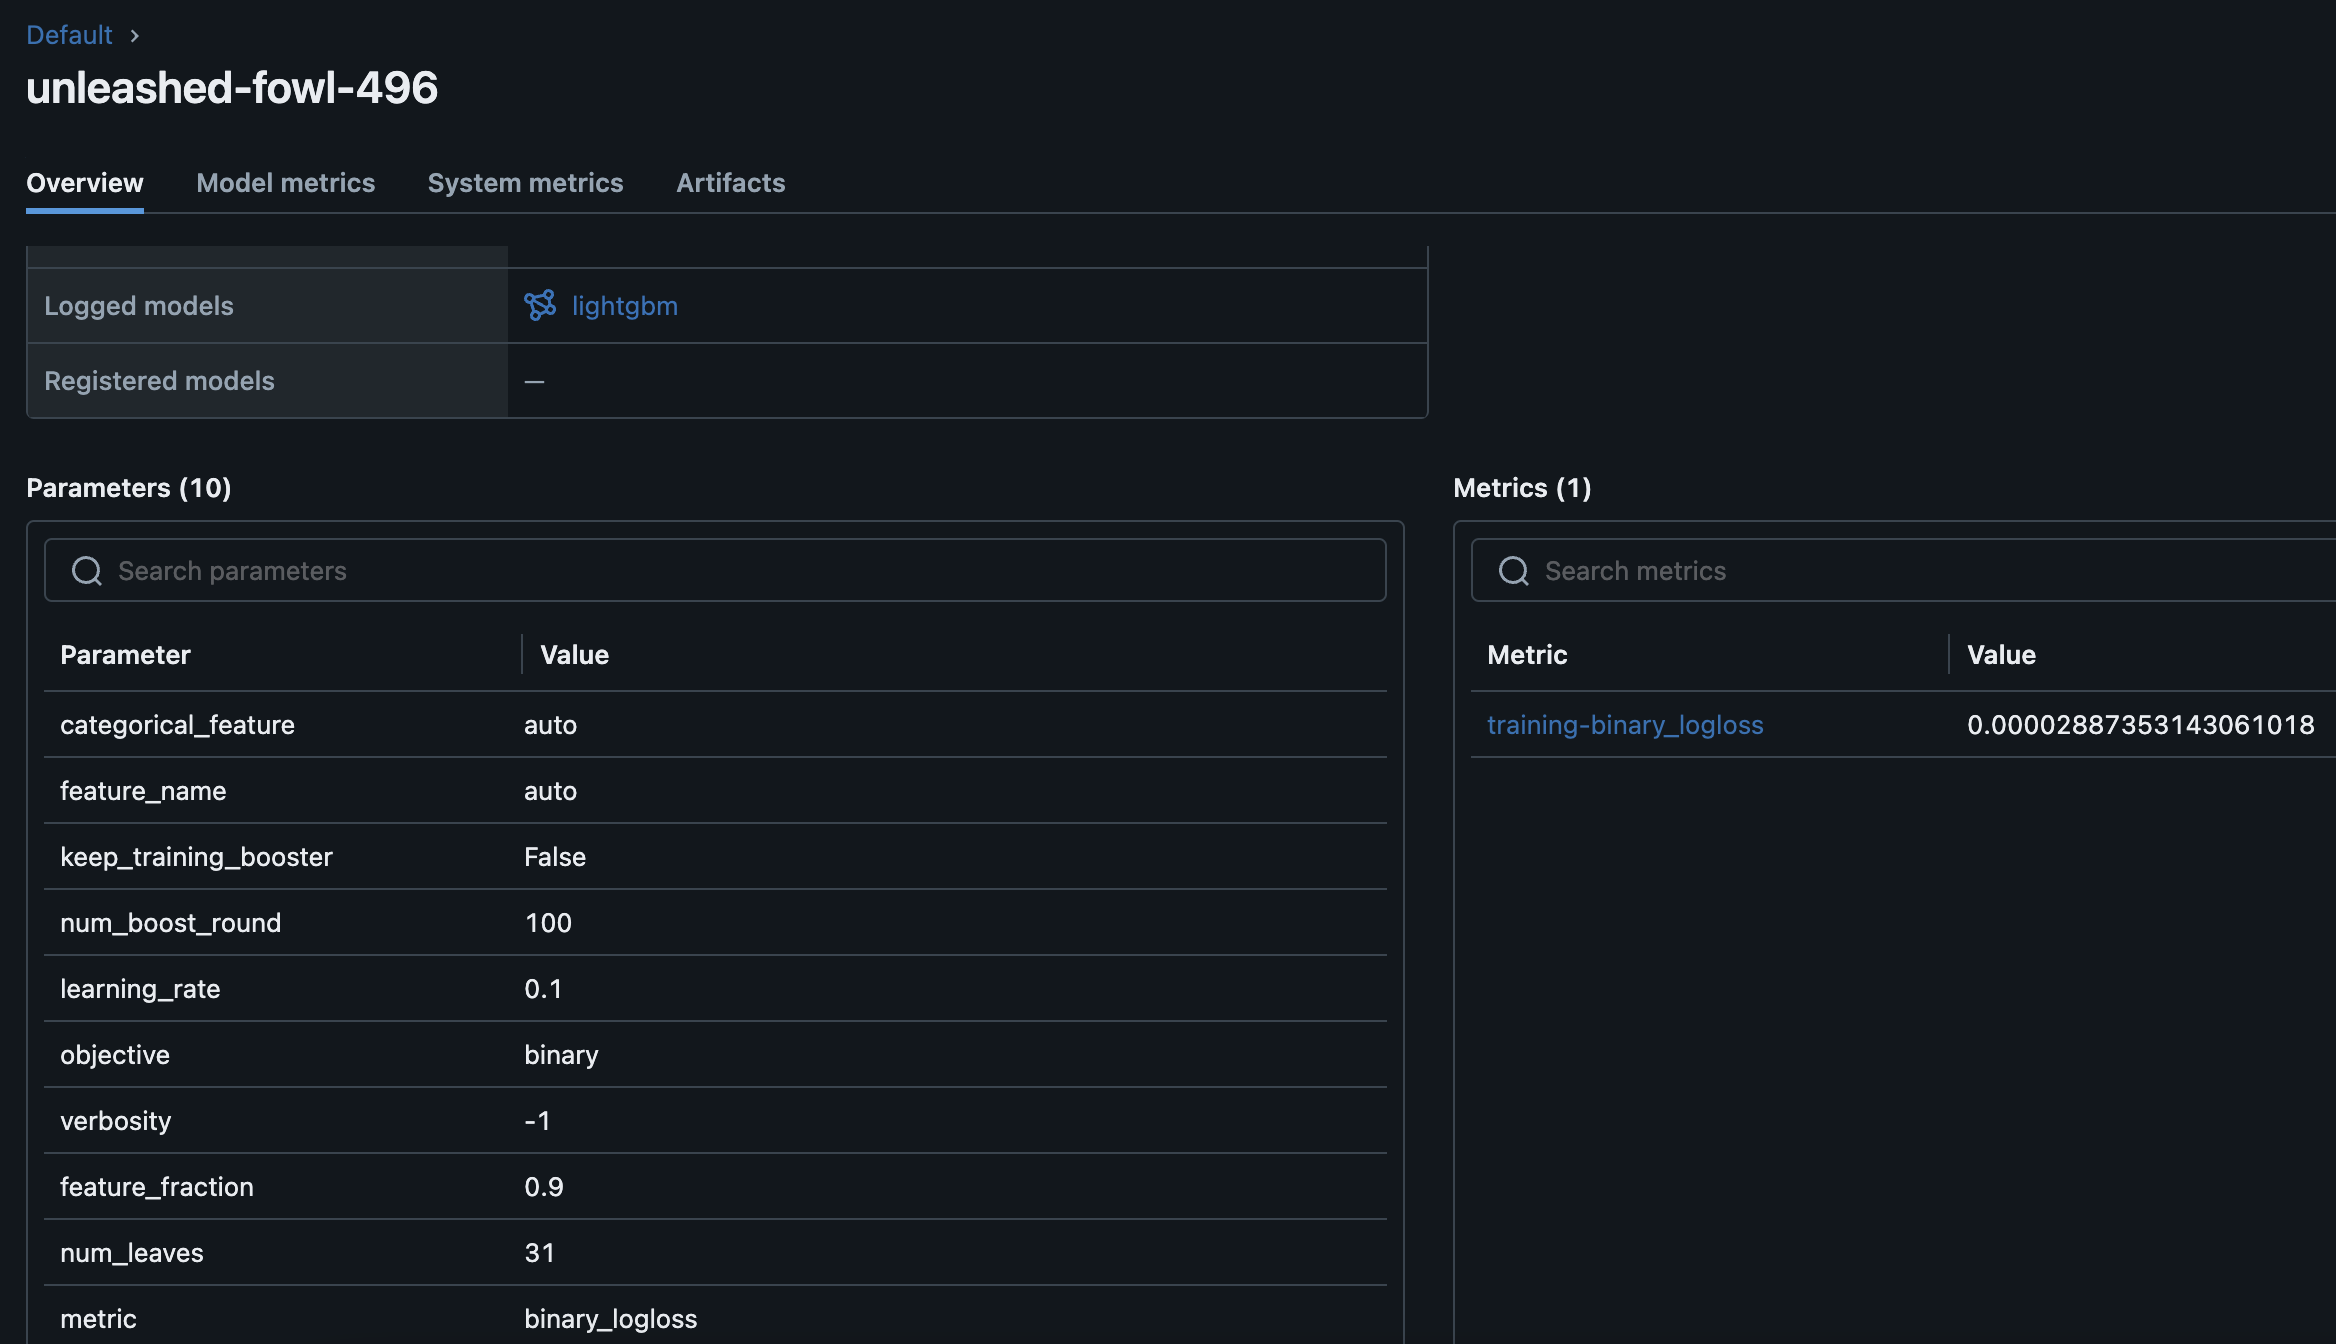
以下のように学習に使ったパラメータやメトリクスなどが表示される。
今回は分類問題なのでloglossが表示されている。
Artifactsをひらけばimportanceの一覧を眺めることもできる。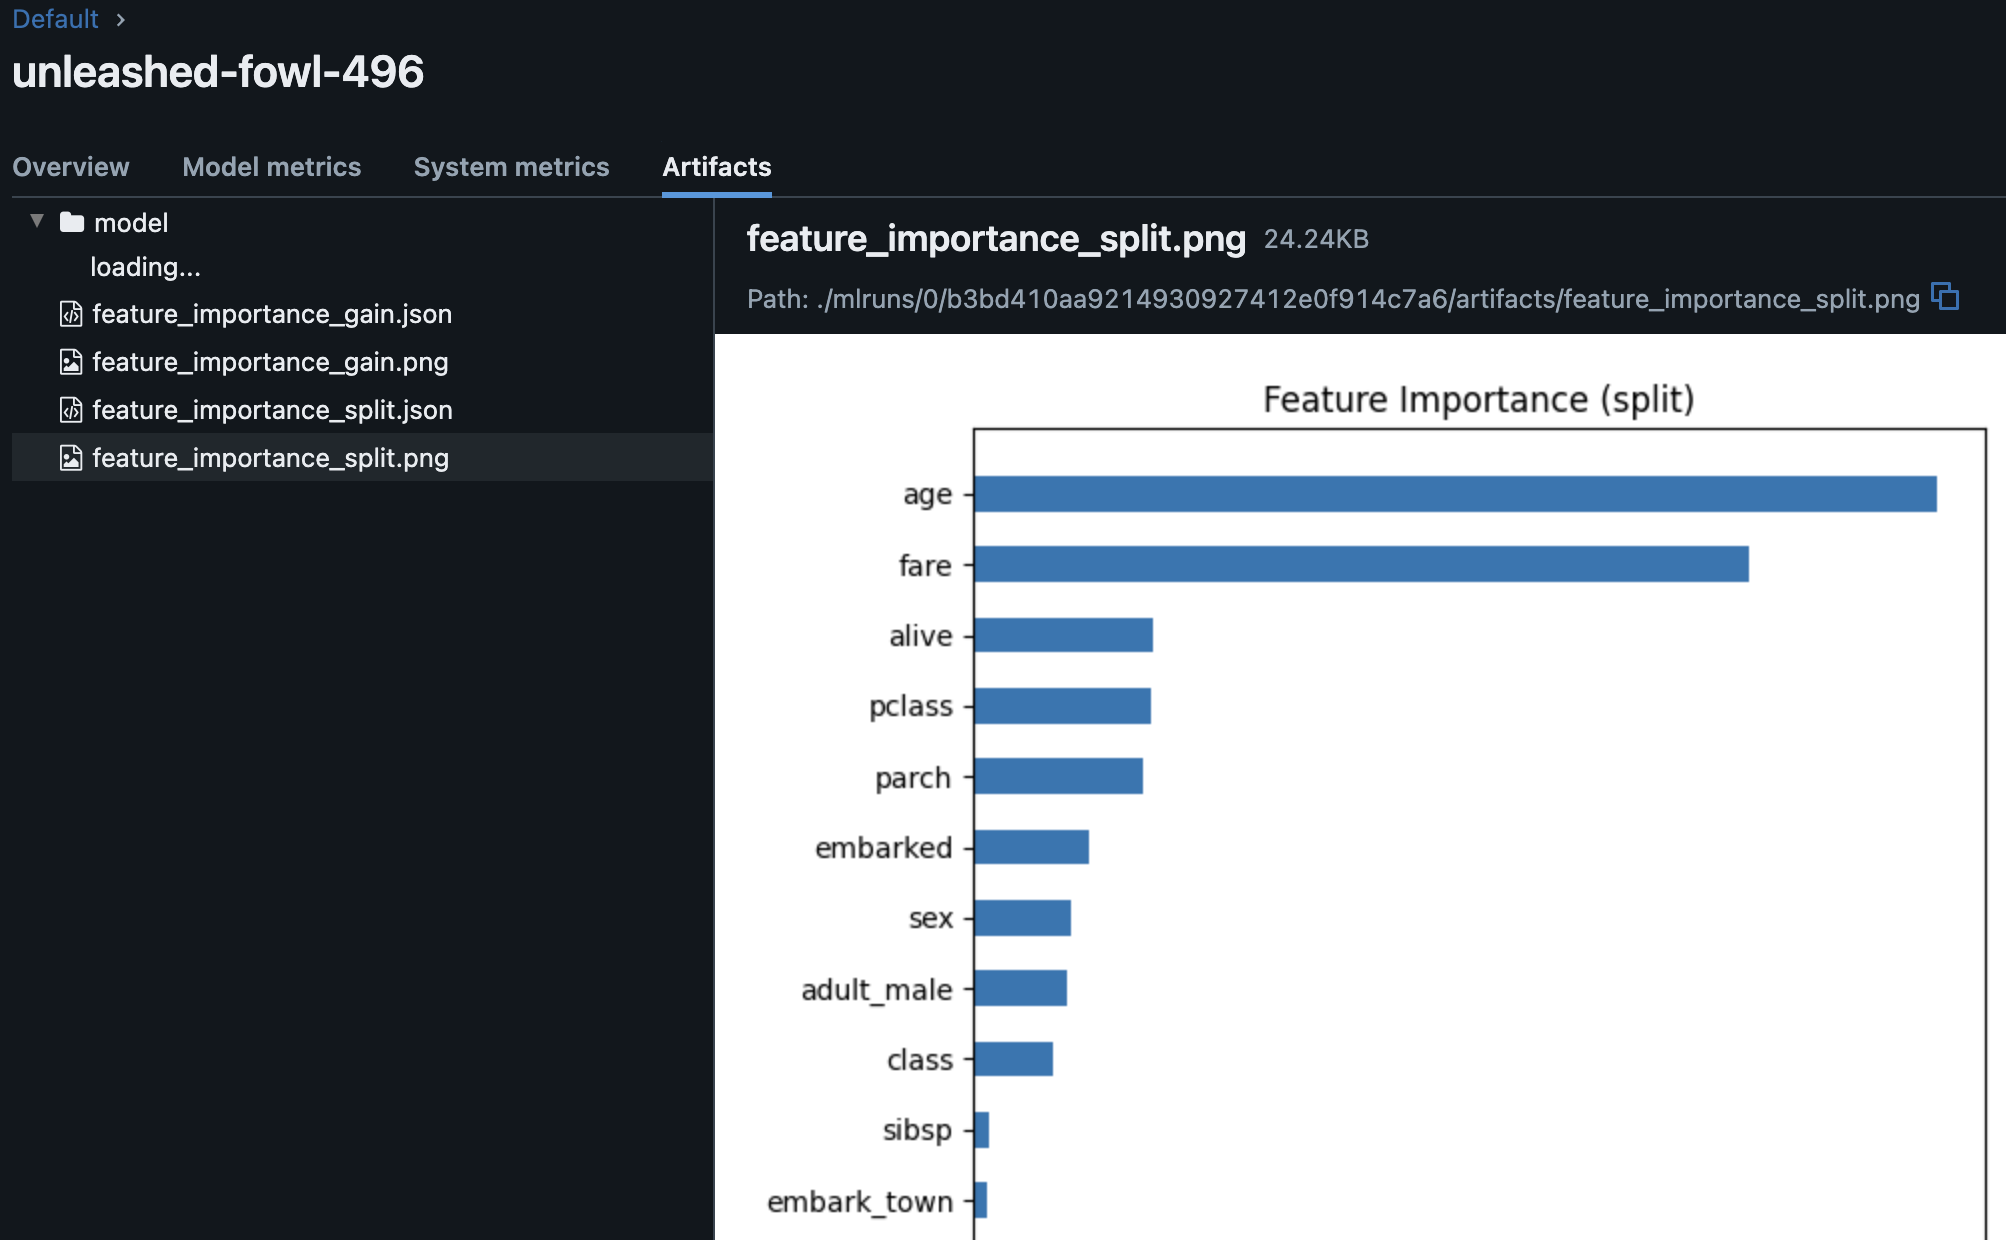
Google Colaboratoryで回す場合の注意
さて、記事の最初でも書いた通り、自分はLightGBMの計算自体はGoogle Colab上で行ったが、いくつか詰まったポイントがあった。
MLFlowのサーバをどこで立ち上げる?
まず、MLFlowの結果をどこにoutputし、どこでサーバを立ち上げるかを考える必要がある。
デフォルトだと./mlruns以下に吐き出されるが、チームで作業する場合はAWSやAzure、GCPなどのクラウドを使うのがおそらく最も効率が良いだろう。
Google Colabの場合、使えるのはあくまでPythonの実行環境とストレージ(GoogleDrive)だけなので、Colab環境上で直接MLFlowを立ち上げるのは難しい。
自分の場合は一人でお試しで使いたいだけだったので、local PCに落としてそこでlocalhostから立ち上げることにした。
Artifactsのpath
結局outputとして生成されたmlrunsをlocal PCに落としてMLFlowを起動するということをやったのだが、ここでもいくつか穴にハマった。
まず最初に./mlrunsがある状態でmlflow uiを実行してもartifactsが見れないという問題があった。
これはartifactを指定するpathの問題だった。
実はMLflowのデータは各run_idごとにmeta.yamlというファイルに情報が格納されているが、ここにartifactsのpathの情報がハードコーディングされている。
以下のようなイメージだ。
artifact_uri: {GoogleDriveのpath}/mlruns/543277036125942931/d47435c591ca45ae8ed0de8ad9156be1/artifacts
end_time: null
entry_point_name: ''
experiment_id: 0
lifecycle_stage: active
run_id: ####
run_name: ####
なので環境を変えて実行したい場合は単純にディレクトリごと全部コピーすればいいわけではなく、runごとにartifact_uriを全てlocal PCのものに書き換える必要がある。
一つ一つ全部書き換えるのは面倒だったので結局以下のようなスクリプトを書いた。
(結構面倒だった。もっといい方法があるかも。。)
import os
import yaml

old_path_prefix = xxxx
root_dir = './'
for dirpath, dirnames, filenames in os.walk(root_dir):
    if 'meta.yaml' in filenames:
        meta_path = os.path.join(dirpath, 'meta.yaml')
        print(f"{meta_path=}")
        with open(meta_path, 'r') as file:
            meta_data = yaml.safe_load(file)
        # アーティファクトのURIを新しいパスに更新
        if 'artifact_uri' in meta_data and meta_data['artifact_uri'].startswith(f"{old_path_prefix}"):
            meta_data['artifact_uri'] = meta_data['artifact_uri'].replace(f"{old_path_prefix}", './')
            print('before:', meta_data['artifact_uri'])
            print('replace...')
            print('after:', meta_data['artifact_uri'])
            # 更新されたメタデータでファイルを再書き込み
            with open(meta_path, 'w') as file:
                print('write...')
                yaml.safe_dump(meta_data, file)
細かい設定の追加
上記でやった内容はLightGBM+MLFlowを使う上での最小構成だったので記述量も少なかった。
明示的にいろんな設定を加えることができるのでやってよう。
Experimentの設定
Experimentを設定しなければDefault (ExperimentID=1)となるが、明示的に設定することもできる。
例えば以下のように実験名を指定し、それをもとにExperimentIDを生成してみよう。
experiment_name = "lgbm_titanic_ver1"

# 実験が既に存在するかチェック
experiment = mlflow.get_experiment_by_name(experiment_name)
if experiment is None:
    # 実験が存在しない場合、新しい実験を作成
    experiment_id = mlflow.create_experiment(experiment_name)
    print(f"Experiment created with ID: {experiment_id}")
else:
    # 実験が既に存在する場合、そのIDを使用
    experiment_id = experiment.experiment_id
    print(f"Experiment already exists with ID: {experiment_id}")

# 作成した実験を現在のコンテキストで使用
mlflow.set_experiment(experiment_name)
print("Current tracking URI:", mlflow.get_tracking_uri())
print(f"{experiment_name=}")
print(f"{experiment_id=}")
Experiment created with ID: 23492843xxxxxxxxxx
Current tracking URI: file:///content/mlruns
experiment_name='lgbm_titanic_ver1'
experiment_id='23492843xxxxxxxxxx'
Google Colabは/contentがデフォルトのpathなので、そこにmlflowディレクトリを指定したものがデフォルトのoutput pathとなっていることがわかる。
Runの設定とArtifactsの追加
さて、runの名前も自動的に生成された名前を使っていたので自分でつけてみよう。
LightGBMのautologの場合は特にrunの設定をしなくてもfoldごとに自動的にrun_idを生成してくれていたのだが、自分で明示的にstart_run()を使ってrunの範囲を設定することもできる。
また、mlflow.log_metric()やmlflow.log_artifact()などを使って好きな指標やcsvなどのファイルの追加も可能だ。
以下のコードは先ほどのものにrun_nameの指定とaccuracyのmetricsを追加したものだ。
mlflow.lightgbm.autolog()

kfold = KFold(n_splits=N_splits, shuffle=True, random_state=42)
for fold, (trn_ind, val_ind) in enumerate(kfold.split(train)):
    print(' ')
    print('-'*50)
    print(f'Training fold {fold}/{N_splits}....')
    x_train, x_val = train.iloc[trn_ind], train.iloc[val_ind]
    y_train, y_val = y[trn_ind], y[val_ind]

    params = {
        'objective': 'binary',
        'metric': 'binary_logloss',
        'num_leaves': 31,
        'learning_rate': 0.1,
        'feature_fraction': 0.9,
        'verbosity': -1,
    }
    verbose_eval = 20

    lgb_train = lgb.Dataset(x_train, y_train)
    lgb_valid = lgb.Dataset(x_val, y_val, reference=lgb_train)

    with mlflow.start_run(run_name=f"fold{fold}"): # run_nameの指定
        model = lgb.train(
            params = params,
            train_set = lgb_train,
            num_boost_round = 100,
            valid_sets=[lgb_train, lgb_valid],
            callbacks=[lgb.early_stopping(stopping_rounds=20,  verbose=True),  lgb.log_evaluation(verbose_eval)]
        )

        y_pred = model.predict(x_val, num_iteration=model.best_iteration)
        accuracy = accuracy_score(y_val, np.round(y_pred))
        print(f'Fold {fold}, Accuracy: {accuracy}')

        mlflow.log_metric("Accuracy", accuracy) # metricsを明示的に追加
再度MLFlowを立ち上げてみよう。
以下のようにExperiment, run nameが表示されるようになった!

metricsとしてaccuracyが追加されていることも確認できた。
まとめ
MLFlowについては仕事で昔使ったことはあったものの、ちゃんと理解していると言い切れない部分があった。
今回手を動かしていろいろいじってみてなんとなく感覚が掴めてきた気がする。
今回の内容はとてもBest Practiceとは言いがたく、どちらかというと見苦しくいじくり回したような感じになってしまったが、よりスマートに使って効率的に実験回していけるといいな。