1. 概要
Raspberry Pi Zero WHにBuster(Debian 10)をインストールしてAmazon Kinesis Video StreamsにWebRTCでカメラ映像を送信する。Buster(Debian 10)は2022年前半時点で、旧版のOSとなっている。
※この記事のかなりの部分は直前に書いた記事とかなり重複します。別々に見ても困らないように省略していません。
2. 前置き
2.1. 経緯
知人から依頼され、2021年頃にRaspberry Pi 3Bを使ってKVSにUVCカメラの映像をアップロードする手順を確認した。その時点では問題なかったが、最近になって改めてその手順を行ったところ、OSのバージョン違いやコマンドの記載漏れによって動かない、分かりづらいなどが判明したので改めて確認することとなった。
2.2. Raspberry Pi OSについて
2021年の後半に出たBullseye((Debian 11)だとカメラや画像を扱うときにライブラリが無いなどの状況になっている。何故なのかは知らないが、知人の多くが困っているようだ。
2020~2021年前半に使ったOSは、Buster(Debian 10)というらしく、最新のRaspberry Pi Imagerであれば選択インストールできるらしい。そこで、従来版のOSをインストールし、旧来のカメラや画像処理がうまく動いていた状況を再現する。
尚、この記事の直前にamazon-kinesis-video-streams-producer-sdk-cppを使い、Amazon Kinesis Video Streams Producerでのカメラ映像送信は問題なく使えることを確認済み。
上記記事を知らせたあと、WebRTCも確認してほしいと言われ追加で確認することとした。
2.3. ハードウェア
前記事と同じ。
- Raspberry Pi Zero WH
- UVCカメラ: Buffalo BSW500M
- USB HUB(カメラ以外にキーボードやマウスをつなぐ場合)
3. 手順
3.1. OSインストール
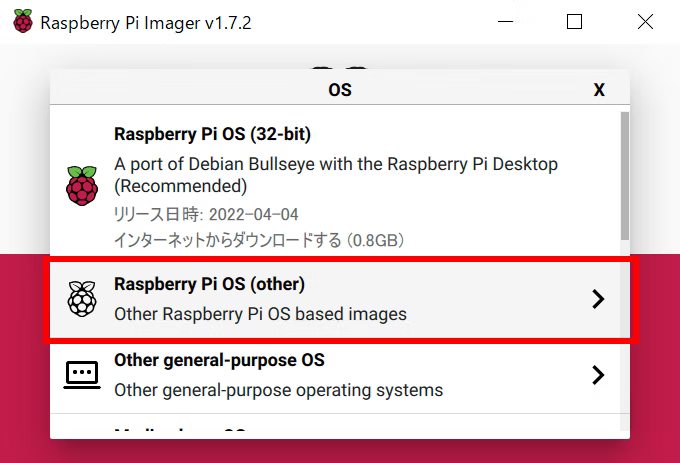
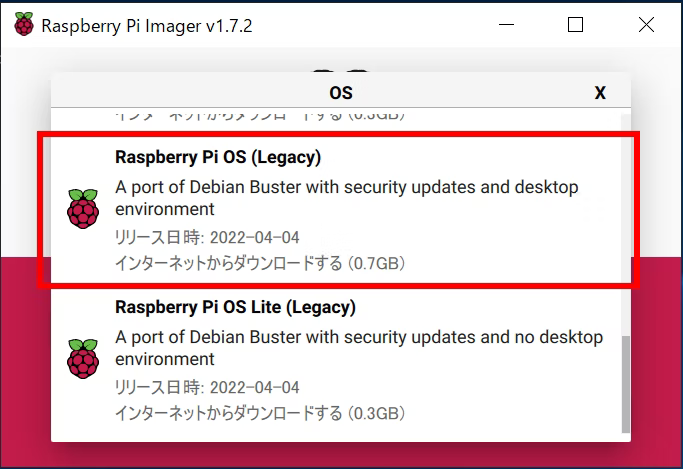
Raspberry Pi Imagerを使ってOSインストール。きちんと選択すれば、Busterもインストールできる。
Raspberry Pi Imagerは以下からダウンロードできる。
https://www.raspberrypi.com/software/
従来通りストレージを選択して、書き込みを開始する。
終わったらWindowsがフォーマットしますか?と書き込みを無にする質問をしてくるのでキャンセル。
3.2. OSのセットアップ
OSのセットアップ時に出てくる「Update Software」は実行する。
さらに、念のためターミナルで以下を実行しておく。
$ sudo apt update
$ sudo apt upgrade
3.3. 環境設定
ここでインストールするライブラリは前記事と少し違う。
$ sudo apt -y install cmake m4 pkg-config libcap2 libcap-dev
$ sudo apt -y install libgstreamer1.0-dev libgstreamer-plugins-base1.0-dev gstreamer1.0-plugins-bad gstreamer1.0-plugins-good gstreamer1.0-plugins-ugly gstreamer1.0-tools gstreamer1.0-omx
$ sudo apt -y install libssl-dev libcurl4-openssl-dev liblog4cplus-1.1-9 liblog4cplus-dev
4. Amazon Kinesis Video Streams Webrtcのインストール
インストールというかビルド。ソースコードからビルドする。
4.1. 準備
gitでクローンしたが、最新ソースだけでも問題ない。
$ git clone --recursive https://github.com/awslabs/amazon-kinesis-video-streams-webrtc-sdk-c.git
$ mkdir -p amazon-kinesis-video-streams-webrtc-sdk-c/build
4.2. ビルド
終わるまで結構時間かかる。
$ cd amazon-kinesis-video-streams-webrtc-sdk-c/build
$ cmake ..
$ make
kvsWebrtcClientMasterGstSampleなどのサンプルアプリが出来ている。
pi@raspberrypi:~/amazon-kinesis-video-streams-webrtc-sdk-c/build $ ls samples/
CMakeFiles  cmake_install.cmake  h264SampleFrames       kvsWebrtcClientMasterGstSample  opusSampleFrames
Makefile    discoverNatBehavior  kvsWebrtcClientMaster  kvsWebrtcClientViewer
4.3. 環境変数の設定
<アクセスキー>と<シークレットアクセスキー>は自分のAWSアカウントで作ったユーザー情報でわかるのでそれと置き換えて使う。送り先のAWSリージョンと映像確認の際に自分が開いているリージョンが違うと映像を見られない。
$ export AWS_DEFAULT_REGION=ap-northeast-1
$ export AWS_ACCESS_KEY_ID=<アクセスキー>
$ export AWS_SECRET_ACCESS_KEY=<シークレットアクセスキー>
5. 実行と確認
「pizero」はAWS上でシグナリングチャネル名として使われる。好きに決めていい名称。
pi@raspberrypi:~/amazon-kinesis-video-streams-webrtc-sdk-c/build/samples $ ./kvsWebrtcClientMasterGstSample pizero video-only
以下のログまで出ていれば起動は問題ない。カメラにカバーがある場合は外しておく。
[KVS GStreamer Master] Signaling client connection to socket established
[KVS Gstreamer Master] Beginning streaming...check the stream over channel pizero
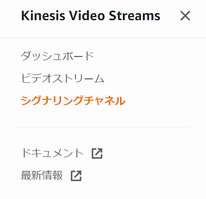
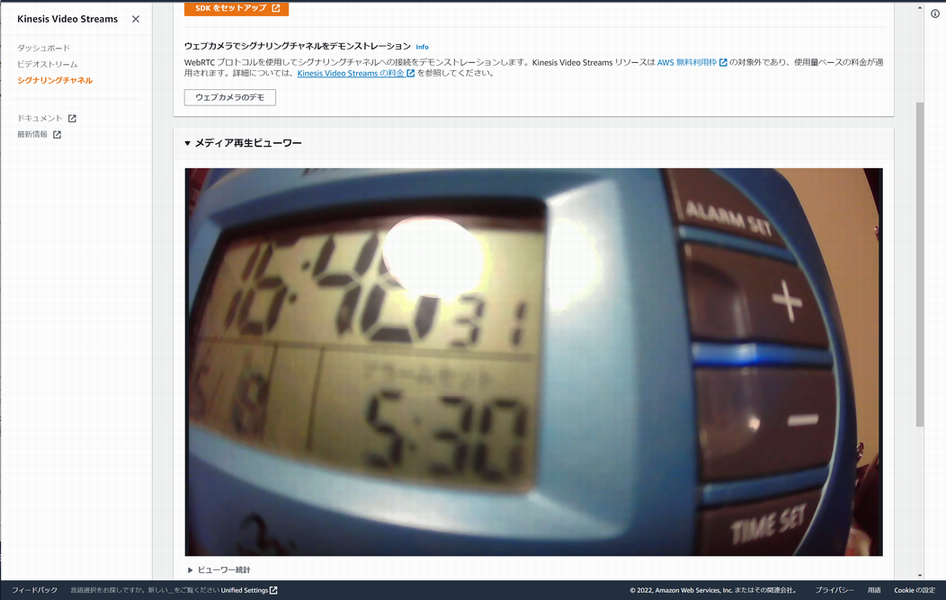
AWSのKinesis Video Streamsに「シグナリングチャネル」があるので、そこを開くと「pizero」が生成されているはず。メディア再生ビューワーでカメラの映像が再生される。・・・はずだが再生されない。

5.1 サンプルコードの修正
映像が送られない真の原因は知らないが、2021年の確認でも同じだったので、その際の修正を入れて再実行してみる。
amazon-kinesis-video-streams-webrtc-sdk-c/samples/kvsWebRTCClientMasterGstreamerSample.c を修正する。
154行目あたりのコードにあたる。
コメントアウトしているところが、元のコード。その下の3行が修正として入れたコード。
ソフトウェアH.264エンコードでUVCカメラのYUVをH.264に変換してアップロード。
    switch (pSampleConfiguration->mediaType) {
        case SAMPLE_STREAMING_VIDEO_ONLY:
            if (pSampleConfiguration->useTestSrc) {
                pipeline = gst_parse_launch(
                    "videotestsrc is-live=TRUE ! queue ! videoconvert ! video/x-raw,width=1280,height=720,framerate=30/1 ! "
                    "x264enc bframes=0 speed-preset=veryfast bitrate=512 byte-stream=TRUE tune=zerolatency ! "
                    "video/x-h264,stream-format=byte-stream,alignment=au,profile=baseline ! appsink sync=TRUE emit-signals=TRUE name=appsink-video",
                    &error);
            } else {
                pipeline = gst_parse_launch(
//                    "autovideosrc ! queue ! videoconvert ! video/x-raw,width=1280,height=720,framerate=[30/1,10000000/333333] ! "
//                    "x264enc bframes=0 speed-preset=veryfast bitrate=512 byte-stream=TRUE tune=zerolatency ! "
//                    "video/x-h264,stream-format=byte-stream,alignment=au,profile=baseline ! appsink sync=TRUE emit-signals=TRUE name=appsink-video",
                    "v4l2src device=/dev/video0 ! queue ! videoconvert ! video/x-raw,width=1280,height=720,framerate=10/1 ! "
                    "omxh264enc control-rate=1 target-bitrate=5120000 periodicty-idr=10 inline-header=FALSE ! "
                    "h264parse config-interval=-1 ! video/x-h264,stream-format=byte-stream,alignment=au,profile=baseline ! appsink sync=TRUE emit-signals=TRUE name=appsink-video",
                    &error);
            }
amazon-kinesis-video-streams-webrtc-sdk-c/buildに戻ってリビルドする。エラーが出なければOK。
$ cd ../
$ cmake ..
$ make
5.1.1. その他の入力フォーマット&エンコードパターン
ハードウェア(OMX)でやる場合の変更が知りたい、映像ソースがMJPEGの場合が知りたいとリクエストがあったので上記と同様の記述の仕方で示す。
UVCカメラのYUV出力をハードウェアH.264エンコードで変換してアップロード
OMXを使っています。
    switch (pSampleConfiguration->mediaType) {
        case SAMPLE_STREAMING_VIDEO_ONLY:
            if (pSampleConfiguration->useTestSrc) {
                pipeline = gst_parse_launch(
                    "videotestsrc is-live=TRUE ! queue ! videoconvert ! video/x-raw,width=1280,height=720,framerate=30/1 ! "
                    "x264enc bframes=0 speed-preset=veryfast bitrate=512 byte-stream=TRUE tune=zerolatency ! "
                    "video/x-h264,stream-format=byte-stream,alignment=au,profile=baseline ! appsink sync=TRUE emit-signals=TRUE name=appsink-video",
                    &error);
            } else {
                pipeline = gst_parse_launch(
//                    "autovideosrc ! queue ! videoconvert ! video/x-raw,width=1280,height=720,framerate=[30/1,10000000/333333] ! "
//                    "x264enc bframes=0 speed-preset=veryfast bitrate=512 byte-stream=TRUE tune=zerolatency ! "
//                    "video/x-h264,stream-format=byte-stream,alignment=au,profile=baseline ! appsink sync=TRUE emit-
                      "v4l2src device=/dev/video0 ! queue ! videoconvert ! video/x-raw,width=1280,height=720,framerate=10/1 ! "
                      "omxh264enc control-rate=1 target-bitrate=5120000 periodicty-idr=10 inline-header=FALSE ! "
                      "h264parse config-interval=-1 ! video/x-h264,stream-format=byte-stream,alignment=au,profile=baseline ! appsink sync=TRUE emit-signals=TRUE name=appsink-video",
                    &error);
            }
UVCカメラのMJPEG出力をハードウェアH.264エンコードで変換してアップロード
OMXを使っています。
    switch (pSampleConfiguration->mediaType) {
        case SAMPLE_STREAMING_VIDEO_ONLY:
            if (pSampleConfiguration->useTestSrc) {
                pipeline = gst_parse_launch(
                    "videotestsrc is-live=TRUE ! queue ! videoconvert ! video/x-raw,width=1280,height=720,framerate=30/1 ! "
                    "x264enc bframes=0 speed-preset=veryfast bitrate=512 byte-stream=TRUE tune=zerolatency ! "
                    "video/x-h264,stream-format=byte-stream,alignment=au,profile=baseline ! appsink sync=TRUE emit-signals=TRUE name=appsink-video",
                    &error);
            } else {
                pipeline = gst_parse_launch(
//                    "autovideosrc ! queue ! videoconvert ! video/x-raw,width=1280,height=720,framerate=[30/1,10000000/333333] ! "
//                    "x264enc bframes=0 speed-preset=veryfast bitrate=512 byte-stream=TRUE tune=zerolatency ! "
//                    "video/x-h264,stream-format=byte-stream,alignment=au,profile=baseline ! appsink sync=TRUE emit-
                      "v4l2src device=/dev/video0 ! image/jpeg,width=1280,height=720,framerate=10/1 ! omxmjpegdec ! "
                      "omxh264enc control-rate=1 target-bitrate=5120000 periodicty-idr=10 inline-header=FALSE ! "
                      "h264parse config-interval=-1 ! video/x-h264,stream-format=byte-stream,alignment=au,profile=baseline ! appsink sync=TRUE emit-signals=TRUE name=appsink-video",
                    &error);
            }
5.2. 改めて実行と確認
リビルドするときパス変更しているので注意。
pi@raspberrypi:~/amazon-kinesis-video-streams-webrtc-sdk-c/build/samples $ ./kvsWebrtcClientMasterGstSample pizero video-only
メディア再生できたのでOKとする。できれば別機器のWebブラウザやスマホなどでも見たいが・・・

5.3 カメラが対応している解像度やフォーマット
調べればすぐに出てくるコマンドだが載せておく。ここで出てくる解像度やfpsと違う数値を入力にはできない。入れて実行するとたぶん黒画となって何が悪いのか分かりづらい状況になる。
pi@raspberrypi:~ $ v4l2-ctl -d /dev/video0 --list-formats-ext
ioctl: VIDIOC_ENUM_FMT
        Type: Video Capture

        [0]: 'MJPG' (Motion-JPEG, compressed)
                Size: Discrete 1920x1080
                        Interval: Discrete 0.033s (30.000 fps)
                        Interval: Discrete 0.200s (5.000 fps)
                        Interval: Discrete 0.033s (30.000 fps)
                        Interval: Discrete 0.200s (5.000 fps)
                Size: Discrete 1280x800
                        Interval: Discrete 0.033s (30.000 fps)
                Size: Discrete 1280x720
                        Interval: Discrete 0.033s (30.000 fps)
                        Interval: Discrete 0.040s (25.000 fps)
                        Interval: Discrete 0.050s (20.000 fps)
                        Interval: Discrete 0.067s (15.000 fps)
                        Interval: Discrete 0.100s (10.000 fps)
                        Interval: Discrete 0.200s (5.000 fps)
                Size: Discrete 800x600
                        Interval: Discrete 0.033s (30.000 fps)
                        Interval: Discrete 0.050s (20.000 fps)
                        Interval: Discrete 0.067s (15.000 fps)
                        Interval: Discrete 0.100s (10.000 fps)
                        Interval: Discrete 0.200s (5.000 fps)
                Size: Discrete 640x480
                        Interval: Discrete 0.033s (30.000 fps)
                        Interval: Discrete 0.050s (20.000 fps)
                        Interval: Discrete 0.067s (15.000 fps)
                        Interval: Discrete 0.100s (10.000 fps)
                        Interval: Discrete 0.200s (5.000 fps)
                Size: Discrete 640x360
                        Interval: Discrete 0.033s (30.000 fps)
                        Interval: Discrete 0.050s (20.000 fps)
                        Interval: Discrete 0.067s (15.000 fps)
                        Interval: Discrete 0.100s (10.000 fps)
                        Interval: Discrete 0.200s (5.000 fps)
                Size: Discrete 320x240
                        Interval: Discrete 0.033s (30.000 fps)
                        Interval: Discrete 0.050s (20.000 fps)
                        Interval: Discrete 0.067s (15.000 fps)
                        Interval: Discrete 0.100s (10.000 fps)
                        Interval: Discrete 0.200s (5.000 fps)
                Size: Discrete 1920x1080
                        Interval: Discrete 0.033s (30.000 fps)
                        Interval: Discrete 0.200s (5.000 fps)
                        Interval: Discrete 0.033s (30.000 fps)
                        Interval: Discrete 0.200s (5.000 fps)
        [1]: 'YUYV' (YUYV 4:2:2)
                Size: Discrete 1920x1080
                        Interval: Discrete 0.200s (5.000 fps)
                        Interval: Discrete 0.200s (5.000 fps)
                Size: Discrete 1280x800
                        Interval: Discrete 0.100s (10.000 fps)
                        Interval: Discrete 0.200s (5.000 fps)
                Size: Discrete 1280x720
                        Interval: Discrete 0.100s (10.000 fps)
                        Interval: Discrete 0.200s (5.000 fps)
                Size: Discrete 800x600
                        Interval: Discrete 0.067s (15.000 fps)
                        Interval: Discrete 0.100s (10.000 fps)
                        Interval: Discrete 0.200s (5.000 fps)
                Size: Discrete 640x480
                        Interval: Discrete 0.033s (30.000 fps)
                        Interval: Discrete 0.040s (25.000 fps)
                        Interval: Discrete 0.050s (20.000 fps)
                        Interval: Discrete 0.067s (15.000 fps)
                        Interval: Discrete 0.100s (10.000 fps)
                        Interval: Discrete 0.200s (5.000 fps)
                Size: Discrete 640x360
                        Interval: Discrete 0.033s (30.000 fps)
                        Interval: Discrete 0.050s (20.000 fps)
                        Interval: Discrete 0.067s (15.000 fps)
                        Interval: Discrete 0.100s (10.000 fps)
                        Interval: Discrete 0.200s (5.000 fps)
                Size: Discrete 320x240
                        Interval: Discrete 0.033s (30.000 fps)
                        Interval: Discrete 0.040s (25.000 fps)
                        Interval: Discrete 0.050s (20.000 fps)
                        Interval: Discrete 0.067s (15.000 fps)
                        Interval: Discrete 0.100s (10.000 fps)
                        Interval: Discrete 0.200s (5.000 fps)
                Size: Discrete 1920x1080
                        Interval: Discrete 0.200s (5.000 fps)
                        Interval: Discrete 0.200s (5.000 fps)
6. 結論
Video Producerと同じく。OSの選択以外は特に問題ない。(手順の記載がなく、使う側がケアレスミスしなければ)
2022/05/11 追記
OMXを使ったハードウェアエンコードも問題ない。

