こちらは Unity #2 Advent Calendar 2020 の 7日目の記事です
概要
- GitHub Actionsでお手軽CI構築
- Unity-CIで即ビルド実行
- WebGL版が出力可能
GitHub Actionsを用いてWebGL版のビルドを作成します
本来はconfig用に細かな設定が必要ですが、
UnityでのActionsを統合したライブラリ Unity-CI の力を借りてお手軽にビルドまで行います
リポジトリがあれば3分でビルドできるようになります

GitHub Actionsについて
https://github.co.jp/features/actions
リポジトリの変更に基づいて設定スクリプトを走らせます
設定ファイルはymlファイルで書くことができます
リポジトリページのActionsから実行状況や履歴が確認できます
Unity-CIについて
https://unity-ci.com/docs
Unity+CIのActionsをまとめており、
GitHubだけでなくGitLabやTravis CIなどとも連携できるようです
今回はUnity-CIのGitHubのページを参考にCI構築を行います
Unityライセンス認証準備
Unity-CIのアクティベーションを参考にアクティベーションを行います
- activation.yml を以下の内容で作成し、.github/workflows以下に置いておきます
name: Acquire activation file
on: [push]
jobs:
  activation:
    name: Request manual activation file 🔑
    runs-on: ubuntu-latest
    steps:
      # Request manual activation file
      - name: Request manual activation file
        id: getManualLicenseFile
        uses: webbertakken/unity-request-manual-activation-file@v1.1
        with:
          unityVersion: 2019.2.11f1 # ※使用するUnityのバージョンに一致させます
      # Upload artifact (Unity_vXXXX.X.XXXX.alf)
      - name: Expose as artifact
        uses: actions/upload-artifact@v1
        with:
          name: ${{ steps.getManualLicenseFile.outputs.filePath }}
          path: ${{ steps.getManualLicenseFile.outputs.filePath }}
2.コミット・プッシュを行うことでActionが実行され、Action結果のArtifactsにUnity_vXXXX.X.XXXX.alfが生成されます
Unity_vXXXX.X.XXXX.alfをダウンロードしておきましょう
Unity-CIではgableroux/unity3dのイメージを使用しているため新しすぎるバージョンは対応していない場合があります
最新バージョンはこちらから確認できます
3.マニュアルライセンスページでUnity_vXXXX.X.XXXX.alfをアップロードするとUnity_vXXXX.x.ulfがダウンロードできます
4.リポジトリページのSettings > serctes > new repository secret(https://github.com/XX/XX/settings/secrets/actions/new
)を選択
Unity_vXXXX.x.ulfの中身(xml形式)をコピーしValueに貼り付けます
secretの名前は UNITY_LICENSE にします
5.このActionは1度実行すればいいため削除しておきます
WebGLビルド
ビルドページ を参考にWebGLのビルドを行います
- main.yml を以下の内容で作成し、.github/workflows以下に置いておきます
name: Actions 😎

on:
  pull_request: {}
  push: { branches: [main] }

env:
  UNITY_LICENSE: ${{ secrets.UNITY_LICENSE }} ※secretで設定した値が実行時に入ります

jobs:
  build:
    name: Build my project ✨
    runs-on: ubuntu-latest
    steps:
      # Checkout
      - name: Checkout repository
        uses: actions/checkout@v2

      # Cache
      - uses: actions/cache@v1.1.0
        with:
          path: Library
          key: Library

      # Build
      - name: Build project
        uses: webbertakken/unity-builder@v0.10
        with:
          unityVersion: 2019.2.11f1 ※使用するUnityのバージョンに一致させます
          targetPlatform: WebGL

      # Output
      - uses: actions/upload-artifact@v1
        with:
          name: Build
          path: build
サンプルからLFSの使用とテストを除いています
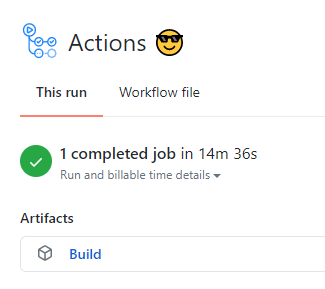
2.コミット・プッシュを行うことでActionが実行され、Action結果のArtifactsにWebGLビルドが生成されます
on: の項目で実行のトリガーがコントロールでき、今回はプルリクエストかmainブランチ更新のタイミングで実行されるようになっています
補足
実行の制限
GitHub Actionsは無料プランで2000分/月まで利用できます
ほぼ空のプロジェクトで10分/1ビルドでした
料金表
イメージのOS
今回のイメージはUbuntu版を利用しています
Unity-CIは現在Ubuntu版のみサポートしているらしいです
そのためスタンドアローン版はビルドできません
https://unity-ci.com/docs/unity-ci/docker-images
GitHub Actionsそのものは他OS(WindwosやMacOS)も選択できますが利用コストが増えるようです
限定的ではありますがビルドマシンの準備やコストが不要で、
すぐにCIビルド環境が用意できるためゲームジャムでの導入をしてみるのはいかがでしょうか?