npm(Node Package Manager)とは、JavaScriptで記述されたパッケージ管理システムです。
無料で使えて、世界中のオープンソースソフトウェア(Node.jsのツール、モジュール)を開発に使用することができます。
使い方
1.初期化
Macのターミナルを使った手順を解説します。
まずmkdirで新規ディレクトリを作成し、cdで作成したディレクトリに移動します。
$ mkdir npm_test
$ cd npm_test
npm initで初期化を行います。
$ npm init
package.jsonファイル作成のユーティリティがスタートするので、
pacakge name:にプロジェクト名を入力します。
デフォルトはディレクトリ名になっているので、そのままでよければエンターを押します。
This utility will walk you through creating a package.json file.
It only covers the most common items, and tries to guess sensible defaults.

See `npm help json` for definitive documentation on these fields
and exactly what they do.

Use `npm install <pkg>` afterwards to install a package and
save it as a dependency in the package.json file.

Press ^C at any time to quit.
package name: (npm_test)
バージョンが表示されるので、問題なければエンターを押します。
version: (1.0.0)
プロジェクトのdescription(解説)を入力して、エンターを押します。
description: This is test.
エントリーポイントとは、アプリケーションで一番最初に呼び出される部分のことです。今回の場合は、実際に最初に実行されるJavaScriptのファイルを指します。デフォルトで問題なければ、エンターを押します。
entry point: (index.js)
テストコマンドを入力することもできますが、未入力でもOKです。エンターを押します。
test command:
Gitのレポジトリを入力できますが、テストなので未入力でエンターを押します。
git repository:
npm内で検索する場合のキーワードを入力できます。未入力でエンターを押します。
keywords:
著者を入力します。任意の名前を入力してエンターを押します。
author: tetsu
ライセンスの設定ができます。デフォルトでよければエンターを押します。
license: (ISC)
最後に、上記で設定した情報が一覧で表示されます。問題なければyesと入力して実行します。
About to write to /Users/tetsu/Documents/npm_test/package.json:

{
  "name": "npm_test",
  "version": "1.0.0",
  "description": "This is test.",
  "main": "index.js",
  "scripts": {
    "test": "echo \"Error: no test specified\" && exit 1"
  },
  "author": "tetsu",
  "license": "ISC"
}


Is this OK? (yes) yes
lsでnpm_testディレクトリの中を確認すると、pacage.jsonファイルが作成されていることがわかります。
iMac:npm_test tetsu$ ls
package.json
catで中身を表示すると、先ほど設定した情報が記述されていることが確認できます。
iMac:npm_test tetsu$ cat package.json
{
  "name": "npm_test",
  "version": "1.0.0",
  "description": "This is test.",
  "main": "index.js",
  "scripts": {
    "test": "echo \"Error: no test specified\" && exit 1"
  },
  "author": "tetsu",
  "license": "ISC"
}
2.インストール
パッケージのインストールには、2種類の選択肢があります。
- PC自体にインストール → どのプロジェクトからも参照可能(pathの設定が必要)
- このプロジェクトにインストール → このプロジェクトのみ利用可能(このディレクトリにダウンロードされる)
サンプルとして、chalkをダウンロードしてみます。
※chalkは、console.logに色付けできるパッケージです。
$ npm install chalk
少し待つと、実行結果が表示され、インストールの完了を確認できます。
npm notice created a lockfile as package-lock.json. You should commit this file.
npm WARN npm_test@1.0.0 No repository field.

+ chalk@4.1.0
added 7 packages from 4 contributors and audited 7 packages in 4.911s

2 packages are looking for funding
  run `npm fund` for details

found 0 vulnerabilities
lsでnpm_testディレクトリの中を確認すると、
node_modulesディレクトリと、package-lock.jsonファイルが新たに作成されていることがわかります。
iMac:npm_test tetsu$ ls
node_modules		package-lock.json	package.json
catで先ほどのpackage.jsonを確認すると、dependenciesにインストールしたパッケージが追加されていることがわかります。
package.jsonを読めば「このプロジェクトには、どんなパッケージが使われているか?」がひと目でわかるようになっています。
iMac:npm_test tetsu$ cat package.json
{
  "name": "npm_test",
  "version": "1.0.0",
  "description": "This is test.",
  "main": "index.js",
  "scripts": {
    "test": "echo \"Error: no test specified\" && exit 1"
  },
  "author": "tetsu",
  "license": "ISC",
  "dependencies": {
    "chalk": "^4.1.0"
  }
}
node_modulesの中を見ると、「chalk本体のファイル」と、「chalkと依存関係にあるファイル」がセットになってインストールされています。
iMac:node_modules tetsu$ ls
@types		chalk		color-name	supports-color
ansi-styles	color-convert	has-flag
npmの便利なところは、このように「使いたいパッケージをセットとしてまとめてプロジェクトにインストールできる利便性」です。
3.実際に使ってみる
index.jsを作成して、実際に実行してみます。
プロジェクトのディレクトリ直下にファイルを作成します。
iMac:npm_test tetsu$ nano index.js
nanoでファイルを作成して、下記のコードを記述します。ctr + xとyで保存して終了します。
※エディターを使ってもOKです。
const chalk = require('chalk');
console.log(chalk.blue('Hello world!'));
この段階で、一度実行してみます。npm run startを入力してみると、エラーになってしまいます。
iMac:npm_test tetsu$ npm run start
npm ERR! missing script: start

npm ERR! A complete log of this run can be found in:
パッケージを実行するには、package.jsonに実行するためのスクリプトを記述する必要があります。
script内に"start": "node index.js"を追記します。
{
  "name": "npm_test",
  "version": "1.0.0",
  "description": "This is test.",
  "main": "index.js",
  "scripts": {
    "test": "echo \"Error: no test specified\" && exit 1", // 「,」を入れて、
    "start": "node index.js" // この行を追記
  },
  "author": "tetsu",
  "license": "ISC",
  "dependencies": {
    "chalk": "^4.1.0"
  }
}
node index.jsは、npm runで実行されるファイルを指しています。"start:"には任意のコマンドを指定できます。
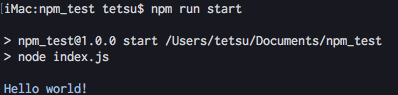
この状態で、もう一度npm run startで実行してみます。
iMac:npm_test tetsu$ npm run start

> npm_test@1.0.0 start /Users/tetsu/Documents/npm_test
> node index.js

Hello world!
下記の画像のようにコンソールに色が付いたらchalkが実行できています。
chalkで遊んでみたい方は、下記のリンクを参照してください。