はじめに
本記事では、SoftLayerにおけるrootユーザー(Linux)のpasswordリセット方法をご紹介したいと思います。
rootユーザーのパスワードが分からなくなるなんてことは、普通はあってはならないことです。パスワードを紛失する時点で、運用に問題があるんじゃないか?という厳しいコメントをされる方もいらっしゃるでしょう。
とはいっても、、、再発防止策は別途考えるとしても、このままにしておく訳にはいかず、現実には何かしらの対応が必要になります。こういう問題を解決する際には、SoftLayerでは、Rescue LayerというリカバリーOSを利用して回復させることが可能です。こういう方法で復旧できるのだということが分かれば、何かあっても安心できますよね!
手順
- Rescue layerを使ってリカバリーOSにSSHログインする
- "/"領域が存在するディスク領域を特定し、マウントする。
- そのファイルシステムに対してchrootし、passwdコマンドで設定変更
- OS再起動
1. Rescue layerを使ってリカバリーOSにSSHログインする
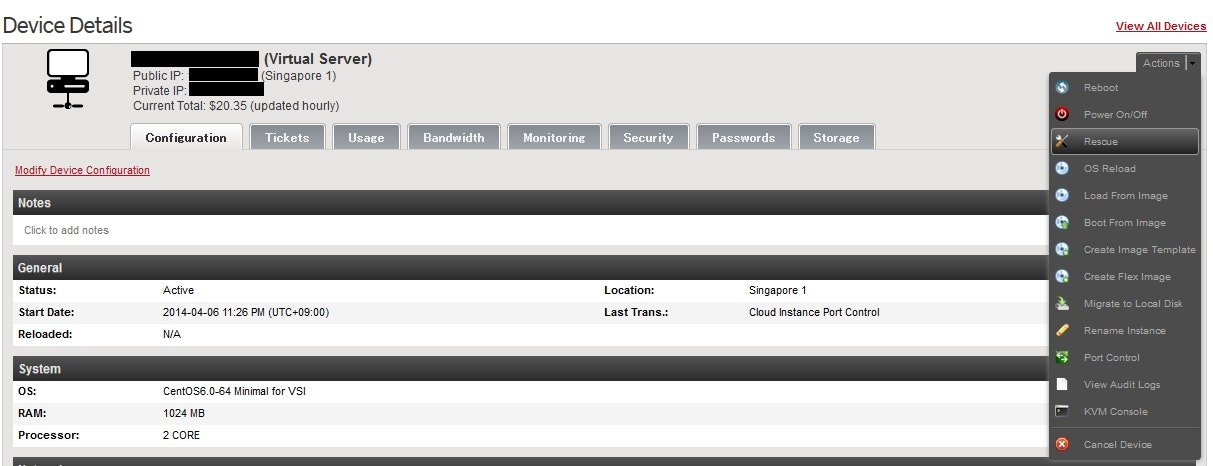
Rescue Layerは、SoftLayerのポータルから実行します。Device DetailsのActionsボタンから、Rescueを選択して下さい。リカバリーOSで起動するため、OSの再起動を伴います。
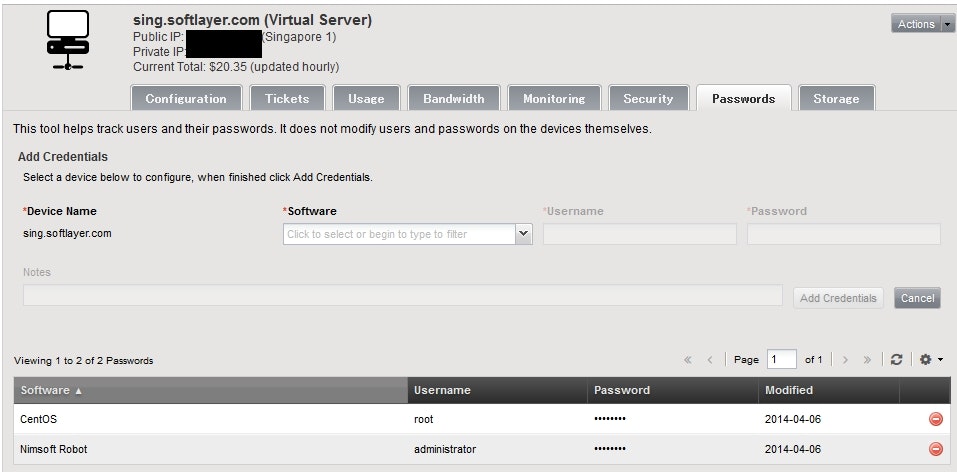
しばらくすると、SSHでサーバーにログインできます。パスワードは、以下のパスワードセクションに載っているものが利用されます。
※OSパスワードを変更する度に、このパスワード欄を必ず更新するような運用にしておけば、今回のようにパスワードを紛失するような問題は発生しなかったのかもしれません。。。

以下は、無事にSSHでログインした後に環境を確認しています。コマンド結果からはRescue LayerはCentOS 5.8ベースで動いていると想像されます。
[linuxrescue -- **RESCUE**]# cat /etc/redhat-release
CentOS release 5.8 (Final)

[linuxrescue -- **RESCUE**]# df
Filesystem           1K-blocks      Used Available Use% Mounted on
/dev/ram0               538496    386584    151912  72% /
none                     52428         0     52428   0% /dev/shm

[linuxrescue -- **RESCUE**]# fdisk -l

Disk /dev/xvdb: 2147 MB, 2147483648 bytes
255 heads, 63 sectors/track, 261 cylinders
Units = cylinders of 16065 * 512 = 8225280 bytes

    Device Boot      Start         End      Blocks   Id  System
/dev/xvdb1               1         261     2096451   82  Linux swap / Solaris

Disk /dev/xvda: 26.8 GB, 26843545600 bytes
255 heads, 63 sectors/track, 3263 cylinders
Units = cylinders of 16065 * 512 = 8225280 bytes

    Device Boot      Start         End      Blocks   Id  System
/dev/xvda1   *           1          33      262144   83  Linux
Partition 1 does not end on cylinder boundary.
/dev/xvda2              33        3264    25951232   83  Linux
2. "/"領域が存在するディスク領域を特定し、マウントする
SoftLayer標準のVirtual Serverの構成では、
- /dev/xvda1が/boot領域
- /dev/xvda2が/領域
となります。"/"領域だけmountしておけば十分なことも多いのですが、このままでは/mnt/devとか/mnt/procとか/mnt/sysが空のままになってしまいます。よって、後でchrootした際に、これらのディレクトリ配下を参照する必要があるコマンドを発行した場合はエラーになってしまいます。こうした問題を避けるためには、bind mount(すでにマウントされているツリーの一部を、別の場所にマウントさせるオプション)を併用すると良いでしょう。
[linuxrescue -- **RESCUE**]# mount /dev/xvda2 /mnt
[linuxrescue -- **RESCUE**]# mount /dev/xvda1 /mnt/boot
[linuxrescue -- **RESCUE**]# mount --bind /dev /mnt/dev
[linuxrescue -- **RESCUE**]# mount --bind /proc /mnt/proc
[linuxrescue -- **RESCUE**]# mount --bind /sys /mnt/sys
[linuxrescue -- **RESCUE**]# mount
/dev/ram0 on / type ext2 (rw)
none on /proc type proc (rw)
none on /sys type sysfs (rw)
none on /dev/pts type devpts (rw,gid=5,mode=620)
none on /dev/shm type tmpfs (rw,size=5%)
none on /proc/sys/fs/binfmt_misc type binfmt_misc (rw)
sunrpc on /var/lib/nfs/rpc_pipefs type rpc_pipefs (rw)
/dev/xvda2 on /mnt type ext3 (rw)
/dev/xvda1 on /mnt/boot type ext3 (rw)
/dev on /mnt/dev type none (rw,bind)
/proc on /mnt/proc type none (rw,bind)
/sys on /mnt/sys type none (rw,bind)
3. chrootを実行してパスワードを変更する
それでは実際にchrootしてパスワードを変更してみましょう。
[linuxrescue -- **RESCUE**]# chroot /mnt
[linuxrescue -- **RESCUE**]# cat /etc/redhat-release
CentOS release 6.6 (Final)
[linuxrescue -- **RESCUE**]# passwd
Changing password for user root.
New password:
Retype new password:
passwd: all authentication tokens updated successfully.
4. OS再起動
無事完了したら、chrootから抜けて、OSを再起動しましょう。これでRescue Layerから抜けて、元のOSが起動してきます。
[linuxrescue -- **RESCUE**]# exit
[linuxrescue -- **RESCUE**]# shutdown -r now
元のOSが起動した後は、rootユーザーで新しいパスワードが使えるようになった事を確認してみてください。
終わりに
いかがでしたでしょうか? Rescue Layerは非常に強力なツールです。今回は、passwordリセットのみを紹介していますが、システム領域を安全にチェックするなど、いろいろな用途に利用可能だと思いますので、是非有効活用して下さい。
※Windows版のパスワードリセットもそのうち書きますね。。。


