はじめに
今回は、RecyclerViewを作った繰り返し処理を実装します。
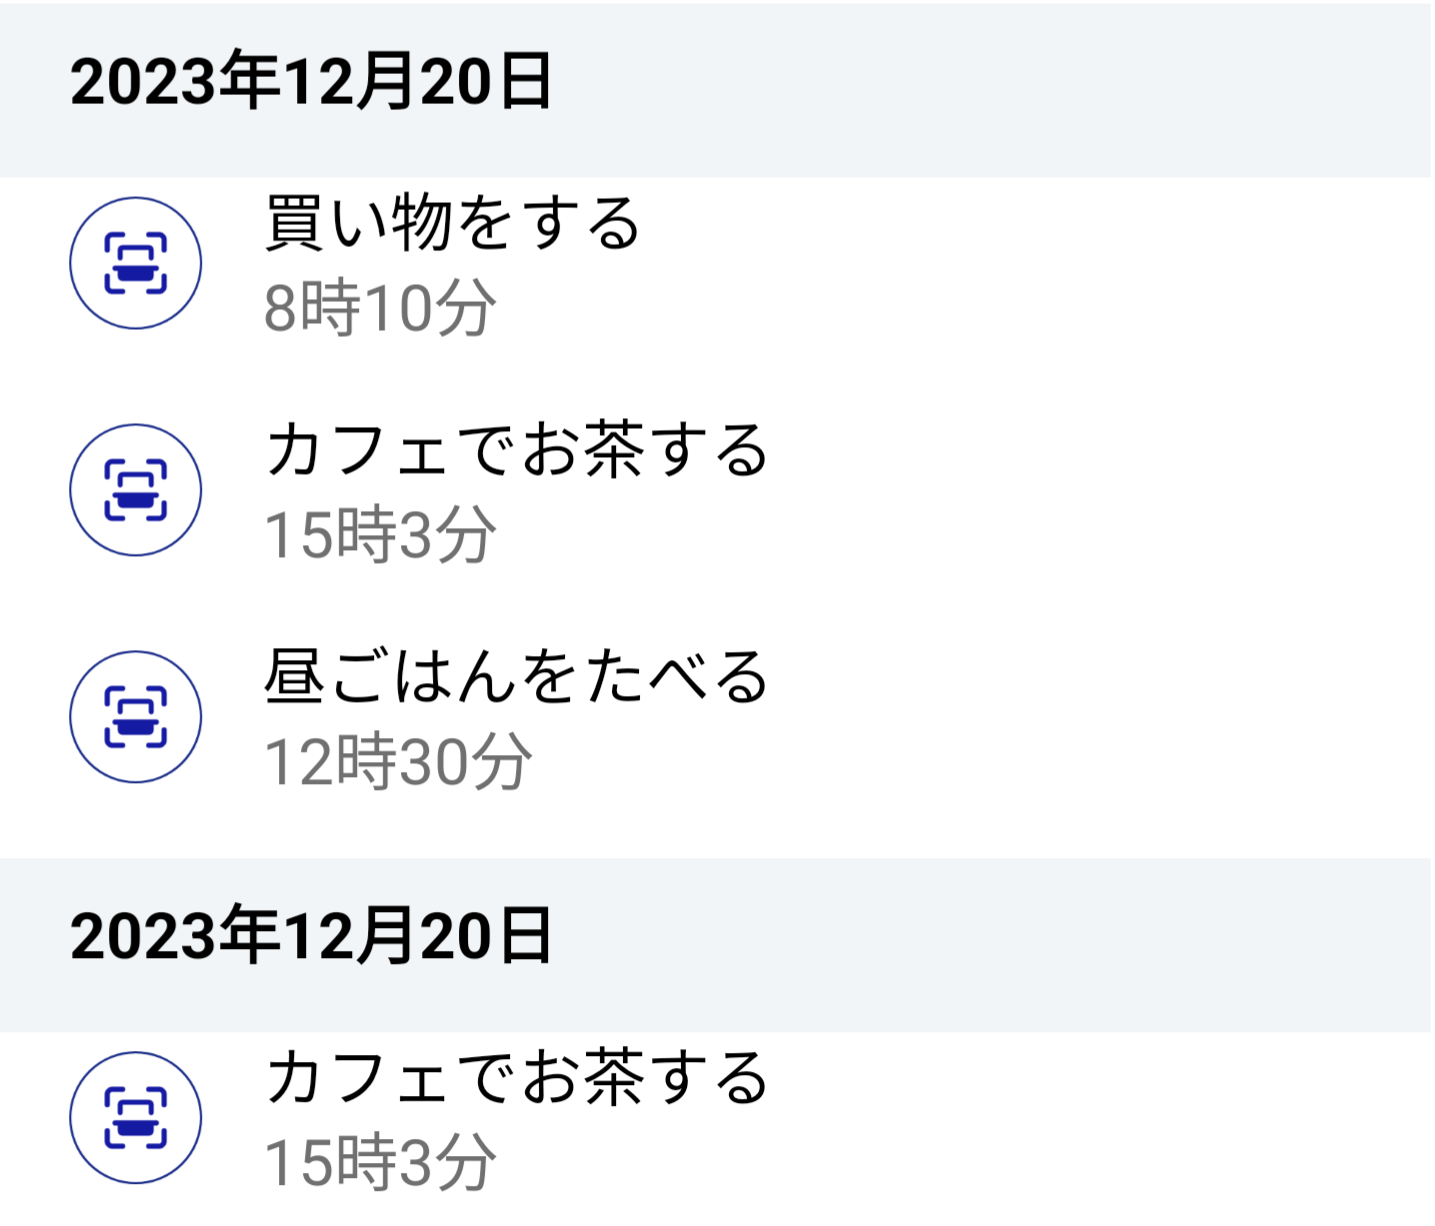
完成イメージは以下です。

「日付」の行と、「買い物をする」などのデータの行の、二種類のレイアウトが必要になります。
これを実現するために、ViewHolderを2つ用意し、条件によって出し分けます。
1 依存関係を追加する
buildgradleに以下を追加します。
buildgradle(:app)
dependencies {
    implementation 'androidx.recyclerview:recyclerview:1.2.1'
}
2.RecyclerViewの設置
表示させたいレイアウトにRecyclerViewを配置します。
activity_main.xml
<?xml version="1.0" encoding="utf-8"?>
<androidx.constraintlayout.widget.ConstraintLayout xmlns:android="http://schemas.android.com/apk/res/android"
    xmlns:app="http://schemas.android.com/apk/res-auto"
    xmlns:tools="http://schemas.android.com/tools"
    android:layout_width="match_parent"
    android:layout_height="match_parent"
    tools:context=".MainActivity">


        <androidx.recyclerview.widget.RecyclerView
            android:id="@+id/list"
            android:layout_height="match_parent"
            app:layout_constraintBottom_toBottomOf="parent"
            app:layout_constraintEnd_toEndOf="parent"
            app:layout_constraintStart_toStartOf="parent"
            app:layout_constraintTop_toTopOf="parent" />
</androidx.constraintlayout.widget.ConstraintLayout>
3.データ一つあたりのレイアウトファイルを作成
今回は2パターンのレイアウトを用意します。
アイコンとデータのレイアウト
item_layout.xml
<?xml version="1.0" encoding="utf-8"?>
<androidx.constraintlayout.widget.ConstraintLayout
    xmlns:android="http://schemas.android.com/apk/res/android"
    xmlns:app="http://schemas.android.com/apk/res-auto"
    xmlns:tools="http://schemas.android.com/tools"
    android:layout_width="match_parent"
    android:layout_height="wrap_content"
    android:paddingBottom="16dp">

    <ImageView
        android:id="@+id/imageView"
        android:layout_width="38dp"
        android:layout_height="38dp"
        android:layout_marginStart="20dp"
        app:layout_constraintBottom_toBottomOf="parent"
        app:layout_constraintStart_toStartOf="parent"
        app:layout_constraintTop_toTopOf="parent" />

    <TextView
        android:id="@+id/itemView"
        android:layout_width="0dp"
        android:layout_height="21dp"
        android:layout_marginStart="17dp"
        android:textColor="#000000"
        android:textSize="14sp"
        app:layout_constraintStart_toEndOf="@+id/imageView" />

<TextView
        android:id="@+id/timeView"
        android:layout_width="wrap_content"
        android:layout_height="wrap_content"
        android:layout_marginStart="17dp"
        android:layout_marginTop="3dp"
        android:textColor="#707070"
        android:textSize="14sp"
        app:layout_constraintStart_toEndOf="@+id/imageView"
        app:layout_constraintTop_toBottomOf="@+id/historyItemView" />


</androidx.constraintlayout.widget.ConstraintLayout>
日付のレイアウト
date_layout.xml
<?xml version="1.0" encoding="utf-8"?>
<androidx.constraintlayout.widget.ConstraintLayout
    xmlns:android="http://schemas.android.com/apk/res/android"
    xmlns:app="http://schemas.android.com/apk/res-auto"
    xmlns:tools="http://schemas.android.com/tools"
    android:layout_width="match_parent"
    android:layout_height="wrap_content"
    android:paddingBottom="16dp">

   <TextView
        android:id="@+id/dateView"
        android:layout_width="wrap_content"
        android:layout_height="wrap_content"
        android:layout_marginStart="20dp"
        android:layout_marginTop="9dp"
        android:textColor="#000000"
        android:textSize="14sp"
        android:textStyle="bold"
        app:layout_constraintBottom_toBottomOf="parent"
        app:layout_constraintStart_toStartOf="parent"
        app:layout_constraintTop_toTopOf="parent" />


</androidx.constraintlayout.widget.ConstraintLayout>
4 アダプターの作成
itemAdapter.kt
class ItemAdapter: RecyclerView.Adapter<RecyclerView.ViewHolder>()  {

    //2つのレイアウトを出し分けるための変数を用意
    override fun getItemViewType(position: Int) : Int{
        return if(position == 0 || position == 4) 0 else 1
    }


   //データを準備
    val dataList = arrayOf(
        mapOf("name" to "昼ごはんをたべる", "time" to "12時30分"),
        mapOf("name" to "買い物をする", "time" to "8時10分"),
        mapOf("name" to "カフェでお茶する", "time" to "15時3分"),
        mapOf("name" to "昼ごはんをたべる", "time" to "12時30分"),
        mapOf("name" to "買い物をする", "time" to "8時10分"),
        mapOf("name" to "カフェでお茶する", "time" to "15時3分"),
    )

    val images: ArrayList<Int> = arrayListOf(
        R.drawable.scan_white, R.drawable.scan_white,
        R.drawable.scan_white,R.drawable.scan_white, R.drawable.scan_white,
        R.drawable.scan_white,
    )


  //ViewHolderを定義
    class itemViewHolder(view: View): RecyclerView.ViewHolder(view) {
        val textView: TextView
        val timeView: TextView
        val imageView: ImageView
        init {
            textView = view.findViewById(R.id.itemView)
            timeView = view.findViewById(R.id.timeView)
            imageView = view.findViewById(R.id.imageView)
        }
    }

    class dateViewHolder(view: View): RecyclerView.ViewHolder(view) {
        val dateView: TextView
        init {
            dateView = view.findViewById(R.id.dateView)
        }
    }


//ViewHolderの作成(viewTypeによって出し分ける)
    override fun onCreateViewHolder(parent: ViewGroup, viewType: Int): RecyclerView.ViewHolder {
        if(viewType == 0){
            return dateViewHolder(LayoutInflater.from(parent.context).inflate(R.layout.date_layout, parent, false))
        } else {
            return itemViewHolder(LayoutInflater.from(parent.context).inflate(R.layout.item_layout, parent, false))
        }
    }

//ViewHolderに表示するデータを関連付ける
    override fun onBindViewHolder(holder: RecyclerView.ViewHolder, position: Int) {
        if(position == 0 || position == 4){
            val dateViewHolder = holder as ItemAdapter.dateViewHolder
            dateViewHolder.dateView.text = "2023年12月20日"
        }else{
            val itemViewHolder = holder as ItemAdapter.itemViewHolder
            val item = dataList[position]["name"]
            val time = dataList[position]["time"]
            itemViewHolder.textView.text = item
            itemViewHolder.timeView.text = time
            itemViewHolder.imageView.setImageResource(images.get(position))
        }


    }

    override fun getItemCount() = dataList.size
}
5 アダプターをセット
itemAdapter.kt
val recyclerView = view.findViewById<RecyclerView>(R.id.job_list) // rootView から取得
        val adapter = JobAdapter(dataList,itemList)
        recyclerView.adapter = adapter
以上です。ぜひ参考にしていただければと思います。