初めに
React+Redux+typescript+firebaseで認証機能作るのが辛い①の続きです。ただ、各記事独立しているため、前のを見る必要はなし。
前回、Reactとfirebaseで認証機能を実現したので、今度はReduxを取り入れてみます。
作る機能と、この記事の立ち位置
作る機能
・firebaseで認証機能の実現
・React,Redux,typescriptを利用した実装
・セッション切れたらログイン画面へリダイレクトなど基本的認証の機能を実現
記事の立ち位置
・Reactとfirebaseで認証機能作る //①
・ReactとReduxとfirebaseで認証機能作る //② ←ココ
・Routeで認証するかホーム画面へ遷移するかを分ける //③
フォルダ構成
Reduxで基本のactionとかreducerとかを小分けにするディレクトリ構成にしようかと思いましたが、ducksのほうがどこに何があるかで迷わなくてよいので、ducksの構造にしました。参考
src
|_ containers
  |_ AuthContainer.ts
|_ modules
  |_ Auth.tsx
|_App.css
|_App.tsx
|_index.tsx
|_firebase.ts
|_store.ts
App.tsx
これは特別なことやっていないので特に説明なし
import * as React from 'react'
import './App.css'
import AuthContainer from './containers/AuthContainer';

class App extends React.Component {

  public render() {
    return (
      <div className="App">
        <AuthContainer />
      </div>
    )
  }
}

export default App
index.tsx
reduxではstoreをここに配置します。ただ、create-react-appコマンドを使ってちょいといじるだけなので、特に説明いらないかと
一応、参考にしたのは→10分でできるReact+FirebaseのGoogleAuth
import * as React from 'react';
import * as ReactDOM from 'react-dom';
import { Provider } from 'react-redux'
import './index.css';
import registerServiceWorker from './registerServiceWorker';
import Store from './store'
import App from './App';

ReactDOM.render(
  <Provider store={Store}>
    <App />
  </Provider>,
  document.getElementById('root') as HTMLElement
);
registerServiceWorker();
AuthContainer.tsx
Auth.tsxとstate,Actionの紐づけを行います
import { connect } from 'react-redux'
import { Dispatch, Action } from 'redux'
import { ReduxState } from '../store'
import firebase from '../firebase'
import { Auth, UserInfo, authActions } from '../modules/Auth'

export interface AuthActions {
    login: () => Action<string>;
    refLogin: () => Action<string>;
    logout: () => Action<string>;
}

function setUserInfo(fuser: firebase.User | null): UserInfo {
    if (!fuser) {
        return {}
    }
    return {
        displayName: fuser.displayName,
        email: fuser.email,
        uid: fuser.uid
    }
}

function mapDispatchToProps(dispatch: Dispatch<Action<string>>) {
    return {
        login: () => {
            const provider = new firebase.auth.GoogleAuthProvider()
            firebase.auth().signInWithPopup(provider)
                .then(response => {
                    dispatch(authActions.login(setUserInfo(response.user)))
                })
        },
        refLogin: () => {
            firebase.auth().onAuthStateChanged(user => {
                if (!user) {
                    return
                }
                dispatch(authActions.login(setUserInfo(user)))
            })
        },
        logout: () => {
            firebase.auth().signOut()
            dispatch(authActions.logout())
        }
    };
}

function mapStateToProps(state: ReduxState) {
    return Object.assign({}, { userInfo: state.userInfo });
}

export default connect(
    mapStateToProps,
    mapDispatchToProps
)(Auth)
AuthActionsは、Propsで利用するactionの定義を書いています。
setUserInfoはfirebaseで使うUserから、自分のアプリで使うinterfaceへの変換ロジックを書いています。
mapDispatchToPropsの中で、actionの実装を行っています。dispatch(authActions.login(setUserInfo(response.user)))と書かれているところでは、stateに変更が必要な場合にAuth.tsxにあるauthActionsを呼び出しています。ややこしいのですが、stateをいじるactionとViewから操作するactionがあります。
viewから呼び出すloginはユーザーがログイン処理を行ったあと、stateを書き換えるために、dispatch(authActions.login(setUserInfo(response.user)))を呼びます。
refLoginは、ユーザー操作はなく、firebaseで保持している認証情報を取得して、認証済みであればlogin状態にしたいためにdispatch(authActions.login(setUserInfo(user)))を呼んでいます。つまり、入り口は違うがstateの書き換え方は同じため、refLoginのauthActionが存在しないということになっています。ややこしいので、明示的に名称を変えたほうがいいかもですね。
mapStateToPropsではstatusをpropsに設定しています。
最後に、connectでAuthというcomponentにpropの紐づけを行っています。
Auth.tsx
ここからやけに四苦八苦したところ。ひとまず、完成したファイルを貼ります
import * as React from "react";
import actionCreatorFactory from 'typescript-fsa';
import { ReduxState } from 'src/store';
import { AuthActions } from 'src/containers/AuthContainer';
import { reducerWithInitialState } from 'typescript-fsa-reducers';


// action
const actionCreator = actionCreatorFactory();

export const authActions = {
    login: actionCreator<UserInfo>('auth/login'),
    logout: actionCreator('auth/logout')
};

// reducer
export interface UserInfo {
    displayName?: string | null,
    email?: string | null,
    uid?: string
}

const initialState: UserInfo = {}

export const authReducer = reducerWithInitialState<UserInfo>(initialState)
    .case(authActions.login, ({ }, amount) => {
        return Object.assign({}, amount);
    })
    .case(authActions.logout, () => {
        return Object.assign({}, initialState)
    });

// component
type Props = ReduxState & AuthActions;

export class Auth extends React.Component<Partial<Props>> {

    public componentDidMount() {
        this.props.refLogin!()
    }

    public render() {
        return (
            <div className="App">
                <p className="App-intro">
                    You: {this.props.userInfo!.uid ? this.props.userInfo!.displayName : 'お前誰や'}
                </p>
                {this.props!.userInfo!.uid ? (
                    <button onClick={this.props.logout}>Google Logout</button>
                ) : (
                        <button onClick={this.props.login}>Google Login</button>
                    )}
            </div>
        )
    }
}
import したもの
import * as React from "react";
はcreate-react-appで一緒に入ります。jsと違って、微妙にimportの書き方違うのでts初学者は注意(私含む)
import actionCreatorFactory from 'typescript-fsa';
import { reducerWithInitialState } from 'typescript-fsa-reducers';
この2つは、reduxでactionとかreducerとか作成するサポートをしてくれる者たちになります。便利なので使っていきましょう
npm install --save typescript-fsa typescript-fsa-reducers
で入れられます。
import { ReduxState } from 'src/store';
import { AuthActions } from 'src/containers/AuthContainer';
は、後述するstoreで定義したReduxStateと、AuthContainerで定義したAuthActionsをパス指定で取得しているだけです。
Action
const actionCreator = actionCreatorFactory();

export const authActions = {
    login: actionCreator<UserInfo>('auth/login'),
    logout: actionCreator('auth/logout')
};
ここでは、actionCreatorFactoryから、ReduxのActionを取得します。そしてauthActionsの中で、login,logoutというactionを定義しています。
actionCreatorを使うことで、actionの引数の型をジェネリクスで書き、actionの名前をカッコ内に書くだけでactionを作成できます。
Reducer
export interface UserInfo {
    displayName?: string | null,
    email?: string | null,
    uid?: string
}

const initialState: UserInfo = {}

export const authReducer = reducerWithInitialState<UserInfo>(initialState)
    .case(authActions.login, ({ }, amount) => {
        return Object.assign({}, amount);
    })
    .case(authActions.logout, () => {
        return Object.assign({}, initialState)
    });
Actionで使うパラメーターを定義します。UserInfoが今回認証で使う構造体。initialStateが初期値になります。今回は空のUserInfoを定義しています。
そのあとauthReducerの定義をしています。reducerWithInitialStateを使うことでReducerの定義も簡単になっています。
reducerWithInitialState(initialState)と書くことで、Statusの型がUserInfo。初期値はinitialStateであることを意味しています(たぶん)
その後ろには、case文が並んでいます。これは単純で、actionがauthActions.loginが来たらstatusをどう変えるか。同じくauthActions.logoutならどう変えるかを記述しています。returnしているものが新しいstateになります。logoutしたら情報を空にしたいため、空のオブジェクトをreturnしています。
component
Props
type Props = ReduxState & AuthActions;
ここでcomponent内で使いまわすstatusとactionをPropsという型でまとめています。
実質、Propsの中身は下記と同等になります
type Props {
    login: () => Action<string>,
    refLogin: () => Action<string>,
    logout: () => Action<string>,
    userInfo: UserInfo
}
React.Component
export class Auth extends React.Component<Props> {

    public componentDidMount() {
        this.props.refLogin()
    }
画面描画の際にrefLoginを呼んでいます。これによりこのページにアクセスするたびにfirebaseに問い合わせてログイン状態かどうかを判別しています。
render
    public render() {
        return (
            <div className="App">
                <p className="App-intro">
                    You: {this.props.userInfo.uid ? this.props.userInfo.displayName : 'お前誰や'}
                </p>
                {this.props.userInfo.uid ? (
                    <button onClick={this.props.logout}>Google Logout</button>
                ) : (
                        <button onClick={this.props.login}>Google Login</button>
                    )}
            </div>
        )
    }
}
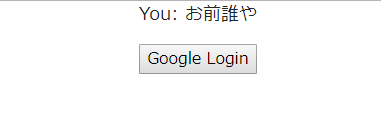
ここで、描画するhtmlを記載しています。this.props.userInfo.uidがあればログインしたユーザーの表示名を示し、それ以外の時は”お前誰や”と表示します
その下では、uidの有無で、ログインボタンかログアウトボタンの表示を切り替えています。ここの実装は前回のReactでの実装をほとんど流用しています。
store.ts
import { combineReducers, createStore } from 'redux'
import { UserInfo, authReducer } from './modules/Auth';

export type ReduxState = {
    userInfo: UserInfo
}

const store = createStore(
    combineReducers<ReduxState>({
        userInfo: authReducer
    })
)

export default store;
ここでは、reducerでstateを書き換えられるように設定しています。Reduxの一般的な記述をしていると思うので説明は省略。
結果
初回アクセス時
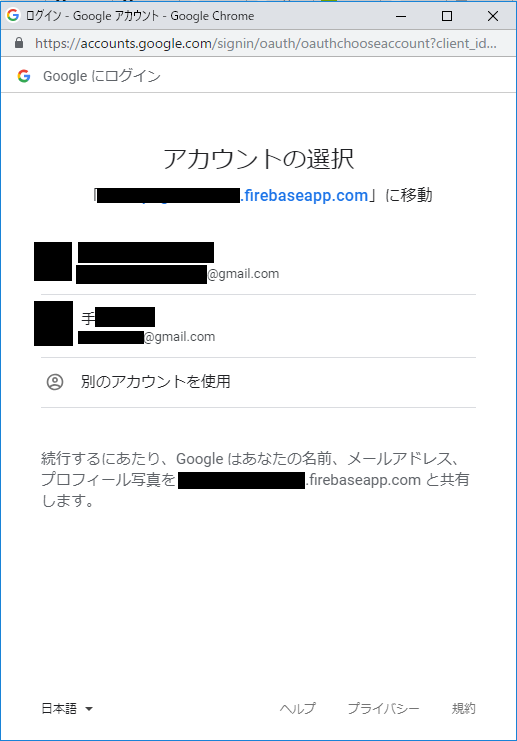
Google Loginを押したとき
ログイン実施後
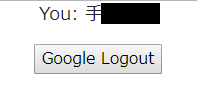
ちゃんとログインされました。画面更新と化してもrefLoginが走るためちゃんとログイン状態の画面が表示されます。
ただ、非同期でログインチェックしているため、画面更新すると一瞬ログアウト画面になってしまいます。router導入して解消できると思っていますが、また別の機会に。
次回は、認証を含めた画面遷移を作ってみようと思います。
次→https://qiita.com/teshima/items/9284ed5dac8eb4c8ef10
参考にした記事
関東最速でReact+Redux+TypeScriptなアプリを作る
[React] Ducks というデザインパターン [Redux]
10分でできるReact+FirebaseのGoogleAuth