はじめに
deep learningのインフラとして最近kubernetesが注目されています。6/6にAWS EKSがGAされましたのでdeep learningのインフラの選択肢として調査しました。
調査の結果のポイントは次のような感じかと思います。
・AWS EKSには専用のAMIがあり、それにcuda等各種ソフトウェアをインストールしてGPUノード用のAMIを作成する
・AWS AutoscalingはCPU使用率を閾値としているが、今回は利用できるGPUの有無でAutoscaleさせたいため、kubernetesのcluster-autoscalerを使用する
・kubernetesのcluster-autoscalerを動作させる為にGPUノードを起動しっぱなしにしておくのはもったいないのでcluster-autoscalerを動作させるノードグループとGPUインスタンスを動作させるノードグループの2つに分けて構築する
クライアント環境
今回構築検証した際のクライアント環境は以下です。
Windows 10 Home
curl
python 3.6.1
pip 10.0.1 (python 3.6)
構築作業
Getting Started with Amazon EKS を元に作業を進めます。またこの記事を書いている時点でEKSはUS East (N. Virginia)とUS West (Oregon)のみで利用できるため今回はUS East (N. Virginia)で構築しています。
ロールの作成
| key | value |
|---|---|
| Role name | eksServiceRole |
クラスタの作成
| key | value |
|---|---|
| Cluster name | lminfratest |
| Kubernetes version | Kubernetes 1.10 (default) |
| Role ARN | eksServiceRole |
| VPC | (default) |
| Subnets | subnet-798e2925 (172.31.32.0/20) us-east-1a subnet-527adb7c (172.31.80.0/20) us-east-1c |
| Security groups | (default) |
クライアント環境
'To install kubectl for Amazon EKS'と'To install heptio-authenticator-aws for Amazon EKS'の項を参照しkubectlとheptio-authenticator-awsをインストールします。
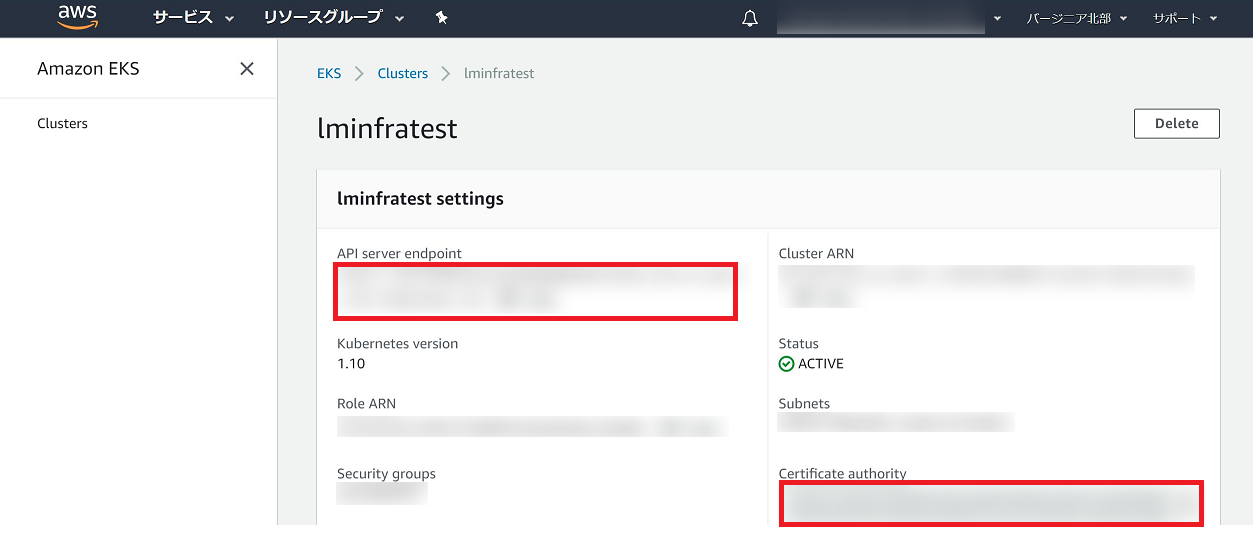
.kube/configについては、EKS > Clusters > lminfratestと辿り'API server endpoint'の項を<endpoint-url>に、'Certificate authority'の項を<base64-encoded-ca-cert>に書き、<cluster-name>にはクラスタ作成時に入力したCluster nameを入れます。

kubectl get svc を実行し以下のように表示されれば成功です。
NAME         TYPE        CLUSTER-IP   EXTERNAL-IP   PORT(S)   AGE
kubernetes   ClusterIP   10.100.0.1   <none>        443/TCP   1h
後で使うawscliもインストールしておきます。
pip install awscli
aws configure
AWS Access Key ID [********************]: xxx
AWS Secret Access Key [********************]: xxx
Default region name [None]: us-east-1
Default output format [None]: json
AMI作成
Getting Started with Amazon EKS に記述されていますが、EKS Worker Nodeには専用のAMI(Amazon Linux 2ベース)が用意されています。今回GPUノードグループを構築したい為このAMIをベースにcuda等各種ソフトウェアをインストールしたものをAMIとして登録しそれを使用します。事前にキーペアは作成済とします。OSはUbuntuですがAWS上のkubernetesでGPUを使うの記事を参考にさせて頂きました。
sudo su -
yum groupinstall "Development Tools"
yum install kernel-devel kernel-headers
reboot

wget http://jp.download.nvidia.com/XFree86/Linux-x86_64/390.67/NVIDIA-Linux-x86_64-390.67.run
sh NVIDIA-Linux-x86_64-390.67.run --silent

wget https://developer.nvidia.com/compute/cuda/9.0/Prod/local_installers/cuda_9.0.176_384.81_linux-run
sh cuda_9.0.176_384.81_linux-run --silent --toolkit --override

distribution=$(. /etc/os-release;echo $ID$VERSION_ID)
curl -s -L https://nvidia.github.io/nvidia-docker/$distribution/nvidia-docker.repo | \
  sudo tee /etc/yum.repos.d/nvidia-docker.repo
yum list
# Importing GPG key
# ...
# Is this ok [y/N]:
# のようなメッセージが出る為 y とします。

yum install docker nvidia-docker2

docker --version
Docker version 17.06.2-ce, build 3dfb8343b139d6342acfd9975d7f1068b5b1c3d3

sed -i -e 's/fd:\/\//fd:\/\/ -s=overlay2/g' /lib/systemd/system/docker.service

tee /etc/docker/daemon.json <<EOF
{
    "default-runtime": "nvidia",
    "runtimes": {
        "nvidia": {
            "path": "/usr/bin/nvidia-container-runtime",
            "runtimeArgs": []
        }
    }
}
EOF

pkill -SIGHUP dockerd
systemctl daemon-reload
systemctl restart docker.service

docker run --rm nvidia/cuda nvidia-smi
Fri Jul  6 07:58:32 2018
+-----------------------------------------------------------------------------+
| NVIDIA-SMI 390.67                 Driver Version: 390.67                    |
|-------------------------------+----------------------+----------------------+
| GPU  Name        Persistence-M| Bus-Id        Disp.A | Volatile Uncorr. ECC |
| Fan  Temp  Perf  Pwr:Usage/Cap|         Memory-Usage | GPU-Util  Compute M. |
|===============================+======================+======================|
|   0  Tesla K80           Off  | 00000000:00:1E.0 Off |                    0 |
| N/A   54C    P0    68W / 149W |      0MiB / 11441MiB |     98%      Default |
+-------------------------------+----------------------+----------------------+

+-----------------------------------------------------------------------------+
| Processes:                                                       GPU Memory |
|  GPU       PID   Type   Process name                             Usage      |
|=============================================================================|
|  No running processes found                                                 |
+-----------------------------------------------------------------------------+
nvidia-smiコマンドが実行できれば成功のため、AMIとして登録し、AMI IDを控えます。
| key | value |
|---|---|
| AMI ID | ami-09da63a82bab00a50 |
Workerノードグループの作成
メインとなるノードグループはp2.xlargeを使用する為、未使用時にはノード数を0にしたい所です。しかしながらkube-dnsやcluster-autoscalerが存在するノードは削除対象となりません。その為まずt2.smallを使用するノードグループを作成します。
Getting Started with Amazon EKS の'Step 3: Launch and Configure Amazon EKS Worker Nodes'に従い作業します。
テンプレートの選択
URL https://amazon-eks.s3-us-west-2.amazonaws.com/1.10.3/2018-06-05/amazon-eks-nodegroup.yaml を指定します。
詳細の指定
| key | value |
|---|---|
| スタックの名前 | lminfratest-worker-nodes-system |
パラメータ
EKS Cluster
| key | value |
|---|---|
| ClusterName | lminfratest |
| ClusterControlPlaneSecurityGroup | default (sg-3d4d3f76) |
Worker Node Configuration
| key | value |
|---|---|
| NodeGroupName | ng-lminfratest-system |
| NodeAutoScalingGroupMinSize | 1 |
| NodeAutoScalingGroupMaxSize | 1 |
| NodeInstanceType | t2.small |
| NodeImageId | ami-dea4d5a1 |
| KeyName | ※各自のもの |
Worker Network Configuration
| key | value |
|---|---|
| VpcId | |
| Subnets | subnet-798e2925 (172.31.32.0/20) |
Getting Started with Amazon EKSの'To enable worker nodes to join your cluster'の項に従いaws-authという名前のConfigMapをデプロイします。
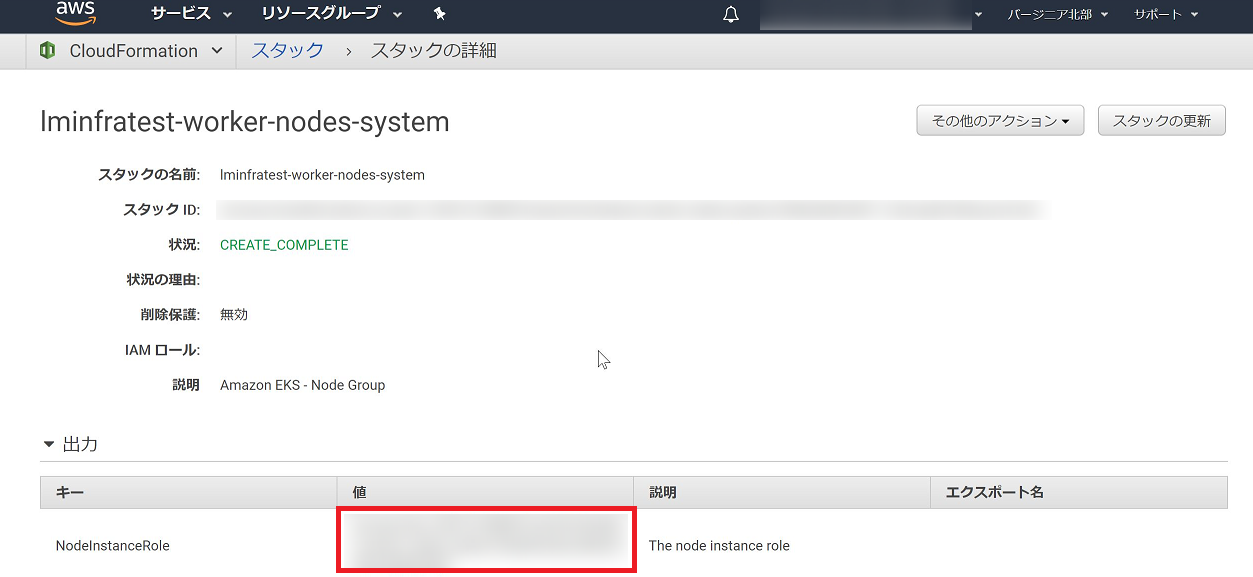
<ARN of instance role (not instance profile)> については作成したStackの詳細ページ > 出力 の項に表示されるNodeInstanceRoleの値を書きます。

kubectl apply -f aws-auth-cm.yaml
configmap "aws-auth" created
kubectl get pods -n kube-system -o wide
NAME                        READY     STATUS    RESTARTS   AGE       IP              NODE
aws-node-2v4vp              1/1       Running   1          4m        172.31.47.223   ip-172-31-47-223.ec2.internal
kube-dns-64b69465b4-rwczv   3/3       Running   0          1m        172.31.39.215   ip-172-31-47-223.ec2.internal
kube-proxy-xbp79            1/1       Running   0          4m        172.31.47.223   ip-172-31-47-223.ec2.internal
次にGPUノードグループを作成します。
テンプレートの選択
URL https://amazon-eks.s3-us-west-2.amazonaws.com/1.10.3/2018-06-05/amazon-eks-nodegroup.yaml を指定します。
詳細の指定
| key | value |
|---|---|
| スタックの名前 | lminfratest-worker-nodes |
パラメータ
EKS Cluster
| key | value |
|---|---|
| ClusterName | lminfratest |
| ClusterControlPlaneSecurityGroup | default (sg-3d4d3f76) |
Worker Node Configuration
| key | value |
|---|---|
| NodeGroupName | ng-lminfratest |
| NodeAutoScalingGroupMinSize | 0 |
| NodeAutoScalingGroupMaxSize | 2 |
| NodeInstanceType | p2.xlarge |
| NodeImageId | ami-09da63a82bab00a50 |
| KeyName | ※各自のもの |
Worker Network Configuration
| key | value |
|---|---|
| VpcId | |
| Subnets | subnet-798e2925 (172.31.32.0/20) |
aws-auth ConfigMapを更新します。
apiVersion: v1
kind: ConfigMap
metadata:
  name: aws-auth
  namespace: kube-system
data:
  mapRoles: |
    - rolearn: <ARN of instance role (lminfratest-worker-nodes-system)>
      username: system:node:{{EC2PrivateDNSName}}
      groups:
        - system:bootstrappers
        - system:nodes
    - rolearn: <ARN of instance role (lminfratest-worker-nodes)>
      username: system:node:{{EC2PrivateDNSName}}
      groups:
        - system:bootstrappers
        - system:nodes
kubectl delete -f aws-auth-cm.yaml
configmap "aws-auth" deleted
kubectl create -f aws-auth-cm.yaml
configmap "aws-auth" created
削除→再作成が正しいやり方なのか分かっておりません。。
nvidia-device-plugin デプロイ
kubectl create -f https://raw.githubusercontent.com/NVIDIA/k8s-device-plugin/v1.10/nvidia-device-plugin.yml
kubectl get nodes "-o=custom-columns=NAME:.metadata.name,GPU:.status.allocatable.nvidia\.com/gpu"
NAME                            GPU
ip-172-31-32-100.ec2.internal   1
ip-172-31-43-81.ec2.internal    1
ip-172-31-47-223.ec2.internal   <none>
cluster-autoscaler デプロイ
AWS用cluster-autoscaler をデプロイします。
Role作成
AWS用cluster-autoscaler にどのようなIAM Policyが必要か書かれているためそれに従いIAM Policyを作成します。今回は以下の内容で作成しました。
{
    "Version": "2012-10-17",
    "Statement": [
        {
            "Effect": "Allow",
            "Action": [
                "autoscaling:DescribeAutoScalingGroups",
                "autoscaling:DescribeAutoScalingInstances",
                "autoscaling:DescribeTags",
                "autoscaling:DescribeLaunchConfigurations",
                "autoscaling:SetDesiredCapacity",
                "autoscaling:TerminateInstanceInAutoScalingGroup"
            ],
            "Resource": "*"
        }
    ]
}
IAM Role の一覧にある
lminfratest-worker-nodes-NodeInstanceRole-xxx
lminfratest-worker-nodes-NodeInstanceRole-system-xxx
という2つのRoleにこのIAM Policyをアタッチします。
AutoScalingGroupNameの確認
今回AutoScaleさせたいノードグループlminfratest-worker-nodesのAutoScalingGroupNameを確認します。
aws autoscaling describe-auto-scaling-groups
...
"AutoScalingGroupName": "lminfratest-worker-nodes-NodeGroup-1CRBWFYLE571G"
...
cluster-autoscaler デプロイ
lminfratest-worker-nodes-system の方にデプロイしたいため該当ノードにラベルを貼ります。
kubectl label nodes ip-172-31-47-223.ec2.internal type=system
- --nodes=1:10:k8s-worker-asg-1
の部分を以下のように変更します。
- --nodes=1:2:lminfratest-worker-nodes-NodeGroup-1CRBWFYLE571G
また最下部にnodeSelectorを追加します。
      volumes:
        - name: ssl-certs
          hostPath:
            #path: "/etc/ssl/certs/ca-certificates.crt"
            path: "/merged/etc/ssl/certs/ca-certificates.crt"
            #path: "/etc/ssl/certs/"
      nodeSelector:
        type: system
デプロイします。
kubectl create -f cluster-autoscaler-one-asg.yaml
serviceaccount "cluster-autoscaler" created
clusterrole.rbac.authorization.k8s.io "cluster-autoscaler" created
role.rbac.authorization.k8s.io "cluster-autoscaler" created
clusterrolebinding.rbac.authorization.k8s.io "cluster-autoscaler" created
rolebinding.rbac.authorization.k8s.io "cluster-autoscaler" created
deployment.extensions "cluster-autoscaler" created
意図したノードにデプロイされたか確認します。
kubectl get pods -n kube-system -o wide
NAME                                   READY     STATUS    RESTARTS   AGE       IP              NODE
aws-node-2v4vp                         1/1       Running   1          25m       172.31.47.223   ip-172-31-47-223.ec2.internal
aws-node-784kr                         1/1       Running   1          10m       172.31.32.100   ip-172-31-32-100.ec2.internal
aws-node-fmgsr                         1/1       Running   1          10m       172.31.43.81    ip-172-31-43-81.ec2.internal
cluster-autoscaler-868487f854-j9727    1/1       Running   2          31s       172.31.41.99    ip-172-31-47-223.ec2.internal
kube-dns-64b69465b4-rwczv              3/3       Running   0          22m       172.31.39.215   ip-172-31-47-223.ec2.internal
kube-proxy-29p84                       1/1       Running   0          10m       172.31.43.81    ip-172-31-43-81.ec2.internal
kube-proxy-sbhbv                       1/1       Running   0          10m       172.31.32.100   ip-172-31-32-100.ec2.internal
kube-proxy-xbp79                       1/1       Running   0          25m       172.31.47.223   ip-172-31-47-223.ec2.internal
nvidia-device-plugin-daemonset-bjcrr   1/1       Running   0          9m        172.31.39.188   ip-172-31-43-81.ec2.internal
nvidia-device-plugin-daemonset-dcrjl   1/1       Running   0          9m        172.31.38.47    ip-172-31-47-223.ec2.internal
nvidia-device-plugin-daemonset-mmx84   1/1       Running   0          9m        172.31.40.140   ip-172-31-32-100.ec2.internal
構築作業は以上で完了です。
挙動確認
kubectl logs -f -n kube-system cluster-autoscaler-868487f854-j9727
でログを追います。
GPU Podをデプロイすると
kubectl create -f gpu_pod.yml
pod "gpu-pod" created
GPUノードがないのでPodはPending状態です。
kubectl get pods -o wide
NAME      READY     STATUS    RESTARTS   AGE       IP        NODE
gpu-pod   0/1       Pending   0          14s       <none>    <none>
以下のようなログが出てノードが起動されます。
I0709 04:56:43.144665       1 static_autoscaler.go:244] Filtering out schedulables
I0709 04:56:43.144950       1 static_autoscaler.go:254] No schedulable pods
I0709 04:56:43.144990       1 scale_up.go:249] Pod default/gpu-pod is unschedulable
I0709 04:56:43.180682       1 scale_up.go:291] Upcoming 1 nodes
I0709 04:56:43.180952       1 scale_up.go:368] No need for any nodes in lminfratest-worker-nodes-NodeGroup-1CRBWFYLE571G
I0709 04:56:43.181117       1 scale_up.go:376] No expansion options
kubectl get nodes
NAME                            STATUS    ROLES     AGE       VERSION
ip-172-31-46-214.ec2.internal   Ready     <none>    3m        v1.10.3
ip-172-31-47-223.ec2.internal   Ready     <none>    2d        v1.10.3
GPU Podを削除します。
kubectl delete -f gpu_pod.yml
pod "gpu-pod" deleted
10分程待つとノードが削除されます。
I0709 05:12:59.620758       1 scale_down.go:584] ip-172-31-46-214.ec2.internal was unneeded for 10m0.085041466s
I0709 05:12:59.620817       1 scale_down.go:790] Scale-down: removing empty node ip-172-31-46-214.ec2.internal
I0709 05:12:59.621921       1 factory.go:33] Event(v1.ObjectReference{Kind:"ConfigMap", Namespace:"kube-system", Name:"cluster-autoscaler-status", UID:"2244ee72-80fd-11e8-8c88-0e55e8ad28ec", APIVersion:"v1", ResourceVersion:"478974", FieldPath:""}): type: 'Normal' reason: 'ScaleDownEmpty' Scale-down: removing empty node ip-172-31-46-214.ec2.internal
I0709 05:12:59.633926       1 delete.go:53] Successfully added toBeDeletedTaint on node ip-172-31-46-214.ec2.internal
I0709 05:12:59.830526       1 aws_manager.go:190] Terminating EC2 instance: i-0ddb606225444aad9
I0709 05:12:59.875145       1 factory.go:33] Event(v1.ObjectReference{Kind:"Node", Namespace:"", Name:"ip-172-31-46-214.ec2.internal", UID:"76b40978-8334-11e8-8c88-0e55e8ad28ec", APIVersion:"v1", ResourceVersion:"478975", FieldPath:""}): type: 'Normal' reason: 'ScaleDown' node removed by cluster autoscaler
kubectl get nodes
NAME                            STATUS    ROLES     AGE       VERSION
ip-172-31-47-223.ec2.internal   Ready     <none>    2d        v1.10.3
以上です。