はじめに
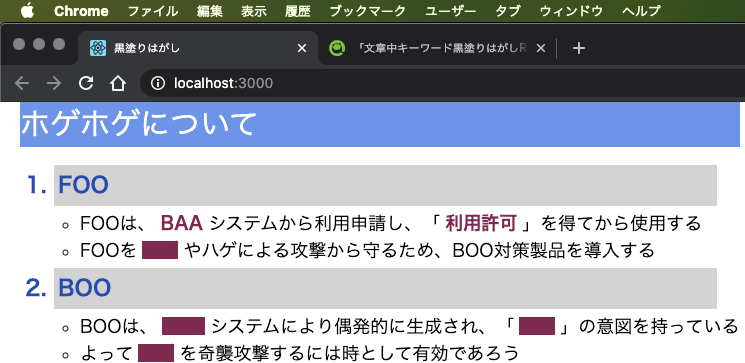
Reactを使って文章中の特定のキーワードの黒塗り文字列をクリックして黒塗りをはがして読めるようにするアプリを作りましたので紹介いたします。
このアプリは単純で、黒塗りをはがすためにはキーワードの黒塗り部分をクリックします。再びキーワードをクリックすると黒塗りに戻ります。
前提条件
node.jsがインストールされている事が必要です。まだインストールしていない場合には、インストールしておいてください。
Reactプロジェクトを作成します
以下のようにcreate-react-appコマンドを実行します。少し、時間がかかります。
- macOS
(base) macpro:dev teruroom$ cd /Users/teruroom/dev/react/
(base) macpro:react teruroom$ npx create-react-app blackout-peeling
- Windows10
PS C:\> cd C:\dev\react\
PS C:\dev\react\> npx create-react-app blackout-peeling
Creating a new React app in /Users/teruroom/dev/react/blackout-peeling.
・・・・・・・・途中省略・・・・・・・・・・・
Success! Created blackout-peeling at /Users/teruroom/dev/react/blackout-peeling
Inside that directory, you can run several commands:
  npm start
    Starts the development server.
  npm run build
    Bundles the app into static files for production.
  npm test
    Starts the test runner.
  npm run eject
    Removes this tool and copies build dependencies, configuration files
    and scripts into the app directory. If you do this, you can’t go back!
We suggest that you begin by typing:
  cd react-boardgame
  npm start
Happy hacking!
デフォルトで生成されたファイルを全て削除します
- macOS
(base) macpro:react teruroom$ cd blackout-peeling/src
(base) macpro:src teruroom$ rm -f *
- Windows10
PS C:\dev\react> cd .\blackout-peeling\src
PS C:\dev\react\blackout-peeling\src> rm -Force *
必要なJavaScriptとCSSファイルを作成します
- macOS
(base) macpro:src teruroom$ touch index.css index.js
- Windows10
PS C:\dev\react\blackout-peeling\src> New-Item -type file index.css
PS C:\dev\react\blackout-peeling\src> New-Item -type file index.js
JavaScriptとCSSを実装します
-
VSCodeを起動し、
blackout-peelingフォルダを開きます -
srcフィルダ内のindex.jsとindex.cssを以下のように実装します
-
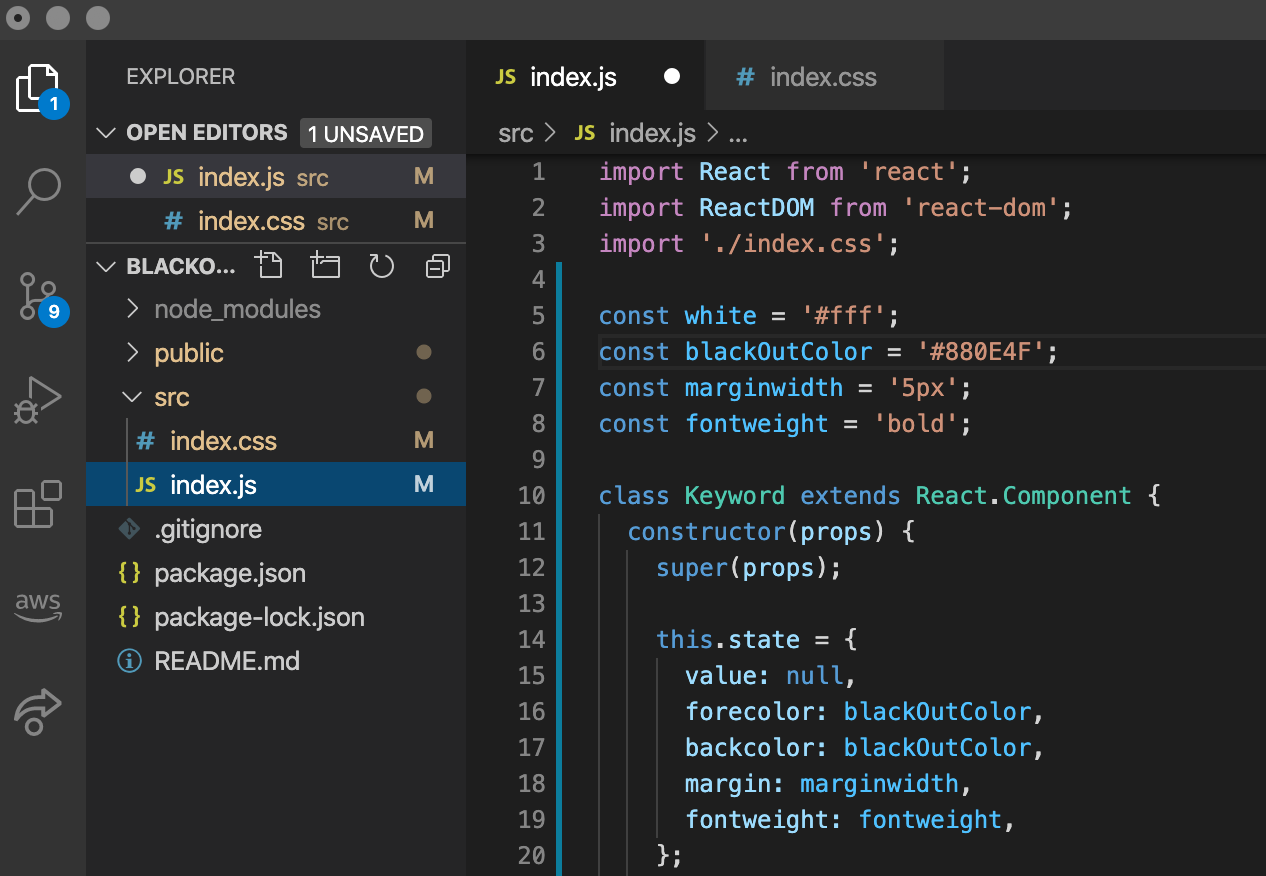
index.js
以下のようにクラスの階層構造を設計しました
Pageクラス:ページ
|
+--Sentenceクラス:ページ内の文章
|
+--Keywordクラス:文章内のキーワード
import React from 'react';
import ReactDOM from 'react-dom';
import './index.css';

const white = '#fff';
const crimson = '#880E4F';
const marginwidth = '5px';
const fontweight = 'bold';

class Keyword extends React.Component {
  constructor(props) {
    super(props);

    this.state = {
      value: null,
      forecolor: blackOutColor,
      backcolor: blackOutColor,
      margin: marginwidth,
      fontweight: fontweight,
    };
    this.changeColor = this.changeColor.bind(this);
  }
  changeColor() {
    const newColor = this.state.backcolor === blackOutColor ? white : blackOutColor;
    this.setState({ forecolor: blackOutColor, backcolor: newColor })
  }
  render() {
    return (
      <span style={{
        color: this.state.forecolor
        , background: this.state.backcolor
        , marginLeft: this.state.margin
        , marginRight: this.state.margin
        , fontWeight: this.state.fontweight
      }}
        onClick={() => this.changeColor()} >
        {this.props.value}
      </span>
    );
  }
}

class Sentence extends React.Component {
  blackOut(keyString) {
    return <Keyword value={keyString} />;
  }

  render() {
    return (
      <div>
        <div className="maintitle">ホゲホゲについて</div>
        <ol>
          <li className="subtitle">FOO</li>
          <ul>
            <li>FOOは、{this.blackOut('BAA')}システムから利用申請し、「{this.blackOut('利用許可')}」を得てから使用する</li>
            <li>FOOを{this.blackOut('ホゲ')}やハゲによる攻撃から守るため、BOO対策製品を導入する</li>
          </ul>
        一部省略
        </ol>
      </div>
    );
  }
}

class Page extends React.Component {
  render() {
    return (
      <div className="page">
        <div className="page-sentence">
          <Sentence />
        </div>
        <div className="page-info">
          <div>{/* status */}</div>
          <ol>{/* TODO */}</ol>
        </div>
      </div>
    );
  }
}

ReactDOM.render(
  <Page />,
  document.getElementById('root')
);
- index.css
body {
  width: 1100px;
  font: 18px "Meiryo", "Century Gothic", sans-serif;
  margin: 0px;
  cursor: pointer;
}

ol, ul {
  padding-left: 30px;
}

td {
  width: 50%;
}

.maintitle {
  width: 100%;
  font-size: 30px;
  color: #fff;
  background: cornflowerblue;
}
.subtitle {
  width: 95%;
  font-size: 22px;
  font-weight: bold;
  color: rgb(26, 75, 182);
  background: rgb(210, 210, 211);
  margin: 4px;
  padding: 4px;
}

.page {
  display: flex;
  flex-direction: row;
}

.page-sentence {
  margin-left: 20px;
}

.page-info {
  margin-left: 20px;
}
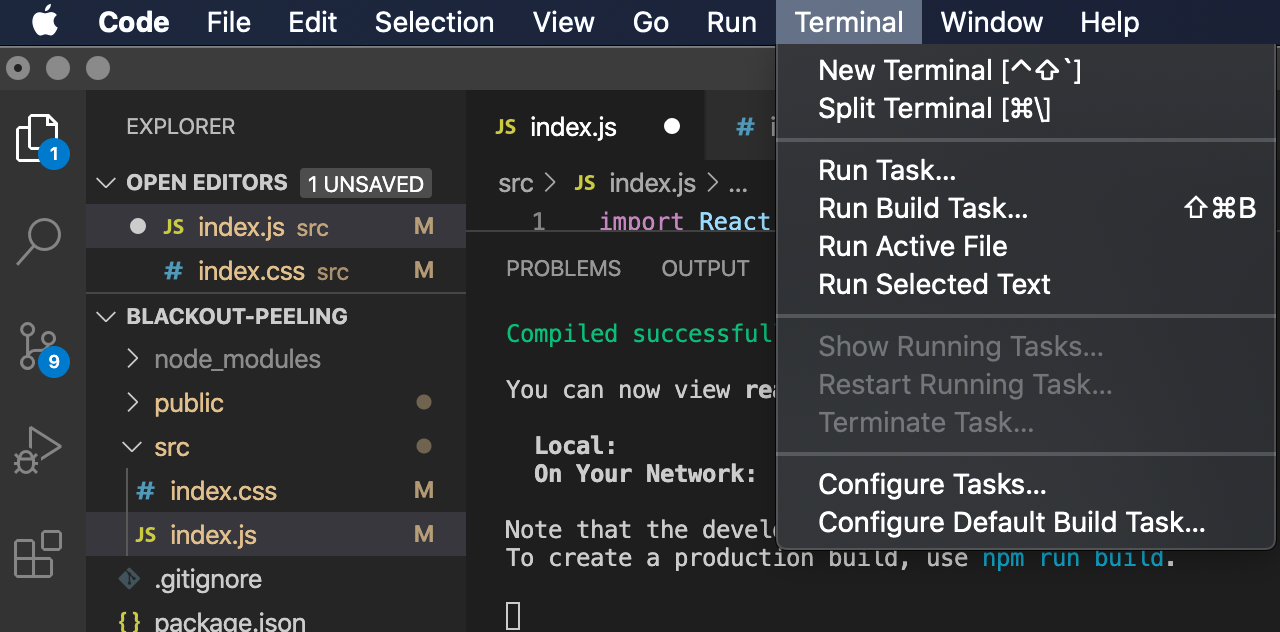
React Webアプリを開発用に起動します
-
VSCodeの
Terminal→New Terminalで新規のターミナルを起動します -
Webアプリを起動コマンドを実行します
-
macOS
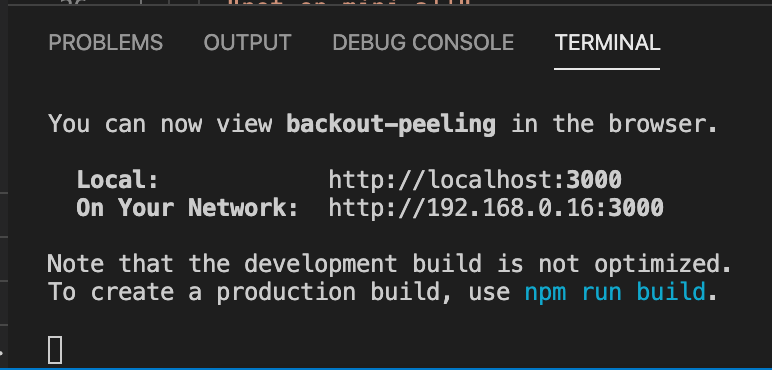
(base) macpro:blackout-peeling teruroom$ npm start
-
実行結果
-
Windows10
PS C:\dev\react\blackout-peeling> npm start
Web ブラウザで http://localhost:3000 が自動的に立ち上がりページが表示されます。以降、VSCodeで実装コードを変更し、保存するたびごとにWeb ブラウザの http://localhost:3000 が自動的に再読み込み(Reload)されるようになります
最適化ビルドを実行します
React Webアプリが完成したら、最適化ビルドを実行してから公開します
- macOS
(base) macpro:blackout-peeling teruroom$ npm run build
- Windows10
PS C:\dev\react\blackout-peeling> npm run build
- 実行結果
macOSの場合
省略
> security-compliance@0.1.0 build C:\dev\react\blackout-peeling
> react-scripts build
Creating an optimized production build...
Compiled successfully.
File sizes after gzip:
  39.89 KB  build\static\js\2.73f5bc0c.chunk.js
  5.5 KB    build\static\js\main.11e48eb2.chunk.js
  782 B     build\static\js\runtime-main.623a1e28.js
  310 B     build\static\css\main.3c6f1d95.chunk.css
The project was built assuming it is hosted at /.
You can control this with the homepage field in your package.json.
The build folder is ready to be deployed.
You may serve it with a static server:
  npm install -g serve
  serve -s build
Find out more about deployment here:
  bit.ly/CRA-deploy
React Webアプリを本番用に起動します
オプション--host='0.0.0.0'をつけてコマンドを実行し、インバウンドとして全てのIPアドレスからのリクエストを受け付けるようにします
- macOS ➡️ ubuntsサーバにデプロイ
teruroom$ npm start --host='0.0.0.0'
- Windows10 ➡️ Windows Server 2016にデプロイ
PS C:\dev\react\blackout-peeling> npm start --host='0.0.0.0'
React Webアプリを利用します
WebブラウザでURL http://192.168.0.16:3000 (192.168.0.16はWebアプリを動かしているPCのIPアドレス)にアクセスします
macOSの場合
デフォルトWebブラウザのSafariや後からインストールしたChromeで表示されます

Windows10の場合
デフォルトWebブラウザのEdgeや後からインストールしたChromeで表示されます。IE11では残念ながらそのままでは表示や動作が上手くいきません。react-app-polyfillライブラリを別途インストールし、index.js``ファイルの先頭で import 'react-app-polyfill/ie11';` のようにインポートする必要があります。
諸々の都合によりIE11を既定のブラウザにしている場合には、以下のようにWindowsショートカットなどにURLを仕込んでおいてください。ショートカットを開くとEdgeによりReact Webアプリが開かれるようになります
microsoft-edge:http://hoge-foo.ad.baa.co.jp:3000/
- hoge-foo.ad.baa.co.jp:Active Directry内のReact Webアプリを起動しているPCの端末名
黒塗りをクリックすると剥がれてキーワード文字が読めるようになります