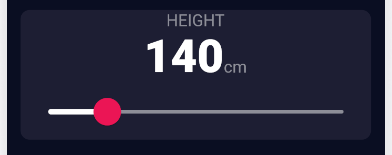
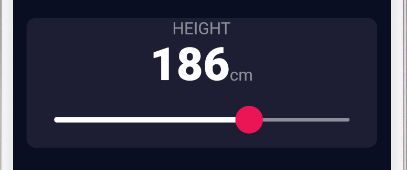
Flutter学習中にスライダーを用いて、値を設定、入力をできるようなUIを作成したので共有します。
イメージ
コード全文
.dart
int height = 180;

cardChild: Column(
                  mainAxisAlignment: MainAxisAlignment.center,
                  children: [
                    Text(
                      'HEIGHT',
                      style: kLabelTextStyle,
                    ),
                    Row(
                      mainAxisAlignment: MainAxisAlignment.center,
                      crossAxisAlignment: CrossAxisAlignment.baseline,
                      textBaseline: TextBaseline.alphabetic,
                      children: [
                        Text(
                          height.toString(),
                          style: kNumberTextStyle,
                        ),
                        Text(
                          'cm',
                          style: kLabelTextStyle,
                        )
                      ],
                    ),
         SliderTheme(
                      data: SliderTheme.of(context).copyWith(
                        inactiveTrackColor: Color(0xFF8D8E98),
                        activeTrackColor: Colors.white,
                        thumbColor: Color(0xFFEB1555),
                        overlayColor: Color(0x19EB1555),
                        thumbShape:
                            RoundSliderThumbShape(enabledThumbRadius: 15),
                        overlayShape:
                            RoundSliderOverlayShape(overlayRadius: 30),
                      ),
                      child: Slider(
                        value: height.toDouble(),
                        min: 120,
                        max: 220,
                        onChanged: (double newValue) {
                          setState(() {
                            height = newValue.round();
                          });
                        },
                      ),
                    ),
スライダー本体
.dart
                      child: Slider(
                        value: height.toDouble(),
                        min: 120,
                        max: 220,
                        onChanged: (double newValue) {
                          setState(() {
                            height = newValue.round();
                          });
                        },
                      ),
                    ),
見た目の通り変化させる値、最大値最小値、スライダーが動かされたときの変化を設定します。
デザイン
.dart
SliderTheme(
                      data: SliderTheme.of(context).copyWith(
                        inactiveTrackColor: Color(0xFF8D8E98),
                        activeTrackColor: Colors.white,
                        thumbColor: Color(0xFFEB1555),
                        overlayColor: Color(0x19EB1555),
                        thumbShape:
                            RoundSliderThumbShape(enabledThumbRadius: 15),
                        overlayShape:
                            RoundSliderOverlayShape(overlayRadius: 30),
                      ),
SliderThemeData classに沿ってデザインをカスタムできます。
参考
公式ドキュメント
Complete Flutter App Development Bootcamp with Dart
会社の紹介
私は現在、株式会社ダイアログという物流×ITの会社に勤務しております。
様々な職種を募集しているので、Wantedlyのページをご覧ください。

