- CSSと同じように考えてしまうのは結構危険だなあという感覚はありつつ、逆引き的にまとめたい。
- xcode 6.1、swift Playground上で確認。
- 貼り付けてお試し下さい。
font-size, font-family
フォントは多少扱いづらい印象。複数指定は出来ない(確かにする必要はないのだけど)し、fontはサイズと種類が1セットになっている。
let font = UIFont(name: "Times New Roman", size: 30)!
let fontText = NSAttributedString(string: "Font", attributes: [
    NSFontAttributeName: font
])
font-weigth
UIFontで対応するfontを指定することで再現する。
nameにどんな指定するといいかはここが参考になる。http://iosfonts.com/
// bold
NSAttributedString(string: "bold", attributes: 	[NSFontAttributeName: UIFont(name: "HelveticaNeue-Bold", size: 20)!]
)
font-style: oblique (日本語italic代替)
基本としてはfont-weigthと同様UIFontでイタリック文字を利用することにはなるのだが、日本語なんかではそれが無い。
あまり綺麗ではないけどこんなやり方で日本語もイタリックっぽくできる
let obliqueness = NSAttributedString(string: "日本語イタリック", attributes: [NSObliquenessAttributeName: 0.3])
1で45度ぐらいになっている印象。
line-height: 1.5
NSParagrahSytleを使います
var paragraph = NSMutableParagraphStyle()
paragraph.lineHeightMultiple = 1.5
let linehight = NSAttributedString(string: "Line\nHeight", attributes: [NSParagraphStyleAttributeName: paragraph])
text-decoration
text-decoration :underline
NSUnderlineStyleを使います
let underline = NSAttributedString(string: "Underline", attributes:
	// rawValueを指定しないといけないので注意
	[NSUnderlineStyleAttributeName: NSUnderlineStyle.StyleSingle.rawValue])
下線の色だけ変えたりも。
let underline = NSAttributedString(string: "Underline", attributes:
	[NSUnderlineStyleAttributeName: NSUnderlineStyle.StyleSingle.rawValue,
	NSUnderlineColorAttributeName: UIColor.redColor()
])
あとは点線とか二重線とかを組み合わせたり
let underlineStyle = NSUnderlineStyle.PatternDot.rawValue |
        NSUnderlineStyle.StyleDouble.rawValue
let underline = NSAttributedString(string: "Underline", attributes:
    // rawValueを指定しないといけないので注意
    [
		// fontは関係ないのだが、小さすぎると二重線が見えない。
        NSFontAttributeName: UIFont.systemFontOfSize(30),
        NSUnderlineStyleAttributeName: underlineStyle
])
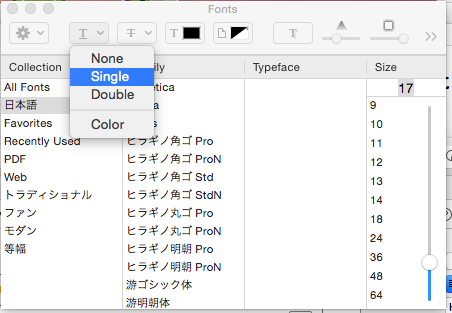
欄外: Interface Builder編
最近発見したけどこんなやり方。あまりにも馴染みがなくて気付かなかった。
ちょっとした装飾にはいいかも
- UILabelなどでmodeをPlainからAttributedにする
- 文字部分を選択状態にする
- Font選択で選ぶ
text-decoration: line-through
取り消し線だが、styleの指定はNSUnderlineStyleを使う
let text = NSAttributedString(string: "Text", attributes: [
        NSStrikethroughStyleAttributeName : NSUnderlineStyle.StyleSingle.rawValue,
        // 取り消し線に色つけるなら下記
        NSStrikethroughColorAttributeName: UIColor.redColor()
])
text-align : center
left, right, justfiedなんてのもあるみたい。
var paragraph = NSMutableParagraphStyle()
paragraph.alignment = NSTextAlignment.Center
let alignment = NSAttributedString(string: "text\nalign\ncenter", attributes: [NSParagraphStyleAttributeName: paragraph])
text-indent
var paragraph = NSMutableParagraphStyle()
paragraph.firstLineHeadIndent = 10
let alignment = NSAttributedString(string: "alignmentalignmentalignmentalignmentalignmentalignmentalignmentalignment", attributes: [NSParagraphStyleAttributeName: paragraph])
letter-spacing : 3
字間ですね。
NSKernAttributeNameを利用。
var letterSpace = NSAttributedString(string: "kern", attributes: [NSKernAttributeName : 3])
shadow
CALayerで設定するほうが早いかも・・
let shadow = NSShadow()
shadow.shadowOffset = CGSizeMake(5,5) //ずらし具合
shadow.shadowBlurRadius = 5 // ぼかし具合
shadow.shadowColor = UIColor.redColor() // 色
let shadowText = NSAttributedString(string: "shadow", attributes: [
    NSShadowAttributeName: shadow
])
color : red
UILabelなどにはfontColorなどそれぞれ設定が可能ですが
部分的に使いたかったりするならこんなんもありますというやつ
var color = NSAttributedString(string: "red", attributes: [NSForegroundColorAttributeName : UIColor.redColor()])
欄外:background: blue
背景色も変えられるけど細かな調整はしづらいので他の手法を取るほうが良いかも
let color = NSAttributedString(string: "Background", attributes:[ NSBackgroundColorAttributeName: UIColor.blueColor()
])
transform: scaleX(2);
正直このプロパティはCSSにあるものでもないのでちょっとtransformと対応づけてしまうのも無理があるけれど・・・
let expansion = NSAttributedString(string: "metabolic", attributes: [NSExpansionAttributeName: 1])
