ある程度大きな規模のShinyアプリを作成するとき、アプリをいくつかの部品に分けて構造化したくなります。Shiny modules はまさにそのような場合にアプリの部品となるモジュールを定義し、再利用と構造化ができるように用意されている仕組みです。
Shiny modulesの基本的な使い方についてはブログ記事 "「ShinyModule」で中規模Shinyアプリをキレイにする - Dimension Planet Adventure 最終章 最終話『栄光なる未来』" や書籍 『RとShinyで作るWebアプリケーション』 の第3章で解説されています。
Shiny modulesを使ってアプリを構造化していくとき、アプリ全体の制御に関わる「グローバルな」入力項目があって、その入力値を複数のモジュール間で共通に使用したい場合があります。そのような場合には実装にひと工夫が必要だったのでここではその方法をご紹介します。
デモ
こちらにデモアプリを公開しました。
スクリーンショット
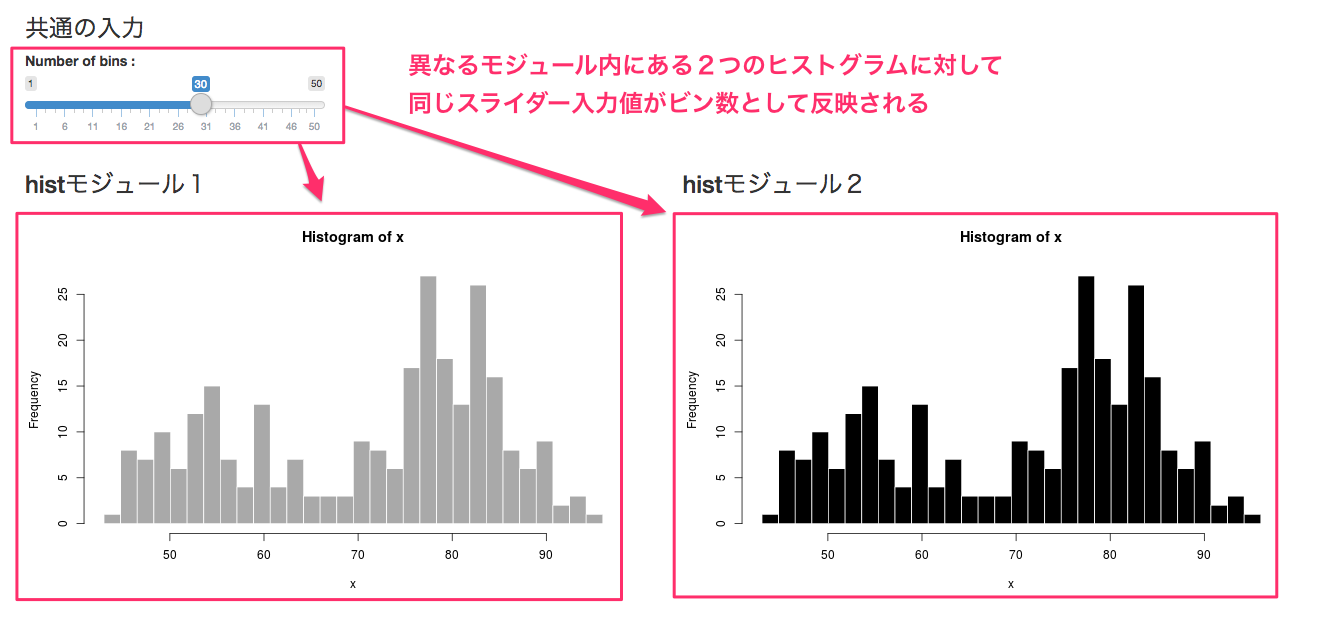
見た目には分かりませんが、2つのヒストグラムはモジュールを使って作成されています。
上部にあるスライダー入力の値が変わると両方のヒストグラムに同時に反映されるようになっています。
ソースコード
デモアプリのソースコード app.R は次のようになっています(このコードは GitHub でも公開しています)。
app.R
# Shiny moduleへのreactiveな値の受け渡し
library(shiny)

# モジュールの定義 ------------------------------

# histモジュールのUI
histPlotUI <- function(id) {
  ns <- NS(id)
  tagList(
    plotOutput(ns("distPlot"))
  )
}

# histモジュールのサーバー側ロジック
histPlot <- function(input, output, session, color, inputBins) {
  output$distPlot <- renderPlot({
    x    <- faithful[, 2]

    # 悪い例その1: 名前空間の違いでモジュールの親階層から値を受け取れない
    # bins <- seq(min(x), max(x), length.out = input$bins + 1)

    bins <- seq(min(x), max(x), length.out = inputBins() + 1)
    hist(x, breaks = bins, col = color, border = 'white')
  })
}

# UI ------------------------------
ui <- fluidPage(
  column(
    12,
    h3("「グローバルな」入力"),
    # モジュールの外で定義されたスライダー入力
    # これを「グローバルな」入力値として複数のモジュール間で共有したい
    sliderInput(
      inputId = "bins",
      label = "Number of bins :",
      min = 1, max = 50, value = 30
    )
  ),
  column(
    6,
    h3("histモジュール1"),
    # histモジュールのUI呼び出し
    histPlotUI("hist1")
  ),
  column(
    6,
    h3("histモジュール2"),
    # histモジュールのUI呼び出し
    histPlotUI("hist2")
  )
)

# サーバー ------------------------------
server <- function(input, output, session) {

  # 悪い例その2: callModuleにそのままinput$binsを渡しても入力値の変化に対して応答しない
  # callModule(histPlot, "hist1", "darkgray", input$bins)
  # callModule(histPlot, "hist2", "black", input$bins)

  # 正解: reactiveな表現式inputBinsを作成してモジュールを呼び出す際に渡す
  inputBins <- reactive(input$bins)
  callModule(histPlot, "hist1", "darkgray", inputBins)
  callModule(histPlot, "hist2", "black", inputBins)
}

# Shinyアプリの開始 ------------------------------
shinyApp(ui = ui, server = server)
ポイント
悪い例その1
histPlot <- function(input, output, session, color) {
  output$distPlot <- renderPlot({
    x    <- faithful[, 2]

    # 悪い例その1: 名前空間の違いでモジュールの親階層から値を受け取れない
    bins <- seq(min(x), max(x), length.out = input$bins + 1)
    hist(x, breaks = bins, col = color, border = 'white')
  })
}
このようにモジュール内から親階層の input$bins を参照しようとしても名前空間が異なるためにスライダーの入力値を受け取ることができません。
悪い例その2
server <- function(input, output, session) {
  # 悪い例その2: callModuleにそのままinput$binsを渡しても入力値の変化に対して応答しない
  callModule(histPlot, "hist1", "darkgray", input$bins)
  callModule(histPlot, "hist2", "black", input$bins)
}
このように親階層からのモジュール呼び出し callModule() の引数としてスライダーの入力値 input$bins を渡しても、スライダーを動かして input$bins の値が変化したときモジュール内のヒストグラムがそれに応じて変化するようにはなりません。
正解はreactiveを使う
別のモジュールを呼び出す際に変化する値を渡したいときは、以下のようにして reactiveな表現式 を作る必要があります。
モジュール呼び出し側:
server <- function(input, output, session) {
  # 正解: reactiveな表現式inputBinsを作成してモジュールを呼び出す際に渡す
  inputBins <- reactive(input$bins)
  callModule(histPlot, "hist1", "darkgray", inputBins)
  callModule(histPlot, "hist2", "black", inputBins)
}
モジュール側:
histPlot <- function(input, output, session, color, inputBins) {
  output$distPlot <- renderPlot({
    x    <- faithful[, 2]
    bins <- seq(min(x), max(x), length.out = inputBins() + 1)
    hist(x, breaks = bins, col = color, border = 'white')
  })
}
このように書くと入力値の変化がモジュールの内容に反映されるようになります。
なおここでreactiveな表現式を呼び出す際の約束として、モジュール側では inputBins ではなく inputBins() となっている点に注意してください。
参考
以上の内容は
- Using global input values inside of R Shiny modules · goonR blog
- r - observeEvent Shiny function used in a module does not work - Stack Overflow
に述べられていたものです。日本語での解説は見当たらなかったので今回こちらでご紹介しました。
Shiny modulesもreactiveも共にShinyのやや進んだ使い方に含まれるかと思います。
それぞれについて知りたい方向けの参考として、Shiny modulesについては
- Shiny - Modularizing Shiny app code
- 「ShinyModule」で中規模Shinyアプリをキレイにする - Dimension Planet Adventure 最終章 最終話『栄光なる未来』
などが、reactiveについては
- Shiny - Use reactive expressions
- RStudio Shiny チュートリアル レッスン6 reactiveな表現式の使用 - Qiita
- Shinyを効率よく使うための、reactive関数基礎講座 - 世界一やさしいデータ分析教室
などの解説があります。