構成要素
- Bitbucket レポジトリ (git or hg)
- Sphinxのドキュメンテーション
- AWS S3 バケット (データ保存用)
- Webサーバ(nginx) (Basic認証を行う)
- Bitbucket Pipelines (レポジトリのPushをキーにSphinx build & S3にPush)
- Dockerコンテナ Pipelineで使用するコンテナ
補足
Web静的ホスト・認証
AWS S3 には、静的Webホスティングの仕組みがありますが、Basic認証が掛けられないため、別途Webサーバを準備し、S3の静的ホスティングにリバースプロキシする。
S3の閲覧権限をIPアドレスで制限する。
つまり、IP制限のみならWebサーバを別途準備する必要はない。
Pipelines と Dockerコンテナ
Bitbucket Pipelinesは、最近正式にサービスが始まった、Bitbucket内のCI(継続インテグレーションサービス)です。
Pipelinesでは、Dockerコンテナを指定して、テストやディプロイなどを行います。
SphinxのHTMLビルドを実行し、S3にアップロードを行う都合の良いDockerコンテナが見つからなかったので作成しました。
terapyon/sphinx-s3
設定手順
AWS設定
- IAMで新規ユーザ作成(アクセスキーなどを取得)
- S3バケットを作る
- 上記バケットに静的ホスティングを有効にする
- 上記バケットのアクセス権限(IAMユーザのアップロード許可及び指定IPからの静的ホスティング閲覧許可) *1
*1: バケットのアクセス権限()
{
	"Version": "2012-10-17",
	"Id": "S3PolicyId1",
	"Statement": [
		{
			"Sid": "IPAllow",
			"Effect": "Allow",
			"Principal": "*",
			"Action": "s3:*",
			"Resource": "arn:aws:s3:::BUCKET-NAME/*", # <- BUCKET-NAME変更
			"Condition": {
				"IpAddress": {
					"aws:SourceIp": "0.0.0.0/32" # <- WebサーバのIPアドレス
				}
			}
		},
		{
			"Sid": "statement1",
			"Effect": "Allow",
			"Principal": {
				"AWS": "arn:aws:iam::5260xxxxxxxxx:user/IAM-USER" # <- IAM-USER変更
			},
			"Action": [
				"s3:GetBucketLocation",
				"s3:ListBucket"
			],
			"Resource": "arn:aws:s3:::BUCKET-NAME" # <- BUCKET-NAME変更
		},
		{
			"Sid": "statement2",
			"Effect": "Allow",
			"Principal": {
				"AWS": "arn:aws:iam::5260xxxxxxxxx:user/IAM-USER" # <- IAM-USER変更
			},
			"Action": "s3:*",
			"Resource": "arn:aws:s3:::BUCKET-NAME/*" # <- BUCKET-NAME変更
		}
	]
}
Webサーバ
- nginxでプロキシーパスの設定
- Basic認証の設定
nginx設定
server {
    listen 80;
    server_name SERVER-NAME; # <- SERVER-NAME変更

    charset utf-8;
    access_log /var/log/nginx/access.log;
    error_log /var/log/nginx/error.log;

    index index.html index.htm;

    location / {
        #Basic auth
        auth_basic  "Restricted Area.";
        auth_basic_user_file "/etc/nginx/.htpasswd";
        proxy_pass http://BUCKET-NAME.s3-website-ap-northeast-1.amazonaws.com/doc/; # <- BUCKET-NAME変更
    }
}
Bitbucket
- レポジトリの設定で
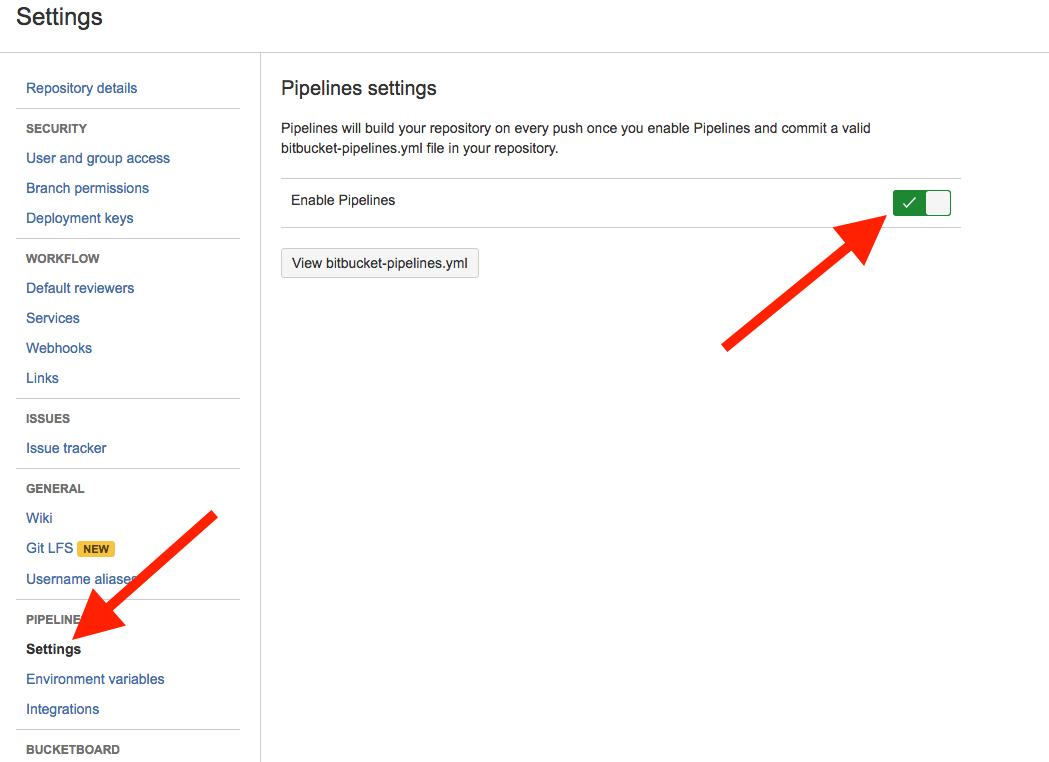
Pipelinesを有効にする -
bitbucket-pipelines.ymlをレポジトリrootに設置 -
s3_website.ymlをレポジトリrootに設置。これは今回の仕組み上必要な設定を入れるもので、Pipelinesに必須のものではありません。 - Pipelines の
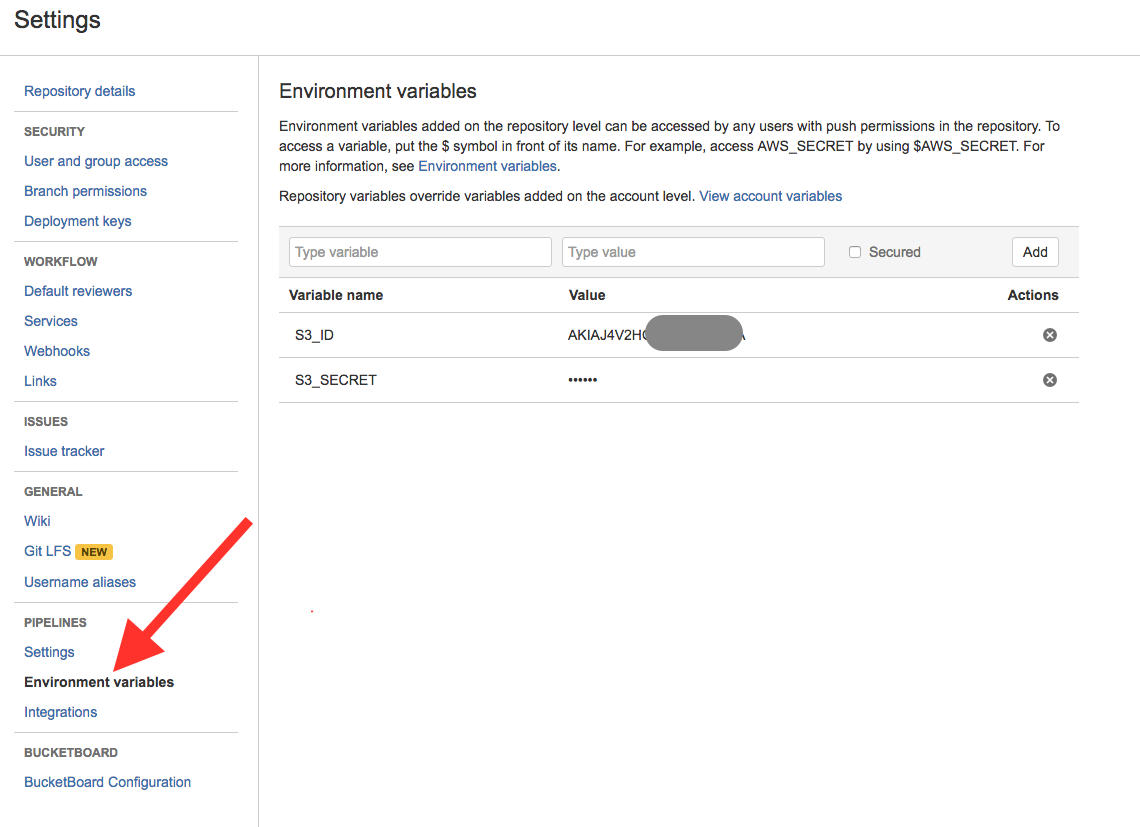
Environment variablesにS3_IDとS3_SECRETを保存。(S3にアクセするための物)
Pipelines を有効化
bitbucket-pipelines.yml
image: terapyon/sphinx-s3

pipelines:
  branches:
    master:
      - step:
          script:
            - pip install -r requirements.txt
            - make html
            - s3_website push
s3_website.yml
s3_id: <%= ENV['S3_ID'] %>
s3_secret: <%= ENV['S3_SECRET'] %>
s3_bucket: BUCKET-NAME # <- S3バケット名を指定

s3_endpoint: ap-northeast-1
s3_key_prefix: doc # <- S3フォルダ名を指定
site: build/html # <- レポジトリ上 or ビルド後の転送対象のフォルダを指定
Environment variables
自動ディプロイ
設定が完了すると、push時に自動的にS3にHTMLが転送され、Webサーバで閲覧可能
最後に
このエントリーは、Bitbucketの自動ディプロイ方法を解説をしました。
部分的に記載ミスが残っている可能性があります。ミスについてはご指摘いただけたら幸いです。
著者関連Blog記事とあわせてお読みください。

