OAuthで認証をしましょう
OAuthで認証をしようという記事です。OAuthと言えば認可で用いられるのが正当な使い方ですが、実際認証の代わりに用いられるのが多いのが現状です。
大雑把に説明するとOAuthの認可とは、家の合い鍵を渡すのと似ています。鍵を持っていれば家に入ることができます。しかし、その鍵の持ち主が家の主とは限りません。もし鍵が盗まれると別の人が家に入れてしまいます。
OAuthではこの鍵を__"AccessToken"といい、これを渡す、つまりAccessTokenの発行を行うことで、家に入れる、つまり"そのサービスの情報を利用できる"__ようになります。
その仕組みを使ってこのAccessTokenを持っている人を信頼してサービスを利用できるようにしようというのが今回の記事の内容になります。
今回はクライアントサイドの処理のみ解説します。
早速Springでこの仕組みを使ったWebサービスを作ってみましょう。
プロジェクトの作成
SPRING INITIALIZR
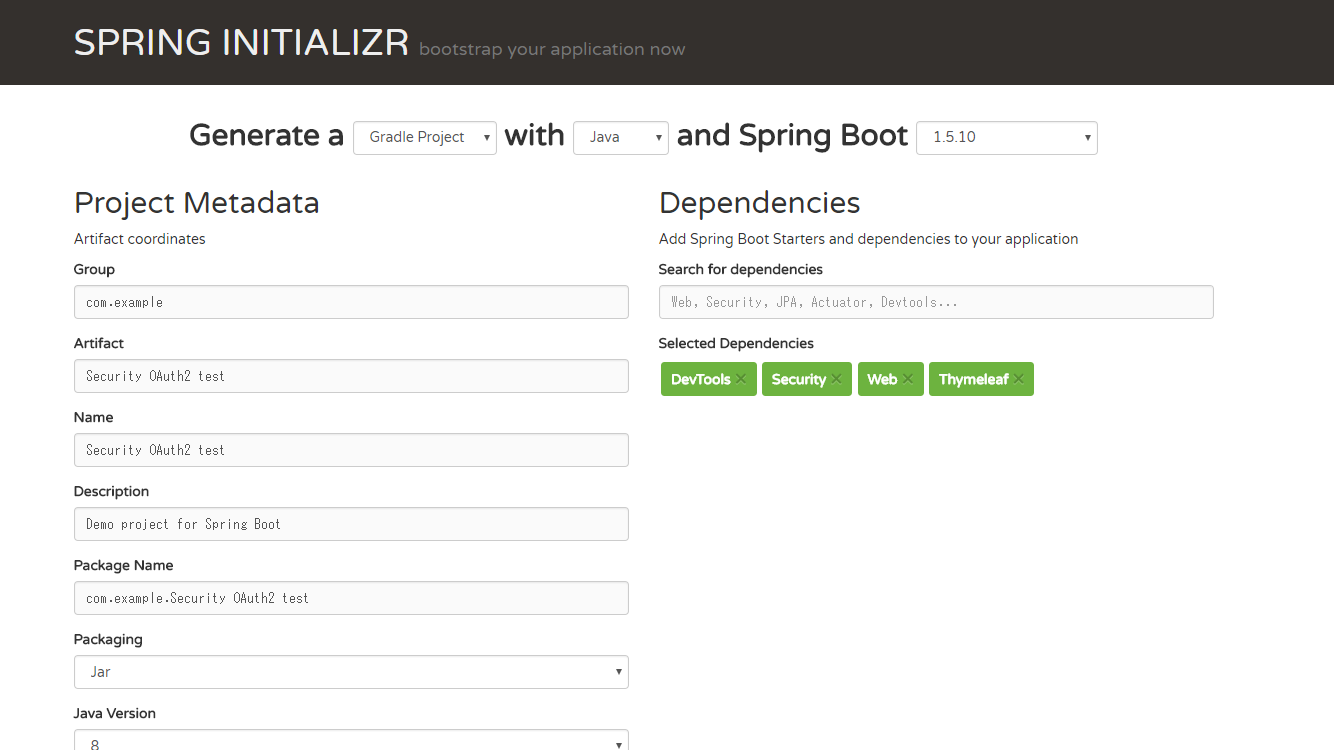
SPRING INITIALIZRを使ってプロジェクトを作成していきます。基本は画像の設定で作成しGradleプロジェクトとしてEclipseとかでインポートして進めていきます。
Dependenciesのものは最低限のもので構いません。(Web,Thymeleaf,Spring Security,Devtool)
Spring Bootのバージョンはv1.5を使います(2.0では実装方法が異なるので注意してください)。
Slack API
OAuthの認証用のサービスとしてSlackを使います。他にはGoogleやFacebook,Githubとか使えるみたいです。
アプリ名は各自好きにつけてもらって構いません。
リダイレクト先にhttp://localhost:8080/を加えることを忘れないでください。
コードを書く
- build.gradle
SPRING INITIALIZRでプロジェクトを作成したときに
compile('org.springframework.security.oauth:spring-security-oauth2')
が入ってなかったので追加しました。
buildscript {
	ext {
		springBootVersion = '1.5.10.RELEASE'
	}
	repositories {
		mavenCentral()
	}
	dependencies {
		classpath("org.springframework.boot:spring-boot-gradle-plugin:${springBootVersion}")
	}
}

apply plugin: 'java'
apply plugin: 'eclipse'
apply plugin: 'org.springframework.boot'

group = 'com.example'
version = '0.0.1-SNAPSHOT'
sourceCompatibility = 1.8

repositories {
	mavenCentral()
}


dependencies {
	compile('org.springframework.boot:spring-boot-starter-security')
	compile('org.springframework.boot:spring-boot-starter-thymeleaf')
	compile('org.springframework.boot:spring-boot-starter-web')
	compile('org.springframework.security.oauth:spring-security-oauth2')  // 追加
	runtime('org.springframework.boot:spring-boot-devtools')
	testCompile('org.springframework.boot:spring-boot-starter-test')
	testCompile('org.springframework.security:spring-security-test')
}
- 設定ファイル
${Client ID}および${Client Secret}は各自Slack APIから取得して置き換えてください。
IDとSecretはシングルクオーテーションで囲ってください
security:
  oauth2:
    client:
      clientId: '${Client ID}' # ここを変更、Slackのアプリケーション登録で表示された「Client ID」
      clientSecret: '${Client Secret}' # ここを変更、Slackのアプリケーション登録で表示された「Client Secret」
      accessTokenUri: https://slack.com/api/oauth.access # Slackを利用する場合の設定値
      userAuthorizationUri: https://slack.com/oauth/authorize # Slackを利用する場合の設定値
      authenticationScheme: query # Slackを利用する場合の設定値
      scope: identify # Slackを利用する場合の設定値
      tokenName: token # Slackを利用する場合の設定値
    resource:
      userInfoUri: https://slack.com/api/auth.test # Slackを利用する場合の設定値
  basic:
    enabled: false
- Controller
TOPページおよびlogin後のページへのマッピングのみ実装
package com.example.Security.OAuth2.test.controller;

import org.springframework.stereotype.Controller;
import org.springframework.web.bind.annotation.RequestMapping;

@Controller
public class MainController {
	/**
	 * Topページ
	 * @return
	 */
	@RequestMapping("/")
	public String index() {
		return "index";
	}


	/**
	 * ログイン後のページ
	 * @return
	 */
	@RequestMapping("/hoge")
	public String hoge() {
		return "hoge";
	}
}
- Config
csrfの設定は本来であれば必要だが、今回はテスト環境のため無効にしている。
package com.example.Security.OAuth2.test.config;

import org.springframework.boot.autoconfigure.security.oauth2.client.EnableOAuth2Sso;
import org.springframework.security.config.annotation.web.builders.HttpSecurity;
import org.springframework.security.config.annotation.web.builders.WebSecurity;
import org.springframework.security.config.annotation.web.configuration.EnableWebSecurity;
import org.springframework.security.config.annotation.web.configuration.WebSecurityConfigurerAdapter;
import org.springframework.security.web.util.matcher.AntPathRequestMatcher;

@EnableWebSecurity
@EnableOAuth2Sso
public class WebSecurityConfig extends WebSecurityConfigurerAdapter {

    @Override
    public void configure(WebSecurity web) throws Exception {
        // セキュリティ設定を無視するリクエストの設定
        // 静的リソース(images、css、javascript)を無視する設定を記述
        web.ignoring().antMatchers(
                            "/images/**",
                            "/css/**",
                            "/javascript/**",
                            "/webjars/**");
    }
    @Override
    protected void configure(HttpSecurity http) throws Exception {
        http
        	.csrf().disable() // CSRF対策を無効化
            .authorizeRequests()
            	// indexはアクセスを許可
                .antMatchers("/").permitAll()
                .anyRequest().authenticated()
            .and()
	            .logout()
	            .logoutRequestMatcher(new AntPathRequestMatcher("/logout**"))       // ログアウト処理のパス
	            .logoutSuccessUrl("/")
	            // ログアウト時に削除するクッキー名
	            .deleteCookies("JSESSIONID")
	            // ログアウト時のセッション破棄を有効化
	            .invalidateHttpSession(true)
	            .permitAll();

    }

}
- html files
loginとlogoutの遷移先だけ記述。
logoutはPOSTで送らないとだめらしい。(hiddenでcsrf用の値が一緒に送られるため?)
<!DOCTYPE html>
<html xmlns:th="http://www.thymeleaf.org">
<head>
<meta charset="UTF-8" />
<title>Security OAuth2 Test</title>
</head>
<body>
<h1>Hello, Index</h1>

<a href="/hoge">Login</a>

</body>
</html>
<!DOCTYPE html>
<html xmlns:th="http://www.thymeleaf.org">
<head>
<meta charset="UTF-8" />
<title>Security OAuth2 Test</title>
</head>
<body>
<h1>Hello, Hoge</h1>

<form action="#" th:action="@{/logout}" method="post">
    <button type="submit" value="POST" >Logout</button>
</form>

</body>
</html>
Githubに今回のソースを公開しています。
Spring-OAuth2