はじめに
ラズパイに接続したIoTデバイスの情報を外部に発信する方法の第二弾で、対象を汎用化するためにIFTTT経由でtwitterにつぶやくことにした。対象は、安価で導入できる温度湿度計DHT11を使用する。DHT11の導入についてはこちらを参照。
pythonプラグラム
参考文献
以下の情報を参考にして、プログラムを作成した。
- http://shuzo-kino.hateblo.jp/entry/2017/08/28/233900
- https://qiita.com/sqrtxx/items/49beaa3795925e7de666
- http://www.daipanman.com/entry/2017/07/07/071949
前提としてIFTTTのWebHooks Serviceやtwitter連携を使えるようにしておく必要があるが、このあたりはググれば情報はたくさん出てくるので、ここでは省略する。
作成ポイント
ライブラリ
以下のライブラリをimportして設計した。
IFTTTへのアクセスはrequestsを使用する。requestsを使用したPOST/GETを習得しておくとGoogle Cloud Platformなどにも使えるので、pythonでの汎用記述にこだわる場合は便利。
auth key情報
IFTTTのWebHooksを使えるようにすると自分のkeyが発行されるので、それをauth_ifttt.pyに記載する。
ifttt_key = "1234567890ABCDEFGHIJKLMNOPQRSTUVXYZ12345678"
メインプログラム側では、上記をimportする。
from auth_ifttt import(
    ifttt_key
)
cronで自動実行する場合は、importパスが通っていないといけないので、以下を追加する。
/path/to/program/は、auth_ifttt.pyの配置されたパスを記述する。
import sys

sys.path.append('/path/to/program/')
温度湿度情報の取り込み
DHT11_Pythonライブラリを使えば簡単。GPIO設定をして、インスタンスする。この例では、GPIO21(40番ピン)にDHT11のDATAピンを接続した。
# initialize GPIO
GPIO.setwarnings(False)
GPIO.setmode(GPIO.BCM)
GPIO.cleanup()

instance = dht11.DHT11(pin=21)
あとはDHT11_Pythonライブラリのお手本通りに、温度湿度情報を取得する。使い回しできるように、関数化した。
def getInfo():
    while True:
        result = instance.read()
        if result.is_valid():
            #print('温度:', str(result.temperature), '℃です。')
            #print('湿度:', str(result.humidity), '%です。')
            #pass
            break
        else:
            time.sleep(1)
    return result
IFTTTに接続
WebHooks用のjsonデータを生成してIFTTTに接続する。データは現時点ではお仕着せのvalue[123]でしか記載できないので、それぞれ計測時刻、温度、湿度に割り当てた。
今回はイベント名をDHT11とした。IFTTT側で発火したかは、requests.post()の返り値のr.textをprintすればわかる。
使い回しできるように、これも関数化した。
def commInfo(current_time, res):
    #IFTTT Webhooks
    str_key = ifttt_key
    str_event = "DHT11"
    str_headers = {'Content-Type': 'application/json'}
    str_json_data = {
        "value1" : current_time,
        "value2" : res.temperature,
        "value3" : res.humidity
    }
    str_url = "https://maker.ifttt.com/trigger/"\
              + str_event\
              + "/with/key/"\
              + str_key
    #print(str_url)

    jd = json.dumps(str_json_data)

    print("begin request")
    s = requests.Session()
    r = requests.post(str_url, data=jd, headers=str_headers)
    #print("status code : ", r.status_code)
    print("end request")

    if r.status_code == 200:
        return r.text
    else:
        return "error occurred!!"
WebHooks経由でtwitterに投稿
コマンドラインで、IFTTTのWebHooksが使えているかを確認することができるので、事前に確認しておくこと。
$ curl -X POST https://maker.ifttt.com/trigger/DHT11/with/key/キー
Congratulations! You've fired the DHT11 event
今回は、イベント名はDHT11としたが、ここを別のものにすれば、発火試験はできる。
IFTTTでtwitterとの連携設定ができている前提で、このプログラム(this = WebHooksでの"DHT11"の発火)との接続では、以下のようにWebHooksアプレットを作成する。
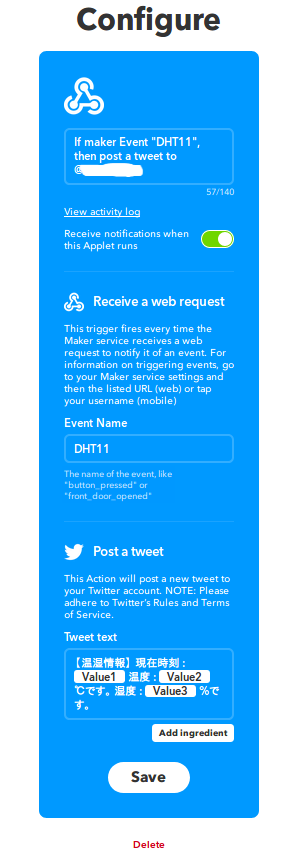
作成結果
メインプログラム全体は以下。
# -*- coding: utf-8 -*

import RPi.GPIO as GPIO
import dht11
import time
import os
import sys

sys.path.append('/path/to/program/') #auth_ifttt.pyのありか

import json
import requests
from auth_ifttt import(
    ifttt_key
)

# initialize GPIO
GPIO.setwarnings(False)
GPIO.setmode(GPIO.BCM)
GPIO.cleanup()

instance = dht11.DHT11(pin=21)

def getInfo():
    while True:
        result = instance.read()
        if result.is_valid():
            #print('温度:', str(result.temperature), '℃です。')
            #print('湿度:', str(result.humidity), '%です。')
            #pass
            break
        else:
            time.sleep(1)
    return result

def commInfo(current_time, res):
    #IFTTT Webhooks
    str_key = ifttt_key
    str_event = "DHT11"
    str_headers = {'Content-Type': 'application/json'}
    str_json_data = {
        "value1" : current_time,
        "value2" : res.temperature,
        "value3" : res.humidity
    }
    str_url = "https://maker.ifttt.com/trigger/"\
              + str_event\
              + "/with/key/"\
              + str_key
    #print(str_url)

    jd = json.dumps(str_json_data)

    print("begin request")
    s = requests.Session()
    r = requests.post(str_url, data=jd, headers=str_headers)
    #print("status code : ", r.status_code)
    print("end request")

    if r.status_code == 200:
        return r.text
    else:
        return "error occurred!!"

if __name__ == '__main__':

    #time stamp
    timestamp = 'date +%F_%H:%M:%S'
    current_time=os.popen(timestamp).readline().strip()

    res = getInfo()
    rt = commInfo(current_time, res)
    print(rt)
つぶやく
以下を実行し、IFTTT経由で自分のtwitterアカウントに投稿されることを確認した。
$ python3 dht11_ifttt.py
つぶやきの自動化
cronで6時間毎につぶやかせる。00分に処理が集中しないように、03分に実行する。
$ crontab -e
エディタが起動したら、6時間毎03分実行するように設定。your LOG dirはこのプログラムの場所。
03 0-23/6 * * * python3 /your LOG dir/dht11_ifttt.py >/dev/null 2>&1
さいごに
pythonの記述で、IFTTT経由でtwitterにつぶやけるようになった。
このプログラムならば、IFTTT側でThatを変更することで、いろいろなものにIoTデータをつなげることができるので、汎用性が高まったと思う。