JSフレームワークに依存しないUIが欲しい
JavaScriptのフロントエンドのフレームワークは色々ありますが・・・
- BackBoneJS
- KnockoutJS
- AngularJS
- VueJS
- ReactJS
- RiotJS
そのままJSフレームワークが提供しているUIを含めるとどれもこれも微妙かなとも思ってます。
というのも、JSフレームワークを学習する必要がある上、依存しているJSフレームワーク自体が廃れたタイミングで使えなくなる可能性があるわけです。
理想はUIは、UIでそのまま使えて、
データバインディングが必要になった場合(サーバからパラメータを取得して埋め込むなど)に
バインディングの機能のみをインジェクションできる形式が良い気がしています。
(アニメーションはCSS3、レイアウト周りも最近はflexboxを使えばできるので、UIさえWeb標準で作れれば、データバインディングのみJSフレームワークを使うという考え方です。)
UIライブラリ単体ならば下記のものがありますが
- jQuery UI
- Dijit
jQuery UIはjQueryに依存するため、JSフレームワークと合わせるとDOM操作がコンフリクトする可能性がめんどくさいのと、DOJOもjQueryもCSSが別ファイルになり、他のCSS定義と重複する可能性があり、CSS重複が起きた場合にCSS修正が難しい(重複箇所の特定が難しい)という問題をはらんでいます。
Web標準のWebComponentsのHTML Import、Custom ElementとShadow DOMという技術を使えば
HTMLファイルを分離し、独自タグ(独自UI)をカプセル化で定義することができます。
(これによりCSS重複の問題も克服できます。)
webcomponentsjsというpolyfillを使えば、IE10以下以外のブラウザでは動くはずです。
WebComponentsのフレームワークでいうと
Polymerがあるじゃないかという声が上がってくると思いますが、
PolymerもデータバインディングとUIが分離できないという点で同じな気がしてます。
(というかPolymerと他のJSフレームワーク組み合わせた場合とかはどんな挙動するのか・・・?)
今回は純粋なWebComponentsのみで作成します。
先に参考にさせていただいたサイトあげておきます。
標準WebComponentsでドロップダウンメニューを作ってみる(v0版)
ドロップメニュータグを定義して
次のような入れ子構造で使うことを考えます。
    <x-dropmenu>
        <x-menu>
            <x-submenu></x-submenu>
        </x-menu>
    </x-dropmenu>
ドロップメニュー本体は次のように3つのUIに分けます
- dropmenu.html:x-dropmenuタグ
- menu.html:x-menuタグ
- submenu.html:x-submenuタグ
ドロップメニュータグの実装は次のようになります。
<link rel="import" href="menu.html">
<template id="dropmenu">
    <style type="text/css">
        /* css */

        :host ul {
            padding: 0rem;
            display: -ms-flex;
            display: -webkit-flex;
            display: flex;
        }

        ::content {}
    </style>
    <!-- 子要素格納用contentタグ -->
    <ul>
        <content></content>
    </ul>
    <!-- DOM -->
</template>

<script type="text/javascript">
    (function () {
        var ownerDocument = document.currentScript.ownerDocument;
        var proto = Object.create(HTMLElement.prototype, {
            // インスタンス生成時のコールバック
            createdCallback: {
                value: function () {
                    var t = ownerDocument.querySelector('#dropmenu');
                    var clone = document.importNode(t.content, true);
                    // Shadow DOMに追加
                    this.shadowRoot = this.createShadowRoot();
                    this.shadowRoot.appendChild(clone);
                }
            },
            // インスタンスがDOMに追加された時のイベント
            attachedCallback: {
                value: function () {
                    // 内部DOM取得
                    //var dom = this.shadowRoot.querySelector("DOM");

                    // DOMのイベント追加など

                }
            },
            // インスタンスがDOMから削除された時のイベント
            detachedCallback: {
                value: function () {
                    // 内部DOM取得
                    //var dom = this.shadowRoot.querySelector("DOM");

                }
            },
            // 属性値が変更、削除、追加されたときのイベント
            attributeChangedCallback: {
                value: function () {
                    // カスタム属性値取得

                }
            }

        });
        // x-tagとしてCustom Elements登録
        document.registerElement('x-dropmenu', {
            prototype: proto
        });
    })();
</script>
メニュータグの実装は次のようになります。
<link rel="import" href="submenu.html">
<template id="menu">
    <style type="text/css">
        /* css */

        :host li {
            list-style: none;
            text-align: center;
        }

        :host(:hover) a {
            background: var(--highlight, #a0a0a0);
            display: block;
        }

        :host a {
            background: var(--background, #808080);
            display: block;
            padding: 0.5rem;
            color: black;
            text-decoration: none;
            border-radius: 0.5rem;
            width: var(--width, 5rem);
        }

        :host a:hover + ul {
            display: block;
        }

        :host ul:hover {
            display: block;
        }

        :host ul {
            display: none;
            position: absolute;
            padding: 0rem;
            margin: 0rem;
        }
        /* deprecated */
        ::content /deep/ li {}
    </style>

    <li>
        <a href="#"></a>
        <!-- 子要素格納用contentタグ -->
        <ul>
            <content></content>
        </ul>
        <!-- DOM -->
    </li>
</template>

<script>
    (function () {

        // 属性値、CSS更新
        var update = function (elem) {
            // カスタム属性値取得
            var title = elem.getAttribute('data-title');
            var url = elem.getAttribute('data-url');
            var a = elem.shadowRoot.querySelector("a");
            a.innerHTML = title;
            a.href = url;

            // submenuがあるか?
            var content = elem.shadowRoot.querySelector("content");
            var isSubmenu = false;
            content.getDistributedNodes().forEach(function (el) {

                if (el.tagName) {
                    if (el.tagName.toLowerCase() === "x-submenu" && !isSubmenu) {
                        isSubmenu = true;
                    }
                }
            });


            if (isSubmenu) {
                var css = ':host(:hover) a { border-bottom-left-radius: 0.0rem;border-bottom-right-radius: 0.0rem; }';
                var style = document.createElement('style');

                if (style.styleSheet) {
                    style.styleSheet.cssText = css;
                } else {
                    style.appendChild(document.createTextNode(css));
                }
                elem.shadowRoot.appendChild(style);
            } else {
                var css = ':host(:hover) a { border-bottom-left-radius: 0.5rem;border-bottom-right-radius: 0.5rem; }';
                var style = document.createElement('style');

                if (style.styleSheet) {
                    style.styleSheet.cssText = css;
                } else {
                    style.appendChild(document.createTextNode(css));
                }
                elem.shadowRoot.appendChild(style);
            }
        };

        var ownerDocument = document.currentScript.ownerDocument;
        var proto = Object.create(HTMLElement.prototype, {
            // インスタンス生成時のコールバック
            createdCallback: {
                value: function () {
                    var t = ownerDocument.querySelector('#menu');
                    var clone = document.importNode(t.content, true);
                    // Shadow DOMに追加
                    this.shadowRoot = this.createShadowRoot();
                    this.shadowRoot.appendChild(clone);


                }
            },
            // インスタンスがDOMに追加された時のイベント
            attachedCallback: {
                value: function () {

                    update(this);
                }
            },
            // インスタンスがDOMから削除された時のイベント
            detachedCallback: {
                value: function () {

                }
            },
            // 属性値が変更、削除、追加されたときのイベント
            attributeChangedCallback: {
                value: function () {
                    update(this);
                }
            }

        });
        // x-tagとしてCustom Elements登録
        document.registerElement('x-menu', {
            prototype: proto
        });
    })();
</script>
サブメニュータグの実装は次のようになります。
<template id="submenu">
    <style type="text/css">
        /* css */

        :host li {
            list-style: none;
            margin: 0rem;
            padding: 0.5rem;
            text-align: center;
            background: var(--background, #808080);
            overflow: hidden;
            width: var(--width, 5rem);
        }

        :host li:hover {
            background: var(--highlight, #a0a0a0);
        }

        :host a {
            color: black;
            text-decoration: none;
            overflow: hidden;
        }

        :host(:last-child) li {
            border-bottom-left-radius: 0.5rem;
            border-bottom-right-radius: 0.5rem;
        }

        ::content {}
    </style>
    <!-- 子要素格納用contentタグ -->
    <li>
        <a href="#">
            <content></content>
        </a>
    </li>

    <!-- DOM -->
</template>

<script type="text/javascript">
    (function () {
        var ownerDocument = document.currentScript.ownerDocument;
        var proto = Object.create(HTMLElement.prototype, {
            createdCallback: {
                value: function () {
                    var t = ownerDocument.querySelector('#submenu');
                    var clone = document.importNode(t.content, true);
                    // Shadow DOMに追加
                    this.shadowRoot = this.createShadowRoot();
                    this.shadowRoot.appendChild(clone);
                }
            },
            attachedCallback: {
                value: function () {
                    // 内部DOM取得
                    //var dom = this.shadowRoot.querySelector("DOM");

                    // DOMのイベント追加など
                    var url = this.getAttribute('data-url');
                    var a = this.shadowRoot.querySelector("a");
                    a.href = url;
                }
            },
            detachedCallback: {
                value: function () {
                    // 内部DOM取得
                    //var dom = this.shadowRoot.querySelector("DOM");

                }
            },
            attributeChangedCallback: {
                value: function () {
                    // カスタム属性値取得
                    //var attr = this.getAttribute('data-attr');

                    var url = this.getAttribute('data-url');
                    var a = this.shadowRoot.querySelector("a");
                    a.href = url;
                }
            }

        });
        // x-tagとしてCustom Elements登録
        document.registerElement('x-submenu', {
            prototype: proto
        });
    })();
</script>
html本体側で部品化したhtmlを呼び出します。
<!-- WebComponents Polyfill-->
<script type="text/javascript" src="webcomponents.js"></script>
<link rel="import" href="dropmenu.html">
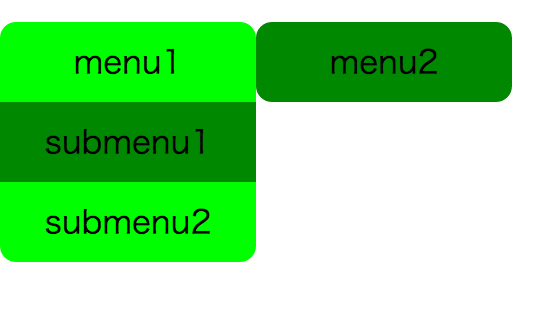
<x-dropmenu>
<x-menu data-title="menu1" data-url="http://google.co.jp">
<x-submenu data-url="http://yahoo.co.jp">submenu1</x-submenu>
<x-submenu data-url="#">submenu2</x-submenu>
</x-menu>
<x-menu data-title="menu2">
</x-menu>
</x-dropmenu>
こんな感じな見た目になるはずです。

標準WebComponentsでドロップダウンメニューを作ってみる(v1版)
mysticateaさんからご指摘があったのでv1版も作ってみました。
Google Chrome Canary(v54)で動作確認しています。
<link rel="import" href="menu.html">
<template id="dropmenu">
    <style type="text/css">
        /* css */
        :host ul{
            padding: 0rem;

            display: -ms-flex;
            display: -webkit-flex;
            display: flex;
        }

        ::slotted() {

        }
    </style>
    <!-- 子要素格納用slotタグ -->
    <ul>
        <slot></slot>
    </ul>
    <!-- DOM -->
</template>

<script type="text/javascript">
    (function(){
        var ownerDocument = document.currentScript.ownerDocument;

        class DropMenu extends HTMLElement {
            constructor() {
                super();

                // Shadow DOMに追加
                this.root = this.attachShadow({mode: 'closed'});
                this.root.appendChild(ownerDocument.getElementById("dropmenu").content.cloneNode(true));
            }
            connectedCallback() {
            }
            disconnectedCallback() {
            }
            attributeChangedCallback(attrName, oldVal, newVal) {
            }
        }


        if ('customElements' in window) {
            // x-tagとしてCustom Elements登録
            window.customElements.define('x-dropmenu',DropMenu);
        } else {
        }

    })();


</script>
<link rel="import" href="submenu.html">
<template id="menu">
    <style type="text/css">
        /* css */
        :host li {
            list-style: none;
            text-align: center;
        }

        :host(:hover) a {
            background: var(--highlight, #a0a0a0);
            display: block;
        }

        :host a {
            background: var(--background, #808080);
            display: block;
            padding: 0.5rem;
            color: black;
            text-decoration: none;
            border-radius: 0.5rem;
            width: var(--width, 5rem);
        }

        :host a:hover + ul {
            display: block;
        }

        :host ul:hover {
            display: block;
        }

        :host ul {
            display: none;
            position: absolute;
            padding: 0rem;
            margin: 0rem;
        }
    </style>

    <li>
        <a href="#"></a>
        <!-- 子要素格納用slotタグ -->
        <ul>
            <slot></slot>
        </ul>
        <!-- DOM -->
    </li>
</template>

<script>
    (function(){
        // 属性値、CSS更新
        var update = function (elem) {
            // カスタム属性値取得
            var title = elem.getAttribute('data-title');
            var url = elem.getAttribute('data-url');
            var a = elem.root.querySelector("a");
            a.innerHTML = title;
            a.href = url;


        };

        var ownerDocument = document.currentScript.ownerDocument;

        class Menu extends HTMLElement {
            constructor() {
                super();

                // Shadow DOMに追加
                this.root = this.attachShadow({mode: 'closed'});
                this.root.appendChild(ownerDocument.getElementById("menu").content.cloneNode(true));

                // submenuがあるか?
                var root = this.root;
                var slot = this.root.querySelector("slot");
                // slotへのDOM操作のイベント
                slot.addEventListener('slotchange', e => {
                    var slot = e.target;

                    var isSubmenu = false;
                    slot.assignedNodes({flatten: true}).forEach(function (el) {

                        if(el.tagName){
                            if (el.tagName.toLowerCase() === "x-submenu" && !isSubmenu) {
                                isSubmenu = true;
                            }
                        }

                    });


                    if (isSubmenu) {
                        var css = ':host(:hover) a { border-bottom-left-radius: 0.0rem;border-bottom-right-radius: 0.0rem; }';
                        var style = document.createElement('style');

                        if (style.styleSheet) {
                            style.styleSheet.cssText = css;
                        } else {
                            style.appendChild(document.createTextNode(css));
                        }
                        root.appendChild(style);
                    } else {
                        var css = ':host(:hover) a { border-bottom-left-radius: 0.5rem;border-bottom-right-radius: 0.5rem; }';
                        var style = document.createElement('style');

                        if (style.styleSheet) {
                            style.styleSheet.cssText = css;
                        } else {
                            style.appendChild(document.createTextNode(css));
                        }
                        root.appendChild(style);
                    }
                });


            }
            connectedCallback() {
                update(this);
            }
            disconnectedCallback() {
            }

            // 変更を監視する属性
            static get observedAttributes() { return ["data-title","data-url"]; }

            attributeChangedCallback(attrName, oldVal, newVal) {
                update(this);
            }
        }


        if ('customElements' in window) {
            // x-tagとしてCustom Elements登録
            window.customElements.define('x-menu',Menu);
        } else {
        }


    })();

</script>
<template id="submenu">
    <style type="text/css">
        /* css */
        :host li {
            list-style: none;
            margin: 0rem;
            padding: 0.5rem;
            text-align: center;
            background: var(--background, #808080);
            overflow: hidden;
            width: var(--width, 5rem);
        }

        :host li:hover {
            background: var(--highlight, #a0a0a0);
        }

        :host a {
            color: black;
            text-decoration: none;
            overflow: hidden;
        }

        :host(:last-child) li {
            border-bottom-left-radius: 0.5rem;
            border-bottom-right-radius: 0.5rem;
        }

        ::slotted() {

        }
    </style>
    <!-- 子要素格納用slotタグ -->
    <li>
        <a href="#"><slot></slot></a>
    </li>

    <!-- DOM -->
</template>

<script type="text/javascript">
(function(){
    var ownerDocument = document.currentScript.ownerDocument;

    class SubMenu extends HTMLElement {
        constructor() {
            super();
            // Shadow DOMに追加
            this.root = this.attachShadow({mode: 'closed'});
            this.root.appendChild(ownerDocument.getElementById("submenu").content.cloneNode(true));
        }
        connectedCallback() {
            var url = this.getAttribute('data-url');
            var a = this.root.querySelector("a");
            a.href = url;
        }
        disconnectedCallback() {

        }

        // 変更を監視する属性
        static get observedAttributes() { return ["data-url"]; }

        attributeChangedCallback(attrName, oldVal, newVal) {
            var url = this.getAttribute('data-url');
            var a = this.root.querySelector("a");
            a.href = url;
        }
    }


    if ('customElements' in window) {
        // x-tagとしてCustom Elements登録
        window.customElements.define('x-submenu',SubMenu);
    } else {
    }

})();
</script>
index.htmlはv0版と変更ありません。
外部CSS(CSS Variables)でUIの見た目を変える
CSS Variables機能で外部パラメータからCSSの色や幅を変更できるようにしています。
(なおIE、Edgeは非対応の模様)
色と幅を外部から変更してみます。
 <style>
        x-dropmenu {
            --width: 5rem;
            --background: #008800;
            --highlight: #00ff00;
        }
 </style>
こんな感じな見た目になるはずです。
CSS Variablesの独自定義は--を先頭につけることが必要です。
独自DOM側で独自パラメータを受け取れるように設定しています。
background: var(--background, #808080);
データバインディングで動的作成してみる
KnockoutJSのデータバインディングで
外部パラメータからメニューDOMを動的に作成してみます。
(KnockoutJSにした理由は私が慣れているからというか、一番わかりやすい)
<!-- WebComponents Polyfill-->
<script type="text/javascript" src="webcomponents.js"></script>
<script type="text/javascript" src="https://cdnjs.cloudflare.com/ajax/libs/knockout/3.4.0/knockout-min.js"></script>
<link rel="import" href="dropmenu.html">

    <script>
        window.onload = function (e) {

            var menus = [
                {
                    title: "menu1",
                    url: "http://google.co.jp",
                    submenus: [
                        {
                            url: "http://yahoo.co.jp",
                            title: "submenu1"
                        },
                        {
                            url: "#",
                            title: "submenu2"
                        }
                    ]
                },
                {
                    title: "menu2",
                    url: "http://google.co.jp",
                    submenus: []
                }
            ];

            ko.applyBindings({
                menus: menus
            });
        };
    </script>

<x-dropmenu data-bind="foreach:menus">
        <x-menu data-bind="foreach:submenus,attr:{'data-title':title,'data-url':url}">
            <x-submenu data-bind="attr:{'data-url':url}, html:title"></x-submenu>
        </x-menu>
</x-dropmenu>
独自定義のDOMをそのまま使うことも
データバインディングで動的に作成することもできました。
コツは独自定義DOM側で独自属性によりDOMイベントやCSSを動作するように設計することです。