mutex関連記事
やりたいこと
C#のアプリとC++のアプリの2つのアプリから一つのリソース(例えばファイル)に読み書きするときに、同時に読み書きしてしまうといろいろ都合が悪いので、同時にアクセスしないように排他制御をしたい。
やり方
Mutexを使う。基本的には、
- 別のアプリと同じ名前の名前付きMutexを作る。
- そのMutexを所有権を要求(WaitOne)して、
- 使える状態(シグナル状態)であれば、そのまま自分が所有して、使いたいリソースを使う。
- 他ですでに所有されている状態(非シグナル状態)であれば、他がmutex開放して使える状態になるまで待つ。
- 使いたいリソースを使い終わったら、所有していたmutexを開放(Release)する。
という流れでmutexを使う。
C#のサンプルコード
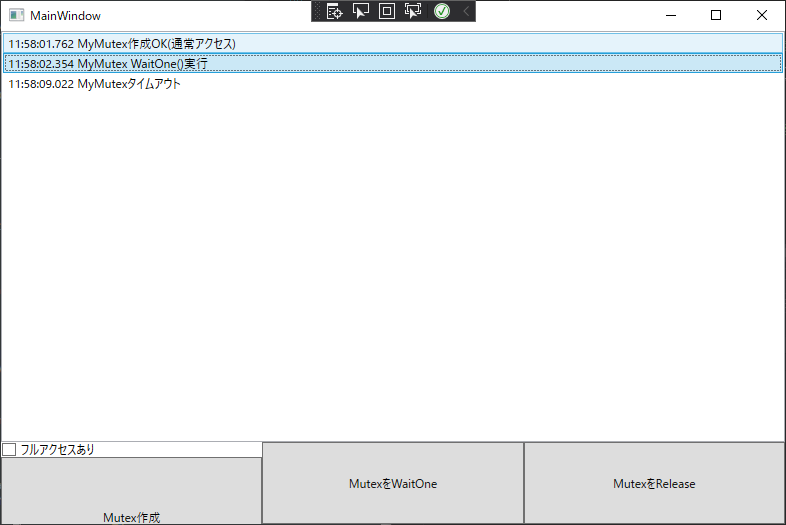
下記が、WPFでmutexを使うサンプルコード。別途C++版も作成して両方からmutexを使う実験をする。
<Window x:Class="WpfApp48.MainWindow"
        xmlns="http://schemas.microsoft.com/winfx/2006/xaml/presentation"
        xmlns:x="http://schemas.microsoft.com/winfx/2006/xaml"
        xmlns:d="http://schemas.microsoft.com/expression/blend/2008"
        xmlns:mc="http://schemas.openxmlformats.org/markup-compatibility/2006"
        xmlns:local="clr-namespace:WpfApp48"
        mc:Ignorable="d"
        Title="MainWindow" Height="900" Width="800"
        Loaded="Window_Loaded"
        Name="root">
    <Grid>
        <Grid.RowDefinitions>
            <RowDefinition Height="5*"/>
            <RowDefinition Height="1*"/>
        </Grid.RowDefinitions>
        <Grid.ColumnDefinitions>
            <ColumnDefinition />
            <ColumnDefinition />
            <ColumnDefinition />
        </Grid.ColumnDefinitions>

        <StackPanel Grid.Row="1" Grid.Column="0">
            <CheckBox Name="cbSecurity" Content="フルアクセスあり"/>
            <Button Content="Mutex作成" Click="Button_Click" Height="120"/>
        </StackPanel>
        <Button Grid.Row="1" Grid.Column="1" Content="MutexをWaitOne" Click="Button_Click_1"/>
        <Button Grid.Row="1" Grid.Column="2" Content="MutexをRelease" Click="Button_Click_2"/>

        <ListBox Grid.Row="0" Grid.Column="0" Grid.ColumnSpan="3"
                 ItemsSource="{Binding Logs, ElementName=root}"/>

    </Grid>
</Window>
using System;
using System.Collections.ObjectModel;
using System.ComponentModel;
using System.Security.AccessControl;
using System.Security.Principal;
using System.Threading;
using System.Windows;

namespace WpfApp48
{
    public partial class MainWindow : Window, INotifyPropertyChanged
    {
        #region INotifyPropertyChanged
        public event PropertyChangedEventHandler PropertyChanged;
        protected void OnPropertyChanged(string propertyName)=> this.PropertyChanged?.Invoke(this, new PropertyChangedEventArgs(propertyName));
        #endregion

        #region LogFramework
        public ObservableCollection<string> Logs { get; set; } = new ObservableCollection<string>();

        public void AddLog(string log)
        {
            DateTime now = DateTime.Now;
            Logs.Add(now.ToString("hh:mm:ss.fff ") + log);
            OnPropertyChanged(nameof(Logs));
        }
        #endregion

        // Mutexの名前
        // 「Global\\」をつけると、自分以外のUserとも共有できるMutexになる
        // ただし、Create時に振るアクセスできるようにしておかないと、別Userが
        // Create時にアクセス拒否例外になる
        string mutexName = "Global\\MyMutex";
        Mutex mutex;

        public MainWindow() => InitializeComponent();
        private void Window_Loaded(object sender, RoutedEventArgs e) { }

        // Mutex作成
        private void Button_Click(object sender, RoutedEventArgs e)
        {
            if (mutex == null)
            {
                try
                {
                    if (cbSecurity.IsChecked != false)
                    {
                        var mutexSecurity = new MutexSecurity();
                        mutexSecurity.AddAccessRule(
                          new MutexAccessRule(
                            new SecurityIdentifier(WellKnownSidType.WorldSid, null),
                            MutexRights.Synchronize | MutexRights.Modify,
                            AccessControlType.Allow
                          )
                        );
                        mutex = new Mutex(false, mutexName, out _, mutexSecurity);
                        AddLog("MyMutex作成OK(フルアクセス)");
                    }
                    else
                    {
                        mutex = new Mutex(false, mutexName, out _, null);
                        AddLog("MyMutex作成OK(通常アクセス)");
                    }
                }
                catch (Exception ex)
                {
                    AddLog(ex.Message);
                }
            }
            else
            {
                AddLog("MyMutexすでに作成済み");
            }
        }

        // チェック
        private void Button_Click_1(object sender, RoutedEventArgs e)
        {
            bool signal = false;

            if (mutex == null)
            {
                AddLog("MyMutex未作成");
                return;
            }
            else
            {
                AddLog("MyMutex WaitOne()実行");
            }

            try
            {
                // mutexの所有権を要求する
                // C++のCreateMutex()とOpenMutex()を一緒にやる感じ
                signal = mutex.WaitOne(5000);
            }
            catch (AbandonedMutexException ex)
            {
                // 相手がmutexを解放する前に終了してしまった場合
                signal = true;
                AddLog(ex.Message);
            }

            if (signal)
            {
                AddLog("MyMutex作成完了");
            }
            else
            {
                AddLog("MyMutexタイムアウト");
                mutex = null;
            }
        }

        // 解放
        private void Button_Click_2(object sender, RoutedEventArgs e)
        {
            if (mutex != null)
            {
                AddLog("Mutex解放します");
                mutex.ReleaseMutex();
                mutex.Close();
                mutex = null;
            }
            else
            {
                AddLog("MutexすでにReleaseしてます");
            }
        }
    }
}
実装・実験するうえで引っかかったこと
今回は、**「別々のユーザーで動いているC#とC++のアプリで、リソースを排他制御したい」**という要件があった。
(具体的には、C++はサービスとして動いていて、C#はGUIをもつWPFアプリとして動く。)
そういう条件でmutexを作ったときに困ったのが下記のような点。
普通の名前のmutexにすると、他のユーザーがすでにつけているmutexの名前と同じ名前のmutexを作る/所有する、ということができてしまう
つまり、そのままだと全然排他できてない、ということ。
(※同じユーザーが起動したものであれば、別のアプリであっても普通の名前で排他できていた)
対処方法としては、名前の前にGlobal\をつけて「グローバルミューテックスにする」ということ。
string mutexName = "Global\\MyMutex";
グローバルミューテックスにすれば、別のユーザーであっても同じ名前を付けていれば、排他制御に使える。
その次に引っかかったのが、
別のユーザーが作ったグローバルミューテックスと同じ名前のmutexを作ろうとすると、「アクセスが拒否されました」という例外になる
別ユーザーが作成したグローバルミューテックスは、そのままではアクセスできない様子。
対処方法としては、「グローバルミューテックスをフルアクセスできるようにして作成する」ということ。
var mutexSecurity = new MutexSecurity();
mutexSecurity.AddAccessRule(
  new MutexAccessRule(
    new SecurityIdentifier(WellKnownSidType.WorldSid, null),
    MutexRights.Synchronize | MutexRights.Modify,
    AccessControlType.Allow
  )
);
mutex = new Mutex(false, mutexName, out _, mutexSecurity);
どのユーザーであってもアクセスできるようにしてやることで、グローバルミューテックスを通して複数ユーザーで排他できるようになった。
所有権を要求(WaitOne)をしてないのにReleaseすると例外になる
通常、mutexを作って所有権を要求(WaitOne)して、処理が終わったらRelease、という流れになるが、
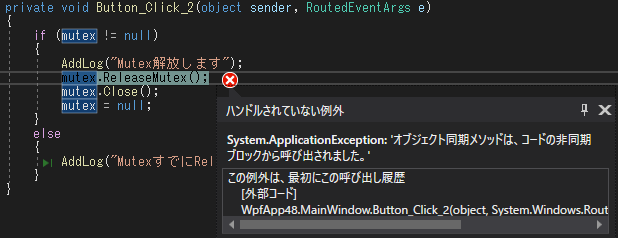
mutexを作るだけ作ってWaitOneせずにReleaseしたら、下記のような例外になる。
非同期ブロックから呼び出すって何?と思うが、ともかくそういう例外になる。
対処としては、単純にWaitOneしてないものはReleaseしないようにする。
(これ起きるのはC#版だけかも?)
以上
上記を気にして作成すれば、C#版とC++版でmutexを通じて排他制御ができた。
参考
Mutexクラス(MSDocs)
https://docs.microsoft.com/ja-jp/dotnet/api/system.threading.mutex?view=net-5.0

