やりたいこと
ウインドウを閉じるボタンを「無効」ではなく消したいとか、最小化ボタンを消したいとかのときに、なんとかしたい。
やり方(概要)
WindowChromeを使って実現する。
msdocsには、
WindowChromeクラスでは、Windows Presentation Foundation (WPF) コンテンツを
オペレーティング システムのウィンドウ マネージャー用に予約された
通常のウィンドウの非クライアント領域に拡張することができます。
とある。
要は、通常は、上の図でいうところのウインドウの中の白いとこ(Client Area)以外の部分はOSのウインドウマネージャーが管理していて勝手に書き換えたりはできないが、WindowChromeを使えば、そのClient Areaを非クライアント領域の部分まで広げてくれるので、あたかも非クライアント領域まで自分で作っているように見せかけることができる、ということらしい。
(もとの枠がなくなっているわけではなく、あくまでクライアント領域を広げて、枠の上にかぶせているイメージ。)
WindowChromeを使うメリットとしては、msdocsの同じページによると、カスタムのウインドウを作る方法はほかにもある(Window.WindowStyleプロパティをNoneに設定する)が、それだと標準のウインドウの動き(端をつまんでサイズ変更とか)が殺されてしまうため、標準のウインドウとしての動作を維持しつつカスタムしたい場合は、WindowChromeがよいらしい。
やり方(コード)
具体的には、下記のようにしていく。
1.デフォルト画面を作成
まずWPFの標準画面を作成。
(下は、プロジェクト作りたてそのまま)
<Window x:Class="WpfApp21.MainWindow"
        xmlns="http://schemas.microsoft.com/winfx/2006/xaml/presentation"
        xmlns:x="http://schemas.microsoft.com/winfx/2006/xaml"
        xmlns:d="http://schemas.microsoft.com/expression/blend/2008"
        xmlns:mc="http://schemas.openxmlformats.org/markup-compatibility/2006"
        xmlns:local="clr-namespace:WpfApp21"
        mc:Ignorable="d"
        Title="MainWindow" Height="450" Width="800">
    <Grid>

    </Grid>
</Window>
2.WindowChromeを追加
そこに、WindowChromeを追加する。
Type=Windowのスタイルとして、リソースに追加し、MainWindowに設定をしてやる形。
※プロパティを複数setしているが、一旦そういうものとする。
<Window x:Class="WpfApp21.MainWindow"
        xmlns="http://schemas.microsoft.com/winfx/2006/xaml/presentation"
        xmlns:x="http://schemas.microsoft.com/winfx/2006/xaml"
        xmlns:d="http://schemas.microsoft.com/expression/blend/2008"
        xmlns:mc="http://schemas.openxmlformats.org/markup-compatibility/2006"
        xmlns:local="clr-namespace:WpfApp21"
        mc:Ignorable="d"
        Title="MainWindow" Height="450" Width="800"
        xmlns:System="clr-namespace:System;assembly=mscorlib"
        Style="{DynamicResource  DefaultWindowStyle}">
    <Window.Resources>
        <System:Double x:Key="CaptionHeight">52</System:Double>
        <Style TargetType="{x:Type Window}" x:Key="DefaultWindowStyle">
            <Setter Property="WindowChrome.WindowChrome">
                <Setter.Value>
                    <WindowChrome CornerRadius="3" GlassFrameThickness="0" ResizeBorderThickness="20" UseAeroCaptionButtons="False" CaptionHeight="{DynamicResource CaptionHeight}" />
                </Setter.Value>
            </Setter>
            <Setter Property="SnapsToDevicePixels" Value="True"/>
            <Setter Property="UseLayoutRounding" Value="True"/>
            <Setter Property="Background" Value="#FF494949"/>     <!-- 背景の色:灰色 -->
            <Setter Property="BorderBrush" Value="#FF14A9FF"/>    <!-- 枠線の色:青色 -->
            <Setter Property="BorderThickness" Value="1"/>        <!-- 枠線 -->
            <Setter Property="Foreground" Value="White"/>
        </Style>
    </Window.Resources>
    <Grid>

    </Grid>
</Window>
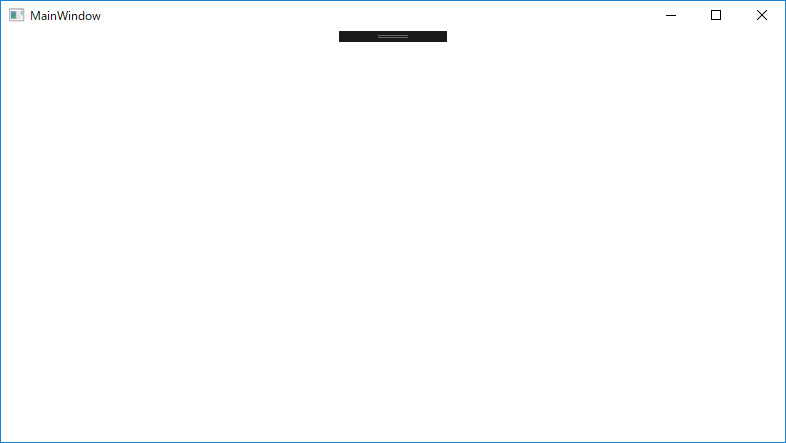
実行時の見た目

デザイナー上での見た目
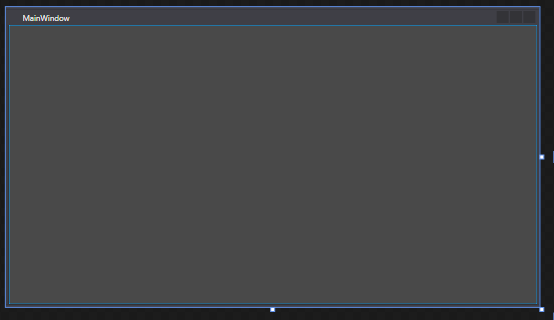
デザイナーに出ているWindowの中の水色で囲まれたClient Areaが、実行時に全体として表示されているイメージ。
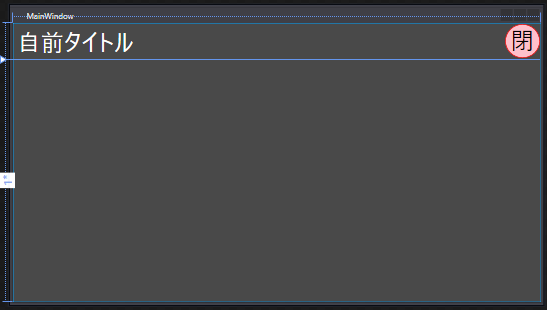
3.カスタムしたい中身を追加する
このClient Areaに、必要なものを追加する。
今回は、自前のタイトル文字列と、自前の閉じるボタンを表示している。
<Window x:Class="WpfApp21.MainWindow"
        xmlns="http://schemas.microsoft.com/winfx/2006/xaml/presentation"
        xmlns:x="http://schemas.microsoft.com/winfx/2006/xaml"
        xmlns:d="http://schemas.microsoft.com/expression/blend/2008"
        xmlns:mc="http://schemas.openxmlformats.org/markup-compatibility/2006"
        xmlns:local="clr-namespace:WpfApp21"
        mc:Ignorable="d"
        Title="MainWindow" Height="450" Width="800"
        xmlns:System="clr-namespace:System;assembly=mscorlib"
        Style="{DynamicResource  DefaultWindowStyle}">
    <Window.Resources>
        <System:Double x:Key="CaptionHeight">52</System:Double>
        <Style TargetType="{x:Type Window}" x:Key="DefaultWindowStyle">
            <Setter Property="WindowChrome.WindowChrome">
                <Setter.Value>
                    <WindowChrome CornerRadius="3" GlassFrameThickness="0" ResizeBorderThickness="20" UseAeroCaptionButtons="False" CaptionHeight="{DynamicResource CaptionHeight}" />
                </Setter.Value>
            </Setter>
            <Setter Property="SnapsToDevicePixels" Value="True"/>
            <Setter Property="UseLayoutRounding" Value="True"/>
            <Setter Property="Background" Value="#FF494949"/>     <!-- 背景の色:灰色 -->
            <Setter Property="BorderBrush" Value="#FF14A9FF"/>    <!-- 枠線の色:青色 -->
            <Setter Property="BorderThickness" Value="1"/>        <!-- 枠線 -->
            <Setter Property="Foreground" Value="White"/>
        </Style>
    </Window.Resources>

    <Grid>
        <Grid.RowDefinitions>
            <RowDefinition Height="Auto"/>
            <RowDefinition/>
        </Grid.RowDefinitions>
        <DockPanel>
            <!-- 自前タイトル -->
            <TextBlock Text="自前タイトル" VerticalAlignment="Center" HorizontalAlignment="Left" Margin="6,3,12,3" FontSize="35"/>

            <!-- 自前ボタン -->
            <Button Content="✕" Width="52" Height="52" FontSize="35" HorizontalAlignment="Right" Background="Orange" BorderThickness="0" Foreground="White">
                <Button.Template>
                    <ControlTemplate>
                        <Grid>
                            <Ellipse Stroke="Red" Fill="Pink"/>
                            <TextBlock Text="閉" HorizontalAlignment="Center" Foreground="Black"/>
                        </Grid>
                    </ControlTemplate>
                </Button.Template>
            </Button>
        </DockPanel>
    </Grid>
</Window>
実行時の見た目
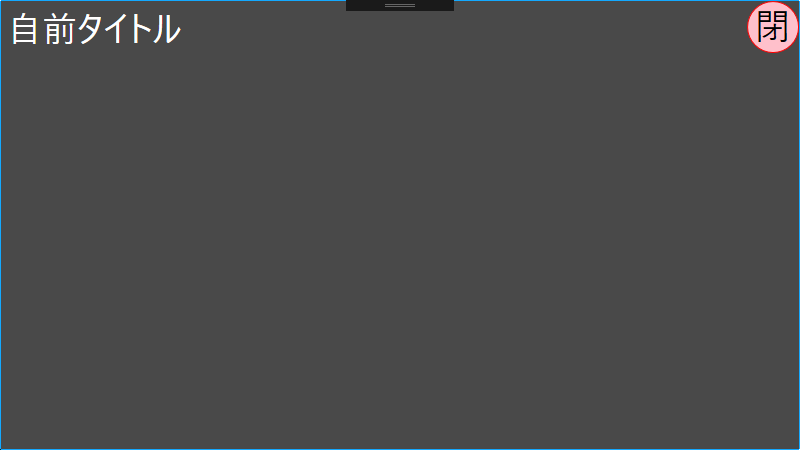
デザイナー上の見た目
4.押された時の処理を追加する
自前のボタンを上で追加したが、このままだとイベントハンドラを追加してもボタン押下時に呼び出してくれない。
キャプションにあたるところにコントロールを追加した場合は、Buttonのところで WindowChrome.IsHitTestVisibleInChrome="True"をする必要がある。
<Button Content="✕" Width="52" Height="52" FontSize="35" HorizontalAlignment="Right" Background="Orange" BorderThickness="0" Foreground="White" WindowChrome.IsHitTestVisibleInChrome="True" Click="Button_Click">
※「Button_Click」には、ウインドウを閉じる処理を書く。
終わり
以上で、一応動くようになる。
細かい点
WindowChromeのプロパティ設定
CornerRadius
角の丸まり。
GlassFrameThickness
タイトルバー等を透けて見えるようにする。-1にすると全体をそのようにするらしい。
(試したところ、透けはしなかったが、-1のときはWindowに影ができた)
ResizeBorderThickness
つまんでサイズを変えられるようにするときのつまめる幅。
CaptionHeight
キャプションの高さ。これが0だと、ウインドウをつまんで動かす操作ができない。
値を入れていると、ウインドウの上端からその高さの分まで、つまんで動かすことができる。
参考
wpfで、独自のウインドウをつくる
http://iyemon018.hatenablog.com/entry/2015/09/13/220155
問題点
最大化したときにはみ出たり、タスクバーにかぶったり、端ギリギリにタイトルが出たりする
http://iyemon018.hatenablog.com/entry/2015/09/19/182404