はじめに
季節もすっかり冬となり、ついついすべての文章を Markdown で書こうと決意し、やってはみても最終的に失敗する病気にかかってしまう時期となりました。
本記事はそうやってなんでもかんでも Markdown で書いてみようとあがいた人間の記録となります。
TL;DR
-
Marp for VS Codeプラグインを使って、 Markdown からスライドを作るよ、という内容です。 -
あと、
Markdown All in Oneも利用しています(今回は目次の作成で使用)。 -
CSS を具体的にあててみて、どういう感じに見えるのか、という部分が主題になります。
-
本体である Marpit の説明、プラグインのインストール方法なんかは、正直なところ
- 公式のマニュアル を見る
- 上の検索窓に
Marpって 入力して出てきた記事 を読む
とかしたほうが詳しいことが載っていると思いますので詳細は省きますね。
具体的なMarkdown
とりあえず全部載せます。
---
# スライドのタイトル、ファイルの情報として記録されます。
title: スライドのタイトル
# ファイルの情報として記録されます。
description: スライドの説明
# テーマ設定 default gaia uncover
theme: "default"
# ページ番号を表示する
paginate: true
# ヘッダー文字列
header: ""
# フッター文字列
footer: "フッター文字列をここに記載します。コピーライトなど。"
# サイズ指定
size: "16:9"
# marpの使用
marp: true
style: |
:root {
    --main-color: #238c3c;
}
section * {line-height: 2em;}
section.titlepage header {font-size: 80%;position: absolute;top: 80px;left : 80px; color:red; border: 1px solid red; padding: 0.25rem}
section.titlepage p>code {background: transparent;font-size: 80%;position: absolute;bottom: 100px;}
footer {padding-left: 140px;background: no-repeat left/100px url("images/logo_black.png");}
section::after {font-size: 60%;content: attr(data-marpit-pagination) ' / ' attr(data-marpit-pagination-total);}
h1 {color: var(--main-color);}
h2 {position: absolute;top: 0px; left: 0px;padding: 20px 40px;display: inline-block;width: 100%;border-bottom: 8px double #aaa;}
h3 {position: absolute;top: 3em;border-left: 8px solid var(--main-color);}
section.toc {background: linear-gradient(to right, var(--main-color) 150px, #fff 0px);}
section.toc h2 {color: #fff; border:0;}
section.toc footer {background-image: url("images/logo_white.png");}
section.toc a {color: #000;}
section.toc li {font-size: 90%;}
section.toc>ul {list-style-type: none;position: relative;left: 90px;overflow: hidden;}
section.toc>ul ul {list-style-type: decimal;}
section.toc>ul ul>li {width: 45%;float:left;clear:left;}
section.toc>ul ul>li:nth-child(n+6) {position:relative;top: -11em;left: 50%;}
section.toc p {position: absolute;top: 0px;left: 180px;padding-top:20px;font-size: 90%;color: var(--main-color);font-weight: bold;}
table {margin-left: auto;margin-right: auto;table-layout: fixed;width: 90%;display:table;}
thead th {text-align: center !important;}
thead tr {background: #eaeaea;}
tbody tr:nth-child(2n+1) {background: #fff;}
tbody tr:nth-child(2n) {background: #dde5d3;}
section.bgpage p {background:white; padding: 0.25em;}
section.lastpage {background: var(--main-color);color:white;}
section.lastpage h2 {display: none;}
section.lastpage footer {background-image: url("images/logo_white.png");color:white;}
section.lastpage p {text-align: center;font-size: 200%;}
---
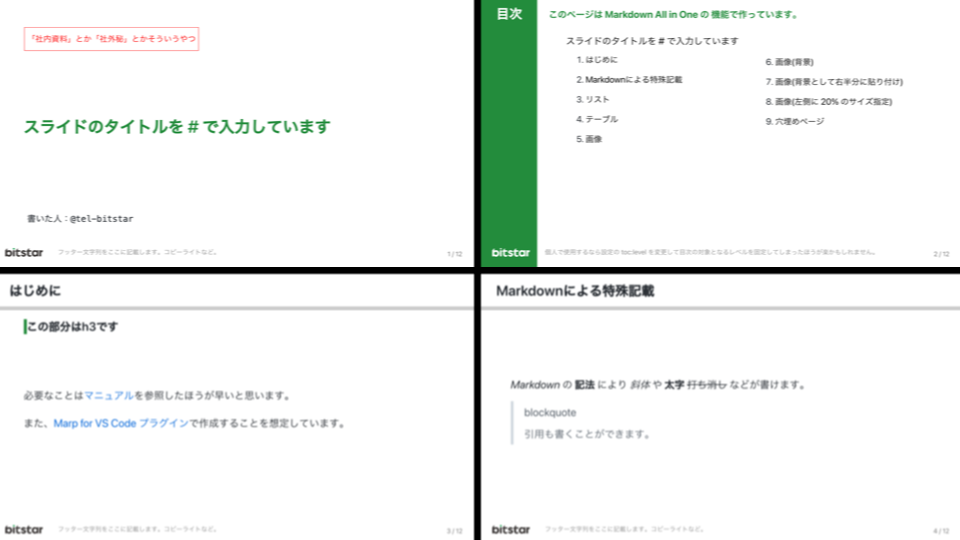
<!-- _class: titlepage -->
<!-- _header: 「社内資料」とか「社外秘」とかそういうやつ -->
# スライドのタイトルを # で入力しています
`書いた人:@tel-bitstar`
---
<!-- _class: toc -->
<!-- _footer: "個人で使用するなら設定の toc:level を変更して目次の対象となるレベルを固定してしまったほうが楽かもしれません。" -->
## 目次<!-- omit in toc -->
- [スライドのタイトルを # で入力しています](#スライドのタイトルを--で入力しています)
- [はじめに](#はじめに)
- [Markdownによる特殊記載](#markdownによる特殊記載)
- [リスト](#リスト)
- [テーブル](#テーブル)
- [画像](#画像)
- [画像(背景)](#画像背景)
- [画像(背景として右半分に貼り付け)](#画像背景として右半分に貼り付け)
- [画像(左側に 20% のサイズ指定)](#画像左側に-20-のサイズ指定)
- [穴埋めページ](#穴埋めページ)
このページは Markdown All in One の 機能で作っています。
---
## はじめに
### この部分はh3です<!-- omit in toc -->
必要なことは[マニュアル](https://marpit.marp.app/)を参照したほうが早いと思います。
また、[Marp for VS Code プラグイン](https://marketplace.visualstudio.com/items?itemName=marp-team.marp-vscode)で作成することを想定しています。
---
## Markdownによる特殊記載
_Markdown_ の __記法__ により *斜体* や **太字** ~~打ち消し~~ などが書けます。
> blockquote
> 引用も書くことができます。
---
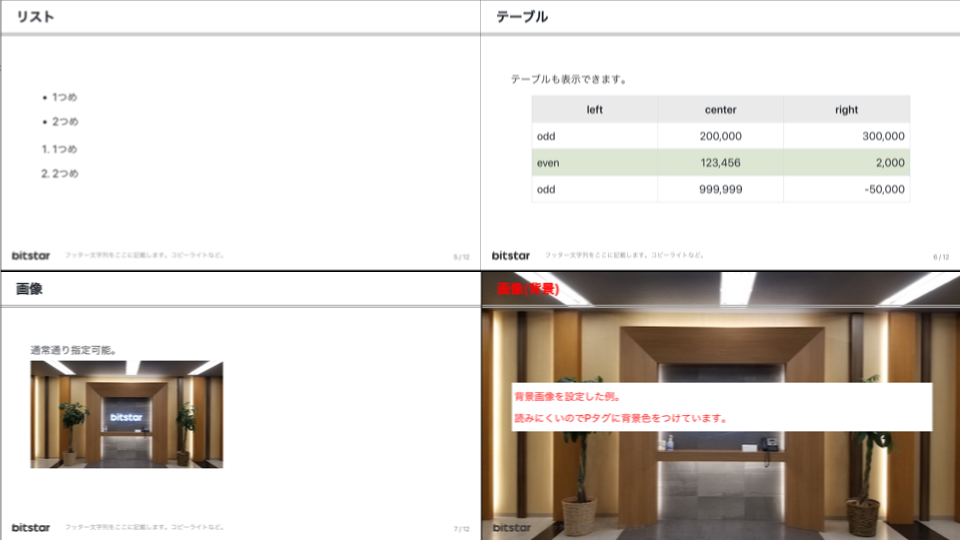
## リスト
- 1つめ
- 2つめ
1. 1つめ
2. 2つめ
---
## テーブル
テーブルも表示できます。
|left|center|right|
|:-|:-:|-:|
|odd |200,000|300,000|
|even|123,456|2,000|
|odd |999,999|-50,000|
---
## 画像
通常通り指定可能。

---
## 画像(背景)
<!-- _class: bgpage -->
<!-- _color: #f00 -->

背景画像を設定した例。
読みにくいのでPタグに背景色をつけています。
---
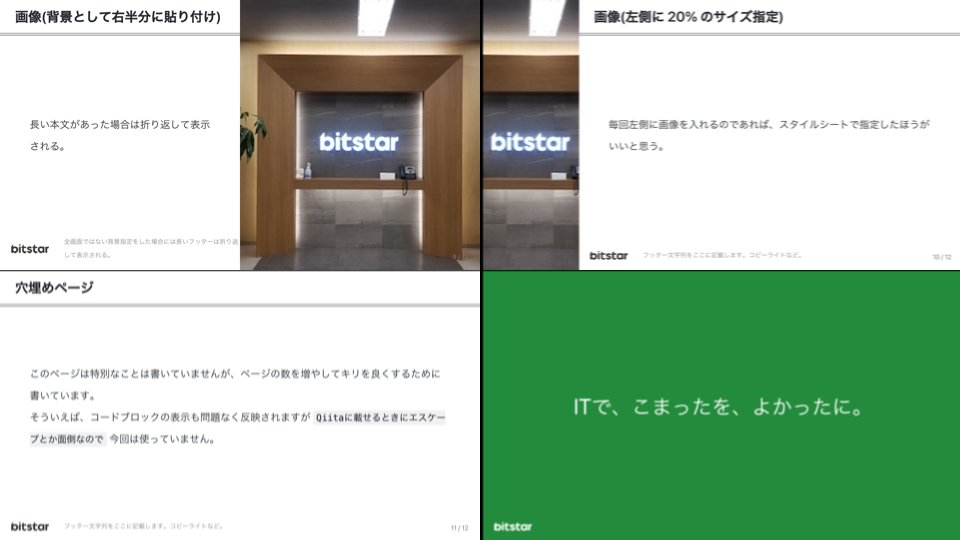
## 画像(背景として右半分に貼り付け)
<!-- _footer: "全画面ではない背景指定をした場合には長いフッターは折り返して表示される。" -->

長い本文があった場合は折り返して表示される。
---
## 画像(左側に 20% のサイズ指定)

毎回左側に画像を入れるのであれば、スタイルシートで指定したほうがいいと思う。
---
## 穴埋めページ
このページは特別なことは書いていませんが、ページの数を増やしてキリを良くするために書いています。
そういえば、コードブロックの表示も問題なく反映されますが `Qiitaに載せるときにエスケープとか面倒なので` 今回は使っていません。
---
<!-- _class: lastpage -->
<!-- _footer: " " -->
<!-- _paginate: false -->
## 最終ページ<!-- omit in toc -->
ITで、こまったを、よかったに。
どんなスライドが出来上がるか
先程の Markdown をスライド化するとこのようになります。
細かい話
共通部分
:root {
--main-color: #238c3c;
}
section * {line-height: 2em;}
メインカラーを定義し、各要素の文字間隔を広めに設定しています。
footer {padding-left: 140px;background: no-repeat left/100px url("images/logo_black.png");}
section::after {font-size: 60%;content: attr(data-marpit-pagination) ' / ' attr(data-marpit-pagination-total);}
ロゴ画像をフッターの背景として設定し、左側にマージンを取ることでフッター文字列がかぶらないようにしています。
また attr(data-marpit-pagination) と attr(data-marpit-pagination-total) は Marpit が提供している変数で、それぞれ現在のページ数、総ページ数が格納されています。
h1 {color: var(--main-color);}
h2 {position: absolute;top: 0px; left: 0px;padding: 20px 40px;display: inline-block;width: 100%;border-bottom: 8px double #aaa;}
h1 はテーマのデフォルトCSSがあたっており、色だけ変更しています。
h2 はページタイトルとして使用するため、ページ上部に固定配置するようにし、下線を入れることでページタイトルと本文を分けるような見た目にしています。
表紙

section.titlepage header {font-size: 80%;position: absolute;top: 80px;left : 80px; color:red; border: 1px solid red; padding: 0.25rem}
section.titlepage p>code {background: transparent;font-size: 80%;position: absolute;bottom: 100px;}

======

<!-- _class: titlepage -->
<!-- _header: 「社内資料」とか「社外秘」とかそういうやつ -->
# スライドのタイトルを # で入力しています

`書いた人:@tel-bitstar`
<!-- _class: titlepage --> と記載することで、 ページを表現している section タグにクラスが割り当てられます。
そのクラスを対象に、header や code にスタイルをあてることで、他のページとは違う見た目に設定しています。
目次

section.toc {background: linear-gradient(to right, var(--main-color) 150px, #fff 0px);}
section.toc h2 {color: #fff; border:0;}
section.toc footer {background-image: url("images/logo_white.png");}
section.toc a {color: #000;}
section.toc li {font-size: 90%;}
section.toc>ul {list-style-type: none;position: relative;left: 90px;overflow: hidden;}
section.toc>ul ul {list-style-type: decimal;}
section.toc>ul ul>li {width: 45%;float:left;clear:left;}
section.toc>ul ul>li:nth-child(n+6) {position:relative;top: -11em;left: 50%;}
section.toc p {position: absolute;top: 0px;left: 180px;padding-top:20px;font-size: 90%;color: var(--main-color);font-weight: bold;}

======

<!-- _class: toc -->
<!-- _footer: "個人で使用するなら設定の toc:level を変更して目次の対象となるレベルを固定してしまったほうが楽かもしれません。" -->
## 目次<!-- omit in toc -->
- [スライドのタイトルを # で入力しています](#スライドのタイトルを--で入力しています)
  - [はじめに](#はじめに)
  - [Markdownによる特殊記載](#markdownによる特殊記載)
  - [リスト](#リスト)
  - [テーブル](#テーブル)
  - [画像](#画像)
  - [画像(背景)](#画像背景)
  - [画像(背景として右半分に貼り付け)](#画像背景として右半分に貼り付け)
  - [画像(左側に 20% のサイズ指定)](#画像左側に-20-のサイズ指定)
  - [穴埋めページ](#穴埋めページ)

このページは Markdown All in One の 機能で作っています。
Markdown All in One の機能により目次を生成しています。
目次や最終ページについては、目次にタイトルを表示させる必要がないため <!-- omit in toc --> コメントにより目次の対象外として指定しています。
表紙と同様にクラス名を指定し、目次用のスタイルをあてている形となります。
section.toc {background: linear-gradient(to right, var(--main-color) 150px, #fff 0px);}
の部分はグラデーションのCSSを使用して背景色を設定しています。
section.toc>ul {list-style-type: none;position: relative;left: 90px;overflow: hidden;}
section.toc>ul ul {list-style-type: decimal;}
通常、 ul のリストは ・ によって列挙されますが、 ol のように連番を出すようにしています。
Markdown All in One の機能で目次のタイトルに章番号をつけることもできるので、どちらが良いかは都度判断という感じになるかと思います。
section.toc>ul ul>li {width: 45%;float:left;clear:left;}
section.toc>ul ul>li:nth-child(n+6) {position:relative;top: -11em;left: 50%;}
2段組を表現している部分になります。
li の横幅を半分にし、6つ目以降は本来の位置から縦にマイナス、横に50%動かすことで、2段組に見えるようにしています。
テーブル部分
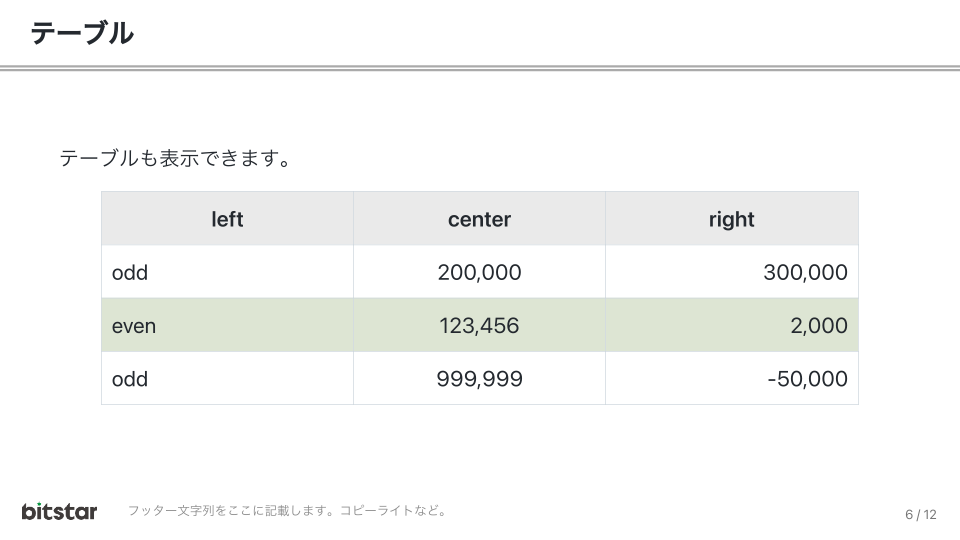
table {margin-left: auto;margin-right: auto;table-layout: fixed;width: 90%;display:table;}
thead th {text-align: center !important;}
thead tr {background: #eaeaea;}
tbody tr:nth-child(2n+1) {background: #fff;}
tbody tr:nth-child(2n) {background: #dde5d3;}

=======

## テーブル

テーブルも表示できます。

|left|center|right|
|:-|:-:|-:|
|odd |200,000|300,000|
|even|123,456|2,000|
|odd |999,999|-50,000|
table {margin-left: auto;margin-right: auto;table-layout: fixed;width: 90%;display:table;}
横幅を大きくしつつ、センタリングする指定です。
Marpit では display:table を書かないと、width を指定してもテーブルの横幅が変わらないようです。
thead th {text-align: center !important;}
タイトル行については、 Markdown での文字配置を無視してセンタリングするように !important しています。
tbody tr:nth-child(2n+1) {background: #fff;}
tbody tr:nth-child(2n) {background: #dde5d3;}
奇数行と偶数行で背景色を変えています。
というわけで今回のオチ
今回は記事に書くために一つの Markdown にスタイルをすべて記載する形をとりましたが、個人で使い続けるのであればスタイル部分を別ファイルとして切り出して、テーマとして使えるようにしたほうが使い勝手は格段に上がるかなぁと思います。
Markdown に全て書いてあると別の環境でも意図した表示になる、という強みもあるのですが、結局ロゴ的なものとかを使っている場合はそのファイルが必要になるわけですし。
お客様に提出するような場合やインタラクティブなスライドが求められている場合は、やはり専用のソフトで作ったスライドにはかなわないとは思うのですが
- 社内でちょっとした発表をする
- 個人的に情報をまとめる
といったときには気軽に書けてとても便利だなぁ、という誰もが思う感想とともに本日はお開き。